Every electrician knows how to use a multimeter, but an ordinary person may also need to use this device. If you need to clarify the serviceability of house wiring, radio components, find out how much electric current a particular household appliance consumes, what is the current strength in the network or its voltage, information about simple measuring manipulations with a multimeter will come in handy.
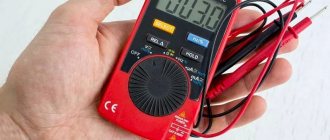
Multimeter ready to use Source bzns.media
Voltage and multimeter
Let's see how to measure voltage with a multimeter. First of all, you need to check the location of the device toggle switch. To prepare the device for measuring voltage, you need to turn it from the off position (indicated as “OFF”) to the V~ mark (the English letter “V” and a wavy line indicating alternating voltage). On some multimeters this mode is abbreviated “ACV”. AC Voltage Test Steps:
- Install the red probe into the socket marked “V/Ω” or “VΩmA” (this is the positive potential), the black one into the “COM” socket.
On a note ! Since alternating voltage has no polarity, installing the probes into the precisely indicated connectors does not play any role. But if the black probe hits a phase, then the number on the screen may be negative.
- Check the switch (it should be at the V~ mark).
- Setting the test level (if you plan to measure alternating voltage in an electrical network with a nominal value of 220 Volts, you should set the test level to a slightly higher value, for example, 236 V, or perhaps to the maximum).
- Inserting the probes into the socket, for the voltage in which it is necessary to check.
Numbers indicating the desired alternating voltage will appear on the screen of the electronic multimeter.
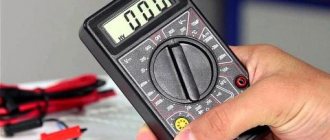
Dial multimeter in the off state Source img1.bgxcdn.com
Next, we'll look at how to use a voltage tester to check battery voltage. To measure DC voltage with a dial or electronic multimeter, insert a red and dark probe into the “V Ω mA” and “COM” sockets, respectively, then turn the switch to “V-”.
After setting the verification level (you will need to set it, as in the previous example, to a slightly larger digital value than the intended measurement object has). The two free ends of the probes must be connected to the object being tested (for example, to the two ends of a battery), observing the polarity (“+” and “-”).
On a note ! If you make the wrong polarity, the multimeter will show a negative value, but the value itself will be the correct number; you need to swap the probes on the battery so that the polarity is correct.
If a value with one or two zeros in front, but without a comma, appears on the device screen, it means that the test level was set too high. It is necessary to achieve a normal number by gradually reducing it and taking measurements. For example, for a battery the value “008” may first appear, and after the indicated manipulations - “8.9”. This means that the battery voltage is approximately 9 Volts.
The multimeter shows the battery voltage Source masteram.com.ua
When “1” appears on the screen, the pre-selected measurement threshold may be too high, then it needs to be brought to a suitable value by gradually decreasing it.
Types and types of multimeters
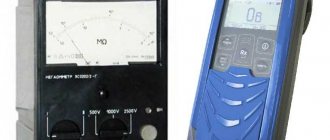
Today there are many types of multimeters, which ones have what functionality. There are devices for professionals, cable technicians, and radio amateurs. There is something simpler. Like all other devices, there are two types of testers. These are analog and digital. True, there are practically no analogue ones - those with an arrow - now. They are rare, they are used by those who could not get used to digital ones.
Pointer multimeters are sometimes characterized by greater measurement accuracy. But, basically, the industry produces a more modern modification - a digital tester. Fundamentally, it is no different, only on the screen it does not have an arrow, but numbers. In principle, this is somewhat more convenient. Compare the top photo of the analog tester and this one of the digital one:
Agree that the digital designation is much more convenient than the pointer designation, where you still need to determine the arrow reading on the scale. True, for those who have worked with an analog tester for a long time, this will not be difficult. However... There are models that have both an arrow and numbers. This is convenient in terms of updating information. On a digital display it is updated up to 4 times per second, and on an analogue display up to 20.
As a result, we can estimate the measured value somewhat faster and better, although not as accurately. Some modern models even display a graphical signal, like on an oscilloscope. Since everything is now computerized, there are also models that work from under the computer and immediately transmit readings to it.
In general, there are a lot of different tester models. The main thing is to take into account the accuracy of the device when choosing. And of course, functionality. Indeed, with the help of this device, in addition to basic measurements, you can look for wiring in walls, measure the capacitance of capacitors, take characteristics of magnetic fields, measure frequencies..... It all depends on the direction and your level. Today we will focus on the simplest and most necessary measurements.
Checking the current strength
Let's see how to use the tester to find out the current strength:
- Insert the red connector into the socket marked “mA” (“VΩmA”), the black one into “COM” (to check the current strength, the value of which does not exceed 10 Amps). To check the current, which ranges from 200 milliamps to 10 amperes, you should put a red electrical probe into the “10A” connector.
Different positions of drills to determine small and large currents Source www.sciencebuddies.org
- Place the switch on the “A~” mark to check the alternating current value or on the “A-” mark to check the direct current strength.
- Set the measurement range so that it is greater than the expected current strength, but not by much.
- Connect the load (for example, an incandescent light bulb with a socket) into the assembled electrical circuit from the outlet to the multimeter.
Important ! You cannot touch the circuit elements that are not insulated with your hands and the ends of the probe.
- Attach a piece of wire to the lamp base, and the other end to the probe.
- Take another wire and attach it according to the “lamp base - electrical outlet” diagram.
- The red probe (its free end) must be set to the “+” of the object being measured, and the black probe must touch the next element of the circuit (the wire coming from the “load”, that is, from the light bulb).
Remember ! For correct, and most importantly, safe measurement of current, it is necessary to connect the multimeter to the electrical circuit in series, since in ammeter mode the resistance of the multimeter circuit is minimal and if connected in parallel there will be a short circuit.
Connection diagram for a multimeter with a “load” Source electrikmaster.ru
See also: Catalog of companies that specialize in electrical and heating systems
A multimeter can also be used to determine the amount of AC current consumed (for example, for a household appliance). After installing the switch on the direct current symbol (“A-”), you should arrange the probes as follows: for high current - the extreme left position (o), for low current - the middle position (o).
Having set the measurement range approximately corresponding to the current, but slightly larger, you can proceed to the next stage, not forgetting that the device can only be turned on in an open circuit (as in the previous example).
How to connect a multimeter
Useful video on how to use a digital multimeter according to instructions:
First, let us remind you: before starting work, carefully read the instructions for using the multimeter in Russian! Usually it comes complete with the device.
And here are a few popular notations (you should find out more precisely in the instructions for use!):
Now let's figure out how to properly connect a multimeter. There are sockets or holes on the body into which probes need to be inserted. Usually there are two or three. What to connect where:
- The black cable must be connected to the socket called COM or COMMON.
- Red must be connected to a free socket. If there are more than two connectors, be sure to read in the instructions which one to connect the red cable to. Most often, the middle hole is intended for the positive wire. In this case, the upper connector remains for those situations where it is necessary to measure current from 200 mA to 10 A (10 ADC). The designation VΩmA usually indicates the intended use for values up to 200 mA.
The nests may be located below. This does not change the connection principle.
We found out how to connect a multimeter for measurements. It's time to move on to the process of turning on and setting up the device.
Multimeter and resistance
To find out the resistance of any radio component, use a conventional multimeter. Measurement algorithm:
- Insert the probes (black – into the “COM” socket, red – into the socket marked “V/Ω” or “VΩmA”).
- The switch will need to be moved to the “Ω” position.
- At the third stage, it is advisable to check the serviceability of the device by connecting the two remaining free ends of the probes. The multimeter is working if it shows a zero value.
- Set the measurement limit to the expected approximate average value (for example, 2 M).
- Connect electrical probes to the coil (to the measurement object).
What will be the coil resistance? Source cdn.sparkfun.com
- Look at the display (screen) of the device.
If several zeros appear, the coil has resistance, but the measurement limit will need to be lowered slightly to see the actual digital resistance value. The same must be done when a number appears in front of the numerical value on the electronic multimeter, but with a zero (zeros) at the beginning. If a unit occurs, it is worthwhile, on the contrary, to reduce the set denomination.
Multimeter device: detailed description with explanatory pictures
In just two decades, universal digital measuring instruments have massively replaced not only the pointer combination testers used by electricians, but have also become available to all home craftsmen.
The device of a modern multimeter design can be conveniently compared with electrician testers from the times of the USSR.
My old voltage indicator and pointer Ts4324 are still in working order, with the exception of the nickel-cadmium batteries that have expired.
They can measure almost all quantities of electrical energy, but it is necessary to perform preliminary calibration of the device, and translate the arrow instructions into actual values using mathematical expressions, which requires skill and attention.
Now the home master is practically freed from routine work with calculations and calibration. Any digital multimeter does all this automatically.
Regardless of the model, it has four individual blocks on its body in the form:
- display;
- control buttons;
- central switches for measurement modes;
- contact sockets.
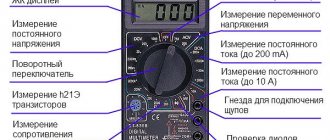
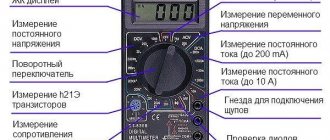
Their design and location may vary on different devices, but have many similarities, as shown in the picture below.
However, all global manufacturers try to adhere to the same designations. I collected the most necessary ones, which can be found even on professional expensive devices, and showed them with clear pictures.
Information block: location
A conventional LCD display is located on top of the multimeter. The result of each measurement is displayed on it with a digital display after the calculations are completed.
Professional multimeters have large numbers and backlit scales. An LED operation indicator, illuminated in green or red, may be located at the top center or in the corner.
Control button block: measurement tasks
It is located immediately below the LCD screen. The names of the buttons and their functions are collected in a table.
| Button name | Functions |
| Range/Delete | Switching the manual measurement range/clearing information by deleting data from memory. |
| Store | Saves the displayed data in the device's memory with the Sto symbol shown on the display. A long press of the button opens a menu for setting automatic saving options. |
| Recall | View data from memory. |
| Max/Min | When pressed once, the minimum and maximum values of the measured value are displayed. Pressing and holding starts the PeakHold mode, which takes into account peak current and voltage values. |
| Hold | Single press - hold (fix) the data on the screen. Double press - return to the default measurement mode (Esc). Press and hold - switch to screen backlight mode. |
| Rel | Enables relative measurement mode. |
| Hz% | Pressing and holding enters the system settings menu - Setup mode. Pressing once switches frequency measurement modes with duty cycle, and also allows you to select the direction in the settings menu. |
| Ok/ Select/ V. F. C. (Blue button) | Pressing once—activates the selection of functions in the settings (Select mode). Press and hold - metering mode with low-pass filters. |
Middle block: central switch and table of its positions
The choice of switch position determines the switching of the device into the mode of measuring one of the quantities: current, voltage, electrical resistance or frequency with various features.
The explanation of these modes is summarized in the table.
| Switch position | Metering functions |
| OFF | Switching off the device. |
| A.C. | AC signal processing. |
| DC | DC signal processing. |
| AC+DC | Processing AC and DC signals. |
| VLoZ | Variable voltage at low impedance. |
| VFC | Low pass filter (LPF) parameters. |
| V— | Constant pressure. |
| mV— | Constant voltage in millivolts. |
| Ω | Resistance. |
| nS | Conductivity. |
| Checking diodes. Here, the continuity testing mode for a section of the circuit is used. | |
| Capacitor capacity. | |
| ˚C˚F _ _ | Temperature in degrees Celsius or Fahrenheit. |
| V~ | AC voltage. |
| mV~ | Alternating voltage in millivolts. |
| A | Current strength direct/alternating), amperes. |
| mA | Current strength (DC/AC) in milliamps. |
| µA _ | Current strength (DC/AC) in microamps. |
| Hz | Signal frequency. |
| % | Fill factor. |
| %(4-20mA) | Current loop. |
| NCV | Non-contact AC voltage detector. |
The inscription on the case True RMS /True Root Mean Square/ literally means the root mean square expression extracted from the instantaneous values of an alternating signal for one period or measurement time.
In other words: when taking measurements, a digital device converts the input signal, processing it according to a given program.
Contact sockets: how to use correctly
On the lower block of the device there are contact sockets for connecting the connecting ends. Their number can vary from two to four. We are considering the best option.
Only two wire ends are always used. For ease of use, they are highlighted in black and red.
The black end is always connected only to its COM socket and never to any other.
Due to the strict implementation of this rule, the correct display of the polarity of the measured quantities is ensured, and errors in connecting the measuring device to any other pair of sockets are eliminated.
The red wire is installed in a socket designated by its color. For voltage measurements, it is always on the right. For digital multimeters with advanced functions, the current sockets can be output separately for different load ratings.
Particular care must be taken when measuring large currents. An end inserted into the wrong socket may cause the device to simply burn out without overload protection.
To fix the end on a wire or contact, special removable clamps on springs are created - “crocodiles”. They make measurements much easier in many cases by freeing your hands. I recommend using it.
Important performance characteristics
Batteries
Most budget multimeters are powered by 9 volts, which are supplied by a Krona battery.
I would like to point out right away that its capacity may not be enough for a long time and you will have to buy spare elements and create a reserve. However, self-discharge is their disadvantage during storage.
Do-it-yourselfers often replace Krona with ordinary AA batteries in various ways.
Instead, they assemble a power circuit from a lithium-ion battery for mobile phones or other devices, and make multipliers and controllers for them.
However, when purchasing, it’s easier to immediately choose a device that runs on AA batteries, which can simply be replaced with a battery.
Instrument accuracy class
The permissible measurement error is regulated by the manufacturer and is indicated by the accuracy class. It is expressed as a percentage of the permissible error to the maximum value of the measurement limit.
For example, on my old Soviet tester Ts4324, the accuracy class is 2.5. This means that at a voltage level of 200 volts it can err by 5 V and show any value at the limit of 195-205.
Let's just say that for measuring work around the house, and for most production purposes, this is more than enough. So I don’t see much point in chasing devices with accuracy classes of 0.5 and higher.
Although most digital multimeters, even for budget purposes, as certified by verifiers, fit into the high accuracy class of 0.5 or 0.2.
Testing with a multimeter
The multimeter has several more functions, one of which is the so-called continuity test. It is used to search for a break in the neutral wire in an electrical circuit.
Algori:
- connect the red probe to “V/Ω”, the black one to “COM”;
Testing wires with a multimeter to check their integrity Source avatars.mds.yandex.net
What can be measured with a multimeter
So what does this miracle device measure, the price of which starts from 300 rubles. for the simplest specimens and ends with several thousand?
Even the cheapest models offer basic measurement functions - DC and AC voltage values, resistance. Advanced models have sensors that allow you to find out the ambient temperature, test circuits for short circuits, measure the capacitance and performance of various types of capacitors, and check the gain of transistors. There is a function for measuring the voltage drop at the pn junction, measuring sound, various parameters of transistors, a low-frequency generator for measuring the frequency of the current, and so on. Some models generate sine or square wave signals.
Correct operation of the device will help you protect your health from electric shock and find damage in electrical appliances.
Checking radio components
If a radio amateur has a digital multimeter, he must know how to use this device to test the functionality and measure the characteristics of transistors, diodes and capacitors. Everything is very simple here:
A black probe should be installed in the COM socket, and a red one in the VΩmA socket.
The black probe (its second end) must be connected to the cathode of the diode (to the “minus”) of the part being tested, and the red one, respectively, to the cathode of the anode (to the “plus”).
The resistance of the part will be displayed on the screen.
If in any position (as in the described algorithm or with the reverse arrangement of the probes connected to the anode and diode) one is displayed, this means that the part has burned out. If the reading is less than one, the diode is broken.
Getting to know your device
To begin with, I propose to talk about multimeters themselves as electronic devices. Next, detailed instructions will be presented for beginners or, as they say, for dummies.
Let's look at the front panel of the device for measuring indicators in the car and at home. Typically, several values are indicated on the front. Namely:
- OFF. Everything is clear here. The device is turned off;
- ACV. This designation indicates alternating voltage;
- The Ω symbol here means resistance;
- DCA is DC;
- Completes all DCV or DC voltage;
- 3 connectors with corresponding indicators;
- Directly the dial itself or the electronic display.
As for the 3 connectors. The probes are connected through them. The set with pliers is included with the MTM, so everything should be clear here.
There is one note regarding how and when to connect certain probes to the tester. There is a black wire that invariably always goes into the socket that is marked with the symbols COM.
But with red the situation is more complicated. It all depends on what kind of measurements you are going to take with your digital multimeter. When making measurements of mains voltage, resistance or current up to 200 mA, then you only need the VmA output. If the value exceeds 200 mA, then connect the red probe to 10 ADC.
I think we've sorted this out. If you do the opposite, you will not be able to use the tester for a long time. The reason for this will be a blown fuse. As in the case of the cigarette lighter fuse in a car, fusible elements are also used here.
Analog MTM
Most motorists and electricians prefer digital multimeters. These are modern devices with wide functionality.
But there are also outdated devices on the market. They are called analog or pointer. Whichever is more convenient for you. But their characteristics and efficiency are significantly inferior to digital solutions. Using a pointer tester is not the best option, since the scale has a larger error.
And in general, using such devices is not particularly convenient. It is better to immediately switch to good quality digital devices.
I would include the following models as such:
- DT830;
- DT832;
- DT838;
- Resanta DT 181;
- Resanta DT 182;
- DT9205a;
- Ermak;
- Mastech, etc.
Although I will not hide the fact that some continue to use digital testers. They probably have had them in their toolbox for a long time, or the motorist simply doesn’t want to spend money on a digital device, since he is completely satisfied with his dial multimeter.
Video description
You can see more details about how this test is carried out in the video:
To check the transistor, you need to switch the multimeter to the “hfe” mode and combine the three outputs of the part with the connectors on the device. They are called "B", "E" and "C" and correspond to the "base", "emitter" and "collector" on the transistor. If the connection is correct, the gain value of the radio component being tested will appear on the multimeter screen.
So, how to use a multimeter tester to check the capacitor for its capacity: this part must be inserted into the corresponding connectors on the device (the “CX” sector). By twisting the toggle switch, you can adjust the measuring limits to the required numerical value.
How to set up a multimeter
The knob selector should be located in a specific area in accordance with the purpose for which you are using the multimeter. Knowing the approximate value, set the maximum in relation to it in the selected sector. If the value is chosen incorrectly, during measurements you will see the number 1 in the most significant digit, which means infinity voltage.
So, everything is connected, turned on, configured. Now the main thing for beginners: detailed instructions on how to use a multimeter. Videos will also help with this.
Video description
Learn how to quickly check a car battery with a multimeter in this video:
Checking a car battery using a multimeter Source mobilehomepartsstore.com
Further measurements will be made in the same way. To measure the current strength in the wiring of your car or for a separate electrical appliance, you should first find out what kind of current you need to check (for example, the “DCA” marking indicates constant). To measure resistance, set the toggle switch to any position, and do not forget to turn off the power to the network.
First things first: how a digital multimeter works
Operation is based on the use of a special converter, with the help of which the reference signal is compared with the input one.
In order for data to appear on the multimeter, you need to connect it correctly to the circuit. This is also part of the instructions on how to use the multimeter tester. There are wires:
- Red is needed to touch the positive contact when DC voltage will be measured.
- Black touches the negative terminal. This cable is also called common.
These wires have probes to help you use them. Note that it is important to use not homemade wires, but cables from the factory, if, of course, you want to obtain accurate measurement values.
The signal is fed to the probes, then the ADC is studied, and the result is displayed on the screen.
The principle of measuring with a multimeter is determined by the purpose:
- To measure the current, you need to connect the unit in the circuit in series.
- To measure voltage, it is important to connect in parallel.
- To measure resistance, you need to de-energize the mechanism that will be tested.
Below the screen there is a range switch that rotates around its own axis. An arrow or dot indicates the current value, and there are marks around it.
A little about its analog brother
Analogue models use a pointer on the scale to display the value. Under the influence of an electromagnetic field, the frame changes its position, and the arrow moves with it.
Such devices have been actively used in the past. Today, old analog multimeters from Soviet times remain, and there are also new devices, mainly from China. Analog multimeters are rarely used now and require a special approach with special knowledge and skills. The devices are highly sensitive to vibrations.
Beginners and experienced electricians can safely use digital multimeters. If you need to carry out complex electrical work at a highly professional level, it is worth having both types of devices.
We will tell you how to use a digital multimeter correctly.
Checking the electrical wiring
When installing new or repairing old wiring, there is always a need to test the cables, as well as check the functionality of electrical installation products and circuit breakers. All these operations can also be successfully carried out using a multimeter.
Correct use of a multimeter, this universal measuring instrument with many functions and capabilities, helps to significantly improve the operating conditions of equipment.
A multimeter helps to timely identify the need for its repair, while increasing the maximum service life. This ultimately allows owners to avoid unnecessary costs for repairs and renovations.
How to use a multimeter to measure current
Current measurements may be required in the following cases:
- clarification of the power consumption of a household appliance;
- assessment of the load connected to the network;
- searching for equipment defects;
- checking the charge level on the battery or battery;
- search for current leakage.
Working with a multimeter in ammeter mode is one of the most difficult and dangerous. The difficulty lies in finding the gap. If the circuit has a terminal or other detachable mechanism, there will be no problems. But if you need to measure a household electrical appliance, you will have to either cut the wire or come up with a device for taking measurements. Also, in ammeter mode, when the upper limit changes, you will have to move the red probe to another hole.
A multimeter measuring current must be connected to the open circuit. Such a connection is called serial. Current passes through the tester, and the resulting value is displayed on the screen.
Before taking measurements, it is important to correctly set the measuring range on the multimeter. An incorrectly selected upper limit may damage the device. If there is no information about the possible current strength, it is recommended to set the highest limit. For DT 830 testers, the red probe must be placed in the 10 Amp socket. The switch handle should also be at the 10 Amp mark. In some cases, the readings may be below 0.2 A - this means that the limit is set too high. If the limit is exceeded, the red probe can be placed in the middle slot. Then the adjustment is made using the switch knob. The limit is reduced bit by bit.
Since the multimeter in ammeter mode is connected to the circuit and becomes part of it, you must observe safety precautions when working with the electrical network. Even small currents can lead to irreversible consequences for humans.
The current must be measured as quickly as possible. Otherwise, the tester may burn out. This is indicated by a mark on the multimeter itself. The recommended measurement time, the interval between measurements and the presence of a fuse are also recorded.
Important! You cannot measure current in a socket. There is only voltage between the zero and phase contacts. When the probes are plugged into the socket, a short circuit will occur.
A multimeter is rarely connected to household appliances. Usually it is turned on to check the correct organization of the home network and check the real power of the equipment. In this case, the multitester is connected to the break point of the circuit - to the neutral or phase wire of the device’s power cable. After the circuit is assembled, the cable must be plugged into the network and the household appliance must be used. After a few seconds, the current in amperes will appear on the screen. The problem with connecting to a home device is creating a break point. Cutting the wire is not the best option. You can create a special device that allows you to take the measurement, but this complicates the process.
Which multimeter should you choose?
When choosing a multimeter for your home, there is no need to pay attention to the models included in the State Register, as this affects their cost.
A simple device with the functions of an avometer, costing 300–500 rubles, can handle everyday needs.
The main thing is that its body is protected from dust and moisture (IP67), and the accuracy is not lower than 1%.
Some models are not equipped with audible dialing, and this is the function most often used by home craftsmen, which should be taken into account.
Such a multimeter is also suitable for car repairs, and for specialists who professionally deal with electrical networks of vehicles, it is better to purchase a special car version.
For professional activities, it is necessary to choose a multimeter with minimal measurement errors.
It is important to pay attention to the availability of exactly the required functions and not to overpay, for example, for a built-in oscilloscope.
Each additional function means a significant increase in the cost of the device.
How to measure voltage correctly
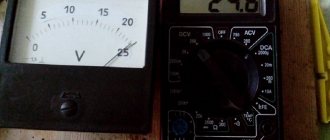
To understand how to use a dial multimeter to measure voltage, you should watch the video at the bottom of the page. The principle is simple - you turn on the probes, select the voltage and calculate the value based on the deviation of the arrow. Using an electronic device is even easier - you don't need to count anything. For example, you need to measure the voltage in an outlet. You select the ACV (alternating current) mode, turn on the black probe to Com, the red probe to VΩmA. You assume that the network is 220 volts, not 380, so you set the switch to the nearest value. If it is not clear what the voltage is in the network, then set the maximum value and lower it little by little.
Classic dial multimeter
For example, your multimeter has three settings - 5 volts, 200 volts and 700 volts. You decide to measure the voltage in the outlet, but you don’t know what the voltage is. First you set it to 700 volts and take a reading. The device shows 235 volts. You realize that measurements should be taken in a different range and switch to 200. The next measurement shows 223 volts, which is the most accurate value.
If you are measuring voltage in a DC network, then you need to switch the knob to the appropriate position. AC symbol on multimeter –
DCV. Next, everything is done in the same way as in the case of measurements with alternating current with the selection of the most accurate value. Measurements are made with a parallel connection, not a serial one, that is, on two phases, not on one. It will not be possible to remove the voltage from one wire.
Attention:
Be careful when working with electricity. Think about what you are doing to avoid causing a short circuit or touching exposed wires with probes.
If you need to find a phase, you can simply use an indicator screwdriver - it helps to find the phase in 220 volt networks without using a device. But if you are repairing wiring, then you won’t be able to get by with just a screwdriver - the phase may be everywhere, and the zero may fall off. But you should still be able to use a multimeter - these are the basics for any electrician.
Professional multimeters
If household models are almost always presented in a compact design, then professional ones can be both compact and stationary. At the same time, the cost of even the simplest ones starts from 15...20 thousand rubles; really high-quality stationary devices cost hundreds of thousands.
Popular models include:
- waterproof (IP67) DT-9979, with the ability to connect to a computer or smartphone, recording measurements for 200 hours, measurement accuracy 0.025...0.3%;
- APPA 107N, also protected, with the ability to synchronize with a computer, store about 6000 measurement values, temperature sensors and alligator connectors;
- KEYSIGHT 3458A is a full-fledged voltmeter with a huge range of capabilities and functions. This is a stationary device, usually used in production. Its main advantages are an error of 0.0008% and a high measurement speed - up to 100,000/1 second. It is considered an industry standard in the Russian Federation.
Useful videos
Briefly and clearly about the multimeter, how to use it, look: Look how to measure current strength, voltage, resistance, as well as the continuity of wires and the integrity of the diode and transistors: The basics of working with a voltage tester - all in one, look: A multimeter is considered an essential device in the house. With its help, even a person who does not have special knowledge can make the necessary measurements of electrical parameters and find out the reason for the lack of electricity. It is important to carry out work correctly in compliance with safety measures.
Introduction
There are two types of testers - electronic (digital) and analog. Nowadays, analogue ones are practically not used due to their large weight and dimensions. They have long been replaced by digital devices - they are small, convenient and allow you to take measurements with high measurement accuracy. They are not difficult to use, especially if you read the instructions and remember the connection rules.
Basic symbols on a classic multimeter
Next, we will consider a digital device, since with a 99.9% probability you will have exactly this one. There is a switch on the front side of the device; its main modes are:
- OFF. Indicates that the tester is turned off and does not consume power.
- ACV. AC mode is enabled.
- DCV. Constant current mode is enabled.
- DCA. DC current measurement.
- Ω. Conductor resistance measurement mode.
Switching modes occurs by turning the switch to the desired position. On the bottom or right side, you will find three connectors that are used to connect test leads. To use a digital multimeter correctly, you need to understand their operating modes.
Attention:
The black cable is always plugged into the com connector. Red is turned on in the VΩmA socket if work is carried out with currents up to 200 mA or the multimeter is used to measure resistance. If work is carried out with currents more powerful than 200 mA, then the cable is connected to socket 10 ADC.
When working, you must take this requirement into account. If you apply high currents to the VΩmA socket, the device will simply fail. At best, the fuse will blow, at worst, the system board will be damaged.
What is important to know about the tester device
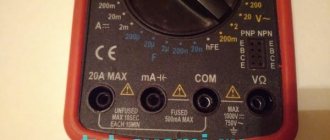
Before you start making any electrical measurements, it is worth understanding what the device itself is and what its functions are. All information is printed on the front panel. You can learn how to use a multimeter of the selected model based on the following generally accepted notations:
- ON/OFF – button to turn the device on/off (on some testers it may not be present; in this case, the device will be turned on by turning the range switch);
- DCA (or A—) – direct current;
- ADCA – alternating current;
- ACV (V~)/DCV (V—) – alternating/direct voltage;
- Ω – resistance.
To take readings, you need to use a rotary switch, which allows you to set different operating modes of the multimeter and select the measurement range.
One of the important points in mastering the question of how to use a digital multimeter is the correct connection of the test leads to the appropriate connectors. The correctness of the measurements taken will depend on this. In order not to make mistakes, there are simple rules:
COM - black size on the left, universal connector in the center, connector for measuring high currents - on the right
- COM connector is common, it is used to connect the negative black measuring wire;
- to connect the red positive probe, one of the sockets for measuring voltage (V), resistance (Ω), current (mA, A) can be used, while it should be taken into account that, as a rule, there are two current sockets (for working with low-current circuits and with current up to 10/20 A depending on the tester model).
But it is also necessary to take into account that when measuring voltage or current, measuring probes installed in reverse will lead to a change in the polarity of the received data, which will be reflected on the display by the appearance of the “-” sign. The digital values will be correct. This is how digital devices differ from analog ones. In the latter, the arrow most often goes beyond the scale, and in some cases such work can lead to damage to the device.
Application
There are times when a person, being a professional in some field not related to electricity, has absolutely no idea why a multimeter is needed. This is possible because until recently, literally a couple of decades ago, these devices were produced only in analog versions and were quite expensive.
They were used mainly by professional electricians, they were cumbersome, and sometimes required the use of an additional power source.
Recently, multimeters have been made compact, inexpensive, and have become much easier to use. Any thrifty owner now has at least the simplest model from a large family of these devices.
After all, if the cause of a malfunction of any household appliance is established, then eliminating it may be within the power of an ordinary person who does not have the professional knowledge and skills of an electrician. Moreover, often, having such a useful measuring device at hand, its owner does not always use all the functions of the multimeter.
The multimeter is used when repairing electrical appliances, debugging circuits, and electronic devices. In everyday life, it can be used in repairing electrical household appliances, electrical parts of cars, motorcycles, troubleshooting electrical networks, installing wiring, and repairing radio equipment. The scope of application is very wide.
Popular multimeter models
Conventionally, all manufactured devices of this type can be divided into groups according to:
- application - home “what if you need it”, relatively permanent for repairing and testing electrical appliances and networks, professional;
- type – portable and stationary. The latter usually refer to professional or semi-professional;
- the range of tasks to be solved - only the simplest measurements, advanced functionality without special settings, advanced functions with the possibility of precise settings;
- measurement accuracy – sufficient for everyday tasks or professional use;
- price. The cost of devices ranges from hundreds of rubles to thousands, depending on the capabilities, quality and popularity of the manufacturer.
Read also: Processing slabs into chips
Multimeter dt 830b: instructions for use
This relatively simple device has all the basic functions.
There are only three connectors for the probe, so you won’t be able to use the device to measure currents above 10A. But it is possible to check transistors and diodes.
When figuring out how to use the dt 830b (dt 830v) multimeter, it is worth considering: on its display, when setting the maximum measurement range in current measurement mode (500 V), a warning appears that this is the highest value - HV (high voltage) - and working with the device requires caution.
When measuring resistance (at small values), do not neglect the resistance of the probes themselves. You can determine its value by connecting the probes to each other. Subsequently, this value is subtracted from the measured resistance value of the device or section of the electrical circuit.
It is worth noting the features of this cheap model:
- relative fragility of plastic (should not be dropped);
- average quality of probes;
- measurement error is about 1%;
- changing the measurement mode manually (by turning the knob);
- display without backlight.
Supplied complete with: multimeter DT 830v, instructions for use (paper, not always of normal quality, especially when buying a Chinese device), probes.
A more convenient option “for dummies” is an overview of operating modes in the video, the nuances of working in different measurement modes.
Multimeter dt 832: instructions for use
In terms of characteristics and functionality, this device differs little from the previous model.
The main difference is the ability to measure temperature using a thermocouple (not available from all manufacturers; availability should be checked before purchasing. A thermocouple can be connected additionally) and overload protection in all measurement modes. There is also a low battery indicator, but users note the inconvenience of replacing it - the back cover, under which the battery is hidden, is secured with small screws, not hooks.
In addition to this inconvenience, the disadvantage of the model is also considered to be the fragile body and the measurement error within 1% according to the documentation, which in reality reaches 2...3% depending on the build quality.
or in video mode.
Multimeter dt 838 instructions for use
The model is so similar in functionality to the DT 832 and DT 830b that you can freely use the instructions for these devices to study its capabilities.
Compact and convenient, the multimeter is not highly accurate, but is quite suitable for home use. The main indicators of the device are shown in the table.
The device has a screen with 3.5 displayed digits and can, in addition to basic parameters, measure temperature. A sensor with a thermocouple is included in the package or purchased separately, and taking into account the dubious quality of the components, it is better to buy both the sensor and the probes.
You can learn how to use the dt 838 multimeter correctly, without the risk of immediately damaging the device due to improper handling, from the video review.
Multimeter dt9208a instructions for use
A special feature of this model is the increased measuring range of direct and alternating current – up to 20A.
Users also include the following benefits of the device:
- convenient temperature sensor (with thermocouple), included in the delivery package. Temperature measurement range from -40 to 1000 degrees Celsius, error 1...2 degrees;
- ability to check capacity and frequency;
- the presence of a “dial-in” function;
- storing measurement results;
- automatic shutdown after 15 minutes of inactivity;
- rubber cover for the body. Protects from dust and partially from moisture. To replace the battery, you must remove the case and unscrew the screws holding the back cover;
- stand for installation in an inclined position and the ability to rotate the screen.
When a multimeter is delivered from China, instructions are attached to it in English, and specifically “Chinese English” language. Therefore, for buyers of this model, we recommend that you immediately find a high-quality video review:
Multimeter dt9205a instructions for use
This model is very close to the previous one in terms of characteristics.
The same rubber body, the same not very high-quality probes (it is recommended to immediately replace them with silicone ones). One caveat - when buying silicone probes, it is better to check that the diameter of the connector and the socket in the multimeter match; some options simply do not insert all the way and do not allow measurements.
The main advantages of the device include:
- a variety of measurement modes - from current strength to capacitor capacity;
- presence of a “phase detector” mode. With this type of operation, the red probe is brought to the device under test (for example, an outlet), and the black probe is grounded to one’s own skin. When the phase is found, one is displayed in the first digit of the display;
- The stand for inclined installation, however, is not very stable.
Users consider the disadvantages to be insufficient measurement accuracy, and the error is floating - at lower measured values the inaccuracy is higher.
Multimeter DT-61 – instructions
This model belongs to a completely different price class (about 5,000 rubles compared to 300...800 rubles for previous devices) and thanks to this it compares favorably with build quality and functionality.
In addition to the usual capabilities, the device allows you to measure the level of noise, humidity, light and temperature. It should be noted that the measurement accuracy of these sensors is significantly lower than that of the main ones;
The case is convenient and protected from moisture and dust, the probes are of higher quality, the screen and the number of indicators on it have been significantly increased. The automatic measurement range selection function is also useful, although it can be changed manually. The measurement results are recorded. If the device is idle for a long time, it automatically turns off; exceeding the permissible measurement values also leads to shutdown.
Classification of multimeters
All testing instruments are divided into digital (later in the article we will only talk about digital multimeters) and analog. The latter are otherwise called switch inventions; they are earlier and less advanced inventions.
The differences between the devices are not so much in the features of displaying information - a dial scale for an analog display and a liquid crystal display for a digital display - but also in capabilities and ease of operation.
While it is more convenient to monitor small changes in the measured parameter (for example, network voltage), an analog multimeter has a greater measurement error. In addition, which is very important when working in inconvenient conditions, the pointer tester must be held in a stationary position (to avoid pointer oscillations), while a digital one does not require this.
Multimeter accuracy
Depending on the complexity, the device can have from 2.5 (the simplest) to 8.5 (precision) digits for displaying numbers. The most common devices are with 3.5 digits. The digit capacity indicates that the device can reflect the number of digits from 0 to 9 in whole or in part. For example, for 3.5 digits, measurements within the range of 0.000...1.999 are possible. If the value is outside the specified limits, manual or automatic switching to another range is required.
The accuracy of the work does not depend directly on the bit depth, although there is a connection. Thus, for devices with 2.5 digits the measurement error is about 10%, for devices with 4.5 – up to 0.1%. When the bit depth is higher than 5, the accuracy is specified separately for each type of measurement and can reach up to 0.01%.
Stationary instruments usually have higher accuracy than portable ones.
Purpose and types
The purpose of the device is guessed from the name. “Multi” is a prefix in compound words, meaning “many.” "Metreo" is translated from Greek as "to measure." It turns out that a multimeter is a device that can measure many different parameters. Of course, almost all measured parameters are related to electricity in one way or another.
It is impossible to measure, for example, a person’s blood pressure or air humidity with a multimeter, but using some models, you can measure the temperature of an object, liquid or gas.
By design, the following types of multimeters are distinguished:
- analog;
- digital.
Analog ones, which previously appeared in use, are noticeably inferior to digital ones in the accuracy of measurements and the number of measured parameters. They require additional setup and preparation before taking the actual measurement.
The design of devices may contain elements whose operation is based on the use of the phenomenon of magnetism.
The accuracy of analog devices is highly dependent on the presence of magnetic fields in the measurement area, humidity and ambient temperature. The readings on such devices are read from a scale that is multifunctional.
Digital multimeters are much easier to use than analog ones, they have a wider range of functions and measurement limits, but they are also more expensive. The readings are displayed as digital information on a liquid crystal display. Very often the display is backlit for ease of use of the multimeter in low light conditions.
How to use a multimeter
Using a multitester, you can measure a battery
. A multimeter is a professional tool used to measure the characteristics of electronic components, check voltage and current, and find short circuits. They are used in industry, electrical engineering, and during repair work. Currently, digital multitesters are predominantly used, so we will start with them.
Using a multitester, you can measure a battery or phone battery, determine the polarity of an LED, measure the current and voltage in a socket. The multimeter has several operating modes that are activated to check a particular parameter.
Multimeter control
The most common version of the device interface can be considered using the example of the dt 830 model. It is a rectangular case with a display and a knob that switches modes. The kit also includes two probes - red and black, with which the measurement is made. They are connected to the desired component. The measured value is displayed on the screen.
The switch positions are divided into blocks. These include:
- device On/Off switch;
- voltmeter to measure DC voltage DCV (measured from 200 millivolts to 1000 V);
- voltmeter for measuring alternating voltage ACV (from 100 to 750 V);
- ammeter DCA (ranges – from 0 to 200 µA, 2000 µA, from 0 to 20 mA, 200 mA;
- ammeter section for measuring large direct currents of 10 A;
- measurement of hFe transistors (for connecting transistors there are special connectors with the letters E - emitter, B - base, C - collector);
- diode test unit;
- Ohm resistance check (from 0 to 200, 2000 Ohm, from 0 to 20, 200 or 2000 kOhm).
Later models have the ability to detect temperature and audible circuit continuity.
Nutrition
Power is supplied from a battery. You can judge the build quality by the power connector. In a reliable and high-quality device, the battery is connected through crown connectors. Cheap multimeters are equipped with conventional springs.
There are several connectors for connecting probes. The choice of the right one depends on the value being tested. If you connect the wires incorrectly, the tester may burn out. The black probe is installed in the COM connector (common), the red probe is installed in another desired output. If necessary, the probes can be replaced with better ones.
Multimeters are classified by measurement accuracy. The simplest are devices with a bit depth of 2.5 - they give an accuracy of 10%. Currently, multitesters with a measurement accuracy of 1% are considered the most used.
Buy a multimeter
In any electrical store you can easily find a dozen different models of testers. Here are several links to good models of different price ranges on a well-known website.
| Inexpensive multimeter ANENG A830L from 200 rubles! | Digital multimeter UNI-T UT61E True rms +USB voltage and current monitor | High-quality and inexpensive multimeter MESTEK DM90 |