Snowballs falling from the roof and falling icicles destroy drainage systems, damage property and threaten people walking under the house. Heating the gutters and roof will help get rid of these troubles. How to install it correctly? What problems can it solve? And is it safe? Let's figure it out within the framework of this article.
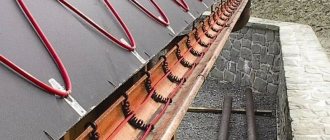
Heating of gutters and roofing (photo No. 1)
Frost, snow and sudden temperature changes above and below 0 degrees are harsh conditions for finishing the facade, roofing and all materials intended for outdoor use. What can happen to the roof?
- Snow falling from the roof can collapse the gutters, installed air conditioners, and damage the cladding of the house.
- Snow slides and icicles can pose a threat to the health and lives of people who pass under the house.
- With a slight thaw, the snow melts, and during the next frost it becomes ice in the drainpipes and gutters, expands and can cause damage.
Heating the roof will help solve the first two problems. The third will be solved by heating the drainage system. But in most cases, the problem must be solved comprehensively by installing an anti-icing system - heating the roof and gutters.
What is roof and gutter heating and how does it work?
A de-icing system is a heating cable installed on the roof and in gutters to melt snow and ice. It allows you to avoid physically cleaning the roof, gutters and pipes, which is often difficult, inconvenient, dangerous and can lead to damage to roofing materials and gutters.
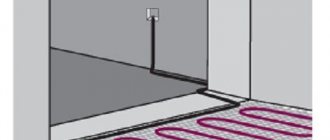
Heating cable installed to heat the roof (photo No. 2)
If the system is installed incorrectly, for example, there is no heating of the gutters, the problem will not be solved. Meltwater will freeze again, causing damage to gutters, downspouts, gutters and downspouts.
Therefore, in most cases the heating cable is pulled:
- along the edge of the cornices,
- in the valleys,
- at all roof joints,
- in the gutters of the drainage system,
- in funnels and drainpipes,
- in drips,
- in drainage trays.
Heating zones for the roof and drainage system. (photo No. 3)
It is not necessary to place the cable in all of the listed places. Sometimes it is enough to lay only a cable to heat the gutters:
- the roof is “cold”, that is, there is an unheated attic underneath it, so the temperature on the roof surface is not higher than the air temperature, which means ice does not form on it;
- the building is low, there are no gutters or walkways underneath it—snow melting won’t do any harm;
- high-quality thermal insulation of the roof has been laid - in fact, if there is no heat loss from under the roof, the roof will also be cold.
For each house, the heating system for the roof and gutters is calculated individually. The calculations are influenced by the size, shape of the roof, the angle of the slope, the presence of architectural elements that can trap snow on the roof, pedestrian paths along them and other factors.
Let's look at a few examples.
1. The roof slope is steep, snow can fall like an avalanche. To avoid consequences, you need to install snow guards. A heating cable is laid between them and the cornice. This should be done with a snake (zigzag with rounded corners). The height of the snake wave, depending on the location of the snow retainers, ranges from 35 to 100 cm.
The cable is laid between the snow guard and the edge of the roof. (photo No. 4)
2. If the roof is flat, the drainage system is installed inside the building. The heating cable is laid out like a snake around the water inlet. The area of such a snake can be about 1 square. m.
The cable is then inserted into the drain. There is no point in warming it up completely - the temperature inside the building is above zero, and the snow will melt naturally. As a rule, a heated drain is made up to 1 m deep.
A simple diagram of the operation of a heating system, which consists of one thermostat, will look something like this.
The thermostat sets the required temperature, for example, 0 degrees or −1 degree. When the air temperature drops to this level, the heating system for gutters and roofing starts automatically.
However, it often happens that the temperature outside is below zero, but there is no snow. In order not to overheat the system, instead of a temperature detector, you can install a comprehensive weather station that evaluates temperature, the presence of snow and humidity levels.
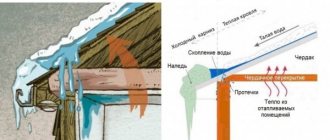
Causes of ice on the roof
“Temperature swings” inevitably lead to the formation of ice. This is the name for weather with temperatures changing from plus to minus at least once a day. In late autumn, early spring and even winter this happens regularly. The snow on the roof melts slightly and sticks together, forming the so-called “firn”, and then pieces of ice. The gutters become clogged to the top, water overflows and now a bunch of icicles are hanging from the roof.
Where does ice accumulate the most?
The coldest place on the roof is its edge, which protrudes beyond the wall of the house. Gutters are usually laid there to collect rainwater and drain it through funnels and downpipes to ground level. Ice forms and accumulates here, on the edge of the roof and in the drainage system.
Why is roof icing dangerous?
Ice, with its weight, deforms the roof, bends and breaks gutters. Iced gutters no longer fulfill their purpose; ice covers them inside and out, the brackets cannot withstand and break off. Blocks of ice fall down, breaking wires and breaking windows. In cities, ice floes crush cars in parking lots and kill bystanders.
In country houses and estates, icicles can cause serious injuries to the inhabitants, destroy the roof and break objects located near the house. Some homeowners park their cars next to their houses - is it necessary to talk about what can happen to the car after an icicle or ice floe hits it? Anti-icing is one of the most important tasks for owners of private cottages and summer cottages. And there's only one way to avoid this task becoming an annual headache.
Ice deforms the roof with its weight. Photo: globallookpress
Selection of anti-ice system
The system is based on a heating wire.
This is a special cable for heating roofs and gutters. The one used in underfloor heating systems cannot be used on the roof. !
To heat the roof you need a special cable. The one used in underfloor heating systems will not work.
For the roof, a cable is used that:
- has a special polymer shell;
- UV resistant;
- waterproof;
- resistant to harsh climatic conditions: negative temperatures, their sharp fluctuations, etc.;
- resistant to mechanical damage, including hail.
A high-quality cable will last up to 10 years.
To heat the roof of private houses, you can use two types of heating cable:
- Resistive (also known as constant power cable) is an economical, easy to use, durable option.
Under its shell there is a conductor with high resistance. When it is energized, its temperature increases and the cable loses heat to the environment. A resistive wire has a constant resistance along its entire length, the sections have a standard length, so it is important to select it correctly according to the required parameters.
Features of the structure of a resistive type cable. (photo No. 5)
Separately, it is necessary to highlight the zonal resistive cable, the heating filament of which is made of chromium. It can be cut.
- Self-regulating cable produces different amounts of heat under different environmental conditions.
Inside it are 2 wires and a matrix that changes their resistance: the higher the air temperature around the wire, the less it heats up; The lower it is, the stronger the heating. This avoids overheating of the wire. You can do without temperature control equipment. And the cable itself can be cut into pieces of the required length (from 20 cm).
Features of the structure of a self-regulating cable. (photo No. 6)
The advantages of different types of cable are summarized in the table below.
| Advantages | Resistive cable | Self-regulating cable |
| Cable price | + | |
| Easy to install | + | |
| Life time | + | |
| Fire safety | + | |
| Price of the system as a whole | + |
Table 1. Advantages of resistive and self-regulating cables.
!
Resistive cable is cheaper, easier to install and will last longer. A self-regulating wire will last less, but it allows you to do without temperature control devices, which ultimately reduces the cost of the heating system as a whole.
Heat the roof or gutter?
How to select materials and install everything correctly, without overpaying for unnecessary things? Here everything will depend on the thermal insulation of your roof.
If everything is fine with it, warm air from inside the house simply will not be able to get out, the roof will not heat up, which means there will simply be nothing for icicles to form from.
In this case, ice will only appear at outside temperatures not lower than -5C.
Mistake #1
In this situation, there is no need to heat the roof itself, but it is enough to get by with heating only the drainage system.
Thermal insulation and energy efficiency, as they say, rule.
But if the roof’s thermal insulation is of poor quality, the snow begins to melt even at relatively low air temperatures (-10C).
In this situation, water will flow towards the bottom edge and gutters.
It will freeze there, turning into pieces of ice. Here you will already need to lay a cable for complex heating:
the roof itself
gutters
gutters
How many meters of cable are needed to heat the roof and gutters of a house?
To answer this question, you must first decide where and how it will be laid out and what power is needed.
On the roof, the cable is laid in a snake with a loop length of 30 to 60 cm and a distance between loops of 30-40 cm. The pattern is selected in such a way that the power per square meter of heated area is in the range of 200 - 250 W.
To prevent ice build-up in the gutters, 1 or 2 cable strands are installed in them. The choice depends on the diameter of the gutters and the power of the cable itself:
- The radius of the gutters is less than 7.5 cm - one thread with a power of 30 to 40 W/m is enough.
- The radius of the gutters is more than 7.5 cm - use 2 threads with a power of 30-40 W/m each.
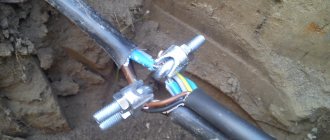
Trench with two strands of heating cable. (photo No. 7)
- The minimum power of a heating cable for a roof is 25 W/m. If there is no wire of the required power, more threads are laid to achieve the specified power.
How to lay cables in valleys? It is enough to warm up 65-70% of the valley length. We stretch the cable vertically in both directions, and so that there is at least 1 m left to the overhang. It is important to ensure its power in the range from 250 to 300 W per square meter. m.
!
For the roof and drainage system we use a special heating cable with a power of 25-40 W/m.
Knowing the pattern of cable installation on the roof, as well as the length and required number of threads for heating the drain, you can calculate the length of the cable. It's simple: we calculate the length of the cable for heating each element and add it up.
What does the anti-icing system consist of?
To install the anti-ice system we will need the following elements:
- the heating cable itself;
- control panel;
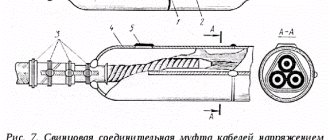
Panel for control equipment. (photo No. 8)
- three-wire power cable (VVG);
- temperature, snow, water sensors - installed on the roof, in gutters and drainpipes to collect data and automate the system;
- cable KVVG for connecting sensors;
- controller or thermostat (minimum temperature range from −8 to +3 degrees; the larger this range, the easier it is to automate the operation of the system);
- protective distribution boxes with degree of protection IP55;
- mounting tape to secure the heating cable;
Mounting tape and method of fixing the cable in it. (photo No. 9)
- galvanized chain or cable;
- sealant;
- modular input circuit breaker with residual current device; as an alternative - a difavtomat with a similar current;
- modular starter;
- three-position switch that allows you to switch between automatic and manual modes;
- thermostat;
- temperature, water and snow sensors;
- circuit breakers.
Operation of anti-icing systems: expert advice
In order for roof heating to function for a long time and without failure, you must comply with the requirements for arranging the system. The rules for operating the system are as follows:
- Before the start of the season, you need to clean the drainpipes and other elements on which the heating cables are located. To do this, use soft brushes. Cleaning is carried out as carefully as possible, since strong mechanical impact can damage the cable.
- It is necessary to periodically inspect the system equipment. For example, connections need to be tightened.
- Automatic switching on/off of the system is determined taking into account the climatic conditions in the region. The manufacturer's recommendations are also taken into account.
Heating of gutters and roofs: installation
All is ready? You can begin installation of roof heating and gutters.
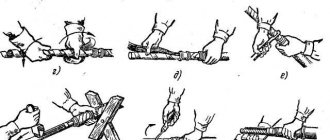
Stage 1. Installation of the heating cable.
➠ Step 1. We measure the heating cable on the ground. We take measurements with mounting tape at a distance of 50 cm from each other. We carry out the appropriate markings on the roof.
➠ Step 2. Measure the length of the cable for heating the gutters. We connect it with a chain or cable.
➠ Step 3. Check the integrity of the heating cable. We measure resistance. We compare the indicators with the data that the manufacturer indicated in the passport.
➠ Step 4. After checking, if the cable is in order, lay it in a snake (zigzag) pattern along the roof slope. It is best to fix the cable using mounting tape glued to the roof with sealant. This way there will be no holes that could cause a leak after some time.
➠ Step 5. We insert the cold end into the installation box, which we install under the ridge.
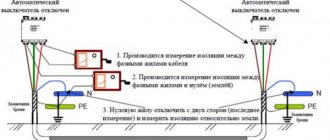
➠ Step 6. Check the sections for the drainage. We measure the insulation between the grounding protective conductor and the working conductors.
➠ We record the received data in the passport. If the system stops working after a few years, our records will make it easier to find the problem.
➠ Step 7. Clean the gutters and pipes of the drainage system from debris and dirt.
➠ Step 8. We fix the mounting tape inside the gutters. To do this, you can use rivets or fasteners without them. The fastening pitch is 25 cm if the cable is resistive, and 50 cm if it is self-regulating.
➠ Step 9. We lower the vertical section of the wire into the drain pipes using a galvanized chain or cable.
For pipes 4 m or more in length, it is mandatory to use a cable. For shorter pipes and valleys - optional. But it’s better to be safe than sorry. If the system does not work, snow will stick to the cable, increasing the load by an order of magnitude. Without a cable or chain, the cable may break.
If we use a chain, we connect the cable to the links using special spacers.
We pay attention to the “bottlenecks” of the drainage system - funnels and pipe outlets. Sometimes, to prevent ice from forming here, it makes sense to add additional heating.
➠ Step 10. We hang the cable from above on a hook. The top link of the chain is secured to a pin fixed across the hole.
An example of using a chain to support a cable and secure it to a pin placed across a hole. (photo No. 10)
➠ Step 11. We insert the cold ends of the heating cables into the installation box.
➠ Step 12. Repeat the described algorithm on all roof slopes.
➠ Step 13. If there is an extension, for example, a garage, drains are not always installed on it. But you need to protect yourself from snow or icicles. If the garage has a pitched roof, it is heated using the “dripping loop” principle: the loops should extend beyond the edges of the roof by 5-7 cm.
The principle of cable installation is “drip loop”. (photo No. 11)
Stage 2. Connecting automation
System protection equipment (photo No. 12)
➠ Step 14. Install the automatic control system: controller and protective group. The optimal place for this is the switchboard in the house.
➠ Step 15. Install the sensors. In order for the heating system of the roof and gutters to work correctly, we correctly choose where to place them. Snow sensor - on the roof. The water sensor is at the bottom of the gutter.
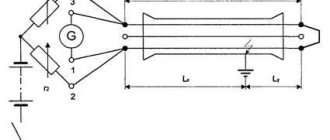
➠ Step 16. Connect the sensors and the controller.
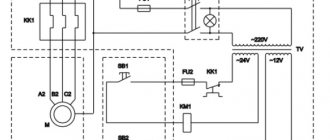
Equipment connection diagram. (photo No. 13)
➠ Step 17. Install the protective group.
➠ Step 18. Measure the resistance of the cables.
➠ Step 19. Check the operation of the automatic protective shutdown system.
➠ Step 20. If everything works, set the required indicators on the thermostat and turn on the system.
What should you not do when installing an anti-ice system?
Due to the apparent simplicity of installing the system, inexperienced workers make common mistakes. And the heating of the roof and gutters does not work correctly, does not work at all, or causes premature death of the drainage system and roof.
We have collected the most common mistakes that anti-icing system installers make.
1. The specifics of the building are not taken into account. The system was installed “like everyone else.” As a result, it turned out to be ineffective. Ice continues to form in some areas.
Which is correct? Preliminarily design a heating system for gutters and roofing.
2. The opposite example: the cable is laid where it is not needed. There will be no harm to the system from this. But these are pointless expenses that you can do without.
Which is correct? Carefully consider the system before installation.
3. The cable was used for heated floors, not for the roof. And it will last much less.
Which is correct? Use a special cable with UV and weather protection.
4. The cable is secured with brackets using self-tapping screws. As a result, the tightness of the roof is broken and a leak forms.
Which is correct? Use fastenings without mechanical damage to roofing materials.
5. The cable is secured with a plastic clamp, not intended for outdoor use. In the sun it will quickly become unusable. This mount will last no more than a year.
Which is correct? Use special fastenings.
6. The cable for heating the drainage system pipes is not secured with a cable or galvanized chain. Under certain circumstances, snow and ice will begin to accumulate on it, and under their weight, sooner or later the cable will break.
Which is correct? Heating of gutters and downspouts is done using a cable or chain.
7. A cable with a power of less than 25 W/m was used. Such a system will not cope with its task.
A clear example of how a low-power heating cable works (photo No. 13)
Which is correct? Select an anti-ice system based on power in accordance with the design characteristics of the roof and gutters.
8. The temperature sensor is located in direct sunlight or near the heating cable. It records an unreliable temperature, and the entire system does not work correctly.
Which is correct? All sensors must be located in the correct place. Temperature detector - in the shade.
9. No drainage system. The roof heating device can still be installed. But snow and ice will melt, flow from the roof along the facade of the house and freeze, forming ice on the finish. When it starts to melt, it may fall off along with the trim.
Why is a heating cable needed?
The situation with icicles and pieces of cloth that fall down, demolishing everything they come across in their path, is not uncommon. There are two ways to avoid tragedy:
- constantly clean the roofs of buildings and structures from snow mass;
- install a heating cable for the roof.
The second option is simpler in all respects, but it has one requirement - the presence of electricity as a power source. That is, it turns out that the electric current passing inside the cable turns into heat. The cable heats up and melts the snow. Water slowly flows down the drainage system without forming icicles or ice.