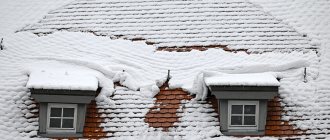
In the winter and spring, we all face the problem of ice on the roofs of our houses.
Due to the fact that the temperature at this time of year very often passes through zero (in both directions), such changes lead to the formation of pieces of ice and icicles.
In addition to the fact that roof elements suffer and deteriorate as a result, the entire perimeter of the house turns into a potential minefield.
You don't know where and when someone might fly from above. And it’s good if this block falls on a parked car, and not on your head.
Not only private owners, but also city services face the same problem. For example, in Moscow alone, the total length of the entire roof is greater than the length of the equator!
The main places where ice accumulates are:
- valley
- drainpipes
- gutter
- drip
This problem can and should be solved preventively in the summer. You can't really climb on the roof in winter.
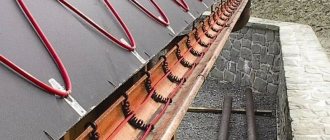
Anti-icing systems for roofs and gutters, made on the basis of a heating cable, help with this.
What does this all look like in general? The cable is spread along the drain and the edges of the roof, the “cold” ends from it are fed into junction boxes on the walls. Temperature, humidity and precipitation sensors are placed along the perimeter and on the roof.
The cables from them are also fed into a common box under the canopy. And from there all the wiring goes down to the control panel with automation.
Although the pleasure is not cheap (from 100,000 rubles for a small private house), it is effective.
Heat the roof or gutter?
How to select materials and install everything correctly, without overpaying for unnecessary things? Here everything will depend on the thermal insulation of your roof.
If everything is fine with it, warm air from inside the house simply will not be able to get out, the roof will not heat up, which means there will simply be nothing for icicles to form from.
In this case, ice will only appear at outside temperatures not lower than -5C.
Mistake #1
In this situation, there is no need to heat the roof itself, but it is enough to get by with heating only the drainage system.
Thermal insulation and energy efficiency, as they say, rule.
But if the roof’s thermal insulation is of poor quality, the snow begins to melt even at relatively low air temperatures (-10C).
In this situation, water will flow towards the bottom edge and gutters.
It will freeze there, turning into pieces of ice. Here you will already need to lay a cable for complex heating:
- the roof itself
- gutters
- gutters
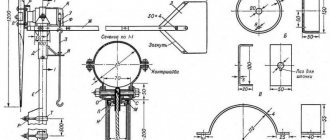
1.4. Sloping roof without gutters
Figure 1.6. Cable laying diagram according to the “dripping” edge pattern.
Figure 1.7. Cable laying diagram using a “drip” loop.
If a building does not use a gutter system, ice build-ups and icicles can form on the edges of the roof. To remove ice (icicles) from the edge of the roof, you can use two options for laying the heating cable:
- according to the “dripping edge” scheme (Figure 1.6);
- according to the “dripping” loop scheme (Figure 1.7).
Attention!!!
If the roof slope is steep, i.e. It is possible for snow to slide on the roof, it is necessary to carry out a set of additional measures: - install a snow retention system; - expand the roof heating zone upward by at least 15 - 20 cm.
If a gutter system is not used, a situation may arise where ice will form below the level of the “dripping” loop or “dripping” edge.
Ice can form on vertical wall surfaces if the size of the overhanging slope on the roof is insufficient, or there is constant strong wind in this area.
Cable selection
Mistake #2
Please note that a completely different heating cable is used here, different from what is laid in heated floors inside the house.
Its shell is made of a special heat-resistant, light-stabilized PVC plastic compound. This material is not afraid of exposure to ultraviolet radiation and harsh climatic conditions.
There are two types of such cable:
- self-regulating
- resistive
For an ordinary home, the second option is quite suitable. It has constant power and, in addition to being inexpensive, is more reliable than a self-regulating one.
Selection of anti-ice system
The system is based on a heating wire.
This is a special cable for heating roofs and gutters. The one used in underfloor heating systems cannot be used on the roof. !
To heat the roof you need a special cable. The one used in underfloor heating systems will not work.
For the roof, a cable is used that:
- has a special polymer shell;
- UV resistant;
- waterproof;
- resistant to harsh climatic conditions: negative temperatures, their sharp fluctuations, etc.;
- resistant to mechanical damage, including hail.
A high-quality cable will last up to 10 years.
To heat the roof of private houses, you can use two types of heating cable:
- Resistive (also known as constant power cable) is an economical, easy to use, durable option.
Under its shell there is a conductor with high resistance. When it is energized, its temperature increases and the cable loses heat to the environment. A resistive wire has a constant resistance along its entire length, the sections have a standard length, so it is important to select it correctly according to the required parameters.
Features of the structure of a resistive type cable. (photo No. 5)
Separately, it is necessary to highlight the zonal resistive cable, the heating filament of which is made of chromium. It can be cut.
- Self-regulating cable produces different amounts of heat under different environmental conditions.
Inside it are 2 wires and a matrix that changes their resistance: the higher the air temperature around the wire, the less it heats up; The lower it is, the stronger the heating. This avoids overheating of the wire. You can do without temperature control equipment. And the cable itself can be cut into pieces of the required length (from 20 cm).
Features of the structure of a self-regulating cable. (photo No. 6)
The advantages of different types of cable are summarized in the table below.
| Advantages | Resistive cable | Self-regulating cable |
| Cable price | + | |
| Easy to install | + | |
| Life time | + | |
| Fire safety | + | |
| Price of the system as a whole | + |
Table 1. Advantages of resistive and self-regulating cables.
!
Resistive cable is cheaper, easier to install and will last longer. A self-regulating wire will last less, but it allows you to do without temperature control devices, which ultimately reduces the cost of the heating system as a whole.
How much cable do you need - footage and power?
How to calculate the required cable footage? To do this, multiply the total length of the gutter and drain pipe by two (when installing two heating lines).
Then calculate the height of the cable on the roof and add the distance from the end of the roof to the bottom of the gutter.
Taking into account the recommended laying step of 10-15 cm, you will get the length of the heating section and the entire anti-icing system.
Mistake #3
Do not forget that excess cable is the same disadvantage as lack of length.
What power cable should I choose? With a gutter width of up to 15 cm, it will be enough to lay one thread with a power of 30-40 W/m.
Mistake #4
If you use cable less than 30W/m you will face serious problems. The system simply will not cope with its tasks at certain temperatures and heavy precipitation.
If no other power is found, use more threads.
For gutters wider than 15cm, you will need to lay two strands of cable. The power is the same - 30-40W/m.
Let's look at the entire cycle of installing a roof heating system and connecting automation for a house with a roof that has poor thermal insulation. That is, when it is necessary to de-ice not only the gutters, but also the roof itself.
Heating system installation technology
First, let's look at which specific areas need to be laid heating cables for the drainage system. For the most part, these are places where meltwater drains and areas where ice forms. What are these places:
- Gutters. It is mandatory to lay heating cables in gutters in one or a pair of threads along the entire length.
- Drainpipes extending from gutters. Additionally, it is necessary to strengthen the funnels and outlet parts of the pipes, where ice forms much more often. In most cases, two strands of cable are placed in the pipe itself.
- Roof valley. The cable is laid up and down. The length is selected at least 1 m from the start of the overhang, but it is recommended to do this at 2/3 of the non-specialized length of the valley.
- In order to prevent the formation of icicles and ice on the roof eaves, the wires are laid in a “snake” manner. This scheme involves laying a heating cable along the edge of the eaves. It should be taken into account that on hard surfaces the stroke of the snake depends on the multiplicity of the pattern, and on soft roofs - depending on the power that the cable produces per square meter. The height of the triangle is chosen so that cold areas do not form on the surface that is heated. Otherwise, ice may appear in such places.
- Drip line on the liquid separation line. It is necessary to secure one or two threads, depending on the dimensions and design of the drip.
Now let's take a closer look at how to install a cable heating system for drainage systems. You must create your system installation in accordance with these rules:
- To fix the heating cable in the gutters, use a special mounting tape. Strips of tape installed transversely hold the cable securely on the gutter. The tape installation process differs for different cables. For example, a self-regulating cable must be fixed in increments of 50 cm, and a resistive cable - 25 cm. The tape on the gutter is fixed with rivets, and in order not to break the tightness, these places are treated with sealant.
- In drainage pipes, the cables are secured using mounting tape or heat-shrink tubing. In the case when the height of the pipe is more than 6 m, it is recommended to additionally connect the cable with an iron cable in an insulating sheath in order to transfer the entire load-bearing load to it.
- In the funnel and the end of the pipe, the heating cables are secured using the same mounting tape with rivets.
- In roofing material, the cable must be secured with mounting tape to the sealant. There is another option: in a soft roof, the fastening is a result of special SLT-C clips, which are attached with self-tapping screws or nails to the roof. But there is a possibility that the roof will start to leak, so everything needs to be sealed with silicone sealant. In an iron roof, such clips are attached to the ribs.
- Before fixing the elements of the heating system, you must inspect all installation locations. There should be no foreign objects on them; sharp edges can damage the cable.
- Cable sections should be checked to ensure their length matches the heating area.
- If during inspection it turns out that the cable is too long or the length is not enough, sections must be cut off, removed or added, coupled, laid out and secured.
- At the end of which it is necessary to install the mounting boxes, they are called and the insulation resistance of the sections is calculated.
- Next, the thermostat sensors are installed, power and signal cables are laid.
- The next stage is the installation of the control panel.
- Now the resistance is measured and the power and signal cables are tested.
- For reliability, you need to test whether the protective shutdown device operates.
- Then all that remains is to set the thermostat to the temperature range you require and perform a test run of the entire system.
That's all, now your gutter and roof overhang are heated, which will allow you to solve the problem of water freezing in these places, and the formation of snow and icicles. Be careful when doing any work at height. Use a reliable stepladder or scaffolding.
Installation of a roof anti-icing system - materials
To install the anti-ice system you will need the following materials:
- three-wire power cable 220V – VVG
- panel for control equipment
- automation (full equipment will be given below in the diagrams)
- cable KVVG
This is the control cable that will connect the sensors.
- sensors – precipitation, humidity, temperature
- protective junction boxes
They must have a degree of protection IP55.
- mounting tape for fastening the heating cable
- galvanized rope or chain
- mounting clips
- resistive heating cable itself
Where does installation begin? First of all, measure the cable on the ground along the mounting tape. Choose the distance between the tapes from 30 to 50cm.
The descent into the drain is immediately measured and the cable is installed.
Performance characteristics of heating cables
Electric cables for heating drains and roofs operate in difficult conditions - under the influence of moisture, negative temperatures, and mechanical loads. Therefore, it is necessary that the cables have the following set of characteristics:
- the tightness of the shell and resistance to atmospheric moisture;
- resistance to UV radiation;
- the ability not to change its properties at high and low (negative) temperatures;
- high mechanical strength to withstand loads from snow and ice;
- safety associated with high electrical insulating properties.
Cables are supplied in coils or ready-made heating sections - cut pieces of a fixed length with a coupling and supply wire for connection to the network.
Sections are a more convenient option, which is easier to install. Cable in coils is usually used for drainage systems and roofs of complex configurations, for which standard sections are not suitable.
How to secure cable to roof and gutter
After this, screw the fastening clips or tape onto the roof.
To prevent leaks, do not forget to treat the entry points of the screws with sealant.
The step between the top and bottom rows of clips is 60cm.
Mistake #5
To install the heating cable on the roof, use only specialized fasteners.
Forget about the cable ties that are often used to run cables along the walls of the house.
For certain types of roofing, special petals with latches are produced. You don't even have to make holes with them.
There is also a fastening method using self-adhesive sealing tape on an aluminum base.
According to the manufacturer, the tape has a high level of adhesion, is heat-resistant and durable. But still, the majority prefer through cable fastening, considering it more pragmatic and reliable.
Before installing the heating cable, be sure to check its resistance and integrity of the wires with a multimeter.
Resistance data must be indicated in the product passport.
If everything is in order, lay the cable in waves according to the fixed clips on the roof slope.
After which, the cold end is inserted into the installation box under the ridge.
Sections for drainage are also called. Both between the working conductors and with the protective conductor.
Between the grounding protective conductor and the working conductors, the insulation should reach several megohms.
This check is no longer carried out with a multimeter, but with a megger.
Be sure to write down all the data in your passport so that you have something to compare with later. Suddenly, in a few years you will need to find the reason for the system's inoperability.
After all checks, the gutter is thoroughly cleaned of dirt and debris.
A mounting tape is secured inside it. Most often this is done on rivets.
But there is also a rivetless fastening.
It is best to use a combined option. Every 1.0-1.5 m you rivet the tape, and in the middle of these sections you place plastic spacers that simply push the cable apart.
The horizontal section of the cable is laid in the gutter, and the vertical section is lowered down the drain using a cable.
Please note that if you have pets at home, they love to chew on such a cable, provocatively peeking out of the pipe.
Mistake #6
In this situation, you cannot release it outside, and it is better to hide the noose inside.
The cable of the vertical section of the cable is suspended on a hook.
This cable is required for pipe heights over 4 m. By the way, when laying cables in the valley, a support cable is also often used.
It absorbs all mechanical load, protecting the shell from damage.
Instead of a cable, you can use a chain in the drain. It must be galvanized so that it does not rust from constant contact with water.
The cable is simply put on individual links through special spacers.
The last link from above is suspended on a spacer rod or pin.
The pin itself should not just lie across the hole in the drain, it is advisable to secure it.
For example, for the same mounting tape.
Mistake #7
Do not skimp and do not lower the cable into the pipe without such a chain or cable.
They perform a protective function. If the system fails, ice very quickly sticks to the cable in the drain, increasing its weight several times.
And so that it does not break from such a load, an additional load-bearing element is required.
After installation, all cold ends of the cables are inserted into the installation box.
The whole process is repeated on all roof slopes.
If you have an extension without gutters (garage), the cable is also placed on it, but in such a way that its loops hang down a few centimeters (5-8cm).
This is the so-called “drip loop” scheme.
Type No1. Resistive cable
This type of cable is traditional. Its main feature is that the same output power is provided throughout its entire length, which is why the heat generation also evenly covers the entire length of such a wire. Typically, to heat drains, they use resistive cables with a heat output of 15-30 W/m and temperatures up to 250C. The eternal resistance of a resistive heating cable causes it to heat up consistently over its entire length. The heating power is affected only by the current strength, without taking into account various external conditions, although they can affect the wire along different sections of its length.
Different sections of such wires can be located both under the sky and in snowdrifts, in leaves and in the pipe itself. Because of this, different amounts of heat will be required in any given area to prevent ice formation. As mentioned above, the entire length of the resistive cable is at the same heating level, and it will not be able to adapt to certain conditions.
Thus, some parts of the wire that are in fairly warm conditions will have excess heat, resulting in wasted thermal energy. The operation of resistive cables constantly requires significant power consumption, which is partially wasted.
There are two types of resistive cables that differ in design: zonal and serial.
Serial Cable The structure of a serial cable is simple. Along its entire length, inside, there is a solid conductive core that is insulated. Residential wire is called copper wire. To prevent the occurrence of electromagnetic radiation, this wire is grounded by placing a shielding braid on top of it. The outer layer of the resistive cable is a polymer sheath, which prevents short circuits and also protects it from adverse external factors. The total resistance of such a cable is equal to the total resistance of all its parts, this determines its main exclusivity. In this regard, if the length of the wire changes, the thermal power will change accordingly. Monitoring of this type of wire must be carried out continuously, since the heat transfer process is unregulated. This implies the mandatory removal of accumulated debris, since it can cause overheating and burnout of the cable. It will not be possible to restore it.
Serial cables are divided into single-core and double-core. The first cable contains one core, the second, respectively, two. In the latter, the wires run parallel and conduct current in different directions to themselves; for this reason, leveling of electromagnetic radiation occurs. For this reason, cables with two cores are safer than single-core ones.
Pros of resistive serial cables:
• reasonable cost; • flexibility, which gives options for cable placement on various planes; • easy installation, which does not require the use of unnecessary parts.
Cons of resistive serial cables:
• constant heat transfer despite climatic conditions; • damage to the cable due to overheating at any point or intersection.
Zone cables
Zone cable is a modified version of a regular resistive cable. It contains two insulated conductors, the function of which is to conduct current. They are located in parallel. The wire wrapped around them, which is wound in a spiral, has high resistance.
This spiral, usually consisting of nichrome, is closed with the first and second cores alternately. This happens due to contact windows in insulation. Next, zones arise through which heat generation passes. These zones do not affect each other. You can see that if overheating occurs, this wire burns out at any point, only one zone will break down, but the others will remain operational. Since the zone heating cable for guttering and roofing is a chain of heat-producing parts that are independent of each other, it is possible to divide it into separate parts right where installation will take place. It is important that the length of each part of the cable is a multiple of the size of the heat-generating zone (0.7-2 m).
Pros of zone cable:
• low price; • absence of influence of heat generation areas on each other, due to which you don’t have to worry about cable overheating; • easy installation.
Cons of zone cable:
• constant heat release regardless of climatic conditions; • dependence of the particles separated for installation on the total length of the zone where heating is applied.
Installation and connection of automatic roof heating systems
Let's move on to connecting the automation. To control the entire roof and gutter anti-icing system, you will need the following components:
- modular input circuit breaker + RCD with leakage current of 30 mA
Or they can be replaced with one diffautomatic circuit breaker with the same current.
- modular starter with normally open contacts
- 3 position switch
To switch the system to manual and automatic modes.
- thermostat or weather station
The brains of the entire system.
- automatic switches for heating sections
- humidity, temperature, precipitation sensors
Heating of industrial buildings
At pumping stations, oil depots, and shipping terminals, complex systems of measuring and process pipelines, tanks, and buildings are installed that need to be heated in cold weather. At oil refineries, freezing of process units, treatment facilities, and transport routes must also not be allowed.
In winter, serious problems arise in the fields when transporting oil, water, gas, and various process fluids. If circulation stops, any compositions, especially highly viscous or waxy oils, freeze and clog the lines. Most often this leads to pipe ruptures. High viscosity is the cause of overloads of pumping units and excessive consumption of electrical energy.
At industrial enterprises it is necessary to install equipment that protects against freezing. Industrial roof heating is used to maintain specified temperatures in containers and pipelines. Using cables, you can protect any devices from damage, including those in hazardous areas. Thanks to this, you will maintain the impeccable quality of petroleum products and various technical fluids. At the same time, the operation of heating tapes will always be safe.
Self-regulating heating cables
Products of the SST PROFI brand, VL, VM, VR, VC, VX series, have a flat shape. The semiconducting matrix is made of materials that change resistance when temperatures change. It is fixed between two conductive wires.
The linear power of each point of the heating tape corresponds to the temperature conditions. This allows you to save energy by preventing overheating at the intersections of cables. The outside of the matrix is covered with a layer of elastomer insulation and braided tinned copper wire. They provide reliable grounding and mechanical strength.
Tapes are used in the following areas:
• food industry; • electric power industry, fuel industry; • ferrous and non-ferrous metallurgy; • chemical and petrochemical industry; • mechanical engineering and metalworking; • forestry, woodworking industry; • farms.
VM cables
with a power of 11 or 17 W/m protect against freezing and maintain the required temperature in small-diameter pipes, small-sized tanks, and process equipment with an operating temperature of no more than +65 °C.
VL cables
have a power of 23 or 27 W/m. They are designed for more intense electrical heating of roofs and gutters than VM. With their help, you can protect pipes with a diameter of up to 10 cm from freezing, compensate for heat loss during the transportation of technical fluids, and warm up industrial installations.
VR cables
suitable for industrial and architectural heating. They have a power of 11, 17, 27 or 31 W/m. Heating tapes help effectively combat icing of elements of industrial structures. The shell is made of elastomer, resistant to water and direct sunlight. The fluoropolymer shell reliably protects against corrosive chemical solutions and vapors. The operating temperature, as in the cases of VM and VL, does not exceed +65 °C.
VC cables
designed for use in harsh conditions. Heating tapes have a power of 17–60 W/m. They operate at temperatures up to +120 °C, without load they can withstand temperatures up to +190 °C. VC cables heat process equipment, pipelines with petroleum products, and prevent the hardening of paraffins. The black fluoropolymer jacket is required for protection in corrosive environments.
VX cables
technical characteristics resemble VC, but have a red shell. It is made from resistant fluoropolymer VX-F for use in chemically aggressive environments: organic solvents, acids, alkalis. Such tapes allow you to build simple and effective roof electric heating systems. They have a wide power range: 10, 30, 45, 60, 95 W/m. The wire does not overheat and does not burn out even if it crosses itself.
Other industrial system components
Thermostats compensate for heat loss and optimize heating power by maintaining the required temperature. The RTM-2000 model is classified as a universal multifunctional multiprogram regulator. It is designed to measure temperature indicators and control the process of maintaining specified parameters in anti-icing systems in open areas. With the help of this regulator, industrial buildings, pipelines, tanks are heated, and various types of roof heating using electric cables are organized.
The thermostat offers 5 heating control algorithms. To select the most suitable option, use the on-screen menu. The advantages of the equipment include:
• control of four independent channels, • high accuracy of measurements, • noise immunity of all channels, • temperature range from –100 °C to +600 °C, • extremely simple setup, • mounting on a DIN rail, • storage of all parameters in non-volatile memory.
Algori allows you to use this model for de-icing of roofs, gutters, trays, drips, drains in order to clean them from precipitation and prevent the formation of ice. Using this program, you can also remove ice from open areas.
A large number of settings help adapt the thermostat to the local climate in order to use the generated heat with high efficiency. Thanks to this, when heating the roofs of buildings, you can save up to 40% of electricity.
Temperature sensors
continuously measure the performance of a variety of non-aggressive media: air, cement screed. The devices are used in conjunction with regulators in heating systems for drains, open areas, pipelines, and tanks. For example, you can install model TST01. Devices of this brand have different design features. Depending on the type of sensing element, they can be digital or analog.
To avoid rupture of pipelines and damage to surfaces, it is important to properly organize the heating of the internal drainage in any building. This can be done using the technological solutions proposed in the article. Cables laid in gutters or pipes will heat up to certain temperatures, melt the snow, and prevent it from accumulating. The melted ice will flow down in the form of water.
A simple roof heating connection diagram
The simplest scheme consists of a single thermostat for one zone.
It is used for heating small areas.
Roughly speaking, we connected one temperature sensor and unscrewed the knob of the regulator (RT 330 or another) to the desired temperature, for example, zero degrees Celsius.
It turns out that when this temperature occurs, the anti-icing system will start on its own and melt the ice.
The scheme is simple, but has its drawbacks. This system will not understand whether it is snowing outside the window or not.
This means that very often it will be useless to heat your roof, burning extra kilowatts to nothing. This method, although cheap, is not very economical.
Therefore, let's look at a more rational option, using a full-fledged programmable weather station and a combination of all sensors.
Heating zones for drainage systems
In winter, due to exposure to low temperatures, a number of areas on the roof find themselves in extreme conditions:
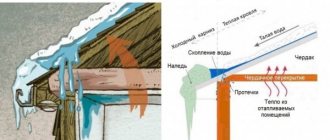
- The junction of the wall and the roof. In this zone, the highest temperature is observed due to the rising heat from the windows of the house and its leakage through the walls and ceiling. The snow here is actively melting, and the resulting moisture can flow under the roof and accelerate the rotting of the rafter system and the upper part of the walls.
- Roof overhang or roof canopy. The heat does not spread to the overhanging part of the roof, and the cold does its job. The flowing water turns into ice. As a result, ice forms on the edge of the roof and icicles grow. Walking under such a roof is simply dangerous for a person.
- Gutter. Moisture remains in the drainpipe. When water freezes, it expands sharply, which leads to metal deformation and even rupture.
- Stagnant zones of a non-standard roof. The presence of valleys, towers and other complex elements create areas where snow accumulates, and it gradually melts into the attic.
- Dormer window. They are often subject to icing, and the problem can be eliminated by heating nearby drainpipes and the edge of the roof.
Thus, on the roofing part of the house there are characteristic zones where in winter there is an increased danger to the structure and people.
An anti-icing system is required at the roof edge, gutter funnel and in stagnant areas of complex roofs.
Operating principle of the heating system
The heating system operates in automatic mode. Virtually no user intervention is required. This is ensured by the fact that the design provides for the presence of a special sensor that continuously receives data on the ambient temperature. It transmits a signal to the regulator, which closes the electrical current supply circuit and the heating elements come into action, warming up the layer of snow or ice.
Composition of the heating system
If necessary, activation can be done manually; usually an additional switch is provided for this.
Calculation of self-regulating wire and components
The need for a heating cable and components is determined by preliminary calculation. It depends on the required power of the system, which is influenced by such basic factors as the type of roof and the climatic conditions of the area.
Roofing is conventionally divided into 2 types:
- Cold. Such a roof has good thermal insulation, and snow melts only due to sunlight and air temperature (0-minus 2 degrees). In this case, the greatest attention is paid to gutters.
- Warm. Thermal insulation is insufficient and there is significant heat loss from the house. Due to this, snow melting begins already at a temperature of minus 10 degrees.
The calculation of the required roof heating power is carried out from the condition that the minimum value of the specific indicator should be 27-28 W/sq.m for the central regions of Russia with moderate snow load. In colder regions, the average value is 300 W/sq.m.
For heating drain pipes with a diameter of up to 10 cm, the power is calculated based on the condition of 18-25 W per meter of length, with a diameter of up to 16 cm - 30-45 W/m, with a diameter of up to 22 cm - 50-90 W/m for cold roofs.
When heating warm roofs, the required power increases by 40-50 percent. For guttering, average values are 55-58 W/m and 85-92 W/m for cold and warm roofs, respectively.
How to mount the system
In order to be fully equipped to begin installing the system, let’s look at a clear example of a heating scheme for a roof and gutters and adhere to a certain sequence.
First, we select the location for installing the automation and control system indoors. Often the main controller and protection devices must be located near the electrical distribution panel. This is done for ease of installation, and allows you to reduce the length of cable and wire routes and increase the reliability of the circuit. Connecting the controller will not be difficult, since all its pins and terminals are signed and marked. A person who is familiar with the basics of electrical wiring and knows how to handle tools will quickly find his bearings and do such work with his own hands.
The installation of a heating conductor in gutters should be considered based on the fact that it is divided into four component parts (gutter, waste pipe, funnel and water inlet), each of which must be heated. First, you need to feed a loop of wire into the drainpipe and screw it into the water inlet using steel clamps. Then we attach the cable to the bottom of the drain pipe as high as possible, placing it at a distance of 5 cm from each other in the part of the pipe located closer to the house (melt water usually flows through it). In the same way we attach the conductor at the top near the bottom of the funnel
It is important that if the pipe consists of several collapsible parts, then in each of them it is necessary to organize an intermediate fastening of the heating system. In the funnel, the cable is laid in the shape of a ring and screwed with clamps in this position
Let's move on to the gutter. In it, the wires need to be placed on opposite side surfaces. Next, the ends are connected to the terminals in the distribution junction box.
Advice! The self-regulating conductor does not have to be laid in a loop. Installation into one core is suitable, the end of which is insulated with a special plug.
As an example of installing a heating element, let's take a flat roof. The cable is laid in the lower part along the perimeter of the water drainage line and laid in the internal funnel of the drain at a distance of 400 mm, if the drain pipe is located in the building. If the pipe is installed outside, then a “dripping loop” scheme is used. Where the parapet and roof touch, the laid conductor should have a power of about 60-70 W/m2. It is also necessary that a wire be laid around the heated funnel at a distance of 2 m as shown in the figure below:
The sequence of cutting the heating wire is shown in the photo:
Finally, when the previous steps are completed, the control system for heating the gutters and roof is connected to the heating elements using power cables through adapter junction boxes. Also, all the necessary sensors and protection equipment are connected.
You can clearly see the installation process of the anti-icing system in the video:
That's all I wanted to tell you about how to heat the roof and gutters with your own hands. We hope that the instructions provided were useful and interesting for you!
Frequent errors and problems during installation
Installing a heating system is not difficult, but common errors occur during assembly:
- The cable cannot be secured using self-tapping screws, steel strips, wire, vinyl tape, or tape. Sealant and mounting tape are always required;
- Incorrectly selected power is fraught with either high costs or ineffectiveness of the system;
- The wires must not be twisted, otherwise a short circuit will occur;
- Any connection should be carefully insulated from moisture;
Common problems:
- Circuit breaker malfunction;
- Malfunction of the residual current device;
- Poor quality braided cable termination;
- Low voltage, hence the reduction in heating power;
- Mechanical damage;
- Overheating (resistive version);
Advantages and disadvantages
Like any engineering solution, a heating cable has a number of pros and cons.
Advantages:
- Fast, uniform heating;
- Long service life - at least 10 years;
- Safety and environmental friendliness;
- The system configuration can be easily changed;
- Quite low power consumption.
- Resistance to external influences.
Flaws:
- The need for accurate, competent calculations;
- The cost of a good cable is quite high.
Make it yourself or buy it
The range of heating cables in stores is very large. But there are several ways to make a wire with your own hands. Let me give you an example of a home-made cable:
- We take a two-core copper wire in double insulation and a 300W power supply (a computer one will do), in addition, to measure the parameters you will need a temperature sensor.
- We connect the wire to the 5V output of the power supply.
- After 10 minutes, the temperature of the cable will reach approximately 50 C-, this is quite enough to heat the drain.
Benefits of using a heating system
The basis of the heating or anti-icing system is a special electrical cable, which is installed along the outer part of the roof and in the most dangerous places.
The principle of its operation is based on the fact that when electric current passes through the cable, significant thermal energy is released due to the increased electrical resistance of the conductors. Advantages of roof heating :
- Prevents the accumulation of excessive amounts of snow and ice, as well as icicles on the eaves.
- Eliminates the need for manual roof cleaning and icicle removal.
- Creating conditions for uniform melting of snow and systematic drainage of melt water.
- Eliminating the risk of ice jams blocking the drainage system.
- Increasing the durability of the roof by reducing mechanical loads.
- Possibility of process control and automation.
- Ensuring the aesthetic appearance of the structure in winter.
The heating system requires significant financial costs and the involvement of specialists for installation, but it helps to increase the service life of the roof and eliminates accidents that occur when snow avalanches and icicles fall from the roof.