SHARE ON SOCIAL NETWORKS
FacebookTwitterOkGoogle+PinterestVk
Replacing wiring in an apartment is a fairly common event. The need for this process is most often determined by the fact that old cables include an aluminum core that is not adapted to modern power. Such systems are not always able to withstand the loads placed on them by a large number of electrical appliances. Before replacing the electrical wiring, you need to familiarize yourself with the sequence of work and recommendations for each item.
If the electrical wiring of the apartment was installed 20 years ago, then we can say with confidence that it must be replaced
Choosing the right cable
Most people, when starting to draw up a diagram and work plan, are faced with the problem of what type of wires to choose. Wires are divided into several types. Basic:
- aluminum
- copper
Of course, it is best to buy copper ones. They are durable and reliable, and also have a longer service life. All specialists in the construction of both panel and other houses use only copper wires. When sockets or switches are connected, the core of aluminum cables is easy to break; with a multi-core copper cable, such an unpleasant situation is impossible. In addition, copper cable has good throughput.
Necessary materials
Now, based on all the work done, you can determine the amount of materials you will need to change the wiring in the house. Count how many junction boxes, sockets and switches you have marked. If the wiring is of a hidden type, then you will also need a socket box for each switching device. Measure the amount of wire needed along the drawn routing routes using a tape measure. Be sure to take it with a margin for cutting at the joints (6-10% of the total length).
To do the wiring yourself, choose a three-core wire or copper cable. A cross-section of 1.5 mm2 will be sufficient for a lighting network, 2.5 mm2 for socket groups, and 4 mm2 for powerful electrical consumers.
We advise you to purchase a high-quality German conductor marked NYM, with polyvinyl chloride insulation. Among domestic cable products, the VVG brand conductor is in greatest demand. Also, for laying conductors you will need a corrugated pipe, and in the case of an open type of wiring, cable channels. It is better to buy metal corrugation, since in the event of an emergency, polyvinyl chloride can decompose and release toxic substances.
Selecting cables and machines on video:
It is imperative to protect the home electrical network from overloads, short circuits and current leaks, so you cannot do without automation. It will be necessary to install RCDs and circuit breakers (or combined options - differential circuit breakers). They are selected by rated current depending on the load that will be present on the protected line. Let us give you an example of approximately what machines will be needed for an ordinary three-room apartment:
- general input circuit breaker - 40 A;
- for the socket group - 25 A;
- for lighting - 16 A;
- for powerful consumers - 32 A.
When choosing machines, give preference to the leaders in the electrical products market - and ABB.
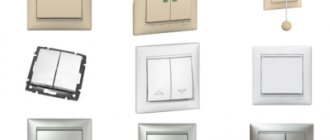
There are two types of distribution boxes and they differ from each other only in design.
Square and rectangular boxes are more spacious, while round boxes are much more convenient to install.
Drilling a round hole in the wall for such a box is much easier than drilling a square or rectangular niche.
Be sure to choose sockets with grounding. If there are small children in the house, you will need special devices with protective curtains (so that the child cannot pick around with foreign objects inside). Pay special attention to the rated current for which the switching device is designed, otherwise problems may arise when connecting powerful consumers.
How to choose a wire?
On the electrical products market you can find a huge variety of cable products with a core cross-section of 0.30 mm2 and above. Therefore, wiring in the house requires a special approach.
An incorrect calculation of the rated power of all electrical appliances will result in the purchase of an unsuitable wire, the wires of which will begin to overheat, which can lead to melting of the sheath, short circuit and fire.
The following section is considered the most common:
- For lighting fixtures use 1.5 mm square.
- For sockets (with and without grounding) use 2.5 mm square.
- For other, more powerful devices, 4 - 10 mm square is used.
In order to correctly calculate and select the cable cross-section, it is necessary to carry out a preliminary calculation using the formula: Ptotal = (P1+P2+P3)*0.8.
P1+P2+P3 – power of electrical appliances, kW. Correction factor – 0.8. Individual values can be applied to individual groups of devices.
Tools
Before you change the wiring in your apartment, you will need to stock up not only on materials, but also on a fairly large number of tools. If you don’t have all the necessary equipment, then it might make sense to turn to professionals. Check out the list of everything you will need to install new wiring, and then make a decision for yourself.
The ideal option is to rent a power tool.
- A hammer drill and a set of drill bits for concrete (as well as a concrete drill, a core drill and a chisel). This tool is necessary for installing holes for sockets, switches and boxes.
- Level, plumb line and cord for marking the laying of wires.
- A grinder (and a stone circle for it) or a wall chaser for making grooves in the walls for wires.
- A spatula and plaster (or alabaster) for filling the grooves after the wires are laid in them.
- A mounting knife or a special device for removing the insulating layer on wires (stripper).
- Pliers, a set of flat and Phillips screwdrivers, side cutters.
- Soldering iron with solder and rosin for connecting wires.
- Indicator screwdriver for determining phase and zero.
- Long carry. During repair work, you will use a temporary structure to power the power tool, and its length should be sufficient to reach the most remote rooms and corners.
Low-current system
Everyone knows that when laying rough electrical wiring, it is also necessary to think in advance and lay all the accompanying low-current cables.
There are various low-current systems and they have nothing to do with the electrical wiring in the apartment, since the wiring will work without them. BUT, today, without some of them (and this is at least the Internet), an understanding of modern and comfortable housing is not possible.
The main low-current systems in order of demand for them:
- Internet
- TV, telephone
- CCTV
- Fire alarm
- ACS systems (remote access)
Our company also provides services for installation and configuration of low-current systems. You can find prices for these services here.
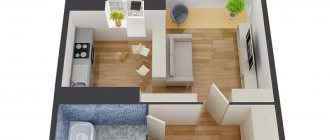
Installation diagram of sockets and switches
Before laying electrical wiring, you need to carefully work on the location of sockets and switches in the house. It is with the help of the diagram that the wiring in the apartment will be carried out. For example, if you know in advance where you will put the computer, you can run a separate cable there, which will allow you to power all computer devices that have increased power consumption. The same applies to other powerful equipment.
How to distribute the number of sockets:
- living room . In the living room, it is recommended to install 5 sockets with a common frame (or whatever is convenient for you) for connecting video and audio equipment, two sockets near the sofa and one socket each where you need additional power sources
- bedroom . The sockets here should be near the sleeping place, the desktop, if there is one. The rest are optional
- corridor . A double socket will suffice here
- bathroom . The number of sockets depends on what electrical appliances you will use here. On average, one or two sockets are enough
- kitchen . It is worth installing three to five sockets near the cutting table. Place the rest as needed.
According to standard standards, sockets in the house should be located at a distance of 30 cm from the floor, and switches - 85 cm .
Partial wiring replacement
Partial replacement of the wiring in an apartment will cost much less than replacing the entire electrical wiring. This procedure will save on large-scale repairs and will keep the apartment’s electrical system in good condition.
Simply improving the wiring in one room will, first of all, reduce the load on the rest of the apartment, and secondly, it will allow partial renovations to be made in the apartment. This is most suitable for residents of Khrushchev-era apartments, communal apartments, hostels and Stalinist houses. And also to several families living in the same living space. If it is not possible to replace all the wiring, first of all you need to think about a partial replacement.
Removing old wiring
So, after you have drawn up a diagram of the placement of all sockets and switches in the apartment, you can begin to dismantle the old wiring. This process can be done with your own hands. It depends on how the old wiring was installed. Before doing all the work yourself, you need to disconnect the wiring from the meter in the apartment. If the electrical wiring was placed in channels, then dismantling the old wiring and installing new wiring is carried out in parallel. You need to wind a new one to one side of the old cable, then you need to get the other end of the old wiring. That is, you won’t need to hammer into walls and create unnecessary problems. But if the new wiring diagram of the house does not correspond to the old wiring, then grooves will need to be made in the walls.
In the case where the electrical wiring is embedded in the wall, the first thing you need to do is find out in which part of the house it is laid. You can find it by noticing grooves embedded in the walls, or by using a special device. You can also study the house diagram. Once you have determined its location according to the diagram, you can change the electrical wiring.
Completion dates, guarantee
The duration of replacement work depends on a number of factors. Usually all work is divided into rough BEFORE and finishing AFTER. In such cases, the timing of the work directly depends on other craftsmen (plasterers and painters) doing repairs in the room.
Rough laying of communications takes an average of 1 day/room, installation of sockets and switches for a finished floor takes an average of 1-3 days for the entire apartment, and work on assembling a switchboard can take 1-2 days.
All deadlines for completing the work, as well as the guarantee and payment, are specified in the contract. Prepayment is required only for materials; it is also possible to divide the prepayment in stages according to the stages of work performed.
Warranty for all turnkey electrical equipment (maintenance and warranty repairs) from 5 years , the warranty period directly depends on the stages of the work (turnkey or partially) and the materials used.
Wall preparation and marking
There are two types of electrical wiring installation in an apartment - closed and open. In an open way, the wires are laid in cable channels or attached directly to the walls. All sockets and switches are also mounted without recessing. This method does not require labor-intensive operations for wall cutting and is relatively simple, but less aesthetically pleasing. This type of wiring can be used in the garden, garage, and storage room.
For closed placement of wires, we will need to make recesses and slits in the wall along the entire line; we can use technological holes in the walls and ceiling. But after sealing the cables, you get a smooth surface, ready for finishing. For apartments, only this option is used. It is possible to place the main cable lines on the ceiling, followed by installation of a suspended or suspended ceiling.
Preparation of the walls begins with cleaning them of old wallpaper and plaster, dismantling the old wiring, after which markings are applied according to the plan. At this stage, it is convenient to mark the cable locations using a laser level or a long cord.
According to the markings, recesses are made using a grinder and a chisel or a special wall chaser, and recesses are made for distribution boxes and sockets with switches. To do this, you will need a hammer drill with special drill bits for concrete. This is the most time-consuming part of the repair, so if you doubt your abilities or do not have the necessary tools, it is better to entrust the work to specialists.
To work with wires, it is worth purchasing special wire cutters that quickly and accurately cut wires and remove insulation from them. With their help, bare contacts can be sleeved with copper tubes.
Chasing walls for electrical wiring
Installation of new wiring
It’s worth noting right away that replacing electrical wiring in a private home should be done with tools with insulated handles. And the master himself must wear rubber gloves.
Usually, replacing old electrical wiring in a house begins with replacing the panel and installing it in a new place (unless, of course, the old one is not satisfactory). In private houses, as a rule, there is no special niche for the shield, so the easiest way is to make it hinged and attach it to dowels.
A place is selected for the shield that will always have easy access. In addition, the owner of a private house must run a VVGng 5*6 cable from the old location of the panel to the new one and connect it.
At the next stage of replacing the electrical wiring, you must perform the following actions:
- prepare the walls and apply markings using a pencil and level;
- By marking with a grinder, grooves are made inside the wall. For gating at considerable heights, it is worth using sawhorses or a stepladder. The execution technique in this case is as follows: first, the edges of the grooves are marked with a grinder, after which the rest is hollowed out with a chisel;
This is followed by work on replacing the cables in the grooves. To do this, they are cut into pieces of the required length. In the right places, the cables of future electrical wiring should be secured with alabaster or special clamps;- then the socket boxes and distribution boxes are installed. And here you need to decide how the wires will be mounted directly into them. Welding is considered the most reliable method, but owners of private houses sometimes neglect it - due to the high cost of welding machines and lack of skills in handling them. However, there is a simple solution that is popular among home craftsmen - using special terminal blocks when replacing;
- Lastly, sockets and switches are installed, and the protective automatics in the distribution panel are connected. After this, the installation procedures for replacing electrical wiring in a private house can be considered complete.
Replacing outdated or dilapidated electrical wiring in a wooden house follows approximately the same algorithm. But here special attention needs to be paid to fire safety. Therefore, experts advise making open cable routing in a private house made of wood.
However, it can be internal if serious finishing and wall covering is planned in the future. Internal electrical wiring in private wooden premises must be placed inside pipes or metal sleeves.
This allows you not only to protect yourself from the risk of fire, but also from damage when drilling holes.
Installation of hidden wiring
Now you can proceed directly to laying the line.
The sequence of actions will be as follows:
- We turn off the switch in the panel at the entrance to the apartment. Armed with a multimeter or an indicator screwdriver, we check the presence of voltage in the network and only then get to work.
- After the meter, we install a distribution box with a strip for circuit breakers, from which each cable line will be routed. An RCD is installed in front of the distribution box, in which the input wire should always be routed from above, and the exit to the apartment from below. There can be one RCD per apartment or several for different groups of electrical appliances.
- At the output there may be a common junction box, from which the wires will already go to their rooms. Instead of one such box, individual ones can be installed in the premises.
- We must place the wires in corrugated tubes made of non-flammable material. This will simplify repairs in the future, and the wires will not overheat.
- We tack the wires to the wall using special fasteners (clamps) or spread alabaster at regular intervals.
- We leave an extra 15-20 cm of wire at sockets and switches for connection and repair. In places where pendant lamps are planned, you need to leave up to 1 meter of cable, depending on the design of the chandelier. It is better to cut off excess wire than to screw in missing pieces.
- We attach socket boxes and switches to alabaster. It quickly and reliably sticks to the wall, so you need to cook it in small quantities.
- We connect all sockets, lamps and switches to the machines and apply voltage. Then we check the functionality of electrical appliances. If the tests are successful, you can seal the cable channels and begin final finishing.
Sometimes experts suggest installing wiring under the floor. This method has several advantages: saving on wires, ease of maintenance, if the floor is wooden, there is no need to trench the walls.
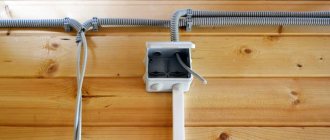
Laying open wiring
This quick way to replace or re-wire electrical wiring has become popular thanks to cable channels of various sizes. There are wall-mounted and floor-mounted “plinth” types. The quantity is calculated according to our scheme, leaving 5-10% of the length for allowance and trimming. For fastening you will need self-tapping screws or liquid nails.
- At the marked places we cut off the cable channels with a construction knife or a hacksaw.
- We attach the lower part of the channel to the wall using screws, dowels, nails - it all depends on the material of the walls.
- We install distribution boxes in the same way, without embedding them into the walls. In this case, the cable channels must be closely connected to the box of switches and sockets.
- We put the wires in them and close the lid. The line is ready.
- We clean the contacts and connect all the fittings. Now you can perform a trial run and check the functionality of individual nodes.
There is another way of wiring - the so-called retro style. Most often it was found in village houses and buildings built in the 20-30s of the last century. It consists of fastening the wires on ceramic insulators. For it we need a soft-braided copper wire and small roller insulators that are attached to the wall at regular intervals.
Execution of open wiring
Replacing the electrical wiring in an apartment with your own hands is not particularly difficult and can easily be done by a person without special knowledge and skills, the main thing is to follow safety precautions.
Two types of electrical wiring repair work
I divide electrical wiring work in an apartment into two main types.
- complete replacement of electrical wiring;
- partial repair of electrical wiring.
Complete replacement of electrical wiring
The first, most labor-intensive type of work is a complete replacement of electrical wiring . Typically, such electrical installation work is carried out during a major or at least major renovation of an apartment. Complete replacement of electrical wiring is, of course, the most effective way to get rid of all the problems associated with old electrical wiring. But this method is often not applicable for many. And there can be many reasons for this, starting with its high cost and ending with the physical impossibility of carrying out a major renovation of the apartment. What to do?
Partial electrical wiring repair
Partial repair of the apartment's electrical wiring, without major work, will help solve problems with old electrical wiring This article will talk about repairing old electrical wiring in an apartment. With this article, I plan to begin a series of articles specifically covering electrical wiring repairs without major capital investments, as they say, do-it-yourself, including the third type of electrical wiring work, minor repairs (repair of sockets, switches, etc.)
So, repairing old electrical wiring in an apartment, where to start. Let's start with diagnostics.
How to calculate cable length?
Using the diagram, you can make approximate calculations of the amount of cable if the exact dimensions of the rooms are taken into account. But they should be clarified and double-checked by transferring the diagram from paper to the walls. And this procedure is also carried out by professionals to determine as accurately as possible the placement of all sockets and switches, as well as the cables connecting them.
There are no clear standards at what height from the floor and at what distance from the corners the wires should run. Until recently, in Eastern Europe it was customary to install sockets at the level of the lowered arm, and switches at eye level, but it is now difficult to say where such standards came from.
Today, construction manuals typically provide the following information:
- Sockets are installed 30–35 centimeters from the floor (or 40–45 cm from the interfloor ceiling). Although they can be installed directly on baseboards, then the sockets must be special.
- The switches are at a height of about 90 cm, so that they can be used with their hands down and are also convenient for children.
It is important to note that these are standards for living rooms. For the kitchen, for example, they are different. Most of these rooms are occupied by countertops and cabinets, so sockets will need to be placed somewhere between them or even inside - hidden socket blocks in the form of a book or a “column” that rises when you press the lid are popular today.
There are also rules for bathtubs, in which sockets and switches are not placed at all, and everything is taken out of bounds. And if they are placed, then they are special, resistant to constant humidity and temperature changes.
For other rooms, the rules for laying the wiring are simple - the line should go straight down from the socket or switch (or up if the network is located under the ceiling). No ladders, corners or diagonal placements are allowed due to the danger of forgetting the location and then running into cables if you need to make a hole in the wall.
And to understand what wiring placement standards are in effect now, it’s worth studying this table.
| An object | Distance from object |
| Windows and doors | Not less than 10 cm |
| Heating pipe | Not less than 30 cm |
| Pipes with flammable substances (gas) | At least 40 cm |
| Ceiling | From 15 cm |
| Stretch ceiling | From 10 cm |
| Corner of the room | From 10 cm |
| Floor | At least 15-20 cm |
How often is smart installation performed?
In Russia
Smart installations are most often installed in new homes. In older ones they are produced sporadically. I think no more than 5 percent. orders.
Installing installations to support automation in existing homes often involves replacing the electrical installation. This is usually a consequence of the fact that the methods of organizing such installations have only recently been standardized. It also happens that the existing turnkey electrical wiring replacement and installation in a private home is not suitable for inclusion in the automation installation. Having to cut grooves into walls and sometimes floors comes with the risk of damaging other cables, especially if they are not inventoried.
The cost of installing a smart home always depends on its size and the complexity of the functions it must perform. This is also influenced by the design of visible elements. However, the difference in price between the same installations in an old and new house can only be reduced to the cost of the furrow, which fluctuates around 10%.
Companies involved in the installation of smart buildings must deal with the comprehensive implementation of the electrical distribution board (design, assembly, installation, commissioning, as well as preparation of technical documentation and electrical measurements.
Why determine the cross section?
First of all, if the wire is of too small a cross-section, it will not be able to withstand a large consumption load.
It will heat up frequently, resulting in:
- Deterioration of insulation.
- Damage to contacts on terminals.
This increases the risk of a short circuit significantly.
Also, not many people know that wires that differ in their cross-section also differ in prices. Therefore, it is worth doing the calculation in order not to overpay for material with excessive parameters.
It is important not to forget that the wires also differ in purpose, but this is easy to figure out if you know the correct color layout.
It is suggested in the table below.
| Wire color | Purpose |
| Striped, yellow-green | Neutral protective conductor (grounding) |
| Blue | Zero working conductor |
| Black, red, brown, and all other colors different from the previous ones. | Phase conductors |
How to make calculations?
All the lines that appear on the apartment diagram come out of the access panel that distributes energy.
And each of the designated lines inside has two devices:
- Automatic with suitable power.
- RCD.
In addition to this, there is always a common machine and a common RCD. The operation of this equipment depends on the total load on the network section limited to one room. It can be calculated by having in hand a list of all household appliances and other devices that will be used in the apartment.
Usually the calculation occurs according to a very simple algorithm:
- The average power consumption is taken from the passport of each device.
- All these values are added up, as if assuming that all devices will be connected to the network at the same time.
This will give you the total maximum power. And if there are no passports for some equipment, then this is not a problem - you can use the average power of other similar devices or look for the necessary data in average power tables, like the one proposed below.
| electrical appliance | Average power |
| Warm floor | 1kW |
| Split system | 2.5 kW |
| Lighting | From 100 to 1000 W |
| TV | 150-200 W |
| Iron | 1 kW |
| Chargers for gadgets | 25-50 W |
| Washing machine | From 1.5 to 3 kW |
| Water heater | From 2.5 to 7 kW |
| Dishwasher | 2-3 kW |
| Laptop | 80 W |
| Microwave | 1.5-2 kW |
| Printer | 350 W |
| Desktop computer | 250-750 W |
But that is not all. Now you need to calculate the load current on the circuit section. To do this, you will again need a diagram where the equipment is distributed among the rooms.
For example, you need to make a calculation for a children's room in which they will constantly work:
- TV – 150 W.
- Warm floor – 1 kW.
- Night light – 100 W.
The total power per room is calculated using the formula:
I sum = P sum/U, where I sum is the total current in the room, P sum is the power of all electrical appliances when connected at the same time, and U is the usual voltage in the network, that is, 220 V.
Then in the designated nursery Isum will be equal to 5.7 A. And given that the network is not too loaded and does not have many branches, additional calculations are not required here. Just in case, another 5 A is added to the resulting number, and then everything is rounded up. This will give you 11 A for the nursery.
All that remains is to take the table proposed above and find a suitable cross-section of the copper cable. In the example, the load turned out to be ideally suited for a cross-section of 0.5 mm and one single-core wire is enough.
It is worth noting that special sockets are often purchased for children's rooms, the protection on which will not allow inquisitive minds to conduct their first lesson in learning about electricity. And if there are often small children in the house, then such sockets can be installed wherever young naturalists can reach them.
Selection of machines and cables
The purchase of machines is carried out based on the devices used. Their power can be completely different:
for lighting - 10 A;
- for sockets and air conditioning - 16 A;
- for kitchen appliances - 25 A;
- for all rooms - 32 A.
The power is influenced by the cable cross-section. In order for the wiring to be selected correctly, it is necessary to make the following calculations:
- the power of all devices connected to the network is summed up (with a reserve of 100 W for each device);
- the resulting number is divided by 220.
If you get a number between 12 and 15, you can use a cable with a cross-section of 1.5 mm². For a higher value, a thicker wire is selected.
Experts recommend choosing a cable based on the load. The best option is to use non-flammable wire VVG NG or VVG with the following cross-section:
- 1.5 mm² (two-core) - for lighting devices;
- 4 mm² (three-core) - for an electric stove in the kitchen, air conditioners and all powerful appliances;
- 2.5 mm² (three-wire) - for sockets and other devices.
It is mandatory to replace the aluminum wire with a copper cable, which has a longer operating period and better current flow.
It is forbidden to connect a copper cable with an aluminum one. This will cause an oxidation process to occur, which will lead to contact failure.
Cable selection
Selecting the cable cross-section is the most important part of preparing for the installation of electrical wiring. To make a competent selection, a preliminary calculation is necessary: you need to add up the power of the available devices and add to the sum 100 watts for each device used.
Then you should divide the result by 220. If the final figure does not exceed 15, you can use wires with a real cross-section of 1.5 mm square. And for sockets, the optimal cross-section is larger - 2.5 mm square.
As for materials, today the priority for home craftsmen who decide to replace the electrical wiring in their home is copper cables of the VVGng-LS and NYM brands. The former are characterized by an affordable cost, and the latter by an additional insulating shell, as well as ease of cutting.
Aluminum cables are also not prohibited from being used to replace electrical wiring, but their cross-section must be larger than copper cables.
And the cable cores made of aluminum tend to break at bends, that is, they are not very reliable. Paying attention to this, aluminum is not recommended for use inside the house.
It is also worth determining in advance the length of wires and cables needed for replacement. To do this, you need to measure the distance from the panel to the connection point, taking into account all the corners, alcoves and protrusions present in a private house.
Traditionally, all electrical wiring turns are made strictly at an angle of 90 degrees, and this also needs to be kept in mind when taking measurements. The resulting values are added to each other and added to the total by at least another 15%.
There is also a simplified method for calculating the footage of wires and cables - you simply need to multiply the area of a private house by two.
Safety rules when replacing electrical wiring in an apartment
- When replacing electrical wiring in an apartment, it is necessary to strictly use tools with insulated handles, using rubberized gloves.
- Walls need to be tapped using trestles and stepladders with a horizontal stop. It is not recommended to use an ordinary stepladder for work, as you may fall from it.
- Work can be carried out strictly observing the PUE and safety rules. Of course, it is impossible to fully list them all. However, we will provide a list of the main mistakes that a non-professional can make. Please pay attention to the following points to avoid problems when working with electrical wiring.
The most common errors:
- Under no circumstances should circuit breakers or fuses be installed in neutral working or grounding conductors.
- Wiring of a 220 V network must be done with a three-phase wire: 1 wire - phase, 1 wire - neutral, and 1 wire - ground.
- Based on clause 7.1.37 of the PUE, installing sockets in a bathroom, shower or bathhouse is prohibited. In addition, clause 7.1.39 also does not allow the placement of switches in these rooms.
- Wires can be connected by soldering, crimping, welding or bolting.
- The wires should be connected with reserve so that you can reconnect if necessary.
- It is imperative to ground the metal parts of the wiring: boxes, trays, corrugated hoses.
It is also necessary to replace the electrical wiring in the apartment in compliance with the following rules:
- Electrical wiring must be placed either horizontally or vertically. Otherwise, the chances of damaging the wiring greatly increase.
- Place switches and sockets at the same height.
- Wires should not be crossed.
- It is prohibited to place sockets and electrical wiring near heating appliances or water supply systems.
Replacing electrical wiring in an apartment on your own is hard work. If you know how to read and draw up electrical diagrams, then you can safely start working. However, otherwise, it is recommended to seek help from specialists.
Drawing up a diagram
The future wiring diagram can be based on standard single-line power supply diagrams, which are freely available on the Internet. The basic rule here is the following. At least two branches must go from the meter to any room in the house - one for the lighting circuit, the second for sockets.
Since a private house, as a rule, has one bathroom, an additional potential equalization system is not required. That is, on the wiring replacement diagram, only branches to connection points (sockets) and stationary electrical installations should be indicated.
Another important rule that is worth remembering when replacing electrical wiring: do not draw branches on the veranda, balcony or loggia on the diagram. This is a gross violation of the rules for installing electrical installations in residential premises. Balconies, verandas and loggias must be powered from sockets located in other rooms.
It is advisable if the drawn up diagram is approved by electricians and organizations involved in fire safety.
Practice shows that it is better not to overload a scheme for replacing electrical wiring in a private house with trifles such as ceiling lighting, an extension cord for the veranda, etc. Inspectors are confused by such details, and a generally suitable plan may not be accepted because of this.
Having a permit certificate for replacing old wiring, as well as a certificate of work performed, will help the owner of a private house value it more expensively in the future during a possible sale.
How much does it cost to replace electrical wiring in an apartment?
When replacing electrical wiring in an apartment, the cost of the work depends primarily on what kind of sockets and switches you plan to make - hidden or external. In the first case, wiring (as well as sockets and switches) is carried out by gating the walls. In the second case, a cable duct, corrugation, and the like are used.
Have you decided and are going to hide the wires? Then it is important to know that gating involves carrying out rough work that must be completed before finishing (puttying, wallpapering). While external wiring will not affect the finishing of the room in any way.
When replacing electrical wiring in an apartment, the price of the work depends on the following:
- Technologies for laying wiring (sockets and switches): hidden or external.
- The number of groups (machines), which is determined by the number of rooms and, accordingly, sockets.
So, you have decided how you will route the electrical wiring. Then you need to calculate the required footage of the groove or cable channel. In addition, the material of your house plays an important role - concrete slabs or brick.
If you decide to invite specialists to replace the electrical wiring in your apartment, the cost of the work is calculated individually. To do this, the master needs to see the project, look at the “field of work,” agree on deadlines, payment, and the like.
The bathroom is characterized by high air humidity and a splashed floor, which makes it necessary to take special electrical safety measures. In addition, a body steamed in hot water has a radically reduced resistance to electricity: the circuit current in this case can exceed 5A, which is deadly. The severity of electric shock depends on the time of contact and an RCD will not help in this case.
At the same time, the bathroom contains powerful consumers of electricity, including a washing machine and a water heating tank.
The operating rules for electrical installations allow the installation of sockets in the bathroom using an isolating transformer or RCD, however, to ensure complete safety, it is recommended to take the following steps:
- Electrical wires from the water heater and fan must be replaced with longer ones. The length of the cords should be sufficient for them to pass through the hole in the wall and reach the sockets in the adjacent room (most often the kitchen). The boiler does not come with a cord, and in the case of a fan, re-equipping the device only risks losing the warranty, which is of little importance due to its low cost. The wires must contain three cores and a protective conductor.
- Buy an extension cord without a cord, but with a grounding switch for three sockets. The extension cord is equipped with a three-core cord.
- Wires from electrical household appliances are supplied with European standard plugs. The cords are placed in a polyvinyl chloride casing.
- The water heater plug is permanently connected to the outlet.
- The extension cord is fixed in the bathroom with self-tapping screws.
- The washing machine is connected via an extension cord on a permanent basis. The remaining sockets can be used for local lighting, hair dryers and other small household appliances.
- The extension cord in the next room is switched on as needed.
So, with these simple steps you can avoid the presence of exposed wire ends in the bathroom, which will significantly increase the safety of residents.
Replacing wiring in an apartment with your own hands: necessary tools
Before starting work on dismantling the old wiring, you need to calculate the materials that will be required to organize the system and purchase them. It is also necessary to prepare tools to perform all types of work. Let's take a closer look at what tools you will need to replace electricity in your home.
Related article:
Electrical wiring in an apartment: drawing up a diagram, rules and algorithm of work
Drawing up a wiring diagram. Installation of electrical appliances and cables. Programs for drawing up diagrams.
First of all, you need to prepare a hammer drill. This device is needed to dismantle old wiring and organize new channels (if necessary). To work, you will need to purchase several attachments for a hammer drill: a drill for hammering concrete walls with a cross-section of 16-20 mm, a crown drill of 90-100 mm and a chisel of 25-30 mm.
To replace the wiring, you will need to purchase several attachments for the hammer drill.
To connect wires, you need to prepare soldering equipment. The power of the device in this case should be at least 40 W. For installation of electrical For wiring in the home, you will need tools: an angle grinder with a stone wheel, pliers, side cutters, a set of screwdrivers, a building level, a cord, a flashlight and a knife. For finishing you need to buy a spatula. In addition, you should acquire instruments for checking electrical circuit readings, such as a multitester and a phase indicator.
Replacing wiring in an apartment: calculation of materials
Calculation of wires is quite simple. The most common way to determine the exact amount of cable required to connect an electrical network element is to measure the distance to it from the panel. To do this you need to use a regular tape measure. It is important to remember that during manual measurements, all surface irregularities, protrusions and depressions are taken into account.
After calculating the wiring in an apartment or private house, it is advisable to add another 10-15% of the cable to the resulting figure. The stock is needed to meet installation needs, since during operation there is always a certain amount of spoiled material.
To calculate the cross-sectional size of a copper cable, you will need to count the number of household appliances and their power consumption
Note! The cable must be laid at right angles only. Thus, the wires are mounted horizontally or vertically. Diagonal lines are not recommended as they are much more difficult to organize. Knowing how to do the wiring in the house with your own hands, it is much easier to draw up a plan for future work.
There is another option for calculating the materials needed to organize an electrical network in a home. It is simpler, but at the same time less accurate, because generalized values are used when calculating. To carry out such a calculation, you need to find out the area of the apartment and multiply this figure by 2. The resulting number is approximate, but this calculation is used quite often. In this case, two-thirds of the wires will be used to lay outlet lines, and one-third will be used to connect lighting fixtures.
After calculating the amount of cable, other elements of the electrical system should be calculated. To install the network, you will need to buy at least 3 sections of terminal blocks, and they must include 10 contacts each. Experts do not recommend buying parts with a polyethylene body. This is due to the fact that this material does not have high technical characteristics and the necessary degree of protection.
The main indicator by which a wire is calculated is its long-term permissible current load.
In order to answer the question of how to conduct wiring in a house, it is recommended to watch training videos that can easily be found on the Internet. It is important to determine what and how the cables will be secured in the system. The option for fixing the wires depends on the personal preferences of the master. Experts note that it is more convenient and reliable in this case to use clamping plates. In turn, screw fastenings are less functional.
When choosing socket boxes, you need to pay attention to whether these elements are equipped with external protrusions to enhance adhesion to alabaster. VVG and PUNP cables are best suited for wiring. You will also need to buy an inlet shield, corrugated tubes and insulating material.
Replacing wiring in the house with your own hands: dismantling the old line
Before you begin laying new wiring, you will need to dismantle the old system. This work is carried out taking into account safety rules, so rubber gloves should be purchased as a precaution. The first thing you need to do to dismantle the electrical network is to turn off the power to your house or apartment.
Replacing electrical wiring in an apartment must begin with dismantling the old electrical network
Then all wires are checked using a phase indicator. If the device does not register voltage, you can proceed directly to dismantling the line. Most often, it is in old-style buildings that the wiring is replaced. In Khrushchev buildings, old wiring diagrams cannot cope with modern voltage levels. This not only risks interruptions in the operation of the power grid, but also poses a direct threat to the lives of residents, since a fire may occur in a faulty system.
Helpful information! Each element of the system is first checked with a phase indicator - and only after that it is allowed to begin removing it.
First, sockets and switches are dismantled. You don’t have to remove the old cables at all, leaving them in the walls, but in this case you need to disconnect them from the network. If you still decide to remove old wiring from the walls, then you will need to buy a tester. This device is used to detect old cables. Then the places where they are laid are tapped, followed by the removal of the wires.
How to change wiring in an apartment: features of hidden installation
As mentioned above, the installation of a hidden system is carried out inside the walls. If necessary, the cables can be placed in the floor or covered with plasterboard boxes. Today, a very popular option is to hide the cables behind a suspended ceiling.
Using a hammer drill with a crown-shaped attachment, you need to prepare holes for sockets
The most difficult way is to organize channels in the walls. The amount of “dirty” work in this case increases several times. Laying wiring in an apartment along the floor has some advantages. For example, this option allows you not to go around the walls. However, installing electrical cables in the floor requires dismantling the old covering and completely replacing it with a new one. Before installing the wiring yourself, experts recommend that you read the step-by-step instructions for carrying out the work.
First of all, you will need to make channels in the walls into which the electrical wiring will be laid. To do this, it is customary to use a special tool - a wall chaser. If you don't have one, a regular hammer drill will do. As a result of such work, a lot of dust rises in the room, so it is necessary to take protective measures by wearing glasses and a respirator.
When choosing the optimal depth for channels, you should remember one important rule: the thickness of the plaster applied on top of them should not exceed 10 mm. As for the width of the grooves, there are no restrictions in this case. If it is possible to install electrical wiring in the house with your own hands in the ceilings, then you should give preference to this method. This will simplify the process of installing a new network.
Before installing a socket box, you need to choose the right type: plastic or metal
At the second stage, it is necessary to prepare holes for sockets. In this case, a hammer drill is used. To work, you will need to equip it with a crown-shaped attachment. It is used to create niches for distribution boxes. Next, the cables are laid in pre-prepared grooves. During this process, you must strictly follow the diagram drawn up before starting the installation of the electrical network.
Then you need to connect the wires in the junction boxes. For this purpose, connecting clamps (PPEs) are used, which also perform an insulating function. Then switches and sockets are installed. After installing electrical appliances, wires are connected to their contacts. At this stage, the wiring in the apartment is completed. Control of the work performed is carried out using a special tester.
The final stage includes two points: activating the electricity supply from the panel and sealing the channels with cables. If the wiring was laid in plasterboard structures, then it must be protected using corrugated tubes, which are attached to the surfaces using clips.
To check the correctness of the work performed to replace electrical wiring, you need to use a special tester
Kitchen
Based on the above, the kitchen needs a couple of wire branches: from the bathroom and your own. Wire cross-section is 4 millimeters. You will need a circuit breaker. For your own branch of wires in the kitchen you need not one, but two triple sockets. They can be connected to a dishwasher, oven, small kitchen appliances, and lighting fixtures.
The extension cord coming from the bathroom is plugged into a separate outlet. The refrigerator operates through an additional group socket, which is installed on the opposite wall. It is recommended to install the sockets of the main group and the bathroom behind the kitchen furniture - just below the countertop, but as far as possible from the sink.
Features of wiring in the kitchen
The concentration of all kinds of electrical appliances is typical for the kitchen. Instructions on how to replace the wiring on it will be useful. The wiring of the last century was not designed for such power. Turning on two or three devices at the same time can result in a short circuit and fire in the old thin wiring.
Powerful equipment is connected to a three-phase output. One phase and zero are not enough for an electric stove and oven. An additional wire is routed from the corridor panel. The total power of all equipment fluctuates around 15 kW, the cross-section is chosen taking into account this load.
Types of electrical cables and wires: device, purpose, marking and characteristics of the main types of cables used in houses and apartments (150 photos)Methods for laying cables in trenches: step-by-step instructions for laying and installing power cables in earthen trenches (140 photos)
Types of cable channels and cable boxes: types, sizes and materials of manufacture. 120 photos and videos of cable channel installation
There are special danger areas in the kitchen: the stove and the sink. In these places the wire is exposed to heat and moisture. If it is not possible to bypass sources of increased danger, the wire is laid in corrugated pipes.
It is not advisable to place sockets in a row for safety reasons. There must be at least three pieces per 6 m2. Laying the cable in the baseboard is undesirable, since the furniture is tightly packed with furniture and access to the wire will be blocked.