Important nuances when laying country wiring
When planning the installation of electrical conductors in a suburban area, you should decide on the scope of work. A full replacement or restoration of the existing network can be carried out. In any case, it is recommended to follow the following rules:
- Distribution boxes, electricity meter, switches and sockets should be located in easily accessible places.
- Switches must be installed so that they are not blocked when the door leaf is opened. Switches are installed at a height ranging from 60 to 150 cm.
- Sockets are installed at a sufficient distance from the water supply system and heating devices at a height of at least 50 cm from the floor.
- Power wires to sockets are supplied from bottom to top, and to switches - from top to bottom.
- Direct connections of copper and aluminum conductors are not allowed.
- It is necessary to exclude the location of sockets in rooms with high humidity (bathrooms and restrooms);
- The wiring must be laid according to the prepared diagram, which is recommended to be saved.
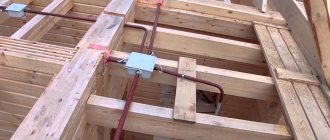
Placing distribution boxes in a wooden house
All work is carried out in compliance with safety precautions.
How to ensure the safety of electrical wiring on the site?
Firstly, if you are not an electrician or a builder, entrust this task to professionals. Incorrectly done electrical wiring can lead to serious problems: from a short circuit to a fire. It's not worth taking risks with this.
Secondly, it is recommended to consider the placement of wires and sockets in such a way that there is minimal risk of damage to them by people and animals. Therefore, they should either be buried in the ground or parallel to blind areas, walls, paths, in general, any other protrusions behind which they can be hidden and hidden from accidental damage.
Thirdly, you need to choose the right cables and sockets - for outdoor use. This means that they must be reliably protected from the sun's UV rays, temperature changes, water, snow, ice and dust. It is best to choose devices with the maximum protection and tightness classes: IP 65 and IP 67. Otherwise, after the first winter, you may encounter the fact that your sockets or lamps will refuse to work.
And, of course, it is better to plan the installation of sockets and lamps in the garden in advance - even before laying the paths with tiles, laying the lawn or planting flowers in the beds. Otherwise, you will have to dig through them to get the wires into the ground. This is not difficult, but it is more expensive and, of course, will spoil the aesthetics of your garden for some time.
Did you find this article helpful? Please share it on social networks: Don't forget to bookmark the Nedvio website. We talk about construction, renovation, and country real estate in an interesting, useful and understandable way.
Problems caused by the location of the summer cottage
Most holiday villages are located outside the city. At the same time, old power lines are usually used to power them. They are not designed to withstand large flows of electrical energy that arise due to the use of a variety of household appliances. This is accompanied by periodic interruptions in electrical networks, which can lead to failure of equipment installed at the dacha. To eliminate this problem, you will need to use highly sensitive circuit breakers and voltage stabilizers.
Voltage stabilizer for a private home
The condition of the wiring of a summer cottage is strongly influenced by the frequency of stay in it. This fact must be taken into account when choosing a wiring method, since without heating in winter, moisture will accumulate inside the room. Oxidation of the contact connections will gradually occur, which will lead to a short circuit, and as a result, the need for restoration work.
Important! Taking into account the fact that the dacha plot is private property, the owners must take care of the installation of the grounding loop and lightning rod themselves.
What is needed to conduct electricity
In order to conduct electrical communications to your own site, you need to perform a number of actions in the following order:
- Visually find a nearby electrical network. It is best if it is a 380 volt network, which looks like 4 conductors on poles. If such a line is not detected, then a 6 kV network may be located nearby, which looks like 3 conductors on more “solid” poles.
- Determine the owner of the electrical network. First of all, you should ask your neighbors about this, especially those who have recently dealt with a similar issue.
- Contact this organization and apply for connection.
- Conclude a service agreement with the organization.
You can find the necessary information on the Internet. It is better to search at the address where the land plot is located, which will help you find an organization engaged in the sale of electricity in a certain territory.
Each site is serviced by one company. Difficulties can arise only when the plot is located on the border of the service areas of two electricity supply companies. In this case, you need to contact the organization whose pillar is closer.
When submitting an application, you need to find out whether there are technical conditions for connection. You can clarify the information only with the organization that will be involved in the sale of electricity.
What type of wiring to use at the dacha
To determine the best option, you should familiarize yourself with each of them separately. At the dacha you can use open and closed wiring. Each option has its own pros and cons that must be taken into account for the final choice. There are also differences in installation.
Open gasket
This option involves an open arrangement of cable lines (CL) directly on the walls of the dacha, including on top of finishing materials. Special protective boxes can be used, which are made in different colors. This will allow you to match the elements to the color of the design. The main advantage of open wiring is quick installation. There is also the possibility of trouble-free troubleshooting and installation of additional power points.
Open wiring in cable channels
The only negative point is the aesthetic side. All installed wiring is visually accessible, which some owners of country estates may not like.
It is rational to use open wiring in dachas that are used exclusively in the summer.
Hidden gasket
It is impossible to use this wiring option in dachas with wooden walls without finishing. Closed wiring involves laying cables in grooves, which are subsequently hidden under a layer of plaster. This will require more time and effort, but you will be able to achieve an aesthetic appearance.
Closed wiring is accompanied by increased safety. But in case of damage to individual supply cores, it is necessary to remove the finishing layer.
Hidden electrical wiring device
Preparing the wiring diagram
To draw up a power distribution diagram at your dacha, you can use two options:
- classic - using a regular pencil and paper;
- modern - using specialized computer programs.
When performing work, it is not necessary to comply with established norms and rules. It is enough to accurately display the installation locations of switches, sockets, lamps, equipment, junction boxes, as well as the location of cable lines. It is first recommended to draw a schematic plan of a country house.
Electrical wiring diagram in a country house
Further steps to connect to electricity
After obtaining permission and technical conditions, it is necessary to prepare an electrification project. You can do it yourself, but in the absence of special technical knowledge, this will be problematic. It is recommended to contact a specialist or order one from a resource supply company that carries out the relevant work.
The actual connection can also be done by specialists. You will need to install the meter on a special pole. And the connection to the network will be made by employees of the resource supply company, who will also seal the meter and draw up an act on connecting the new subscriber to the network.
Determination of design loads
After drawing up a preliminary wiring diagram for a suburban estate, you should begin calculating the load. To do this, you will need to take into account the power of all electrical appliances, as well as lighting lamps. To minimize costs for cable lines, it is recommended to divide electricity consumers into several groups. The formation of groups is carried out taking into account the location and type of equipment.
With the correct calculation of the loads, it will be possible to avoid current overloads of the cable cores, and, accordingly, damage.
Load distribution among consumer groups
Selection of the required cable cross-section
After determining the loads of all supply lines, you can begin to select the cross-section of the current-carrying conductors. To do this, it is necessary to divide the calculated rated power by the network voltage, which will determine the current value. Based on the obtained value, the cable line section is selected using tables PUE 1.3.4 and 1.3.5. Using the first, conductors with aluminum conductors are selected, and the second, with copper conductors.
Table PUE 1.3.5 permissible cable currents
The required length of the conductors can be approximately determined from a previously prepared diagram.
Cable entry through a wooden house wall or foundation
If a self-supporting insulated wire or other conductor with aluminum conductors is laid from a pole to a wooden house, according to the PUE it cannot be introduced into the house: “laying cables with aluminum conductors over combustible structures is not allowed.” A switch to copper is needed. Most often, VVGng cable is used for this purpose - in non-flammable insulation.
It must be remembered that terminal boxes are used to connect these two conductors; ordinary twisting is unacceptable. Directly connected copper and aluminum enter into an active chemical reaction, quickly and strongly oxidize, which worsens the contact. As a result, even with minor loads, a spark appears at the connection point, and this is a direct path to a fire. Therefore, the use of terminal boxes is mandatory. They are available in a sealed case, and some are open. For outdoor use, of course, sealed ones are better; you can also install open ones in the house.
How to connect copper and aluminum wire
But that's not all. The power cable can only be routed through a wooden wall through a thick-walled steel pipe. The diameter of the pipe must be at least 4 times the outer diameter of the wire. The wall thickness is standardized (SP 31-110-2003) and must be no less than:
- 2.8 mm for cable with core cross-section 4 mm²
- 3.2 mm for cables with cores 6-10 mm².
It is advisable to position the entrance with a reverse slope so that water does not flow inside. To seal entry and exit points, as well as to ensure electrical safety, you can use asbestos, rubber or plastic plugs. The edges of the pipe will need to be carefully processed and sanded until completely smooth so that the cable does not fray and its sheath is not damaged.
Entering an electrical cable through a wooden wall of a house
To calm down and increase reliability, the section that will be inside the pipe can be wrapped with asbestos thread or other insulating material. It can also fill the space inside the pipe to prevent insects from settling there. Another option is to fill the pipe with cement or alabaster mortar.
When entering through the foundation, the situation is slightly different: the structure is no longer considered combustible, so plastic embeds can be used. They are installed at the stage of manufacturing the strip foundation. In this case, the passage for the cable differs depending on whether the cable enters a wet or dry room.
Entering an electrical cable through the foundation of a house
The spare parts necessary for organizing the safe entry of electricians into the house do not cost very much, but significantly increase the reliability, electrical and fire safety of your home. The designs are quite simple; you can handle their construction with your own hands.
Options for supplying power cables from power lines
In the process of installing electrical wiring at the dacha, the owner will certainly be faced with the question of how to connect the power supply to the household. The cable line will need to be pulled from the nearest overhead power line support, naturally after obtaining the necessary permits, together with representatives of electrical network services. You can use one of the following options for connecting to a power line support:
- by air;
- underground.
Supplying a cable to a country house by air
Next, we will consider in detail the advantages, disadvantages, as well as important installation nuances for each of the options.
Air supply
Supplying power to a country house by air can be done using two methods. The first involves the use of SIP cable, which means self-supporting insulated wire. It stretches directly from the power line to the facade of the house. The second option is accompanied by pre-tensioning of the metal cable from the support of the centralized electrical network to the walls of the house using special hooks or talpers. This allows you to use any cable cables that are subsequently fixed to the cable.
Regardless of the chosen method, you will need to use additional insulating fasteners to secure the conductive wires. The following factors will need to be taken into account:
- If the distance from the power line support to the construction site is more than 25 meters, intermediate support pillars should be installed.
- In winter, the load on the wires will increase due to the accumulation of ice. In this regard, it is necessary to correctly calculate the load-bearing capacity of the cable.
- Ultraviolet radiation contributes to the mechanical destruction of the insulating layer of conductor cores. Therefore, it is necessary to use additional protection in the form of corrugation.
Standards for connecting a house to a power line
Connecting electricity to a country house from a pole via air is carried out in the shortest possible time. You will need to purchase special fasteners and also use a tower. This comes with additional costs.
Power supply underground
When powering a country home with a cable laid underground, it is recommended to adhere to the following rules:
- The wires are laid in a trench at least seventy centimeters deep. Except for the case when the cable line is laid in a protective pipe, and the length from the power line support to the input panel is less than five meters. Under such conditions, it is possible to prepare a trench 50 cm deep.
- The trench must be dug at a distance of at least 60 cm from the foundation. If there is a need to lay a cable through the foundation, then you will need to use an additional pipe in it. It is prohibited to pull conductive conductors directly under the foundation.
- When excavating a trench, the following distances should be maintained from various objects:
- 75 cm - bush plantings;
- 100 cm - sewerage, water supply;
- 200 cm - trees, gas pipeline.
- The cable must be armored and have appropriate insulation protection.
Supplying electricity to the house underground
The listed instructions are determined by the requirements of the PUE, PTE and SNiP, regardless of the selected cross-section of the current-carrying conductors.
The main advantage of this option for connecting a country house to a centralized power supply is the minimal cost of the required material. You can also do without using special equipment. Laying the power cable underground will be difficult if the area is tiled or concrete is poured.
Connection rules
The work is based on connecting two cables under the power grid supports, one of which will act as a phase and the other as a zero.
It is important that the cables are located at a safe distance relative to each other: if they are connected to a brick wall, then it should be at least 50 mm; if laid to the wooden structures of the building, the cables are placed at a distance of 100 mm from each other.
The hole created in the wall through which the cable will be inserted must be sealed using non-flammable materials, for example, cement or concrete mortar . After this, they proceed to connecting the cables to the ASU or energy consumption monitoring device. Here you need to focus directly on the project.
An important point is that when the area supplied to electricity is removed from the power line supports at a distance of more than 25 meters, additional poles .
What kind of lighting do you prefer?
Built-in Chandelier
It is important to maintain the minimum height from the ground to the cable entry into the wall, which should be 2.75 meters. The optimal height from the cable entry point to the nearest window will be considered to be at least 1.5 meters.
Consequences of independently supplying electricity to the site
The same applies to increasing the power of an already connected power line or power consumption control device. Such actions are considered illegal and are subject to penalties .
If illegally installed line control and distribution devices are identified, they must be dismantled. The legislation also establishes the disconnection of the site by employees of the electrical network organization from energy consumption.
If a house or site was connected to electricity without permission, then it is very difficult to make this work legal.
The legalization procedure will require much higher costs than in the case of connecting electricity to the site using the services of a licensed organization in accordance with a plan that takes into account the specific technical conditions.
How much does it cost to install electricity on a site?
The cost of supplying electricity to a site will be similar to the cost of supplying it to a private house, since the latter is located on a plot of land. However, you can save money and conduct electricity cheaper by purchasing a plot located close to electricity poles. After all, the difference between an amount of 550 rubles and several thousand significantly hits the wallet.
After the permit is issued, a plan for electrification of the site must be agreed upon with the energy sales company.
Advice! You can do it yourself if the house or plot is small, but it is better to trust the specialists of the same company, so that subsequently there will be no additional obstacles on the part of energy sales when accepting it.
Expert opinion
Viktor Pavlovich Strebizh, lighting and electrical expert
Any questions ask me, I will help!
It is better to search at the address where the land plot is located, which will help you find an organization engaged in the sale of electricity in a certain territory. If there is something you don’t understand, write to me!
Place of installation of the input panel and connection of the power cable
It is recommended to install the shield in an accessible place. This could be a corridor or a technical room, for example, a heating unit. It must be installed at a height of at least half a meter from the ground. Currently, you can easily purchase a shield of the required size. In this case, it is necessary to take into account the location for installing the meter and protective circuit breakers, including RCDs.
When inserting the power conductor into the panel, you will need to comply with the requirements of the electrical networks. The main thing is to lay a solid cable. When choosing its type, you should take into account the material from which the overhead power line wire is made, as a rule, it is aluminum.
Electrical panel in a wooden house
Electrical wiring throughout the site. What to consider?
Of course, the first thing you need to do is connect your house to the power grid. Conduct wiring, install distribution boards, meters. Without this, there can be no talk of any electrification of the site, since the entire system is powered from your home.
Next, you should think about lighting the area. The first step is to install lamps on the porch, terraces, and walls of the house. This will make it easier for you to work in the garden at night, more safe to use various garden tools (especially automatic, electric or motorized ones, such as a lawn mower, leaf blower or scarifier) and, of course, more comfortable for relaxing in your garden.
Of course, if your area is large, just lamps on the house will not be enough. In order to effectively illuminate the area, you will need to make additional lamps, sockets, and therefore, run wires to them.
So the creation of additional electrical points in the garden is necessary, first of all, for installing lighting. What does your imagination have to do with this? With the help of beautiful lanterns, light bulbs and light garlands, you can create a unique illumination of the area. Moreover, thanks to effective outdoor lighting, you can safely move around the garden not only during the day, but also in the evening, and even at night. What is important to consider when designing and installing electrical equipment in your garden?
When determining the location of future outlets and lamps on the site, you should consider:
- Safety of people (i.e., so that when walking and moving around the site they do not touch the wires);
- Distance from the house (the farther the new electrical point is from the house, the more difficult and expensive it will be to connect it);
- The functionality of the new point (what it will be used for: for lighting, for connecting appliances or garden tools, etc.);
- Lighting area (for points intended for installing lamps in the garden).
Required safety standards
To ensure the electrical safety of installed wiring in a country house, the use of elements such as protective grounding, RCDs and automatic circuit breakers should be provided in advance.
Protective grounding
As mentioned earlier, in most cases, old four-wire power lines are used to power country houses. This means that a combined neutral and ground wire is used. If it breaks, life-threatening voltage may appear on the equipment housing. The machine will not turn off due to the rated current flowing through it. To eliminate such situations, it is necessary to install an additional grounding circuit on the site.
Design of a protective grounding loop
Note! To install a grounding system in a dacha, it is recommended to use factory-made modular-pin circuits. They can be installed in any type of soil without loss of performance.
RCD
Installing a residual current device allows you to ensure the safety of a person from electric shock, as well as prevent the development of a fire. The RCD reacts to leakage currents that are formed when the insulating coating of the cores is damaged or when the neutral wire breaks. It is recommended to mount the RCD directly at the power input.
The shutdown setting is selected taking into account the calculated leakage currents of all electrical equipment used in the country. The resulting value must be increased three times. RCDs with the following rated differential currents are available for sale: 10, 30, 100, 300 mA.
Connection diagram for RCDs and circuit breakers
Automatic circuit breakers
To protect cable lines from overload currents and short circuits, circuit breakers should be used. They are established for each individual consumer group. Selection is carried out in accordance with the calculated current consumption. As a rule, individual machines are mounted on lighting and socket networks.
Submitting documents to a network company
Documents can be delivered to the network company yourself, by postal service, or sent by courier. Within 30 days from the date when the application with the accompanying documents was received by the organization, the applicant is sent a separate technical agreement for signing. conditions for connection to SNT.
Important! A draft agreement sent to the subscriber from the technical. terms and conditions must have the signatures of authorized representatives of the network organization and be transferred exclusively free of charge.
The network organization has no legal justification for refusing a consumer to connect his facility to the power grid in SNT (if all connection rules are followed).
The subscriber must review the agreement given to him within 30 days and decide whether to sign or not. If you consider certain conditions to be inappropriate and wish to refuse to sign, please send a refusal. It needs to be justified.
How to install electricity on a site without buildings in 2022
It is important that the cables are located at a safe distance relative to each other: if they are connected to a brick wall, then it should be at least 50 mm; if laid to the wooden structures of the building, the cables are placed at a distance of 100 mm from each other.
Expert opinion
Viktor Pavlovich Strebizh, lighting and electrical expert
Any questions ask me, I will help!
The work is based on connecting two cables under the power grid supports, one of which will act as a phase and the other as a zero. If there is something you don’t understand, write to me!
Tools and material required for the work
To carry out work on installing country electrical wiring, it is recommended to prepare the following tools in advance:
- CL cutting scissors;
- pliers;
- screwdrivers;
- screwdriver;
- grinder with diamond discs;
- hammer;
- mounting chisel;
- putty knife;
- roulette;
- knife.
Tools for laying electrical wiring
It is best to purchase material after drawing up a full-fledged project of the planned electrical network. The following items will be required:
- circuit breakers;
- electric meter;
- wires;
- sockets;
- switches;
- distribution boxes;
- socket boxes;
- connection terminals;
- fastening hardware.
The nuances of laying current-carrying conductors
Do-it-yourself cable laying at the dacha is carried out in a certain sequence, taking into account important nuances for open and closed types of installation. At the initial stage, it is necessary to mark the installed channels. To do this, you can use a regular pencil. Further actions vary depending on the type of installation chosen.
Open laying
This type of wiring involves the use of remote switches, sockets and junction boxes. The cores are laid in special channels, which are mounted on top of the finishing material. In this case, fasteners are used for a specific type of wall surface. Subsequently, the channels are closed with a protective cover. The convenience of this method lies in the speed of installation and high maintainability.
To create an aesthetic appearance, the boxes should be laid under the ceiling. You can also use special floor skirting boards.
Hidden gasket option
To form hidden wiring in a suburban area, you will need to ditch the walls. To do this, use a grinder with diamond discs, a hammer drill or a wall chaser. Holes for distribution boxes, switches and sockets are made with appropriate crowns. Subsequently, the cables are laid in channels and fixed with putty or special staples. At the final stage, the walls are finished.
Installation of hidden wiring in foam concrete walls
Every person can carry out wiring in a summer cottage, even without special skills. The main thing is to follow electrical safety rules. At the final stage, you must make sure that the generated electrical wiring is working properly.
Controversial situations
The procedure for connecting 15 kW to a private house is standard. Difficulties may arise if the site is located on the border of zones served by two network companies. Choose the company whose poles are located closest to the site.
Failure to meet connection deadlines due to the fault of the servicing power line company is a rare but possible option. During construction, the lack of electricity can lead to additional costs and failure to fulfill obligations with construction participants.
Enter into agreements with contractors, taking into account the possibility of shifting the timing of connecting the facility to the power grid.
Always save contracts and documents with the network company, including issued specifications. This will help you assert your rights in court and recover damages.
In SNT
You can do everything yourself or trust an electrician who will install electricity in your garage for 5,000 rubles. The price may be slightly higher, depending on the complexity of the work and the distance from the electric pole.
Expert opinion
Viktor Pavlovich Strebizh, lighting and electrical expert
Any questions ask me, I will help!
The application will be considered within a month, but the time frame may take longer, so it is better to play it safe and write the application in duplicate. If there is something you don’t understand, write to me!