Author of the article
Yuri Sanaev
System Administrator. Sales manager of computers and wi-fi equipment. Work experience – 10 years. Knows everything and even more about hardware and software.
If a user wants to create a local network at home in order to have shared access to files from all devices, he may have problems crimping a twisted pair cable into 8 cores or 4 cores.
To cope with the task, let’s figure out what types there are, what wires, plugs and tools are needed. We will provide crimping diagrams and tell you which one is suitable in a particular situation.
Kinds
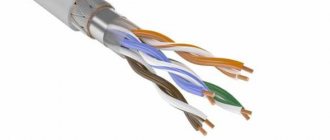
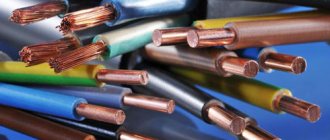
Twisted pair is a cable made of twisted copper or brass wires in a braid. It is designed to transmit signals between equipment and is connected via Ethernet connectors. Maybe with protection. The latter is made of foil or wire braiding and can be shared or paired. The first covers the cable completely, the second covers separate pairs.
Twisted pair cables are divided into several types:
| Name according to ISO/IEC 11801 | General shielding | Paired screen protection |
| U/UTP(UTP) | No | No |
| U/FTP | No | Foil |
| F/UTP (FTP) | Foil | No |
| S/UTP (STP) | Braid | No |
| SF/UTP (S/FTP) | Braid, foil | No |
| F/FTP | Foil | Foil |
| S/FTP | Braid | Foil |
| SF/FTP | Braid, foil | Foil |
An unshielded cable (UTP) is not inferior to others in terms of signal transmission quality, but under the influence of electromagnetic interference, the connection deteriorates significantly. It should not be placed near electrical wiring.
In individually shielded (FTP) cable, the individual pairs are protected by foil, making the signal impervious to external interference or crosstalk between pairs. May be located near electrical wiring.
STP (S/UTP) – shielding occurs due to copper braiding over all pairs.
Explanation:
- U – no screen;
- F – foil is used;
- S – metal braid of the outer screen.
A cable with a common shield (F/UTP, S/UTP, SF/UTP) provides good protection from external electromagnetic influences.
An Internet cable with both types of screens protects both from external influences and from cross influences between pairs. These are the types of cable F/FTP, S/FTP, SF/FTP.
Number of cores
The cable includes one core (single-core) or a series of wires (multi-core). The first type bends poorly, but has better properties responsible for the signal transmission range. It is easier to press it, fix it, it practically does not bend. Optimal for connecting internet outlets.
A wire with many cords bends better, but has high attenuation when transmitting a signal. It does not crimp well because there is a risk of breaking the insulation. It is difficult to fit into the connector and is used where flexibility is required, for example, when connecting a router and a PC or two computers.
Cable interference protection
- chemical (from moisture, gas, ultraviolet radiation);
- mechanical (external influence factors - impacts, bends, twisting);
- shielding (from internal and external radiation from technical means of information processing).
Power is the root cause of the appearance of electrical signals operating in electrical networks. Shielding helps neutralize and reduce the influence of external electromagnetic fields on the Internet cable.
- FTP - isolated. They have a single signal suppressor;
- F2TP – double protection cord with a thin metal sheet;
- S/FTP. The insulated cores are protected, the surface covering is copper weaving;
- STP – individual conductors, the entire cable;
- U/STP. Each individual wire is covered with a thin sheet of metal;
- SF/UTP. There is a double coating of copper braid and metallic paper.
For home connections, in most cases, a four-pin UTP template is used. It is unshielded and susceptible to all kinds of energy emissions operating in electrical and magnetic networks. The most secure is FTP, which resists changes in the state of the electromagnetic field of artificial origin.
RJ-45 twisted pair connector: description, characteristics and types
A network cable used to switch connections between a computer and network equipment is crimped in two ways: straight and cross, which differ in the pressing of the cores in the connector.
Expert opinion
Viktor Pavlovich Strebizh, lighting and electrical expert
Any questions ask me, I will help!
Practically, all owners of existing communication channels with the world computer system use unshielded twisted pair UTP of the fifth category. If there is something you don’t understand, write to me!
Category and containment
The cable category is important when crimping a cable for an Internet connection or setting up a local network. You need to use a category of at least CAT 5. You can see the number on the shell. There are 7 categories in total:
| Category | Number of pairs | Bandwidth, MHz | Data transfer rate, Mbit/s |
| CAT 1 | 1 | 0.1, used in telephone communications | – |
| CAT 2 | 2 | 1 | 4 |
| CAT 3 | 4 | 16 | 10 and 100 |
| CAT 4 | 4 | 20 | 20 |
| CAT 5 | 4 | 100 | 100 |
| CAT 5E | 4 | 125 | 100 (2 pairs), 1 Gbit/s (4 pairs) |
| CAT 6 | 4 | 250 | From 1 to 10 Gbit/s |
| CAT 7 | 4 | 600 | Up to 10 Gbps |
The shape, braid and color of the twisted pair matter. The classic cable has a gray color. It is made of PVC, designated by the letters PVC. It is used indoors, is cheap, but is afraid of fire and is susceptible to heat or cold.
Cables are made from polyethylene (designation PE) for laying outdoors. It is not afraid of temperature changes and moisture, and is often equipped with a support cable for tensioning the cable between supports, without fear of compromising the integrity of the cores.
Orange or bright red indicates that the cable is not lit. It is made of a low-smoke, halogen-free compound (marked LSZH). Used in premises where fire safety requirements are high. This cable is more expensive than standard PVC, but more durable and safe.
The shape of the wire can be round or flat. This does not affect the technical characteristics.
Twisted pair consists of 2 or 4 pairs (4 or 8 wires, respectively). If the Internet speed is up to 100 Mbit/s, 2 pairs are enough. If the speed is from 100 Mbit/s to 1 Gbit/s, then all 8 contacts are used.
Twisted pair, cable categories
Number Number of pairs Frequency band Data rate Application
| CAT1 | 1 | 0.1 MHz | — | Telephone network. |
| CAT2 | 2 | 1 MHz | — | Telephone and local network (rarely used). |
| CAT3 | 4 | 16 MHz | 10/100 Mbit/s | Telephone and local network. |
| CAT4 | 4 | 20 MHz | 16 Mbit/s | Local network (not currently used). |
| CAT5 | 4 | 100 MHz | 100 Mbit/s | Local network, laying telephone lines. |
| CAT5e | 4 | 125 MHz | 100/1000 Mbit/s | Ethernet local network (is the most common). The limit on the cable length between computer-switch, switch-computer, switch-switch devices is 100 m. The hub-to-hub limit is 5 m. |
| CAT6 | 4 | 250 MHz | 1000 Mbit/s | Ethernet local network. |
| CAT6a | 4 | 500 MHz | 10/40 Gbit/s | Ethernet local network. |
| CAT7 | 4 | 600-700 MHz | 10 Gbps | Ethernet local network. Thanks to the double shield, the cable length can exceed 100 m. |
Wire selection
When choosing twisted pair cable for your home network or Internet connection, it is recommended to use CAT5E cable. CAT6 and CAT7 are suitable, but you don't need to pay for them unless you really need them.
When planning a local network, it is recommended to immediately lay a cable with four pairs of cores. Two pairs are enough for speeds up to 100 Mbit/s, but if the speed is increased in the future, you will need to re-stretch the wire.
A single-core cable is suitable for Internet outlets; a multi-core cable is suitable for connecting PCs, routers and PCs.
If the cable is located away from the electrical wire, then the UTP type is suitable. Otherwise, you need to look at types of twisted pair cables with a shield that protects against external interference.
How to set up a connection in Windows 10
After all the wires are physically connected and the corresponding indication is visible on the network card and router (if equipped), it’s time to check and, if necessary, configure the Internet connection. The settings and procedure will differ depending on whether the provider cable was plugged directly into the computer or through a router. Let's consider the first case.
There is a high probability that after connecting the cable to your computer, the Internet will appear on it automatically. The network connection icon should be activated in the lower right corner of the Windows taskbar. To check your network access, simply launch your browser and open any page on the Internet. If it loads then everything is fine, otherwise read the following instructions.
Static or dynamic IP
When concluding an agreement with a provider, the choice of the type of IP address
– static (constant) or dynamic (which changes over time).
I would like to note right away that at the moment most operators provide a static IP using the DHCP
, which means that you do not need to manually configure the network settings, they will be set automatically by the provider, and the IP address will not change, your device will be bound via MAC. address. You can clarify this issue with your provider's support service.
To check whether your computer has received an IP address allocated by your ISP, you need to do the following:
- Right-click on the network connection icon in the taskbar;
- Click "Open Network and Internet Settings
»; - Go to the Ethernet
; - Click on the icon Net
. There should be a note nearby that “
Connection established
"If this is not the case, then you need to check the cable; - On the Network
, scroll to the bottom of the window to the
IP Settings
.
Make sure that IP Assignment
is set to “
Automatic (DHCP)
”; - In chapter Properties
opposite the point
IPv4 address
a value consisting of 4 numbers separated by a dot is specified.
What exactly should the IP address
depends on your provider (let me remind you, we are talking about a direct connection without a router), on whether it provides a “white IP” or an address from its internal network.
pay attention to is that the IP address should not be of the form 169.254.xx. This value indicates that the network is physically working, but the computer cannot obtain an IP address via DHCP. If you see this value, try updating the IP manually:
- Open the Run
using the Win + R key combination; - Type cmd to invoke the command line;
- Type or paste the command ipconfig /release and press Enter;
- Type the command ipconfig /renew and press Enter;
If the received IP still starts with 169, or you see the correct address in the properties of the network adapter, but the Internet does not work, I recommend contacting the support of your Internet provider. There are too many network connection problems to cover everything in one article.
If you still need to register a static IP
- Go to “ Network and Internet Settings
” to the “
Status
” tab and scroll to “
Advanced network settings
”; - Open " Configure adapter settings
"; - Right-click on the name of the network adapter and click "Properties
»; - Highlight the “ IP Version 4 (TCP/IPv4)
” option and click “
Properties
”; - Set the radio button to “ Use the following IP address
” and specify the settings provided by your ISP.
You can specify public Google servers as DNS - 8.8.8.8
and
8.8.4.4
; - Save changes with a click of a button OK
and close the settings window.
Setting up PPPoE in Windows 10
The provider can use the PPPoE
for network authentication. To configure it in Windows 10, do the following:
- Right-click on the network connection icon and click " Open Network and Internet Settings
"; - Go to the “ Dialing
” tab; - Select "Setting up a new connection
»; - In the window that opens, click "Further
»; - Click on “ Create a new connection anyway
”; - Next click High speed with PPPoE
; - Enter your username, password (data provided by your provider), connection name, check the “Remember this password
»; - Click "To plug
».
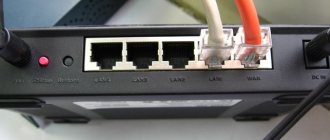
Setting up the Router
After connecting your computer or laptop to the router with a cable, you may need to configure the router. However, if you connected the wires to the correct connectors on the router, as shown in one of the previous sections, and your provider allows you to receive IP address settings automatically via DHCP, then most likely the Internet will work immediately on your computer. If this does not happen, you will still have to diagnose the network connection and, possibly, adjust the router settings.
Since there are a huge number of routers, their settings interfaces can differ significantly, to obtain guidance on setting up specific router models, it is best to refer to the corresponding instructions. For example:
Setting up the D-Link Dir-300 router
How to set up a router without a computer
In this article, I will show the minimum steps for diagnosing an Internet connection via cable through a router.
- cmd
command line ; - Paste the command ipconfig /all into the window and press Enter;
- In the resulting output, find the Ethernet Adapter section, in which you will find the IPv4 address
and
Default Gateway
;
Many routers with default settings distribute local addresses from the network 192.168.0.0
or similar.
In this case, you will see the adapter IPv4 address value is 192.168.0.2-254
and
the Default Gateway
is
192.168.0.1
or similar.
If you see such addresses on the screen, this means that a network has been established between the router and the computer and you can go to the router itself to configure it by specifying the Default Gateway
.
In my example, the computer address is 10.0.2.15
and the gateway
is 10.0.2.2
.
Similar addresses are also used in local networks. If you see an address that starts with 169.254
, try updating it as described above.
You can check your network connection using the ping
.
Type ping_Default_Gateway IP
and press Enter, for example:
- If the gateway pings, then the connection between the computer and the router is working;
- Try to ping the address 8.8.8.8, if it responds, then there is Internet access, otherwise the router cannot access the external network or there is a problem with NAT;
- If the address 8.8.8.8 responds, then check the availability of the node by domain, for
example ya.ru. If packets do not arrive when pinging a domain, then there is a problem with the DNS settings.
Tools
To crimp an Internet cable at home, you need not only wire and connectors, but also a specific tool.
Cable
The stability of signal transmission depends on the correct choice of cable. You need to select a twisted pair cable of category CAT 5E and higher, preferably with four pairs. A wire with a fireproof braid will be more durable and reliable. Flat or round, it doesn't matter.
You need to consider where the wire will be located. If it is not put away in cable channels and is simply stretched around the room, the UTP type is suitable, otherwise you need to consider more expensive types of wire with a common shield or pair protection.
If you need to connect two PCs or a router and a PC with a cable, then a stranded wire is selected, but for ease of crimping it is better to use a single-core wire. For sockets - with one core.
Connector
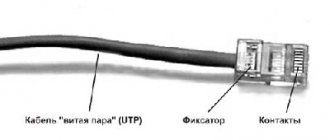
In addition to the wire, you need to prepare a switching element, also known as a connector or Ethernet plug. Often referred to as RJ-45.
Many connectors have a similar design. Their body is made of transparent plastic for visual control of the crimping process. There is a latch on top that allows you to secure the plug after installation in the port. At the back there is a connector for cable entry, a little higher, on the case there is a fixing bar that ensures a reliable connection.
Inside, the connector consists of eight channels, the diameter of the cores. They go to the end wall of the plug, where there are 8 separate contacts. Initially, they are raised up and do not prevent the cable from entering through the channels until it comes into contact with the end wall. Each has pointed protrusions on the bottom.
When crimping, the contacts move down, pierce the insulation and establish a connection with the conductors. They are recessed flush with the surface of the connector and form contact pads for connecting to the port of a router, PC or other device.
Some connectors have auxiliary inserts that make it easier to correctly insert the cores into their positions under the contacts.
When purchasing connectors, you should also buy a protective cap. It is cheap, but it will protect the LAN cable from being bent, the latch from breaking, and the port and plug from dust.
Crimping tool
The following tool is used to crimp twisted pair cables:
- Crimper. These are crimping pliers. To crimp a connector, place the edge of the wires into them, then install the connector into the socket on the tool and squeeze the handles until they click. You need large pliers (light pliers break quickly), but comfortable and light so that your hand does not get tired. The crimper halves must be even in relation to each other, otherwise the plug will break during the crimping process of the wire.
- Stripper. A tool for cutting cables, stripping insulation, or otherwise working with it. Much more convenient than a simple stationery knife.
- Tester or multimeter for crimp diagnostics.
It is not necessary to use a professional tool for crimping, especially if laying the wire will be done once. But with it it will be easier to complete the task, and the result will be higher.
Twisted pair pinout diagrams
There are two main twisted pair wiring diagrams:
- Straight.
- Cross (cross).
Direct crimping of internet cable
Direct scheme - used if you need to connect a PC to a hub (switch) or router (router).
Pinout of an Internet cable for 8 wires in a straight line
Cross-crimp network cable
Cross circuit - used to connect two devices of the same type - computers or routers.
Colored twisted pair pinout diagram for 8 wires - cross arrangement for communication between similar equipment
How to crimp an Internet cable at home without special tools
The crimper is a rather expensive tool, and it is not worth purchasing it for one connector. You can get by with a regular screwdriver. All actions up to the placement of the wires in the collector remain practically unchanged, with the difference that to remove the insulation, a regular wire cutting knife and wire cutters are used.
We place the convector with the wires located in it on the table with the latch downwards. Holding it firmly on both sides with your fingers, use a screwdriver to press on one contact until it completely enters the wiring, breaking through its insulation. We consistently repeat the procedure with all other wires.
Crimping schemes and choosing the right one
There are two known twisted pair connection schemes (pinouts): straight (568B) and crossover (568A).
Straight (Straigt) twisted pair cable pinouts connect various devices. This is a “router-computer”, “router-TV”, etc. scheme. A feature of direct crimping is the identical arrangement of cores in the contacts of both connectors.
Cross connection or crossover (Cross - Over) is required when you need to connect the same type of equipment. This is a “router - router” scheme, a “computer – computer” scheme, etc. The peculiarity is that at the first end of the cable the straight type is used, and at the second the wires intersect.
The second twisted pair crimping scheme for 8 and 4 cores has practically gone out of use. Most modern technology automatically recognizes the connection option and selects the appropriate switching method. Soon it will be possible to crimp an Internet cable only using the first method.
8 cores
The order of wires when directly crimping a network cable looks like this:
- white-orange;
- orange;
- white-green;
- blue;
- white-blue;
- green;
- white-brown;
- brown.
To cross-crimp a wire, use the following diagram:
- white-orange – white-green;
- orange – green;
- white-green – white-orange;
- blue – blue;
- white-blue – white-blue;
- green – orange;
- white-brown – white-brown;
- brown - brown.
The difference is that some of the couples here are crossed.
4 cores
A four-wire connection is typical for a direct crimping circuit of a twisted pair cable into 4 cores. It allows you to transfer information at speeds of up to 100 Mbit/sec. The connector remains the same, with eight channels, but to reduce network costs, a four-pin wire is used.
Color order for direct crimp:
- white-orange;
- orange;
- white-green;
- empty;
- empty;
- green;
- empty;
- empty.
Crossover Ethernet cable pinout or crossover with four-wire wire:
- white-orange – white-green;
- orange – green;
- white-green – white-orange;
- empty;
- empty;
- green – orange;
- empty;
- empty..
How to crimp a twisted pair onto 4 and 8 cores
There are two main wire layout standards - T568A and T568B. In addition, it is possible to transmit an information signal using only four wires instead of eight.
Crimping twisted pair 8 cores - color scheme
The order of the wires is regulated by two standards: T568A and T568B
What is the difference between the T568A and T568B standards? Let's start with the fact that at the moment the newer T568B standard is almost universally used. It was originally developed to provide feedback to uCoz, a website management system from the uKit Group. However, at the moment, publicly available protocols have become so widespread that the T568B standard is used in PC network settings as a predefined template.
Crimping twisted pair 4 cores - color scheme
UTP (twisted pair) cable consists of four pairs of wires with unique color coding. The local network of the Ethernet 10/100BASE-T standard for transmitting information via Internet communication protocols (TCP/IP v4/v6) used only two of the four pairs - orange and green. The remaining pairs, brown and blue, are used to transmit data from other network applications. For example, in fax-modem connections they are responsible for the telephone.
Crimping procedure
The procedure for crimping a twisted pair onto 8 RJ-45 wires:
- Measure the required wire length.
- Make the cable even by biting off a few millimeters from each edge.
- Carefully cut, retreating 1.5 - 2 cm from each edge, to remove the insulation.
- Bend the cable several times in different directions from the cut.
- Separate the insulation that has separated during bending from the cable.
- Remove the shielding, straighten the wires, bite the wires to the same length.
- Lay out the wires using one of the crimp types.
- Connect the twisted pair to the connector, arranging the wires in the correct order into the channels close to the side of the connector.
- Insert the plug into the connector on the crimper.
- Holding the wire, squeeze the handles of the tool to crimp the network cable until it clicks.
After installation, you need to check whether the crimping is done well.
Crimping the network cable
There is one more nuance; we need to decide which of the two options we will use to crimp the cable.
Straight - this cable is suitable for connecting a computer to a router, for a regular Internet cable, etc. We can say that this is a standard.
Read also: Indesit refrigerator constantly works and does not turn off
Crossover (crossover) - this option should be used when you want to make a cable to connect two computers directly. I wrote more about this in the article How to make (crimp) a crossover?
Straight cable (diagram)
See also:
Crossover cable (diagram)
Take the cable and remove the top insulation. Simply stepping back about two centimeters from the beginning of the cable, we make an incision in the top insulation; in a tool like mine, there is a special hole into which we insert the cable and simply twist the crimper around the cable. Then remove the white insulation by simply pulling it off the cable.
Next we observe four pairs of twisted strands and a thread. We cut off the thread; we won’t need it.
Now we unwind all the wiring so that they are one at a time. We pinch them with our fingers and arrange them in the order we need, depending on which cable you are crimping. See diagrams above.
When all the wires are aligned correctly, you can still trim them a little if they turn out to be very long, and it won’t hurt to align them. This means that when everything is ready, we very carefully and slowly begin to insert these wires into the connector. Make sure that the wires fit into the connector correctly, each into its own hole. Once the cable is inserted into the connector, double-check that the cores are positioned correctly, then insert the connector into the crimper and squeeze the handles.
That's it, the cable is ready.
I hope that my article was clear and you were able to crimp the network cable. If something is not clear or doesn’t work out, then ask in the comments and we’ll figure it out.
If you replace a broken tip on the provider cord or if you want to connect the PC to the router using twisted pair, you will need to crimp the cable.
Tool-free crimping
If there is no crimper, you will have to use existing tools, for example, a screwdriver. The braid is removed with a simple sharp knife. You need to act carefully so as not to spoil the integrity of the core insulation. The contacts are cut to the appropriate length using side cutters.
To properly crimp a twisted pair, the wire is placed in the connector and clamped with a strip so as not to be pulled out by negligence. Next, you need to lay the connector on a flat surface and use a slotted screwdriver to press the contacts one by one so that they push through the insulation and cut into the cores. Now you should make sure that all contacts are pressed in completely and are at the same level.
Using special self-crimping connectors
There are self-crimping connectors that do not require tools other than those used to remove braiding and insulation to crimp a twisted pair of 8 cores.
The principle of crimping using such structures is simple. You need to open the connector and insert the wires into the grooves from above (the connectors are painted in different colors, so it is impossible to make a mistake with the correct location). Then close the halves. The wires will be pushed onto the contact blades. Now the connector can be used.
To crimp the network cable we need:
- The network cable itself , immediately measure out the required amount of cable.
- Connectors . In theory, you only need two, but I advise you to buy more, just in case :). They are not expensive, and you can buy them at any computer store, just like a cable.
- Crimping tool . There are several options here, ideally you need to buy a special tool, a crimper . Like the one I have in the photo above. I bought mine for 75 UAH. (300 rubles). If you don’t have such a thing, you can use a screwdriver, but I don’t recommend it.
- If you crimp with a screwdriver, you will also need a regular knife to strip the cable.
Well, let's get started.
Examination
After connecting the device to other devices or connecting to the local network, you need to check how the created line works. The simplest way is to connect the Ethernet connector to the PC and make sure everything is functioning.
Professionals use cable testers or LAN testers. They include two blocks and allow you to diagnose cables distributed in different rooms. Both blocks have ports for installing connectors. After connection, the device starts up and checks each wire, as indicated by LEDs with serial numbers. If there is a break, then you can see where the damage is or where the crimping was done poorly.
At home, a multimeter is used instead of a tester. It is set to ringing or low resistance (200 Ohms). After this, each wire of the same color is diagnosed on two connectors placed next to each other. Thin probes are needed to accurately touch the contacts. To do this, you need to sharpen them or install wire tips.
It is also easy to check the cable with plugs in different rooms with a multimeter. In the ports of the connected devices there is an induction coil connecting the wires of one pair, so there is conductivity between them. You need to insert a connector into the port of one of the switched off devices, and check the conductivity on the second connector. For private lines (up to 100 Mbit/s), only two pairs need to be dialed.
Couples tend to have similar resistance. If the difference is large or the value is very high, if the line cannot be dialed, this indicates that the wires were crimped incorrectly.
How to crimp an rj-45 cable correctly?
First of all, you need to purchase the twisted pair cable itself of the required length and 8 pin connectors. You should also buy or borrow the necessary tools from friends. If you couldn’t get a specialized tool, you can make do with improvised equipment. Let's talk first about the tool itself.
Selection and preparation of tools
The selection of tools can be done in two directions: for professional activities; for personal needs. Those who are engaged professionally will purchase the following equipment:
- crimper;
- stripper;
- tester;
- twisted pair cable termination tool.
Depending on the complexity of the tool, a crimper (crimping pliers) is capable of cutting a cable, stripping wires, crimping sleeves, lugs, and plugs. For this purpose, knives and a pressing clamp with different types of grooves are built into its body. To remove insulation from wires, there are special recesses of different radii.
The stripper allows you to safely remove insulation from wires or cut cables. In addition to the cutting edge, it has sockets of different diameters into which a wire of a suitable diameter is inserted.
The tester is designed to check the correctness and quality of pinout and crimping. The devices are available in varying complexity and functionality. The simplest one consists of two parts. Each part is connected to one of the cable connectors. A signal is received from one part, the other part receives it and shows the quality of work by turning on the LEDs in a certain order.
The latter tool contains a number of application devices that allow you to quickly and efficiently cut the cable. If you don’t have such tools, you can get by with an ordinary knife and screwdriver.
Direct pinout, marked as 568V
Direct layout is used to connect a switch, router, hub with your computer. This method is the most common in our country. In the picture below you see how the wires of a twisted pair consisting of 8 cores should be positioned in the connector.
If you look closely at this diagram, then you will understand why it is called straight. This is due to the fact that the crimping can be done identically on two RG 45 connectors.
Crossover pinout, marked as 568A
A crossover circuit is used when they want to connect a computer to a computer directly or a switch to a switch. Therefore, if you need to connect two devices over a network, this method is just right for you. An example of what the cable pinout should be for an 8-core twisted pair is shown in the photo below.
You can see that on the second plug, the wires are reversed, hence the name - crossover circuit.
Direct crimp from 4-core twisted pair (two-pair wire)
Two-pair cable is also often used by Internet providers for indoor installation. Two pairs are enough to pump 100 Mbit/s, but the cost of such an Internet cable is much lower. The procedure for crimping this twisted pair is shown below in the picture.
The disadvantages of such a cable are that it is impossible to supply power to the device, since there are only 4 wires. Therefore, if you need to transmit power in addition to the information signal, then buy an 8-core cable. See also the article on how to remove the password on Windows 10, 8, 7.
RG-45 twisted pair cable crimping circuit with PoE, standard - IEEE 802.3af
This circuit will allow, in addition to the information signal, to transmit the supply voltage to a switch, router or any other device. Thanks to this, you will not need to buy a separate wire for power supply. In the rj-45 connector pinout, blue and brown wires are used to supply electricity. You may ask, where can we use this? I answer: when installing video surveillance, supplying electricity to the switch. Many of which are designed to receive power from the rj-45 connector. And so on.
Remember! It is strictly forbidden to supply 220 V via a network cable; it is not designed for such a high voltage. The consequences may be unpredictable. The standard diameter of the network cable is 0.51mm, this makes it possible to pass voltage up to 1.5 A. If you need to pass more, then connect the two wires in parallel, then you will get a 2-fold increase (3 A).
Cross-circuit for pumping speed of 1 Gbit/s
To achieve a 1 Gbps connection between devices, you need to use 4 pairs (8 wires). See an example of compression below.
You might be interested in this article about how to enable bluetooth on a Windows 7, 10 laptop.
Console cable crimping diagram (rollover cable)
In this option, you need to crimp one end of the twisted pair in the opposite way, in relation to the other end. It looks like you turned it over and looked at the plug on the other side. This compression scheme is used when you need to configure a router or switch using a PC. Most often used for Cisco devices.
Secrets from installation practice
A few tips for laying out cables for the Internet and crimping twisted pair cables:
- It is most convenient to straighten the veins and place them with a pencil or pen. The wires are smoothed out and placed close to each other, which is what is required for their installation inside the connector.
- The cable insulation must fit into the connector and be clamped. This will avoid possible breakage of the connector.
- After crimping the connector, you need to make sure that the wires are seated tightly in the connector until it stops. This will avoid bad contact.
If possible, it is better to buy a crimper or ask someone for it. It is more convenient to use than a regular knife, and it will not damage the insulation of the cores.
You can do twisted pair crimping yourself if you know the procedure and understand what is required. It is important to do everything efficiently, otherwise a poor-quality connection will cause a poor signal and regular connection interruptions.