The main difference between computer sockets and regular ones is that they have a type of wire called twisted pair. What does this mean? This means that the outlet has 8 copper wires twisted together in 4 pairs. It is with the help of these wires that all electrical interference is safely suppressed, and high data transfer speeds are ensured (up to 1000 Mbit/sec).
This socket has a design that is distinctive from other types of sockets and a special connector (the most commonly used connector for a network socket is RJ-45).
Connecting a power outlet with such an interface is quite simple, especially if there are detailed instructions for this process. Network sockets can be both hidden and for open installation; if you suddenly need to install it in a place with high humidity or in the open air, then you need a surface-mounted Internet socket.
Connecting the Internet outlet
The general procedure for connecting an Internet outlet is as follows:
- Insert the outlet mounting box into the wall.
- Thread a twisted pair cable through the top hole of the box.
- Strip the cable 2-3 cm. You will see four twisted pairs - eight multi-colored wires. Unwind them and straighten them out. Proceed with caution - they are easy to break.
- Open the cover of the terminal block (main socket block) and connect the wires in accordance with the markings. On the case you will see two different markings - A and B. To connect to the Internet, we will use marking B. Marking A is more suitable for connecting PC to PC. We will look at the features of connecting sockets from different manufacturers below.
You need to insert the wires into the corresponding slots
If you don't have enough length of wires to pass them through the required openings, just strip the cable a little higher
The socket is fixed in the box using spacer screws
The front panel holds a decorative frame
Video: how to connect an Internet outlet
Legrand
To connect a Legrand internet outlet, follow this diagram:
- Rotate the white lock clockwise 90 degrees. It should be perpendicular to the body.
Almost all Legrand sockets are equipped with such a latch
This is where we will connect the wires
The cable hole is located in the center of the white ring retainer
The result of your work should look like this
Protruding long ends of the wires need to be cut off
The Viko socket is designed quite simply - in the main block there is a “chair” with grooves that are marked with the required colors. Access to the “chair” is closed by a regular plastic latch, which can be opened with your fingers. Your task is to insert suitable cores into the appropriate slots. Then you just need to close the plastic lid by pressing it firmly with your fingers.
Viko does without unnecessary tricks and fasteners
Video: installation of Viko socket
Lezard
Lezard, like Veko, does without fancy latches. But still, the place where the cores are attached is quite well protected:
- Take the main socket block. You will see on top of it a small plastic cube with small holes for the wires. We need to take it off.
The required block for the cores
A block with inserted cores looks like this
Video: installation of Lezard socket
Schneider
Connecting a Schneider socket is no different from Lezard - you just need to remove the cover with a screwdriver, route the wires and close the cover.
Schneider sockets are also equipped with a simple, strong latch cover
Video: installation of a Schneider socket
How to connect a computer wall socket
Manufacturers produce information sockets with tips. They are placed inside the products. They allow you to learn how to connect an Internet cable to an outlet. Manufacturers place a colored sticker inside the product body with a diagram of how wires are connected to terminals according to standard “A” and “B”.
To connect an Internet outlet in Russia, scheme “B” is used. To begin with, the case is fixed to the wall so that a twisted pair can be inserted from below and a connector can be connected from above. Then perform the following actions:
- Insulation approximately 50-70 mm long is removed from the end of the Internet cable. In this case, you must not damage the protective layer on the conductors.
- The twisted pair is inserted into a plastic clamp and fixed so that only multi-colored wires remain below the fastening element. In this case, the cable is secured along the edge of the main insulation of the wire.
- Multi-colored conductors are connected to microknife contacts in accordance with the connection diagram of the Internet outlet. You need to try to reach each of the cores to the bottom of the contact. If you succeed in doing this, then you will hear a click. This sound means that the conductor is installed correctly and its insulation has cut through. If clicks are not heard, each multi-colored wire is forced down to the bottom of the contact assembly using a flat-head screwdriver. You can also use the non-sharp side of the knife.
- The protruding ends of the connected conductors are cut off.
- The internet socket cover is placed on a fixed base with a connected contact group.
Even an inexperienced person can connect an Internet outlet. The job is usually completed in a few minutes. Short video instruction:
Pinout of RJ 45 Legrand socket
But in order to implement such a scheme, you need to connect those ends of the cables that go outside in the room to a special Internet outlet into which a patch cord will be plugged in to connect to the computer. I will tell you using the example of the popular Legrand model, a well-known manufacturer of various small items for repairing indoor wiring. This is how it looks externally when assembled and already installed on the wall.
And here it is - disassembled.
To connect cables to it, you must first remove the braid and disconnect the twisted pairs from each other. At the same time, be careful not to damage the cables; they are very thin and easily break even with a small cut. After this, we take the socket and turn the latch so that the top cover to which this latch is attached is removed.
Legrand socket connection diagram (RJ-45)
How to do this is clearly shown in the manufacturer's official diagram. Just before doing this, pay attention to how the colors of the wires are located in relation to the base mount, so that later, when installing it in place, you do not put this box upside down and thereby confuse the cables. In the model I am describing, the blue color is directed towards that part of the base of the rosette that is located on the “elevation”, and the brown color is on the lower part.
After removing the top part, we insert our network cable from the side of the white latch - so that the braid goes inside it to prevent the colored wires from bending. Now let's look carefully at this little gray box. It has special grooves for these cables, and on the outside there are color and numerical designations indicating which wire should be fixed in which color. Confusion for beginners is caused by the fact that in these color designations the manufacturer tried to combine both type “A” and type “B”. Both of these types with color numbering are demonstrated in the instruction picture above. So, it will be easier to navigate by matching the wire numbers marked on the connector with the cell numbers on this box for crimping the socket.
In this case, you need to choose exactly the type with which the opposite ends of the cables with connectors that will be connected to the router were or will be crimped, that is, both ends must have the same crimp type - either A or B.
We decided on the type and after that we arrange the colors according to the numbers on the socket. I would like to point out that there was an error in the official instructions - in the picture, brown and white-brown are reversed in relation to the actual color of the socket.
Next, we take the box with the inserted wires and easily place it on the base of the mount - while remembering that the blue colors look towards the elevation. And we tighten the latch until it clicks - at the same time, sharp contact plates cut through the braid and the wires are connected to the contact cores on the external connector of the socket. It should be noted here that this does not always happen correctly - I had cases when the braid was not cut through and one of the wires did not make contact, as a result of which the connection between the PC and the router did not work.
In order to determine this, you need to “ring” each contact for the passage of an electrical signal between the two ends of the cable. This can be done either using a universal device that is used by all electricians. Or using a special tester for checking Internet connections - I ordered one from China and showed it to you in a video review. In this case, to connect an outlet to the device, use a known working patch code, for example, which came with the router.
If everything works, then you can fix the RJ-45 Internet socket in the socket box and install an external decorative frame. That's it - turns out it's not that difficult. For starters, watch a video on how to test the performance of cables.
Types and characteristics
The main parameters of these switching devices are determined by the following criteria:
- Number of ports.
- Category.
- Execution.
Let's briefly talk about each of them.
More doesn't mean better.
One of the main parameters is the number of ports. As a rule, there can be from one to four. If you need to use a larger number of connections, it is easier to install a patch panel, but such a need indicates an ill-conceived network layout. In addition, it should be taken into account that a large number of patch cords connected nearby causes some inconvenience.
Rice. 2. Krauler 4-port external socket
In practice, when organizing an office or home LAN, one and two-unit modules are mainly used.
Category.
This parameter is directly related to the characteristics of the cable used to install the computer network. We are talking about bandwidth, which determines both the data transfer speed and the ability to use special network technologies. Below is a table that shows the relationship between category and bandwidth.
Dependence of cable technical parameters on its category
Currently, when installing a LAN, cables with a category lower than 5e are practically not used.
It should be taken into account that the category of the outlet must be no less than that of the cable being connected, otherwise there is a high probability of losses, which will negatively affect the transmission speed.
Execution.
The method of mounting the switching device depends on this parameter. There are two versions:
- for external (external) installation (such sockets are shown in Figures 1 and 2);
- for indoor installation.
Internal two-port RJ-45 socket disassembled and assembled
As a rule, the choice of one or another version depends on how the LAN wiring is done. If it is external (for example, laid in boxes), external sockets are used. In cases where hidden wiring is done, the internal devices look more aesthetically pleasing.
Separately, it is necessary to highlight the sockets that are installed directly on the box. Technically, such execution can be considered both internal and external.
Double RJ-45 socket mounted on a box
The technical characteristics of the LAN are not affected by the execution.
Modular designs.
Speaking about performance, we cannot fail to mention modular designs. This solution allows you to assemble a socket in a standard case for a specific combination, for example, install it in RJ-45 and RJ-11 modules or with different categories.
Modular socket
Preparatory work
The example uses a product from the Legrand Valena model. Since its mechanism is suitable for many series of Legrand electrical installation equipment, it has become popular among consumers.
Before you begin installing a computer socket with your own hands, you need to install a twisted pair cable. To do this, the end of the twisted pair is brought out into the socket box.
First of all, you need to remove the back cover from the mechanism. To do this, the Internet socket must be turned back to face. This is done as follows: you need to turn the white lock clockwise (approximately ninety degrees). How this is done correctly is shown in the photo below:
After the latch has been rotated, it stands perpendicular to the connector body and the rear part of the structure is easily detached from the device. Then you need to insert the network cable (twisted pair) into the center of the back cover, which was previously removed. This is done from the latch side (outer side). After this you need to expose the veins. To do this, you need to carefully remove the protective sheath from the twisted pair.
Laying twisted pair
Before installing a socket, you need to think about laying the twisted pair:
- Decide on the point (or points) where you plan to install the Internet outlet. It should be convenient for connecting your PC or laptop to the network.
- Locate the router(s). Usually it is placed in the corridor. We will conduct further communication channels between the router and the future Internet outlet.
- If you already have communications built into the wall in your home, be sure to check their location using electromagnetic detectors. If you drill into walls “blindly”, you can damage already laid cables.
- Open up access to existing communications or create new channels. The diameter of the channels is calculated as the sum of the diameters of all laid wires, increased by another quarter.
- The twisted pair is usually laid next to the rest of the wiring, enclosed in a corrugated tube for reliable protection from damage.
- Ditch the wall at the point where the Internet outlet is connected. The size of the hole should match the size of the mounting box of the outlet you purchased. It must be connected to the twisted pair cable.
When building a wall, you need to take into account the size of the installation box.
After this, you can carry out finishing work, if planned. They are usually performed before installing the outlet.
Legrand power sockets
Due to the huge range of products manufactured by Legrand, the computer socket and connection diagram may vary somewhat. Here, a lot depends on the type of outlet, some features of installation, connection and its fastening.
And if we add here a variety of design solutions, a rich range of colors and types of materials used to make sockets, then the range becomes truly comprehensive. Let's first try to understand at least the basic criteria for choosing computer sockets.
- First of all, you should pay attention to the category of information outlet. The Legrand company produces sockets of categories 5e and 6. At the moment, the release of sockets of category 6a has already been announced, but they are not yet presented on our market.
- Let's look at the differences between these categories. Category 5e sockets are designed to transmit data with frequencies up to 100 MHz, and category 6 sockets up to 250 MHz. If we talk about data transfer speeds, category 5e sockets are capable of transmitting up to 1 Gbit/s, and category 6 sockets are capable of transmitting up to 10 Gbit/s. Considering the speed of development of information technology, it is advisable to use category 6 sockets, despite the fact that their price is slightly higher.
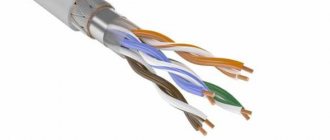
- The next quite important parameter is the type of cable for which the information socket is intended. In most cases, this is a UTP cable type, but the Legrand computer socket and connection diagram can also be designed for STP or FTP cables. This type of cable can only be used for category 6 outlets.
Note! The cable designation can be done in accordance with ISO/IEC 11801. In this case, the cable will be designated U/UTP, F/UTP or S/UTP, respectively. In addition, various additional modifications of these cables can be used.
- UTP cable is a regular cable with twisted pairs, without shielding. If there is a braided screen, the cable is designated STP, and if regular foil is used as a screen, the cable is designated FTP. In addition, there are various modifications with braiding and foil of both the cable as a whole and individual cores.
- Another factor that our instructions advise you to pay attention to is the method of fastening and mounting the connector itself. In addition to conventional connectors, an increasing number of models are equipped with quick-installation connectors. We will describe the features of connecting sockets of this type below, and you can choose a model that is more convenient for you.
Note! Sockets with LCS 2 connectors are now available. They are available only in category 6 sockets and are intended for fiber optic networks. As planned, the same connectors will be installed on category 6a models.
- Another parameter that we advise you to pay attention to when choosing is the method of attaching the connector directly to the box. This can be a clamp or screw fastening. Of course, it is easier to mount models with clamp fasteners with your own hands, but I personally have doubts about their reliability and durability. Therefore, I advise using sockets with screw fastening.
- Well, the last parameter is the number of connectors installed in one mounting box. This can be a product with 1 or 2 connectors. And here you can choose the model that best suits your needs.
Some useful tips
When using a shielded cable, you must install an appropriate socket that has a shield connection. Otherwise, it turns into a large antenna, which will immediately affect the bandwidth, and, consequently, the data transfer speed. For the same reason, you should not use an STP or FTP cable if ungrounded equipment is connected to it.
Twisted pair LAN technology requires the use of continuous lines. Twists and adhesions are unacceptable; this leads to serious losses. If it becomes necessary to extend a piece of cable, special connectors should be used for this purpose.
Rice. 12. Twisted pair connectors
These devices are a box in which a board is installed with two RJ-45 connectors (A in Fig. 12), or twisted pair clamps, like sockets (B in Fig. 12).
It is not recommended to use sockets with more than two ports in domestic conditions. A large number of patch cords in one place will cause them to become tangled. It is better to space the sockets some distance apart.
RJ-45 connector crimping
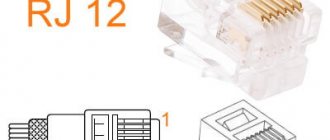
The Internet cable entering an apartment or house, most often called twisted pair, often ends in a small plastic connector. This plastic device is a connector, usually RJ45. In professional jargon they are also called “Jack”.
This is what an RJ-45 connector looks like
Its body is transparent, so wires of different colors are visible. The same devices are used on connecting wires that connect computers to each other or to a modem. Only the order of arrangement (or, as computer scientists say, pinout) of the wires can differ. The same connector is inserted into a computer socket. If you understand how the wires are distributed in the connector, there will be no problems connecting the Internet outlet.
Internet cable connection diagram by color
There are two connection schemes: T568A and T568B. The first option - “A” is practically not used in our country, and everywhere the wires are arranged according to the “B” scheme. It is necessary to remember it, since it is what is required in most cases.
Internet cable connection diagrams by color (use option B)
To finally clarify all the issues, let's talk about the number of wires in a twisted pair. This Internet cable comes in 2-pair and 4-pair versions. To transfer data at speeds up to 1 Gb/s, 2-pair cables are used, from 1 to 10 Gb/s - 4-pair. Today, apartments and private houses are mostly supplied with flows of up to 100 Mb/s. But with the current pace of development of Internet technology, it is quite possible that in just a couple of years the speeds will be measured in Megabits. It is for this reason that it is better to immediately expand a network of eight rather than 4 conductors. Then when changing speed you won't have to redo anything. The equipment will simply use more conductors. The difference in cable price is small, and sockets and connectors for the Internet still use eight-pin ones.
If the network is already wired in two pairs, use the same connectors, only after the first three conductors laid according to scheme B, skip two contacts and place the green conductor in place of the sixth (see photo).
Connection diagram for 4-wire internet cable by color
Crimping a twisted pair cable into a connector
There are special pliers for crimping wires in the connector. They cost about $6-10 depending on the manufacturer. They are more convenient to work with, although you can get by with a regular screwdriver and wire cutters.
Connector crimping pliers (one option)
First, the insulation is removed from the twisted pair. It is removed at a distance of 7-8 cm from the end of the cable. Underneath there are four pairs of conductors of different colors, twisted in twos. Sometimes there is also a thin shielding wire; we just bend it to the side - we don’t need it. We untwist the pairs, align the wires, spreading them in different directions. Then fold according to pattern “B”.
The procedure for sealing the RJ-45 connector in the connector
We clamp the wires in the required order between the thumb and forefinger. We lay out the wires evenly, tightly to each other. Having aligned everything, we take wire cutters and cut off the excess length of the wires laid out in order: 10-12 mm should remain. If you attach the connector as in the photo, the insulation of the twisted pair should begin above the latch.
Cut it so that the wires remain 10-12 mm
We insert the twisted pair with the cut wires into the connector. Please note that you need to take it with the latch (protrusion on the lid) down.
We insert the wires into the connector
Each conductor must get into a special path. Insert the wires all the way - they should reach the edge of the connector. Holding the cable at the edge of the connector, insert it into the pliers. The handles of the pliers are brought together smoothly. If the body has become normal, no special effort is required. If you feel that it “doesn’t work”, double-check whether the RJ45 is installed correctly in the socket. If everything is fine, try again.
When pressed, the protrusions present in the pliers will move the conductors to the microknives, which will cut through the protective sheath and ensure contact.
How connector crimping pliers work
This connection is reliable and problems rarely arise with it. And if something happens, it’s easy to re-terminate the cable: cut it off and repeat the process with another “jack”.
Video tutorial: crimping an RJ-45 connector with pliers and a screwdriver
The procedure is simple and easy to repeat. Perhaps it will be easier for you to do everything after the video. It shows how to work with pliers, as well as how to do without them, and do everything with a regular straight screwdriver.
Cable pinout for RJ-456 connector: basic rules
For the network to work correctly, each wire must be correctly connected to the corresponding connector socket. There are 2 main types of pinout: A and B.
When connecting a cable to an RJ-45 connector, you must select the pinout type. To do this, look into the terminal box where the cable is connected. If there is no diagram on the terminal block, you can look at the wire layout directly in the jack (power plug). If there is no access to the provider's terminal box, you will have to make the connection using a selection method. When using modern router models, you don’t have to worry too much about this, since they are adapted to work with both types of connections.
- Using a special tool or knife, approximately 3-4 cm of outer insulation is removed from the cable. It is necessary to ensure the integrity of each core. The insulation from the conductors should not be removed.
- The cores are straightened and tucked into the ports according to the selected pattern. The socket has special latches and clamps that secure the wires. In some models, the wires are fixed with a special strip and bolt.
- After crimping, the connector is inserted into the socket, fixed and closed with an outer panel.
- All that remains is to connect the power cord and check the Internet connection.
Preparatory activities
For experienced users, studying the first section of this guide is optional.
The material included in the preparatory activities is aimed at beginners. Therefore, advanced users can immediately proceed directly to the procedure for connecting an Internet outlet, which is described starting from the second section of this manual. So, the cable from the Internet provider, which enters the subscriber’s home from the entrance, in the vast majority of cases has 4 pairs intertwined with each other, which is why the nickname “twisted pair” stuck to the wire.
Each wire in pairs has its own insulation color.
They are inserted into the Legrand socket connector and crimped. It should be noted that this is the most difficult and critical stage of all installation stages.
If you make a mistake at this stage and mix up the wiring, the socket will not work. At the preliminary stage, it is recommended to practice on a simple jack; this will not take a significant amount of time, but will allow a beginner to gain invaluable experience, which will help, without damaging the socket, to install it correctly on the first try.
In addition, a cable with a jack is in any case necessary for the user when connecting, for example, a computer. The jack itself costs a penny and you don’t mind damaging it during the training phase, which cannot be said about the Internet outlet.
There are a couple of basic steps you need to take:
- The wiring must be inserted in the correct sequence into the RJ-45 jack. Through the transparent plastic of the jack you can clearly see the pinout of the colored wires;
- The wiring contacts are specially crimped. using pliers or, with a little fiddling, you can perform the procedure of crimping the connector simply with a screwdriver and wire cutters;
Correct wiring arrangement
There are two main types of wiring pinouts: “A” and “B”, but in most cases “B” is used, so a simple home user only needs to learn the second order arrangement of the wires.
If you connect all the wires correctly, then there will be no problems with the socket. The figure below shows the pinout diagrams.
Four-pair cables are widespread, that is, containing 8 colored wires (there may be another additional thin wire for shielding, but if there is one, then after removing the insulation it can simply be bent to the side so as not to interfere).
However, there are also two-pair ones, which have a lower throughput. In this case, the contact diagram will be as shown in the figure below.
In any case, the jack is eight-pin.
Crimping
It is necessary to carefully remove the cable sheath without damaging the colored insulation of thin wires (usually 5-6 centimeters is enough).
Next, you need to unwind and straighten the pairs of wires. Then arrange them according to type “B” and cut off the ends with wire cutters as shown in the photo below.
It is recommended to place the jack next to the wires, so it will immediately become clear how long the ends should be left (about 1 cm).
After that, enter them into the jack. In this case, the connector is positioned with the latch down (the latch is a latch that prevents the jack from falling out of the Legrand socket after it is installed).
All colored wires must be placed in individual grooves and the jack must be installed in the socket of special pliers.
Holding the wire with one hand, bring the special handles together with the other. tool together (you don’t need to apply a lot of force; if the installation is done correctly, the tool handles come together almost effortlessly).
Note: when the handles of the pliers are closed too hard or a cracking noise appears, you need to remove the jack from the tool and check for correct installation.
After bringing the handles of the special pliers together, the insulation will be cut off and the jack will have reliable contacts for connection.
Connecting Internet sockets (RJ-45)
Connecting RJ45 sockets (Internet) is done a little differently. For this, twisted pair is used - this is a certain type of cable consisting of one or more pairs of insulated conductors twisted together, which are covered with a plastic sheath.
Installation of RJ-45 and subsequent connection of a network cable to it is not difficult. After selecting the location for its installation, this Legrand socket is attached to the wall surface with two screws or glued with double-sided tape (they are usually included in the kit). In order to secure it with screws, the cover is removed, the printed circuit board is removed from the case in order to easily use the mounting holes in its base. To carry out this operation, the lid is squeezed with your fingers from the sides (closer to the base) and pulled towards itself. The latches will release from the base and the lid will come off fairly easily. Then, after releasing 4 latches, the board is removed. The RJ-45 base is installed and then screwed to the wall surface.
After which the fee is returned to its own place. Now you can connect the outlet.
This operation is carried out using a twisted pair cable (modification UTP-5e). It contains eight veins, which are twisted into four pairs - orange, green, blue and brown.
Sequence when terminating the connector:
- white-orange
- orange
- white-green
- blue
- white-blue
- green
- white-brown
- brown
To connect an RJ-45 model socket you need:
- clean the insulation (about 6 centimeters);
- insert the wires into the slots of the connector, in exact accordance with the color layout;
- crimp it with a special tool;
- tighten the cable to the socket itself using a nylon tie.
Installation Features
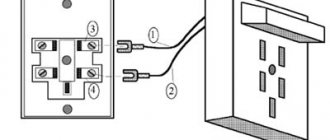
A standard socket always comes with three wires:
- Zero
- Phase
- Grounding
All of them are marked accordingly. On the socket itself (on its reverse side) on the terminals you can find stickers, each of which corresponds to a particular wire. It is impossible to confuse them if you pay at least a little attention to this process, and besides, they are always marked with a universal color marking. Accordingly, the wires must be inserted one by one into the correct terminals, not forgetting to first turn off the power. After this, the ends of the wires must be carefully trimmed with wire cutters and then secured with clamps. And don't forget to connect the ground wire in place!