Calculation of wiring and selection of apartment power supply
Before changing the electrical wiring in a Khrushchev building, we should perform at least an approximate calculation. This will allow you to correctly select the wire cross-section, the required number and rated parameters of circuit breakers and, of course, the power supply circuit for our apartment.
Electrical wiring calculation
In order to more correctly calculate the rated power of our apartment’s electrical network, it is necessary to draw up a detailed plan of all possible electrical appliances. In this case, you should take into account not only their rated power, but also their location, as well as the connection method.
So:
- First of all, you should divide all the devices in your apartment into powerful ones, whose rated power is equal to or greater than 2 kW, and low-power ones, respectively, less than 2 kW. To power powerful devices, it is better to provide a separate power supply group with its own circuit breaker in the distribution panel.
- Now we should calculate the total power of low-power devices. In this case, the calculation should be performed based on the most unfavorable conditions. That is, in our case it is necessary to take into account the largest number of operating devices at the same time.
- Now, having calculated the rated power of our electrical network, we have to convert it into rated current. To do this, we use the formula: I=P/(U×cosα), where I is our rated current, P is our rated power, U is the rated voltage, and cosα is the power factor. But in our case, cosα is practically equal to unity, so we neglect it, thereby adding additional margin to our wire.
- As a result, we get the following formula: I=P/U
Based on this, knowing that the voltage in our electrical network is 220V, we can calculate the rated current. Having carried out a simple calculation, we find that an electrical appliance with a power of 1000 W consumes a current of 4.55 A.
To further simplify the calculation and give additional margin to our wiring, we accept this value as 5A.
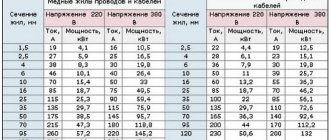
The photo shows the rated currents of wiring of different sections and materials of manufacture
Any electrical wiring in a Khrushchev-era building and its laying pattern largely depend on the type of wire used. After all, it’s no secret that copper wires have a higher throughput, and aluminum wires have less. Therefore, the choice of wire cross-section should be made according to the table below.
Choosing an apartment power plan
Now the electrical wiring diagram in the Khrushchev is selected. This is done based on clause 7.1.18 of the PUE (Electrical Installation Rules), which states that all protection devices in residential premises should not exceed 25A. This point will become the starting point for all further choices.
- So, if the power of all your electrical appliances in the apartment does not exceed 25A, then you can power the entire apartment from one machine using a copper wire with a cross-section of 2.5 mm2 or an aluminum wire with a cross-section of 4 mm2. But in modern even one-room apartments this is unlikely.
- Usually the rated current of the electrical network is more than 25A. Therefore, in this case, we need to divide the meals into groups. The power of each of them should not exceed the specified current. To do this, power groups for sockets and lighting are usually separated. But you can divide groups into rooms or in any other way convenient for you. The main thing is not to “scatter” one group across different parts of the apartment, otherwise problems may arise during operation.
Possible power supply plan for your apartment
- It is also worth remembering powerful electrical appliances, which we excluded at the calculation stage. For them, it is better to organize power from a separate circuit breaker. Moreover, if possible, it is better to do this without additional sockets. The wire cross-section and rated parameters of the switch in this case are selected based on the rated parameters of the electrical appliance according to the same principles as for individual groups.
- If you are planning to install an outlet in the bathroom, then this group should be considered separately. Indeed, according to clause 7.1.37 of the PUE, sockets in the bathroom can only be installed through an RCD (residual current device). In this case, our instructions advise that in the group with the socket in the bathroom, include sockets in the kitchen, where RCD protection will be most relevant. Although PUE does not impose such requirements on kitchens.
- Depending on the square footage and the number of electrical appliances, the electrical wiring diagram in a brick Khrushchev house can contain from two to six groups. It is better to label each of these groups immediately, and visually separate the outlet and lighting groups.
What is a scheme, how is it built and what is it like?
The concept of a wiring diagram is associated with the involvement of experienced specialists (designers), who draw clear lines of connection points only for them and the installers on standard sheets with stamps and signatures. This approach is correct, since the issue will initially be dealt with by professionals. But, given that you will have to pay a lot for their work, all this work can be done with your own hands, based on current recommendations.
Our readers recommend!
To save on electricity bills, our readers recommend the Electricity Saving Box. Monthly payments will be 30-50% less than they were before using the saver. It removes the reactive component from the network, resulting in a reduction in load and, as a consequence, current consumption. Electrical appliances consume less electricity and costs are reduced.
The electrical wiring plan for an apartment or private house should include five main types of circuits:
- Structural. This is a drawing or, more precisely, a schematic representation of the interconnections of key elements and power supply circuits from the panel, the entrance to the apartment and to the planned or existing connection points (household appliances). For greater information, pointer arrows are used, and the nominal characteristics of the elements (voltage, current, power) are also plotted;
- Functional. This is a graphical representation of the actual electrical connections between elements using the symbols adopted in state standards;
- Principled. This is the most detailed drawing applied to the apartment plan with the designation of all existing network elements from conductors to distribution points (sockets, switches) and consumers (household appliances). It provides the exact locations, dimensions of wiring, junction boxes, busbars for connecting with your own hands;
- Calculated. This is a separate connection diagram for electrical input panels. It displays the circuit breakers used (input, protective), as well as outgoing and incoming electrical wiring. It is the basis for dividing into groups - forming a single-line or group layout with your own hands. Each wire must have a designation of the brand, cross-section and number of cores, and the switch must have a rated operating current;
- Assembly room. This is an authentic display of all electrical, made by hand. The plan indicates the locations of the outputs, the direction of laying the electrical wiring cables, the location of the connecting terminals, and the characteristics of the conductors. In the practice of arranging electrical networks, installation is rarely used, especially if the work is carried out by a professional specialist.
Electrics in a two-room apartment in Khrushchev 41 m2
Conducted robots.
The issue of changing electrical systems in houses built during socialism is very relevant. If you decide to carry out a major overhaul, you must clearly understand that the existing electrics are not able to cope with the load of modern household electrical appliances. You should take the opportunity to resolve the issue with old communications. Hiring craftsmen must be taken seriously, since the quality of the work performed determines the comfortable living of the family, the safety and security of electrical appliances. The service life of the aluminum wiring has long expired, and major repairs have never been carried out. Unfortunately, it is quite difficult to carry out a complete change of electrical systems in such houses and cannot be done without special equipment.
What to consider when replacing electrics in a 2-room Khrushchev house
The work involves a specific, rather complex algorithm, so it is advisable for you to turn to real specialists. Our electricians have the skills and considerable experience in electrical installation work in two-room Khrushchev-era apartment buildings. The sequence of work is as follows; checking the entire line, searching for weak points, identifying them and discussing them. Next, a plan is drawn up; after the network is disconnected, the old electrical equipment is dismantled and new sockets and switches are installed. Based on the area of apartments and specific layouts, as well as the current state of houses and apartments, our specialists always give relevant advice and help you make the right decision on the purchase of components. For example, installing electrics in a two-room Khrushchev house has its own characteristics due to the fact that the building most often uses an old electrical network. For this reason, a serious plan for preparing projects is required; it often happens that many electrical appliances have to be placed in one room.
Number of points in a two-room apartment in Khrushchev 41 m2
| № | premises | module | Qty |
| 1 | Room 1 | switch | 1 |
| socket | 3 | ||
| output for lamp | 1 | ||
| 2 | Room 2 | switch | 1 |
| socket | 2 | ||
| output for lamp | 1 | ||
| 3 | Corridor | switch | 1 |
| block | |||
| switch | 2 | ||
| socket | 1 | ||
| output for lamp | 1 | ||
| 4 | Kitchen | sockets | 2 |
| output for lamp | 1 | ||
| 5 | Bath | output for lamp | 1 |
| 6 | Toilet | output for lamp | 1 |
| 7 | Connection to machines | 2 |
The table provides a list of electrical work for the apartment as standard (the cost of materials is not included in the price). The price of electrical installation work in a 2-room apartment in Khrushchev 41 m2 is 23,000 rubles. A more detailed price list for electrical installation work, unit prices, can be found here.
The optimal price-quality ratio is the choice of smart people.
All you have to do is call and place an order.
T.
Conclusion
The wiring diagram of a two-room apartment, first of all, should be simple and intuitive. There is no need to complicate it by scattering electrical receivers of one group throughout the apartment. After all, you now remember all the nuances of the wiring, but in a year or two it may be forgotten. Therefore, when laying wires, use only right angles, and when distributing sockets of one group, there is no need to distribute them in different rooms.
Source: Elektrik-a.su
Living spaces for people are constantly being improved. There are more and more electrical appliances that improve life. Electricity consumption increases, and the wires laid during construction are exhausted: the metal and insulation age, losing properties from overloads, heating, ultraviolet radiation and mechanical influences.
Aluminum wiring, in use since Soviet times, has long been in need of replacement. Increased safety requirements abolished the TN-C system, which did not provide for grounding of electrical appliance housings, the use of a potential equalization system, or protection against leakage currents.
Owners of old apartments do not always imagine how wires are placed in their premises, because there are many options for laying them.
Types of schemes
The main classification of electrical wiring is carried out according to the type of installation:
- open;
- closed.
The first method allows you to visually observe the passage of the routes. It is more affordable and is most often used in wooden houses.
It is more difficult to detect wires hidden in walls, floors or ceilings: they are not visible. They were laid differently in each building, but principles can be identified that take into account the construction period, wall materials, and installation technologies.
Aluminum electrical wiring of a one-room apartment
This scheme is common, has been used for a long time, is well suited for a larger number of premises, and is easy to understand and implement.
In old houses, on each floor there is an electrical panel with a meter, a packet switch to relieve voltage when working with metering devices and circuit breakers. All equipment is sectioned for each apartment separately.
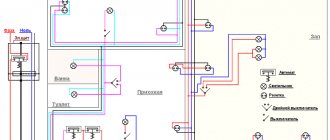
Rice. 1. Option of old electrical wiring of a one-room apartment
For clarity, the picture shows two distribution boxes in each room, but, most likely, the circuits of sockets and lighting are switched through one.
There is no grounding loop provided here. The circuit uses exclusively zero and phase, and the neutral wire should never be broken anywhere by switching devices. It is supplied directly to all consumers through distribution boxes, and is taken from the meter.
To connect the wires, most likely, simple twists with or without welding are used, although screw terminal blocks may be found. The most wires go to the place where the zero is assembled.
The phase from the meter goes to the circuit breakers. In our example, one powers all the outlets, and the other powers the room lights. If the apartment is equipped with an electric stove, then the voltage is supplied to it through a separate circuit breaker, and the wires are used with increased power: up to 10 mm2.
Variations of the scheme are possible:
- fuses are used instead of automatic machines;
- When installing wires after the meter, electricians confused the phase directions with zero (the circuit does not lose its functionality, but is more dangerous);
- a group of machines has been added and consumers are powered according to a different scheme, for example, for a corridor.
Each specific circuit should be carefully understood; it is quite possible that there will be jumpers, additional wires, even installation without junction boxes.
A simple method helps to understand the principle of circuit design:
- turn on all lighting devices and plug in electrical appliances;
- turn off consumers one by one using automatic switches in the distribution panel and observe the extinguished lamps and switched off devices in the sockets;
- analyze changes, write down or remember information, draw conclusions.
What is a panel house?
Panel houses were built back in Soviet times. They were a kind of economical option because they combined speed of construction and low cost of building materials. The panel structure was erected from reinforced concrete slabs, which were manufactured in special factories by pouring concrete into metal reinforcement. These slabs (or panels) were of two types - for floors or ceilings and for walls.
The panel structure is akin to a house of cards; each wall in it is load-bearing. There can be no talk of any redevelopment here; just touch one wall and the whole house will come together. Nowadays such buildings are rarely erected, and people don’t particularly want to buy housing in panel houses. Still, brick buildings are considered more comfortable for living. They retain heat better, have increased noise insulation, and, of course, it is much easier to carry out repairs and remodeling in them. Especially when it comes to the issue of how to replace wiring.
Separation by consumer groups
To efficiently install electricity in your home, you need to plan everything correctly. Divide all lines and sources into groups:
- Network used for lighting.
- The network used to power outlets.
- Power network (for powerful consumers).
- Network used for street lighting.
- Network for outbuildings (garage, barn, bathhouse, etc.).
These networks are drawn on separate sheets of paper indicating the dimensions of the rooms and the width of the partitions. Then a calculation is made of the required amount of cable (taking into account its cross-section), sockets and other devices.
If you are making hidden wiring, then it is laid in grooves, after which it is plastered and the entire wall is leveled into one whole. If you are doing external wiring, then it is laid after the walls are covered, hiding the cables in special metal or plastic channels.
When thinking about how to install electrical wiring in your house, consider whether you will need a voltage stabilizer. Modern networks are extremely unstable; the voltage in them can jump from 180 to 240 degrees, while for many devices the possible deviations are 5-10%.
Draw a diagram of cable routing and device placement
Wiring options for a panel house
Before changing electrical wiring, clearly decide which method is most suitable for you.
The most affordable option is to lay the wires along the surfaces of the walls and ceilings under the plaster. In this case, the cable is attached directly to the surfaces. You can pre-stretch it into a pipe: steel, electrical, plastic, corrugated plastic, or flexible metallized. Fastening to surfaces is carried out with special clips, clamps or brackets, for which you will need to drill small holes. After the conductors are secured, a layer of plaster is applied. Using this method, you can extend separate lines not only to lighting fixtures, but also to powerful household appliances (air conditioners, water heating boilers).
The disadvantage of this option is that additional monetary and physical costs will be required for plastering the surfaces.
Wiring in a panel house can also be placed on the floor if you later make a concrete screed on top. The conductors are pulled into corrugated pipes, laid on the floor and filled with concrete. The wires are also located in the suspended ceiling. The only drawback is that sockets cannot be mounted on floors and ceilings; you will still have to install them on the walls, and up to this point, trench the surface or lay wires under the plaster.
In this case, the conductors are mounted in pipes or special plastic cable ducts. It is advisable to choose places for installation where the possibility of mechanical damage to the cable box will be minimal. This, of course, is not the best option from an aesthetic point of view, but the installation of such wiring can be carried out when the renovation in the apartment has already been completely completed.
The gating method also remains relevant, only in concrete slabs it will require significant physical and time costs.
Selection of materials
On the choice of materials for electrical wiring of a two-room apartment, you also need to give several recommendations.
To avoid twisting, soldering and other unreliable issues, all connections should be made through terminal blocks. The latter are conveniently located directly in the input panel (VShch), the dimensions of which should allow this.
It is even more convenient to place an electricity meter inside the entrance panel. In this case, there will be no electrical wiring elements on the wall of the apartment hallway, except for a neat panel door, which is also locked.
In addition to the beneficial aesthetic properties of this arrangement, it provides a reliable obstacle for children who may be interested in the electrical equipment of the apartment.
There is no need to worry about the brand of cable for electrical wiring. The main thing is that the diameter of the core is the required size.
Lifetime
The service life of electrical wiring is established by departmental building codes. Aluminum wiring should be used for no more than 20 years, copper wiring can be used for up to 40 years.
That is why, when making repairs in an apartment, it is strongly recommended to replace the entire wiring with aluminum conductors with copper wiring.
When constructing new buildings, aluminum wiring is no longer suitable, but in apartments of the so-called old stock, it has most likely served its useful life. Replacing electrical wiring in Khrushchev is mandatory, since such buildings were built more than half a century ago.
In addition, the networks were designed for a load of no more than 3-4 kW, and now, with a large number of household electrical appliances, the electricity demand of one apartment can exceed 10 kW.
You can change the wiring in your apartment yourself, without the help of qualified electricians. To do this, you need to know the requirements of regulatory documents and have some work skills.
Wiring diagram
Replacement begins with drawing up a diagram of new wiring and dismantling the old one.
The wiring diagram must take into account the need for all electrical appliances in the apartment, lighting, security systems (fire, burglar alarms), communication network lines (telephone, Internet, satellite TV).
Power wiring, lighting and wiring with low currents must be laid separately from one another.
Load calculation
When developing a scheme, first of all, the maximum load from all consumers in the apartment is determined. To do this, it is necessary to sum up the power of all appliances, lighting, and electrical floor heating systems. Depending on the obtained value, the cross-section of the input cable to the apartment is selected.
To determine this value, it is necessary to multiply the maximum load by a factor of 0.9, which takes into account the probability of simultaneous activation of the entire load.
After this, the load value is divided by the value of the effective network voltage. Based on the obtained current value, taking it with a margin of 20%, using the table, the cross-section of the main cable is determined.
| Conductor cross-section, mm2 | Current *, A, for cords, wires and cables | ||
| single-core | two-wire | three-wire | |
| 0,5 | — | 12 | — |
| 0,75 | — | 16 | 14 |
| 1,0 | — | 18 | 16 |
| 1,5 | — | 23 | 20 |
| 2,5 | 40 | 33 | 28 |
| 4 | 50 | 43 | 36 |
| 6 | 65 | 55 | 45 |
| 10 | 90 | 75 | 60 |
| 16 | 120 | 95 | 80 |
| 25 | 160 | 125 | 105 |
| 35 | 190 | 150 | 130 |
| 50 | 235 | 185 | 160 |
| 70 | 290 | 235 | 200 |
Switchboard
A switchboard must be provided not far from the front door. Its purpose is to distribute the load across the premises of the apartment. Protective devices for each circuit are installed in the panel.
Bathroom premises are protected using RCDs (residual current devices) or differential circuit breakers. The cable cross-sections of each circuit are calculated similarly to the input cable, taking into account the load in each room of the apartment.
Separate lines
For an electric stove, oven, instantaneous water heater, washing machine (if the power of its heating element is more than 3.0 kW), it is necessary to arrange separate lines from the distribution board. Each line in the apartment must be protected by its own machine.
The diagram should show the wire routes, locations of sockets, switches, their power, installation height from the floor level.
For cable routing, the installation locations of junction boxes are marked.
The installation location of the consumed electricity meter is determined. In an apartment building, as a rule, utility panels are installed for this purpose on the staircase landings in the entrances.
For alarm systems, in addition to wire routes, installation locations for control panels and sensors are determined.
Practical advice. When dismantling old wiring, there is no need to rush to remove wires laid in pipes or voids; they can be used as a conductor for pulling new wiring.
Drawing up a wiring diagram
Electrical wiring in an apartment begins with drawing up a network wiring plan. Installing electrical wiring according to an existing design drawing is much simpler and more expedient for a number of advantages:
- the electrical network diagram will allow you to plan in advance the necessary equipment and facilities;
- the presence of a circuit will allow you to accurately determine the power of the input input;
- the drawing gives installation personnel an understanding of potentially fire-hazardous wiring components in order to take measures to redesign them or take additional safety measures;
- The diagram will allow installation to be carried out as planned, with verification of completion of the full cycle.
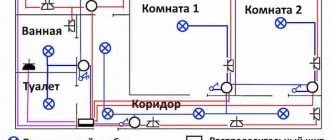
Examples of schemes for a one-room apartment
The drawing shows the competent distribution of the network load of a one-room apartment into several separate circuits with their own RCDs. Such a system will ensure trouble-free operation of the wires and correct operation of the equipment without voltage drop.
For a two-room apartment
The difference between the drawing for the installation of supplies for a two-room apartment and a one-room apartment is in the larger number of circuits in terms of wiring. Some arrangements are possible here. Figure 4 shows an example of such a circuit.
The example clearly shows several lighting circuits, as well as separately dedicated protected circuits for the kitchen, rooms and other powerful equipment.
For a three-room apartment
Figure 5 shows an example of a drawing, which is often used for apartments with three or more rooms, where a fairly large number of conductors will come out of one distribution board.
The peculiarity of this option is that there are separate circuits enclosed in separate blocks with their own protection. In this example, there are 2 blocks (25 A and 40 A, respectively). This method allows you to separate zones of cable products, making the system more convenient and practical.
Expert opinion
It-Technology, Electrical power and electronics specialist
Ask questions to the “Specialist for modernization of energy generation systems”
Apartment wiring diagram, requirements and standards, calculation, how to draw online Rated current values for each of the branches are indicated based on the technical characteristics of modern household appliances and the prospect of expanding their fleet. Ask, I'm in touch!
two-room apartment in Khrushchev
| № | premises | module | Qty |
| 1 | Room 1 | switch | 1 |
| socket | 3 | ||
| output for lamp | 1 | ||
| 2 | Room 2 | switch | 1 |
| socket | 2 | ||
| output for lamp | 1 | ||
| 3 | Corridor | switch | 1 |
| block | |||
| switch | 2 | ||
| socket | 1 | ||
| output for lamp | 1 | ||
| 4 | Kitchen | sockets | 2 |
| output for lamp | 1 | ||
| 5 | Bath | output for lamp | 1 |
| 6 | Toilet | output for lamp | 1 |
| 7 | Connection to machines | 2 |
The table provides a list of electrical work for the apartment as standard (the cost of materials is not included in the price). The price for replacing electrical wiring in a 2-room Khrushchev apartment of 46 m2 is 23,000 rubles. A more detailed price list for electrical installation work, unit prices, can be found here.
The optimal price-quality ratio is the choice of smart people.
All you have to do is call and place an order.
T.
Stage 4 – Laying new wiring
Now the most important thing is that you need to independently replace the electrical wiring in the apartment with a new, more reliable one.
We will not dwell in detail at this stage, because... We discussed the installation of electrical wiring in an apartment in detail in the corresponding article.
When the replacement of apartment wiring is completed, it is imperative to photograph the cable distribution along the walls. This is done so that if problems arise, you can easily find the damaged area using a photo.
Do not rush to cover the grooves with the solution; this should be done after all the wiring has been checked for functionality.
The video below clearly demonstrates an example of new wiring in an apartment after replacement:
Ready wiring
4
Getting started - power consumption project is required
There are few people who want to start drawing a power supply diagram, and then, based on it, a plan. It is this document that needs to be approved by the energy service. It will simplify the work and will come in handy over time when there is a need to fix something if something breaks. That is why it is recommended to keep one sample diagram for yourself.
If you don’t want to turn to specialists, because the service costs money, you can draw up a diagram and, based on it, a project yourself. There is nothing particularly complicated about this if you have an understanding of electric current and the consequences of improper handling. To compile the document, the symbols used are shown in the diagram below.
Getting to work, we draw a plan of the apartment. For convenience, you can use a squared piece of notebook paper; be sure to adhere to the scale. We mark the installation locations of switches and sockets, adhering to the rules described above. We link the sockets to household appliances, marking the installation locations next to them, so as not to use extension cords later. After this, you can begin marking the wiring.
We choose one of the options, the most optimal of which is mixed, which allows you to save material and achieve high efficiency. We divide all connected devices into several groups that have their own specifics:
lighting in living rooms, kitchen, hallway; lighting with power supply in the bathroom; sockets in living rooms and hallway; separately in the kitchen; power supply for electric stove.
Other options for dividing into groups are also possible. This is not a whim, but a way to reduce the amount of materials and simplify the design. We connect each of the groups through a machine that works only for it. This will make it easy to carry out repairs without completely turning off the electricity throughout the entire apartment. When one cable is loaded with devices, it must withstand a very high current, especially when all consumers are turned on simultaneously.
To increase safety, instead of automatic switches, we use RCDs, the use of which is especially recommended in the kitchen and bathroom.
Using symbols, on the exact plan of the apartment we plot the locations of all consumers and equipment, connecting them with lines that indicate the cable. To make work easier, we use different colors to indicate power wiring, lighting and grounding cables.
Disadvantages of partial electrical wiring replacement
If you choose to partially replace the electrical wiring by laying wires in one of the rooms, you will need to power the new lights and sockets from the old existing distribution box. It should be recalled that old electrical wiring was usually made of aluminum wires. If they are directly connected to new copper wires, electrochemical incompatibility will occur, which is unacceptable.
Of course, for this purpose you can purchase special connecting terminals, which are presented in a wide range on the modern electrical market. But you should take into account all possible difficulties associated with their use.
In addition, in the distribution box there may simply not be free space for new connections, or there may be so many old connections that fragile aluminum wires will need to be reconnected.
Certain difficulties will also arise with the uniform distribution of the load and the correspondence of the cross-section of the electrical wires in the wiring to it. If, for example, you replace the old wiring in one of the rooms, increasing the total number of “points” in it and connecting the new wiring to an existing distribution box, there will be a current overload of those wires that power this box.
The thing is that the old wiring in almost all houses is made of only one power supply group made of aluminum wires, the cross-section of which does not correspond to the significant power consumption, as well as the number of modern household appliances.
In this case, it is advisable to power the room by bypassing the distribution box. To do this, it must be connected directly to the circuit breaker in the distribution panel.
But even such a solution cannot be called universal, since wires laid to the electrical panel through the entire house (even hidden in a cable channel) are unlikely to decorate the home. And if there are no plans to renovate the house, it will not be possible to hide the wiring in grooves.
Thus, the disadvantages of partial replacement of electrical wiring include:
- an increase in electrical wiring switching points, which may become a potential source of problems in the future;
- an increase in the number of consumables, since all cables will need to be routed into distribution boxes, and with a complete replacement they go directly to the electrical panel;
- increasing labor costs and, consequently, the cost of replacing electrical wiring in general.
Before you begin a partial replacement of electrical wiring, you should stock up on tools. To perform such work, you will need screwdrivers, a hammer drill, a grinder, a soldering iron, terminal blocks, pliers, a knife, a building level, a spatula, and a phase indicator.
Replacement of wiring must be carried out in such a way that there is no overvoltage in the network and no failures occur. Therefore, each device connected to the network must have enough power.
Power directly depends on the cable cross-section. In order not to make a mistake with your choice, you should do a little calculation. First, add up the power of all household appliances that are planned to be connected to the network. After this, an additional 100 W must be added to each electrical appliance, the number obtained as a result of the calculations divided by 220.
If the final number is in the range of 12-15, then wiring with a cross-section of 1.5 mm2 will be enough to provide all devices with sufficient power. This indicator is the most common. But in some cases the result is higher. There are two options for solving the problem: lay wiring of a larger cross-section or run 2-3 cable lines from the electrical panel. The second option is preferable, since thicker wiring will make the entire system not very reliable and, as a result, the likelihood of failures will be high.
Partial replacement of electrical wiring is carried out in several stages. First, they de-energize the home, then check again that the current is really no longer flowing.
After this, they replace the wiring in the selected room and connect it to the distribution box using terminal blocks. Or, as mentioned above, they power the new wiring bypassing the distribution box, laying the wires directly to the electrical panel.
When all the wires are already connected, they are hidden in decorative boxes. Lastly, sockets and switches are installed.
Preparation for repair
Before you begin directly replacing the wires, you should draw up a detailed drawing of the new route, marking all the elements of the electrical system. It must be developed taking into account the convenient connection of all electrical appliances available on the household.
Tip 1. Remember that equipment manufacturers do not recommend connecting powerful electrical appliances to the network through power strips. Separate sockets must be provided for an electric stove, boiler, air conditioner, etc.
Tip 2. Each room must have at least two cable branches: for lighting fixtures and for sockets.
After drawing up a drawing plan, you can begin purchasing the necessary materials. In addition to the cable, you will need:
- boxes
- switches
- sockets
- rag tape
You should not use system elements that have already been used, since there is no guarantee that they have retained their original performance properties. Saving on small things can lead to problems in the future. A worn-out socket will certainly need replacement sooner or later, but if a short circuit accidentally occurs in it, the new wiring may also burn out.
To change internal electrical networks with your own hands, you will also need a set of tools, namely:
- phase indicator
- hammer drill
- pliers
- screwdrivers
- angle grinder (grinder)
- soldering iron
- terminal blocks
- knife
Having everything you need in hand, you can get to work.
When and why do you need to change old wiring?
Not all of us live in new buildings; most houses in the country were built more than a quarter of a century ago. Of course, the internal equipment of these buildings has long been outdated. Thus, wires for electrical networks in the last century were made of aluminum, a metal highly susceptible to corrosion. In addition, over time, its structure changes, and old wires become very fragile. And this greatly increases the risk of a short circuit and subsequent fire.
Old wiring has a lot of other problems:
- There is no protective grounding, which is now universally accepted. Instead, there is a solidly grounded neutral. The old wires were routed using the branching method.
- There are no RCDs.
- The number of sockets in old apartments does not meet the needs of residents.
It should also be taken into account that over the past couple of decades the number of household electrical devices in apartments has increased several times. Almost every family has various types of coffee makers, mixers, stereos, laptops, etc.
n. The load on the old electrical networks has increased noticeably and has long ceased to correspond to what was initially included in the project. And this is a direct risk of an emergency and fire.
In many homes, due to old wiring, sockets often spark and fail. When repairing them, the wires break. Due to current leakage, any wall can unexpectedly shock you with an electrical discharge. Sometimes, as soon as you plug in some powerful electrical appliance, the old wires begin to smell like melting insulation. If you notice at least one of these signs, then the old wiring clearly needs urgent replacement. If there are more signs, then you have almost no time left to think.
According to the scale of work, replacing old wiring can be:
- partial;
- complete.
Partial replacement of old wiring is justified if:
- There is damage (mechanical or from fire) to only one line of non-old wiring.
- The load on one or more lines has increased, which the wire is not able to withstand. But the rest of the wiring, like the distribution panel, can still be used.
- A major renovation is planned very soon, you just need to wait a little. In this case, you can make a partial repair of the old wiring.
A complete replacement of the old wiring must be carried out in cases where:
- Its insulation has dried out and cracked.
- If its service life has expired. For aluminum it is 20 years, for copper – 30.
- There are old sockets in the apartment or house.
- The old wiring can't handle the new power. For example, thin wires cannot cope with the load from electrical appliances that are simultaneously turned on in the apartment.
If houses built two decades ago need replacing old wiring, what can we say about Khrushchev-era buildings, many of which are “over fifty”? The old wiring was made of aluminum wire, which was not even protected by corrugation. However, it makes no sense to blame the designers: in the last century, apart from a TV and a refrigerator, a chandelier and an iron, apartments often had no other electrical appliances. And they didn’t need a powerful network.
Over time, electric stoves, microwave ovens and kettles, washing machines and dishwashers, vacuum cleaners and food processors were added to the standard set - and the situation changed dramatically. Turn on a couple of such devices at the same time in an old apartment - and the traffic jams instantly pop out. In addition, every time the network is overloaded, there is a risk of fire.
How to choose a cable?
The power of the electrical circuit inside the apartment must be sufficient to connect all devices. Replacement of wiring in Khrushchev is carried out taking into account this requirement. Only in this case can you be sure that in the future there will be no emergency situations due to network overload.
When preparing to install a new electrical wiring in a Khrushchev building with your own hands, first of all, you should correctly calculate the cross-section of the cable for laying the route. To do this you need:
- add up the power indicators of all major electrical appliances used in the household
- add an additional 100 watts to each device
- divide the resulting amount by 220
If the result is a number of 15 (or less), then a wire with a cross-section of 1.5 mm2 is sufficient for laying an internal electrical network. Otherwise, one of two things: either you need to choose a cable with a larger cross-section, or you will have to lay two (or three) wiring lines from the electrical panel.
The principle of electrical installation in a panel house
All cables are laid in panel channels that were made at the factory. These channels are specially made for easy installation of wires, and they are also placed only in certain places. In order to find longitudinal holes, you should be guided by switches and sockets. Where this fittings are located, there are channels. There is no other way to move them except to groove and knock out new holes.
Wires for chandeliers are laid through channels that are located in the ceiling. They are also installed in small spaces between the ceiling panel and the wall in those places where the ceiling molding will eventually stand. However, when replacing electrical wiring, it is necessary to take into account that even in houses of the same type or in the same house, but on different floors, the wiring can be done completely differently. This phenomenon is inherent due to the fact that several teams of electricians could work at one construction site and install cables in different ways.
Based on this, you cannot rely on the fact that the wiring requirements have been met, for example, that the switch is located under the distribution box, or that all wires are routed exactly vertically or horizontally. Such simple rules can be broken, so you should be careful and careful not to damage the old wires
In such situations, experience will help; it is important to always check before dismantling something and make sure that the cable will not be damaged
The seams located between the panels on the ceiling or those between the wall and the ceiling are also used, as shown in the photo below:
The meter is usually installed on the staircase. After all, it is very difficult to recess it into the panel so that it does not stick out. However, it can be placed on external walls or in storage rooms. Usually, a cable is laid from the meter, which is located on the landing, into the apartment to the distribution board.
Open wiring installation
We will not dwell in detail on the installation features of each individual method; they are described in detail in previous articles. Let's talk only about the advantages and disadvantages of each of them.
Appearance of open wiring
So:
- According to clause 2.1.4 of the PUE, open wiring is electrical wiring laid directly along the elements of building structures. This includes installation of wiring in skirting boards and in special electrical skirting boards.
The advantages of open wiring include:
- Possibility of installation in already renovated premises. After all, installing boxes for laying wires does not imply a large amount of dusty work and destruction of building structures.
- High degree of maintainability. After all, the wire laid in the boxes is quite easily accessible and in case of a malfunction, it can be easily removed or replaced.
- Due to the absence of the need to perform work on wall gating, the installation speed of hidden wiring is quite high. Therefore, for a small apartment, all work can be completed literally in one day.
Hidden wiring installation
Hidden wiring is electrical wiring laid directly in the elements of building structures. This includes wiring laid under the screed, in the cavities of building structures and under suspended ceilings.
Hidden wiring
The advantages of hidden wiring include:
- Thanks to its concealment from prying eyes, this method has a more attractive appearance. At the same time, he does not take away the already small space of the Khrushchev buildings.
- The electrical wiring diagram of a brick Khrushchev building does not involve the use of additional boxes for laying wires. Therefore, the price of materials is significantly reduced.
- A wire laid in a hidden way has higher overload capacity parameters. After all, brick or cement mortar have higher thermal conductivity, unlike air. This allows the wire to transfer heat better and reduces the likelihood of it burning out.
- Fire safety requirements for hidden wiring are less stringent and do not have many restrictions on use.
Distribution panel
As a rule, previously in panel houses the electric energy meter and the input machine for the apartment were installed on the staircases. Now one circuit breaker is not enough; the panel is assembled from residual current devices (RCDs) and individual circuit breakers for each group of consumers.
In principle, the counter and the input machine can remain on the site. Moreover, this is required by the energy supply organization in order to easily take readings from the meter.
You can assemble the rest of the distribution panel yourself and install it at the entrance to the apartment. In this case, it is best to use a metal or plastic special box, that is, you will have a mounted switchboard. In a panel house, making it hidden is very problematic, just imagine the size of the niche that will need to be hollowed out in a reinforced concrete slab. Choose among the materials at your discretion.
A plastic box will be more practical, it weighs less and has a more attractive appearance in terms of aesthetics. The metal box is characterized by durability and reliability. Think over the cable branching diagram from the input panel in advance.
This scheme is also convenient because if there is a need for repair work on any of the branches of the electrical network, it will be enough to turn off the required circuit breaker, and not leave the entire apartment without voltage.
Types of electrical wiring
Let's consider the general classification of electrical wiring in an apartment. Depending on the type of installation, it can be:
- Open electrical wiring - laid on the surface of the walls and ceiling outside. The fastening of wires is varied: cable duct, corrugation, baseboards, etc. The cables in this wiring, compared to hidden ones, may have a smaller cross-section. Can be stationary, portable or mobile
- Hidden electrical wiring - laid inside structures: in pipes, ducts, recesses, etc. One of the most common methods of laying cables. The main disadvantage is the lack of access to wiring. And in case of malfunctions, it will take a lot of effort to get to it. The cables in such a network have a larger cross-section. The electrical network must be designed in advance
- External electrical wiring – laying the network outside the building. Can also be open or hidden
At the design stage of the electrical wiring diagram, you need to consider:
- Installation locations for electrical panels and sockets
- Number of electrical points in the apartment
- Power of electrical household appliances that will be used constantly and periodically
- Marking of wires, and for open wiring - places of their attachment
- Basic requirements for electrical wiring - copper cables for laying the network, power supply from a 380/220 V network, TN-CS or TN-S grounding system
How much does it cost to replace electrical wiring in an apartment?
When replacing electrical wiring in an apartment, the cost of the work depends primarily on what kind of sockets and switches you plan to make - hidden or external. In the first case, wiring (as well as sockets and switches) is carried out by gating the walls. In the second case, a cable duct, corrugation, and the like are used.
Have you decided and are going to hide the wires? Then it is important to know that gating involves carrying out rough work that must be completed before finishing (puttying, wallpapering). While external wiring will not affect the finishing of the room in any way.
When replacing electrical wiring in an apartment, the price of the work depends on the following:
- Technologies for laying wiring (sockets and switches): hidden or external.
- The number of groups (machines), which is determined by the number of rooms and, accordingly, sockets.
So, you have decided how you will route the electrical wiring. Then you need to calculate the required footage of the groove or cable channel. In addition, the material of your house plays an important role - concrete slabs or brick.
If you decide to invite specialists to replace the electrical wiring in your apartment, the cost of the work is calculated individually. To do this, the master needs to see the project, look at the “field of work,” agree on deadlines, payment, and the like.
The bathroom is characterized by high air humidity and a splashed floor, which makes it necessary to take special electrical safety measures. In addition, a body steamed in hot water has a radically reduced resistance to electricity: the circuit current in this case can exceed 5A, which is deadly. The severity of electric shock depends on the time of contact and an RCD will not help in this case.
At the same time, the bathroom contains powerful consumers of electricity, including a washing machine and a water heating tank.
The operating rules for electrical installations allow the installation of sockets in the bathroom using an isolating transformer or RCD, however, to ensure complete safety, it is recommended to take the following steps:
- Electrical wires from the water heater and fan must be replaced with longer ones. The length of the cords should be sufficient for them to pass through the hole in the wall and reach the sockets in the adjacent room (most often the kitchen). The boiler does not come with a cord, and in the case of a fan, re-equipping the device only risks losing the warranty, which is of little importance due to its low cost. The wires must contain three cores and a protective conductor.
- Buy an extension cord without a cord, but with a grounding switch for three sockets. The extension cord is equipped with a three-core cord.
- Wires from electrical household appliances are supplied with European standard plugs. The cords are placed in a polyvinyl chloride casing.
- The water heater plug is permanently connected to the outlet.
- The extension cord is fixed in the bathroom with self-tapping screws.
- The washing machine is connected via an extension cord on a permanent basis. The remaining sockets can be used for local lighting, hair dryers and other small household appliances.
- The extension cord in the next room is switched on as needed.
So, with these simple steps you can avoid the presence of exposed wire ends in the bathroom, which will significantly increase the safety of residents.
The main electrical diagram of the apartment: its components
The electrical diagram of the entire apartment is usually drawn up not on one sheet, but on several separate ones. Each of them will indicate only one distribution group, so the diagram will be easy to understand and read. To do this, at the beginning, consumption sources are divided into several groups, the location of which is indicated on the diagram.
Each such group should be connected to one separate machine. This will be very convenient when repairing wiring, since it will be possible to disconnect the wiring of only one of the rooms, and not the entire apartment.
The electrical diagram of the apartment can be drawn up on a computer using a special program
A typical electrical wiring diagram in an apartment contains several components, each of them performs its own specific tasks.
Basic wiring diagrams:
- Structural . This diagram should be created very first, since it indicates the panel and its connection with electrical appliances that will be installed in the apartment.
- Functional . It depicts electrical wiring elements and the connection between them with special symbols.
- Principled . This is a more complete and detailed diagram, on which all lamps, switches, sockets, as well as household appliances are already indicated. They indicate the lines where the wire runs, as well as the locations of junction boxes and other elements, and various connections.
- Calculated . This circuit is the most important; it is created specifically for electrical panels. The electrical panel contains input circuit breakers and protection switches, with which you can turn off any consumer group.
- Assembly room . This diagram is done very rarely, since an experienced electrician will only need a design diagram.
Next, a plan of the entire apartment is drawn up, where all lighting and household appliances, sockets and switches are indicated. Each such group has its own wiring, that is, a cable that comes from the electrical distribution panel. All electrical wiring cannot be connected to this group; the bathroom generally needs to be connected to a separate line. And it also needs to be equipped with a difautomatic device or an RCD, for protection and precaution.
Stages of work
Replacing the electrical wiring in your apartment yourself requires a lot of work with a hammer drill and construction dirt. Usually, indoor wires are laid in a hidden way in grooves in the walls, which you have to do yourself. It will be necessary to tap even in a panel house; it is not always possible to insert new cables into existing cavities in the panels. Often these channels are filled with concrete in some places.
How to hide cables without gating walls
Removing old wiring
Before dismantling the old wiring in the apartment, it must be completely de-energized by turning off the general apartment switch in the panel on the floor. After this, you should check the presence of voltage in the sockets using an indicator screwdriver or a voltmeter. Only after checking can you begin further work on replacing cables.
Marking and preparing walls in the apartment
To simplify the installation of wiring throughout the apartment, you should first mark on the walls all wiring lines and installation locations for sockets, distribution boxes and switches. Then you can begin to groove and cut out holes for the socket boxes.
Marking walls for electrical wiring
Electrical wiring
It is recommended to do internal electrical wiring in a wooden house in an open way with wires laid in cable channels. And in apartments it is customary to install it hidden. It is then easier to cover such wiring with decor, and the risk of damage to it subsequently is minimal. Fixation of electrical wires in the grooves is done with dowel clamps or gypsum mortar.
Placement of electrical appliances in the corridor
Installation of protective systems
In many old high-rise buildings, it is basically impossible to lay a three-core wire with a grounding conductor from the panel to the apartment. This is not provided for in the project. But in some apartment wiring there is a two-wire one, but it can be easily changed to a modern three-wire one. You just need to connect everything correctly in the panel on the floor.
The possibility of converting the Soviet TN-C electrical wiring to a more reliable version TN-S or TN-CS should be checked with the housing office electricians. Changing anything on the floor panel yourself is strictly prohibited. You can do this grounding in a private house yourself; in an apartment building everything is much more complicated.
The calculation of the parameters of RCDs and automatic devices should definitely be entrusted to a specialist in this field. Mistakes here can lead to serious problems.
Connection diagram for the security system in the apartment
Connection to the panel
If you have an electrical design completed by professionals, then it is not difficult to assemble protective devices based on it in a panel on the floor. However, it is best to entrust this task to an invited electrician, who will also then ring the system to check its functionality and the absence of short circuits.
Where to look for wiring
Wiring in panel houses is laid in special channels inside the panels. They are provided for by the design of the slabs. In the figure below you see several examples of typical channel locations in Khrushchev.
You may notice that the channels are located at an angle, and not always vertical or horizontal as is commonly believed. In addition to these channels, it is possible to lay wires in beams under the ceiling. These beams resemble curbs that extend above the wall surface at the corner of the ceiling slab.
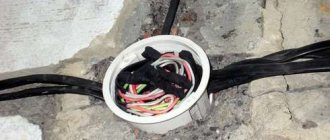
Wiring requires connections, so you also need to find the location of the junction boxes. They can be open - protrude slightly above the wall, then their contents are hidden behind a plastic cover, or they can be plastered.
In a one-room apartment there may be only 1 distribution box, which is accessible without removing the wallpaper.
In this case, to find the junction box you will have to not only remove the wallpaper, but also possibly tap the entire wall along the ceiling corner until you hear the characteristic sound of emptiness. After which this place simply breaks through. They do the same on the ceiling. We talked in detail about how to find a junction box in a separate article.
Once you have found all the boxes and sockets you can evaluate how the wires are routed. The picture below shows the appearance of the wiring channel at the bottom of the ceiling junction box.
By the way, Khrushchev buildings can be divided into two types. The first is houses with load-bearing external walls, that is, those that have windows, and the second is with load-bearing internal walls. In any case, concrete slabs are a load-bearing structure, and those that do not perform a load-bearing role are stiffening ribs, more on this below.
Replacing electrical wiring in a Khrushchev-era building requires at least an approximate knowledge of where it may be (where the cable runs), as well as knowledge of typical diagrams. The electrical diagram of the apartment depends on the number of rooms. In general, the following situation emerges: in each living room there is 1 lamp and 2-4 sockets (depending on the area), while in small rooms, about 10 square meters. m. maybe even 1 socket.
The main characteristics of electrical wiring today
In the late 90s there was a big breakthrough in the world of household appliances. People began to have new televisions, microwave ovens, computers and audio systems. Therefore, the wiring became a little more complicated, although the principle of operation remained unchanged.
What does the apartment layout look like?
Difficulties arise from the moment of the first step - planning the drawing. In order to carry out a wiring plan in the house, you will need to find out the approximate power of all appliances in the house and choose their convenient location. The lighting group is also thought out at the plan development stage.
Attention! In addition to the huge number of new devices, another difference has emerged: along with the power network there must be a low-current group; usually telephones, PCs or intercoms are connected to it. Wiring under the floor screed
Wiring under the floor screed
The two types of these networks cannot be divided, because all devices operate from 220 V power sources.
The number of devices and wires used simultaneously has also changed. If in the 90s it was enough to connect one floor lamp in the living room, now many people use a lighting system with chandeliers, LEDs and lanterns.
To increase the number of devices, it is necessary to add an increase in power - therefore, it is necessary to replace the old wiring so that it can withstand the voltage. If the voltage in the house constantly fluctuates, then you can purchase a special stabilizer. Thanks to him, the devices will not fail.
Where to start
As a rule, at the first stages of renovation, people usually have little idea of the final result. And for proper electrical wiring, it would be very desirable to present it. Since the functionality and logic of the location of sockets, switches, lighting, and, in general, all wiring in general will depend on this. The electrical wiring diagram in a private house or apartment should always start the same way, with drawing up an electrical plan. And that's why. Let’s say you made a repair, but didn’t think much about the end result, as the electrician advised, so you did. All is ready. We put the furniture in its place, arranged the consumer electronics, and what did we get? Catastrophe! All sockets turned out to be in cold reserve, one was blocked by a closet, another by a sofa, a third by a chest of drawers and a fourth by a bedside table, even near the TV and favorite stereo system, as by the law of meanness, there were no sockets within a radius of 3-4 meters. And here begins a very fun and exciting game called, scatter extension cords and pilots throughout the apartment. The question is, why did you make new electrical wiring so that you could then walk around and trip over extension cords? Of course no. And in an apartment, this is half the trouble, but an incorrectly executed electrical wiring diagram in a private house promises more global consequences. After all, if in apartments, wiring changes on average every 20-25 years, then in private residential buildings, much less often or never at all. And how many extension cords will be needed for a two or three story house, but you still need to buy them, how much money will be spent? And how many nerves will be wasted every time you next trip over the pilot wire lying on the floor.
What to do? Sit down and think calmly, decide on the arrangement of furniture and household electronics. Be sure to note what new electrical appliances you plan to purchase in the coming years. For example: an air conditioner, a dishwasher, a freezer, an electric water heater, an electric oven or hob, and so on, and where, after these acquisitions, existing cabinets, sofas and bedside tables can be moved. Consult with your family, wife and children; in practice, their advice turns out to be very helpful.