More and more household appliances are appearing in modern apartments: dishwashers, coffee machines, toasters, heaters and other joys of civilization have become part of our everyday life. Often in houses built before 2000, the electrical wiring is not adapted to such intensive work, because it often happens that many electrical appliances work simultaneously.
In some cases, after purchasing a new apartment or at the time of modernizing an existing home, it becomes necessary to replace the old electrical wiring with a more powerful one if it cannot cope with the load from modern household appliances. This article is about where to start and how to carry out this work.
First you need to analyze the old wires and decide on the following:
- Check the presence of a grounding loop in your area. If it is not there, you should contact your local management company so that they can carry out the appropriate work to install a grounding system. Read about how to make grounding at your dacha in a separate article on our website.
- Is it possible to leave some of the old cables in some rooms? For the bedroom and living room, a complete replacement of the electrical wiring may not be necessary, but if you plan to install warm floors or an additional lighting and heating system, you cannot do without dismantling the old wires.
- Can you do the electrical installation yourself or will you still have to call a specialist? Replacing electrical wiring in a house is not difficult, but it requires some knowledge.
How to choose a machine?
Circuit breaker - designed to protect residential and industrial premises from short circuits, which can cause rapid electric shock to a person. The principle of operation is as follows: in normal circumstances, when the functionality of the devices and cables is in ideal condition, the switch passes current through itself. But, when one device suddenly fails or the incoming current exceeds the rated value, the circuit breaker immediately trips and the network opens.
Net
Usually in apartments, in front of the meter, an introductory machine is installed. One switch for each room and a separate circuit breaker for the electric stove and lighting lines.
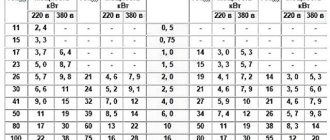
To correctly select circuit breakers for outlet lines, it is necessary to start from the cable cross-section.
If you plan to install one consumer on the protected line, you should select the amperage based on the power of the device.
Table for selecting machines (maximum values are lowered by 1 - 2 points for your safety).
| Cable cross-section | Current, A, cable or wire | ||
| Number of cores –> | 3 | 2 | 1 |
| 1,5 | 19 | 20 | 22 |
| 2,5 | 25 | 26 | 29 |
| 4 | 35 | 38 | 40 |
| 6 | 43 | 49,9 | 49 |
Instrument panel for replacing electrical wiring in a private house
The second important element of the electrical installation is the main one. distribution board. Here, the power is divided into separate electrical circuits and distributed through cables throughout the house. The board also contains fuses, protections and other devices for the correct operation of the installation.
Dashboard upgrade
In many old houses, such shields have been modernized. Instead of fuses, you can find newer circuit breakers, supplemented with a residual current device. It protects against electric shock not only in case of direct contact. For example, with a device body with insulation damage. But also if you touch a live wire or terminals in a socket or switch.
The operation of an RCD is based on a comparison of the current flowing in the phase wire and the neutral wire. And if there is a significant difference, quickly turn off the power source. Residual current can also result from breakdowns caused by damaged cable insulation or moisture in electrical devices. Most often this concerns old equipment operating in conditions of high air humidity. Then the switch may cut off the power very often.
Label the distribution board. Each fuse must have a circuit name. If the board shows signs of burnout, loose cables without covers, or sloppy rework. You cannot use it and during the repair period you must run a portable switchgear that will ensure safe operation. It's a good idea to find out if the previous homeowner took mandatory (every 5 years) measurements of safety, cables and fixtures. If not, use the installation carefully.
Today, the fuse block with fuse links does not meet basic safety requirements. The new switchgear must be equipped with adequate protection against overvoltage, overload and electric shock.
Home renovation is not only an opportunity to change electrical equipment, but also a good time to move sockets and connectors to a convenient location.
How to choose a wire?
On the electrical products market you can find a huge variety of cable products with a core cross-section of 0.30 mm2 and above. Therefore, wiring in the house requires a special approach.
An incorrect calculation of the rated power of all electrical appliances will result in the purchase of an unsuitable wire, the wires of which will begin to overheat, which can lead to melting of the sheath, short circuit and fire.
The following section is considered the most common:
- For lighting fixtures use 1.5 mm square.
- For sockets (with and without grounding) use 2.5 mm square.
- For other, more powerful devices, 4 - 10 mm square is used.
In order to correctly calculate and select the cable cross-section, it is necessary to carry out a preliminary calculation using the formula: Ptotal = (P1+P2+P3)*0.8.
P1+P2+P3 – power of electrical appliances, kW. Correction factor – 0.8. Individual values can be applied to individual groups of devices.
Exposed retro wiring on rollers
When finishing the walls and ceiling with wood siding or a rustic block house, the wiring can be run on top of the trim (exposed wiring). You can even make wiring in a “retro” style: the wires are stretched and fixed on glass or ceramic insulators, similar to three-centimeter weights for scales (What is a retro electrical harness).
The peculiarity of “retro” wiring is that the wire is in the air at a distance of 1.5-2 cm from the surfaces. To perform such wiring, copper wires insulated with rubber and cotton thread are used (brand PR, cross-section is selected according to the power of the current collectors).
Two or three single-core wires are twisted and secured to the insulators with cotton thread or thin wire.
Removing old wiring
Most of our houses belong to the secondary housing stock, so in most cases the electrical wiring is designed for small loads, usually 1.5 kW per apartment. Today, when apartments are overcrowded with a variety of appliances, 10 kW is considered the minimum acceptable. Therefore, after purchasing a new property, you should immediately look at the current electrical wiring plan in the house.
After studying the diagram, it is advisable to familiarize yourself with the (PEU) rules for electrical installations.
Let's look at some of them:
- All aluminum cables must be replaced with copper ones.
- Solid grounding must be replaced with protective grounding.
- New rules require modern branching of wires into groups.
- A new wiring plan, with a complete replacement of all parts, must be approved by a qualified energy supervision employee.
Wires in the junction box
After studying the relevant literature, proceed to the next step:
- We take a pre-prepared plan for the new wiring.
- We abandon the temporary structure and connect directly to the panel to de-energize the apartment.
- Manually remove old cables. To search for hidden and non-functional cables, you can use a special device - a hidden wiring detector.
- We are digging and preparing a place for the new system.
- We install sockets, wiring, switches.
Hidden wiring when replacing
Hidden wiring is laid under plaster or inside frame structures: suspended ceilings, partitions and raised floors. In the panels from which apartment buildings are assembled, steel pipes and open-access distribution boxes are laid into the thickness of the concrete for hidden wiring.
To lay electrical wiring, special channels are cut out in the walls - grooves. Electric wall chasers with abrasive discs are used for cutting hard materials (concrete, brick). Cavities for electrical points are cut out using a hammer drill and round concrete bits.
After laying and wiring, the wires are covered with plaster mortar. Inside frame structures, wires are laid in corrugated plastic pipes or open cable ducts made of plastic or galvanized sheet.
Hidden electrical wiring in a wooden house. Read about it in our article.
Want to know everything about garage wiring diagram? We have provided you with this information.
Installation of a temporary structure
After disconnecting the apartment from electricity, you will need to connect power tools and at least one lamp for lighting. Otherwise, all work will have to be carried out during daylight hours, but what about rooms that do not receive daylight (toilet, corridor)? Therefore, we proceed in the following way:
- We take a board and attach a block to it for one or two sockets.
- We buy or cut a flexible cable (KG or PVS) with a cross-section of at least 4 mm2.
- We turn out the plugs or turn off the supply machine.
- We connect to the meter cable using a regular twist.
In some cases, you will need permission to connect a temporary structure. You can get it from the housing office or energy sales office. Without permission you can get a large fine.
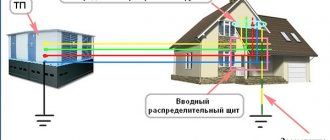
Why change the wires from the pole to the house.
The issue of connecting electricity from a pole to a house worries many residents of the private sector of the city of Krasnoyarsk. In our city there are many private houses, cottage and holiday villages, villages that, with the development and construction of the city, have become part of it.
Electricity supply to such houses, as a rule, is carried out from overhead power lines, which are made of bare wire laid over insulators fixed to supports. Many of these lines are outdated and in poor condition, or are overloaded, as electricity consumption increases every year.
An electrician is replacing the wires to the house with SIP.
Often in bad weather with strong winds and rains, short circuits and wire breaks occur. The power supply organization servicing these networks is in no hurry to respond to emergencies. And if the “emergency crew” arrives, they do everything poorly, just to get away as quickly as possible. Common situation?
Laying new wiring
Let's look at the installation of a new power supply system using this diagram as an example.
Circuit example
For this we need:
- The wire.
- Corrugated or heat-resistant tube.
- Automatic machines, sockets, switches.
- Spare grooves and curved chisels.
After removing the old wiring, we begin laying the new one. For private and small apartments, a single-line house power supply diagram is suitable. To do this, you need to apply a preliminary drawing on the walls, then we proceed to gating.
Note! After installing new electrical wiring, cosmetic repairs to the room will be required.
It is necessary to carry out gating, adhering to certain rules.
- The grooves must run strictly in a horizontal or vertical direction in relation to the floor; crossing or moving obliquely is prohibited.
- It is necessary to maintain a distance of 15–20 cm from the ceiling and floor.
- The groove depth should not exceed 25 cm.
- Horizontal breakdown of load-bearing walls is prohibited. Only vertical processing is allowed.
After the grooves are ready, first of all it is necessary to run the wire from the junction boxes to the meter. For additional safety, the cable can be placed in a special heat-resistant fabric, corrugation. Fixation should be carried out using alabaster every 1 or 1.5 m. Next, a wire is laid from pre-installed distribution boxes to switches and sockets.
The simplest electrical metering device
The next step is the main cable, which is connected to the distribution wires in junction boxes. It is worth paying attention that fastening must be carried out using a special terminal block, and not ordinary twisting. To ensure that replacing electrical wiring in your home with your own hands is of better quality and safety, you should consult a professional electrician. After connecting all the wires, we move on to the main power supply and connect all the sockets, chandeliers and switches. Read about how to connect a chandelier with a double switch in a separate article on our website.
The final stage is to connect the entire system to the electrical metering device. If your device is old, then it is worth replacing. The ideal option would be to invite a qualified electrician to help you run the wires from the entrance to the apartment. It is better to install the meter in a plastic or metal box.
When choosing a meter, pay attention: you can install a multi-tariff device in order to subsequently save on electricity in the evening and at night.
Marking work
Marking work involves marking the cable route on the walls with chalk or charcoal, as well as the installation locations of its elements. To quickly and smoothly make an electrical wiring route, it is recommended to use a rope pre-painted with chalk (or charcoal). Such a rope is correctly called a marking or painting cord; you can see how to use it in the photo below:
All you need to do to create one of the sections is to secure one end of the rope in its original position and carefully pull it to the end point (so that the painted rope does not touch the wall). After this, the rope must be pulled tight and released sharply so that the mark remains on the wall. You can learn more about how to mark walls for wiring in our separate article.
After completing the marking, it is recommended to photograph the walls in a private house. This will allow you to quickly find electrical wiring when replacing or repairing it.
Checking the quality of work performed
Multimeter device
The final step will be to check the work done. To do this, you need to acquire a multimeter and an indicator screwdriver, which will allow you to carry out a control check of the drawn line.
A multimeter is a voltage detection device about the size of a large mobile phone. The kit also includes two probes.
After checking the sockets and switches using a special transparent screwdriver, you next need to measure the voltage in the network using a multimeter, this will avoid an unexpected short circuit. If at the time of testing the device does not find any faults, the walls can be safely sealed and proceed to the main decorative work.
Remember, in the bathroom, due to high humidity, it is prohibited to install sockets and switches without a special isolation transformer or RCD, and the distance between the wires and heating radiators should not be less than 50 cm. A heated towel rail is also included in the heating radiator.
Who pays for the replacement?
In order to find out at whose expense the wire from the pole to the house is replaced, you need to contact the energy supply organization. You need to request a document from them - an act of dividing the boundaries of balance sheet ownership. This document indicates who is responsible for carrying out this work.
In fact, the power supply refuses to replace the cable from the pole to the house. After all, according to the act, the wires that go from the pole to the building are not on the balance sheet of the organization. In this case, the owners need to contact an electrician for replacement, and accordingly, this work is carried out at the expense of the residents.
However, there are certain advantages to this. Because the prices of specialists from organizations servicing power supply lines are inflated, and the quality of the work performed will be underestimated. Since this is a very critical area of power supply, it is necessary that the work be carried out efficiently and in accordance with all technical rules.
The safety and reliability of the electrical supply depends entirely on the quality of the installation. If the replacement is done correctly, bad weather conditions will not affect the power supply. Typically, the cost of installing or replacing the wire from the pole to the house is not high. Nevertheless, the final information about how much this work costs depends on many factors, for example, on the distance from the pole to the house.