Electricity was a luxury a hundred years ago, but today it is a vital necessity for any person. After all, many things depend on electricity - the Internet, lighting, the operation of household appliances, and therefore food storage and cooking. Also, air conditioners and ventilation systems, and often space heating, and many other, smaller but necessary electrical appliances rely on electricity.
But electricity is not taken into the house just like that. Energy supply companies only deliver it to the meter, and then the owners must distribute the lines throughout the house. And this is where the difficulties begin, because without knowledge it is not so easy to design wiring in an apartment. After all, not everyone knows what parts the electrical network consists of, and only learn about circuit breakers and grounding loops when something breaks.
This article explains in detail the step-by-step process of creating your own wiring line from the panel to the farthest outlet in the apartment, so that everyone, after reading it, can evaluate their strengths.
*(It’s not difficult to do the wiring yourself if you have a clear plan)
Calculations and diagram
Single-line diagram according to GOST
First, you need to draw a wiring diagram for your apartment . To do this, you don’t need to be an engineer, because you don’t need a complicated linear diagram according to GOST. It is enough to draw a schematic drawing by hand. An electrical wiring diagram is needed in order to correctly distribute the cable throughout the apartment, and calculate its approximate amount, as well as determine the load on each future line.
Electrical wiring diagram
Draw where you will have sockets and switches. At the same time, take into account what household electrical appliances you will include in them, how many and what kind of lamps you will use.
It is not recommended to hang more than 8-10 sockets on one line. Since all sockets in the line are pass-through, with each subsequent socket there is a possibility of weakening the contact. Especially do not make many sockets on one busy line, for example in the kitchen; it is better not to save money and extend two lines to the kitchen.
Determine the required number of lines and the expected load on them. It is better to divide the lines into zones, for example: kitchen sockets, corridor sockets, bathroom sockets, room 1 sockets, lighting, etc.
Options for electrical wiring diagrams for apartments
Let's consider specific projects of electrical networks for apartments.
This will help you do the work yourself, but consultation with a professional electrician is required.
Studio apartment
These include studio apartments (read the article about the layout of a studio apartment). There are not many rooms in such apartments, so there will not be a lot of wire consumption. There are fewer lines, but it is necessary to ensure the optimal location of each. The general principles remain the same.
It is better to make the living room, kitchen and bathroom into separate groups - this arrangement will be optimal.
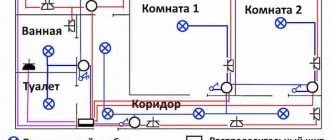
The diagram shown shows that the lines are not divided by room. Lighting is assigned to one group, and sockets to the second.
An example of a wiring diagram in a one-room apartment - drawn by hand
Not the best solution and here's why. Distribution boxes are needed for each line entering the rooms. Many outlets are connected in series, which will lead to the shutdown of an entire branch if one single wire burns out.
It's different here. It can be seen that a separate group consists of lighting in the bathroom and sockets installed in it. The remaining rooms are connected separately - the lighting and sockets in them are combined.
Cable selection
In order for electrical appliances to operate without overloading the network, the cable of each line must be of the appropriate cross-section. And if there are several consumers on the same line (for example, to the kitchen) (and there will be), then it is necessary to calculate their total power and leave a margin of “strength” for the cable , that is, select the required cross-section (wire thickness). The power of all household appliances is always indicated by the manufacturer. For example: an incandescent lamp is 40W, and a hob is 6000W, etc.
In order not to bother with calculations, follow one simple rule. — For outlet lines, use a copper cable with a cross-section of 2.5 sq. mm, for all lighting 1.5 sq. mm, and for a hob or instantaneous water heater 4 sq. mm - and everything will be fine!
| Wire cross-section (sq.mm) | Current (A) | Power, W) | Machine denomination |
| 1,5 | 15 | 3300 | 16 |
| 2,5 | 21 | 4600 | 20 |
| 4 | 27 | 5900 | 25 |
| 6 | 34 | 7400 | 32 |
Each device (consumer) has its own declared maximum power, measured in Watts.
Simplified power formula
The cable must be three-core (phase, neutral, ground). Zero is always blue, ground is yellow or yellow-green, phase is any other color . If you change the wiring, do not skimp on the material - always take a cable with a third core (with grounding), because all modern devices have an additional protective terminal, and automatic protection works only using grounding .
To replace electrical wiring, it is best to use a VVG-ng cable. You can, of course, use NYM or PVS, but the advantages of the VVG cable over others are obvious. Firstly, VVG does not need to be crimped with sleeves (soft ones need to be crimped). And secondly, it is smaller and flat, which allows you to make smaller grooves, and it is possible to insert the cable into a thin slot (3mm for a three-core cable with a cross-section of 1.5mm)
Uncrimped wire with sleeve
Always take only cable in accordance with GOST! For example, an excellent cable is the Gostov VVG ng cable. This is a very important point in preparing to replace the wiring! You can save on automation or sockets (they can always be replaced), but don’t skimp on the cable - get a good one.
Installation of electrical wiring in the apartment
Do-it-yourself electrical wiring in an apartment, step by step, is a matter that requires increased attention to the work being performed, strict adherence to safety standards and installation rules.
The slightest mistakes can cause a short circuit. There are a number of certain rules, following which you can make high-quality electrical wiring.
Carrying out electrical work is not particularly difficult for those who know how to handle the tool.
Installation can be done in either of two ways. Hidden installation methods include embedding wiring into walls, ceilings and voids, under floor coverings, behind plasterboard sheets.
The open installation method includes laying cables in special boxes, cable ducts, using staples and clips. Both of these methods have their advantages. To perform installation, first of all, it is necessary to move all furniture and household appliances away from the walls and, if a major renovation is being carried out, remove all construction debris.
- Installation of “rough” electrics is carried out in several stages:
- drilling holes for socket boxes and distribution boxes;
- wall gating;
- preparing the ceiling for laying cables;
- installation of distribution board;
- cable laying;
- switching of distribution boxes;
- electrical panel assembly;
- system check;
- installation of temporary lamps and switches necessary for the repair process.
Let's look briefly at each of these stages.
Methods for laying electrical wires and cables
- There are 2 ways to install electrical wiring in apartments:
- open;
- hidden.
- The latter in turn can be divided into:
- ceiling gasket;
- laying on walls;
- and flooring.
Hidden way
This technology is the most dusty and dirty, since you will have to trench the walls and ceiling or tear off the floor covering. Therefore, it is best to perform it during a major overhaul.
If the electrical supply project plans for wiring along the walls, then we mark them with places for wiring, pick up a hammer drill or grinder and cut out grooves of a certain width and depth. We select the depth on the basis that after laying the wiring or cable, the layer of plaster will be no more than 10 mm, the width is unlimited.
We cut out places for sockets and distribution boxes using a special crown. We remember about load-bearing walls and make grooves in them that are not too deep. In apartments of panel houses, the interfloor ceilings have internal voids in which wiring can be laid.
Today, monolithic structures with brick interior floors are more popular; in such apartments, grooves are made in all walls, the main thing is not to catch the load-bearing monolithic beams.
The most economical option for hidden installation is installation under the floor covering. The main thing is the presence of corrugations for each wire. This is done for convenience in case of repair or replacement of wires and for additional insulation.
After the grooves are equipped, they begin to install the lighting distribution panel and lay the cable. The shield itself can be mounted or embedded in the wall. In new houses there is a special niche for it, and in old houses it is fixed to the wall using self-tapping screws.
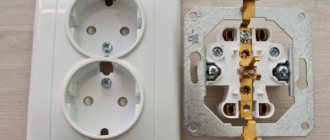
Inside the panel we install machines from which VVG-3*2.5 wires will go to the sockets and the main line. We lay VVG-3*1.5 from distribution boxes to lighting fixtures. For stationary high-power devices we make separate lines from VVG-3*2.5 cable. At the places where the connection points are installed, we make an outlet of 15-20 cm.
Now in the junction boxes we connect the wires into a single network. The highest quality connection will be the use of P&S. To avoid mixing up the wires during connection, you can hang tags with specific markings on them.
After that, using a tester, we check the entire network for damage and errors. If everything is fine, then we wall it up, put the switches and sockets in place.
Outdoor installation
For rooms where it is prohibited or impossible to lay wires hidden, open installation is used (external wiring in the apartment). For these purposes, boxes, cable channels or special clips are used. The installation is quite simple and is carried out only along the walls and ceiling.
The first thing we do is mark the laying location and drill holes for fastening in increments of 40-50 cm; if the space for the wire is less than 0.5 m, then we make increments of 15 cm for two fastening points.
After this, we attach boxes, cable ducts or clips to the wall or ceiling. We install external junction boxes at the wiring points, and carry out the wire connections, wiring and installation of connection points in the same way as in the hidden installation method.
The advantage of open mounting is easy access to all wiring, but the disadvantage is that it is not very aesthetically pleasing.
Ceiling wiring installation
Typically, cables from the apartment electrical distribution board are laid along the ceiling (floor slab).
Holes are drilled in the ceiling, then when laying the cable, a cable fastener is inserted into this hole. I will dwell on this in detail, I will only say that there are many installation options (for example, a dowel-clamp, dowels with a tie).
Tools required for electrical installation
- Before you begin installing electrical wiring in the apartment, prepare the following tools:
- A wall chaser (or, in extreme cases, a grinder) for cutting furrows, a hammer drill.
- Screwdriver Set.
- Pliers, wire cutters.
- Building level.
- Phase indicator.
- Drills, a crown for a hammer drill for drilling out sockets for socket boxes.
- Knife and hacksaw.
If you don’t have a professional tool, you can always rent one.
Which wire to use for wiring in an apartment
Currently, there is no question about what kind of wire is needed for wiring in the apartment. For the installation of home electrical wiring, wires and cables are used exclusively with copper conductors. Wires and cables with aluminum conductors cannot be used for internal electrical wiring.
- Give preference to copper wires, as they have:
- increased ductility (less likely to break during installation);
- corrosion resistance (oxidizes more slowly);
- long service life relative to aluminum;
- can withstand greater loads with a smaller cross-section.
Wires and cables can be single-core or multi-core. Multicore wires and cables have two or more cores reliably insulated from each other in a common sheath.
An example of a stranded wire is a wire of the PRTO brand (a wire with a copper core with rubber insulation in a braid of cotton yarn impregnated with an anti-rot composition). The cores of single-core and multi-core wires and cables can be made single-wire and multi-wire.
Cables and wires differ from each other in the type of sheath and names. The sheath of wires and cables serves to protect the insulation of the cores from exposure to light, moisture, various chemicals and prevent them from mechanical damage. The cable may include armor, and the sheath allows it to be installed in more adverse environmental conditions.
Wires can only be laid in a hidden way; if laid openly, only in pipes and ducts. Cables can be laid openly.
The most popular cable for use in home electrical wiring is VVGng; NYM cable and PUNP wire are less commonly used.
To connect to the floor panel, it is best to use an NYM cable. The same cable is used to connect the floor panel with the apartment or room panels (provided that they exist). Usually such shields are organized in private cottages.
It can also be used for individual connection of powerful consumers. This cable can be used to do all the power wiring in an apartment or house, but since it costs more than the VVGng cable and PUNP wire, it is used less often for these purposes.
VVG is an unarmored protected cable with copper conductors, polyvinyl chloride insulation, in a polyvinyl chloride sheath. The cable can be used in dry and damp areas.
The VVG cable is not designed for stretching. The insulated conductors of the VVG cable are twisted and have a distinctive color. The inner shell does not contain filling in the inter-vein space.
Cable VVGng
The designation “ng” in the name of the cable (VVGng) means that it does not propagate combustion when laid in bundles (a composition based on fire-resistant plastic is used). If VVG cable is used instead of VVGng cable, then if one of the cables catches fire, the flame will spread to other cables instead of localizing the fire.
The VVGng cable has a wide variety of shapes. It is most convenient to use a VVGng flat cable. In addition, it can also be round, square, sector, and even triangular.
NUM cable (NYM) – produced according to the German standard DIN 57250. The cable can be used indoors for hidden and open installation. NYM cable can be used outdoors, only out of direct sunlight. NYM cable has reduced flammability and gas and smoke emission, which is especially important for residential premises.
NYM cable
The NYM cable consists of copper cores, an intermediate sheath of chalk-filled rubber and a sheath of flame retardant polyvinyl chloride insulation. The use of an intermediate sheath in the cable design makes it easy and convenient to cut the cable during installation, increases its fire hazard and increases flexibility.
PUNP – installation flat wire. This is the cheapest wire of all cable and wire products used for installing electrical wiring in the home. PUNP wire is produced with two or three single-wire copper cores and polyvinyl chloride insulation in a PVC sheath. The veins can be painted in different colors.
Wire PUNP
PUNP wire is only available flat. These cable and wire products are used for both power and lighting networks. In the second case, wires of smaller cross-sections are used.
Much less often, when wiring home electrical systems, rubber-insulated wires of the PRN, PRI, and PRTO brands are used. The PRTO wire is intended for laying in fireproof pipes, PRI - can be used for laying in dry and damp rooms, PRN (protected wire) - in the open air, PRD, PRVD (two-core twisted wire) - only in lighting networks of dry rooms.
For open wiring, it is convenient to use a flat wire with copper conductors and polyvinyl chloride insulation with a dividing base of the PPV brand, as well as a wire with polyethylene insulation PPP. There is a flat wire without a dividing base - PPVS, but it is not very convenient to use.
Previously used wires with aluminum conductors (APR, APV, APRTO, APPV) are now not used in the construction and modernization of home electrical wiring.
Wire with copper core and polyvinyl chloride insulation PV. PV wires can be single-wire or multi-wire. Wires are available with different insulation colors. In household electrical wiring, single-core wire PV1 in yellow-green coloring is used for the potential equalization system (PSUP).
Wire PV1
When choosing wires and cables, it is necessary to comply with the requirements of the PUE for insulation painting.
The insulation of the neutral working conductor should be blue, the neutral protective conductor should be yellow-green. The color of the insulation of phase conductors must be different from the color of neutral conductors. There are many options here - brown, red, grey, white, black, etc.
It is also very convenient to use a different color of phase conductors for each section of electrical wiring, as well as different colors of core insulation for power and lighting wiring.
If you choose and then install electrical wiring with a wire or cable without complying with the requirements for the color of the cores, then in the future this will lead to significant difficulties in servicing and repairing electrical equipment in the apartment. In addition, the installation process itself can be very complicated, especially when using a large number of switches and sockets.
For different groups of household electrical appliances, wires with different cross-sections should be used.
- It would be best to divide the power cables into groups and connect them to separate machines:
- Lighting - wire cross-section from 1.5 mm (automatic - 16 A).
- Sockets - cross-section must be at least 2.5 mm (circuit breaker - 20 A).
- Powerful electrical appliances, such as electric stoves and hobs - at least 4 mm (25 A).
Installation of residential electrical panel
Before laying cables, it is advisable to mount the electrical panel into the wall. The size of the switchboard is selected according to the number of circuit breakers, RCDs, and differential circuit breakers that will be installed in it.
The boards are produced in the following main sizes: 4, 8, 12, 18, 24, 36, 48, 60, 72 modules (1 module = 1 single-pole circuit breaker). In an apartment, panels of 12, 24, or 36 modules are usually used.
In my practice of electrical installation of apartments, in most cases I use electrical panels with 24 or 36 modules (24 modules for a 1-room apartment, 36 modules for a 2 or 3 room apartment).
One shield may not be enough if you plan to use equipment for telecommunication networks (router, media converter). In this case, it is rational to place these components in an additional electrical panel, which is installed next to the main (power) panel.
Modern electrical panels are hidden in the wall and do not take up much space.
The advantages of installing an additional electrical panel are that it accommodates the network equipment that is necessary for the functioning of television and the Internet. Thus, a router hung in the hallway on a nail is a thing of the past. In return come functional and ergonomic solutions.
Installation of socket boxes and distribution boxes
After marking, the locations of future sockets and switches became visible. In most cases, nowadays, sockets are installed closer to the floor at a height of about 20-40 cm from the floor, switches - at a height of 70-90 cm from the floor.
This rule is not strictly mandatory; changes are possible upon request. For example, it is more convenient for tall people to use switches located higher; for short people, on the contrary, it is better if the switch is placed lower.
Sockets and switches can be assembled into blocks of up to 5 pieces, and sometimes up to 6 in one line. Moreover, both vertical and horizontal installation is possible. All these points should already be taken into account when marking.
Now all that remains is to drill holes in the wall for the socket boxes. The standard European socket box has a diameter of 68 mm. When folding several socket boxes in a row, the distance between their centers should be exactly 71 mm. The depth of the socket boxes is 45 mm or 60 mm.
Deeper ones are used, for example, for installing a temperature controller for a heated floor or for switching electrical wires if necessary.
After this, holes are drilled for the junction boxes. Typically, distribution boxes (they are also called doses) are mounted under the ceiling at a distance of approximately 15-30 cm from the ceiling. The following rule must be observed: doses must be on the same vertical axis with sockets and/or switches located below.
Not everyone likes having distribution boxes visible on the wall. Installation of distribution boxes under the ceiling is allowed, provided the wires are connected by welding or crimping.
Wall chipping
Grooving is the process of cutting grooves (deepening, furrows) in concrete, brick or plaster layer for the subsequent installation of communications into it (in electrical communications are electrical cables and wires, in plumbing – pipes).
Before cutting, it is necessary to indicate the width and depth of the groove.
- These parameters are determined based on:
- number of cables laid together;
- cable sections;
- the location of the cables in the groove relative to each other.
Regarding the last point, it is worth clarifying: cables in a groove can be laid either flat or deep into the groove. In one case the groove is made deeper, in the other - wider. Here each electrician decides for himself.
You should not make the groove too wide (with a margin) - during installation the wire will constantly fall out and will have to be secured in the groove with special clips or “grabbed” with plaster. It is ideal to make a groove 4 mm wide for a wire with a cross-section of 1.5 mm - the cable fits in there with a little tension and holds without problems.
I strongly recommend making grooves using a wall chaser with a connected industrial vacuum cleaner, and not using an angle grinder for this. Since fine dust after such gating will settle for quite a long time, which can stall all the work.
Professional electricians usually have all these tools (wall chaser and industrial vacuum cleaner) in stock. If you install them yourself, you can rent them.
Wiring
- Wires can be routed in 3 ways:
- along the ceiling;
- by gender;
- along the walls.
- Wiring electrical wiring to the ceiling is, in my opinion, the best option:
- there is no risk of breaking the wire during repairs;
- There is always a way to get to the wiring.
If necessary, you can always remove the suspended ceiling, make changes to the electrical wiring, and then install the ceiling in place. When laying on the floor, you will have to chisel the screed, which is fraught with high costs.
Connecting wires in a junction box
- The main options for connecting conductors in junction boxes:
- twist;
- soldering;
- welding;
- crimping;
- PPE caps;
- Wago type connectors.
Please note that only connections made by welding and crimping (as the most reliable) can be bricked up according to the PUE.
Marking
Determine at what height the sockets and switches will be located; the easiest way is to measure the lines of sockets and switches from the ceiling, because the floors in apartments are most often crooked. For example, if the height from floor to ceiling after renovation will be 250 cm, and you want to raise the sockets by 30 cm, measure 220 cm from the ceiling. If there are several sockets and switches in one group, draw a horizontal line along the level and place a mark every 7 cm (socket box size 71mm), the same applies to vertical groups.
For lovers of standards, so that it is “like everyone else” or “how they do it” - remember, they do not exist! There are requirements for children's institutions, kindergartens and schools, where sockets and switches are installed at a height of at least 160 cm . Everything else, especially in your home, you can do as you please. For example, some make sockets in window slopes or even in the floor.
Wiring plan
Let's say you have an apartment in a new building, which still needs to be renovated before you move in.
- Typically, repairs consist of several stages:
- redevelopment (if necessary);
- plumbing work;
- pre-installation of air conditioning routes;
- construction work – plastering, installation of ceilings;
- installation of plumbing products - washbasins, showers, toilets;
- electrical wiring;
- installation of doors, floor coverings;
- wallpapering, painting;
- installation of electrical installation products - sockets, switches, and lamps.
Electrical work in an apartment is usually done first. Before starting electrical work, it is advisable to have a wiring plan. In the simplest version, it can be done by hand on a sheet of paper.
Drawing a wiring plan
So, you consulted with your household and made your decision. Now all the ideas and plans need to be transferred to paper. We draw a plan of your premises. How to do it? Let's take a standard one-room apartment as an illustrative example.
- To complete the scheme we need:
- notebook sheet;
- ruler;
- pen;
- colored pencils or markers.
The diagram shows the location of the walls and doorways. No specific dimensions are required, just a general picture.
An example of an apartment wiring plan
- The diagram should show the following elements in as much detail as possible:
- Sockets. They can be located in any convenient place, but no less than 15–20 cm from door and window openings, as well as 40 cm away from heat and gas pipelines. As for the quantity, it is customary to install one socket for every 6 m2 of area .
- Lighting. Standard layouts are designed for one large lamp in the center of the ceiling. But you can, if you wish, make additional light sources (spotlights, sconces, night lights), providing wiring for them.
- Switches. Usually they are mounted on the right side of the doorway and at a distance of 60 or 150 cm from the floor.
- Cable routes. When indicating them on your drawing, remember that the wiring must run strictly vertically or horizontally. No zigzags are allowed. If you plan to lay wires inside walls, then you should retreat 15–20 cm from ceilings and openings.
- Distribution boxes. They also need to be shown on the plan because they are where all the major cable connections are made. A box is placed on each branch from the main line, but no more than one per room.
- Distribution panel. Typically, power cabinets are installed outside the apartment in a common corridor. But some layouts are designed for internal placement of the shield, in which case the task will be a little simpler.
Marking
One way or another, between drawing up the plan and starting the rough work, there will be a procedure called “marking”.
In scientific language, marking is the operation of applying lines (scores) to the surface of the workpiece, which, according to the drawing, determine the contours of the part or place to be processed.
At the initial stages of work on distributing electricity in a room, markings are made as follows:
- first of all, the locations of sockets and switches, as well as the locations of cable outlets for household appliances, are marked on the walls;
- Next, lines are drawn along which the walls will be chipped;
- locations for distribution boxes are determined;
- the location where the apartment electrical panel will be installed is selected;
- after this, the routes of cable routes from the electrical distribution panel to a specific electrical point are marked.
In most cases, changes in the electrical wiring diagram of an apartment are easier to make at the initial stage of work, namely at the marking stage. In this case, time and financial resources will be saved, since possible changes will entail additional costs.
Preparing for gating
Typically, wiring in apartments is carried out either on the floor or on the ceiling. There are other options, such as laying cables under baseboards or ducts.
Lighting lines, in any case, are laid behind a suspended or suspended ceiling; if these are not planned, then the ceiling needs to be chipped. And since it is strictly forbidden to ditch , you need to apply a layer of plaster to the ceiling, which will allow you to hide the cable without damaging the monolith. We strongly do not recommend ditching the ceiling yourself, since you need to know the technology for correct gating so that the whole house doesn’t collapse someday.
In cases where plastering of the ceiling is not planned, experienced craftsmen find voids in the monolith slab with the old cable, and tighten a new one in its place.
Using a 70mm or 68mm concrete crown (attachment for a hammer drill), holes for the socket boxes are drilled. Using a wall chaser or grinder, grooves are cut out for laying the cable. The grooves in the walls must be strictly vertical and not horizontal or diagonal. The lines from the sockets to the panel are laid in the floor screed or along the ceiling.
If the ceilings are not wooden, then according to the PUE (electrician's bible), cable laying without corrugation is allowed! There is also no need for a corrugated floor screed; the most important thing is a high-quality cable with good insulation in accordance with GOST! Save on corrugation; if you don’t have drywall or wood (or other flammable materials), then you don’t need corrugation!
A detailed description of the correct cutting of holes for socket boxes. Why can you lay cable without corrugation?
How to install cable and wire products (electrical cables)
Professional electricians recommend installing electrical wiring exclusively in corrugation. Naturally the question arises: why? The answer is very simple. When laying cables in a corrugated structure, you will receive the following advantages:
- If a short circuit occurs in the electrical wiring, you can replace the damaged cable without dismantling the finish, since it will be easy to remove the cable from the corrugation and replace it with a new one.
- If the electrical wiring in the apartment is made in corrugation, then the cable has additional protection, and even if your neighbors flood you, the electrical wiring will remain undamaged since the corrugation is sealed.
- When pulling the cable through the metal profiles on which the drywall is attached, only the corrugation may be damaged, and the protective sheath of the cable will remain undamaged.
Grilling
Before you start dabbling, it is highly advisable that the walls and ceilings be plastered with a leveling layer of plaster. Firstly, you will not have further problems with the final installation of sockets, since all the sockets will be flush with the wall, and not recessed into it (which happens when they are installed before the walls are plastered). And secondly, gating will occur much faster, since in some places it will not be necessary to saw the monolith.
Check in advance the places where you will be trenching so as not to touch communications, such as old wiring and plumbing pipes. If you cannot determine where the old wiring goes, call an electrician , or simply disconnect it in the switchboard (if you are going to change it all). For ease of work, make yourself a temporary carrier (extension).
The hole for the socket boxes is drilled to the full depth of the crown. To quickly drill a hole in concrete, mark a circle with a crown, then drill the maximum possible number of holes around the circumference with any drill, no less than the depth of the crown. After which, the cutting with a crown will go noticeably faster, one might say – it will go like clockwork. If it gets on the reinforcement, it is best to use another crown; in extreme cases, you can knock it off with a spatula. It’s better to use a hammer drill for help (don’t forget about neighbors and the police).
Working with a wall chaser or grinder
Grooves for laying cables go from the socket box to the floor or ceiling. You need to lower the groove down so that the cable lies quietly in the screed and does not stick out in the corner, so you need to know the thickness of the future screed, the same with ceilings. It is best to have a wall chaser with a vacuum cleaner for these tasks, but in extreme cases you can get by with a grinder and a diamond disc for stone. In the case of an angle grinder, take care of your health, wear a respirator and goggles. Close all windows and doors to prevent dust from entering adjacent rooms.
Cabling
Laying the cable on the floor is not difficult; it is enough to hold it to the floor in any way so that it does not float up when they make the screed. Usually they lay the cable along the walls (at a distance of 10-15 cm from the wall) so that later they know exactly where the cable goes.
It is worth noting that it is better not to lay cables under doorways! To lay the cable along the floor, it is better to make through holes between the rooms. Otherwise, there is a possibility of damaging the cable when installing the interior thresholds.
Laying the cable in the groove is also not particularly difficult. You can secure the cable in the groove using dowel clamps or ordinary alabaster (construction plaster). Alabaster hardens quickly, so it is also convenient to use for installing socket boxes. But before you smear the grooves with it, you need to remove dust from them and moisten them with water.
If the cable is securely fastened in the groove and does not stick out anywhere, the grooves can be covered with ordinary plaster mixture; this will save a lot of time.
How to install socket boxes correctly is written in detail here
Machines, wires, security
If you are wiring electricity in an apartment from a panel yourself, then there must be automatic circuit breakers, that is, automatic power cut-offs for a certain group of points in the home network. So, for a socket, the circuit breaker must be no less than 16 A, the cross-section of the wire connected to it is 2.5 mm². A 10 A automatic circuit breaker should be responsible for lighting; the wire connected to it and to the lighting fixtures should be 1.5 mm².
We use machines for each group of consumers
One of the most “powerful” appliances in the apartment is the electric stove and boiler; wires with a cross-section of 4 mm² must be connected to them, and their circuit breaker must be at least 20 A. All this is placed in a distribution panel, which is placed in the corridor. Important: do not use the machine more than indicated in the list below, otherwise the wire will simply burn out.
Cable cross-section – 1.5 mm², automatic 10 A, 2.5 – 16 A, 4 – 20 A.
To connect all the necessary points to the machine, you need to use a special bus and in no case pieces of wires.
Bus for connecting all points to the machine
Each panel must include an input machine (a toggle switch that de-energizes the entire apartment). This is an important point, since it is used mainly in emergency situations, for example, in case of a fire or a water pipe leak from the upper apartment.
For an apartment or any other residential premises, insulated copper wires are used.
We use only copper wires
They do not break, since aluminum ones do not withstand bending, and they also have the ability to conduct current better.
Safety regulations:
- Before installing the wiring, you must turn off the electricity.
- Do not lay the cable when it is live.
- If it is necessary to solder wires, then this must be done in special gloves.
- Before tightening the wires into the tube, you need to remove all burrs from them.
About junction boxes
Junction boxes (or distribution boxes) are necessary for switching (connecting) wires in them and branching lines, for example, for a switch.
Today, professional electricians will tell you that there is no need to install junction boxes in existing apartments ! They can play a cruel joke on your wiring. In the event of a short circuit, tearing, flooded neighbors, etc., you will need access to this very junction box. It’s easy to give up junction boxes - do all the switching in the socket boxes! To do this, you need DEEP socket boxes , in which all switching for lighting will take place. Typically, deep socket boxes are made for light switches, but if switching is needed to branch out socket lines, then deep socket boxes are also installed under the sockets.
Distinctive features of modern electrical wiring
At the end of the 20th century there was a breakthrough in modern household technologies. In addition to televisions, other devices began to be used inside homes:
- Wireless connection.
- Powerful household appliances.
- Video surveillance and security systems.
- Computers.
Therefore, work with the installation of electrical networks has become more complicated. The principles of operation and arrangement remain the same. Even the first stage - design - causes difficulties. It is necessary to know the locations of household appliances and the power they absorb. The lighting system for each room is thought out at the same stage.
Now they use not only power, but also low-current systems. These are wires for TVs, telephones, and computers. This also includes acoustic and security equipment. Power and low-current systems are not separated. The power source for the devices is a classic 220 V network.
The number of devices and devices with simultaneous operation is changing upward. Previously, one chandelier was enough, now local or a system of spotlights is added to the overhead light. The total power consumed by the devices also increases.
Electrical panel installation
The most budget option is to install all the circuit breakers on the staircase in a common panel, where your old circuit breakers and meter are already located. To do this, it is necessary to route all the cables into the access panel. If you want a shield in your apartment, then you need to choose a suitable place for it.
Built-in or overhead shield is up to you. The built-in one looks more aesthetically pleasing, but the overhead one is easier to install. All lines from the apartment go to the panel, and from it one thick cable goes to the entrance panel, the cross-section of such a cable must be at least 6 mm, that is, a three-core cable, for example VVG 3 * 6.
Drawing up a wiring diagram
Electrical wiring in an apartment begins with drawing up a network wiring plan. Installing electrical wiring according to an existing design drawing is much simpler and more expedient for a number of advantages:
- the electrical network diagram will allow you to plan in advance the necessary equipment and facilities;
- the presence of a circuit will allow you to accurately determine the power of the input input;
- the drawing gives installation personnel an understanding of potentially fire-hazardous wiring components in order to take measures to redesign them or take additional safety measures;
- The diagram will allow installation to be carried out as planned, with verification of completion of the full cycle.
Examples of schemes for a one-room apartment
Electrical engineers believe that if the total load on the apartment’s electrical network does not exceed 25 A, then it is possible and even cost-effective to plan the network with one circuit per machine. This method is a typical standard scheme of the past, when lighting elements with power sockets were included in the circuit. Today, these techniques have been abandoned and installation is carried out along independent separate circuits. An example of wiring a one-room apartment is shown in Figure 3.
Rice. 3. Electrical supply diagram for a one-room apartment
The drawing shows the competent distribution of the network load of a one-room apartment into several separate circuits with their own RCDs. Such a system will ensure trouble-free operation of the wires and correct operation of the equipment without voltage drop.
For a two-room apartment
The difference between the drawing for the installation of supplies for a two-room apartment and a one-room apartment is in the larger number of circuits in terms of wiring. Some arrangements are possible here. Figure 4 shows an example of such a circuit.
Rice. 4. Electrical supply diagram for a two-room apartment
The example clearly shows several lighting circuits, as well as separately dedicated protected circuits for the kitchen, rooms and other powerful equipment.
For a three-room apartment
Figure 5 shows an example of a drawing, which is often used for apartments with three or more rooms, where a fairly large number of conductors will come out of one distribution board.
Figure 5. Example of a power supply diagram for a three-room apartment
The peculiarity of this option is that there are separate circuits enclosed in separate blocks with their own protection. In this example, there are 2 blocks (25 A and 40 A, respectively). This method allows you to separate zones of cable products, making the system more convenient and practical.
Installation of circuit breakers
Each individual line is equipped with its own circuit breaker, with a rating depending on the cable cross-section. According to the rules, you cannot insert more than two lines into one machine; if you are trying to power more than three lines from one machine, you must install a special branching bus.
Today there are many ways to protect electrical wiring, even at the household level. The most necessary condition is the installation of circuit breakers for protection against overloads and short-circuit currents (conventional single-pole circuit breakers). It is also recommended to install an additional residual current device - RCD (current leakage protection).
It is best to install RCDs on the lines of high-risk areas: wet rooms, children's rooms. There is no need to install one common RCD for the entire apartment! They install one common RCD only for the purpose of saving. The consequences of such savings are a complex diagnosis of a fault in the event of a leak, + the entire apartment is left without light when it is triggered. On some lines, for example, lighting or street lines, an RCD is not installed.
Installing additional types of protection is already a luxury: thermal relay (protection from cable heating), lightning protection, stabilizer or protection against voltage surges (saves from 380V), fire alarm, etc.
Dividing electrical wiring into groups (lines)
It is much easier to manage and control an electrical network if it is divided into several lines. In the event of a malfunction or emergency, you can turn off one group, while the rest will function as usual.
Option for dividing into 4 groups:
- Group 1 – powerful household appliances
- Group 2 – kitchen line
- Group 3 – bathroom and toilet
- Group 4 – lighting system
Below we will talk about each electric group in more detail.
Stationary household appliances
Large household appliances are usually located in the kitchen or bathroom area. Layout of sockets in the kitchen. Rules: it is prohibited to place sockets directly behind the dishwasher and washing machine; It is better to use waterproof models.
A separate connection for the kitchen area is necessary for repairs. If one of the devices breaks down, a replacement will be required. In order not to turn off the electricity in the entire apartment, it is enough to turn off one protection device responsible for stationary equipment. Unfortunately, even expensive household appliances break down from time to time. Repairs sometimes take several hours. A separate electrical group will allow you to maintain a comfortable stay in the kitchen and other rooms.
What prevents you from simply disconnecting a broken device from the network by pulling the plug from the socket? The fact is that built-in equipment has connection points to the electrical network in hard-to-reach places. In addition, the malfunction may occur not in the device itself, but in the wiring disguised in the wall. In this case, it is much easier to move the circuit breaker lever.
Dedicated line for the kitchen
The kitchen line is traditionally the busiest. Approximately 5-6 units are constantly connected to the network, even when not in use. This applies to the refrigerator, oven, hob, dishwasher, hood, microwave, toaster. Many people use a kitchen electric grill, meat grinder, bread maker, multicooker, etc.
Electrical wiring diagram for the kitchen, divided into 4 groups. For powerful household equipment, separate circuit breakers are installed in the distribution board. In this case, a separate powerful electrical cable will simply make it possible to use several devices simultaneously.
If lighting devices or a water heater are also “hanging” on the common wiring, then when the next device is turned on, the network simply cannot withstand it and an automatic shutdown will occur. A detailed analysis of diagrams and options for the location of sockets in the kitchen is given in the article, which we recommend that you read.
One or more lighting groups?
Considering the number of lighting fixtures in each room, you can make one or several lines. If there is one six-arm chandelier in the hall, and in the bedroom there is low-power overhead lighting and two chandeliers, then all the devices can be combined into one line.
However, if the living room resembles a disco hall - with chandeliers, spotlights, ceiling and wall lighting - then a separate group should be organized only for it.
Wiring diagram for 220 V spotlights or halogen lamps for one room, for example, a kitchen, children's room or hallway. If, in addition to lamps, the network of one room includes transformers or power supplies, then it is also recommended to connect it to a separate protection device.
Rooms with high humidity
Increased requirements apply to electrical appliances and cables in the bathroom, since the close proximity of water is a risk. In order for the electrical network to be safe and functional, a number of rules must be taken into account when drawing up the diagram and installing the wiring:
- The distribution box should be installed outside the bathroom - in the corridor, hall or hallway
- For each device that is used in the bathroom (washing machine, mirror lamps, hair dryer or electric razor), it is necessary to allocate a separate socket
- Regardless of the size of the bathroom, the switch is always installed on the outside. The best place is near the front door
- It is recommended to lay the electrical cable at the top of the wall, right under the ceiling, placing the lines parallel to the floor and using an insulating sleeve
The requirements also apply to the choice of fittings that will be used regularly - sockets and switches. Suppose the degree of protection of sockets should be at least IP 44, and it is even better to purchase special devices with a splash-proof cover.
It is recommended to abandon 220 V lamps in favor of 12 V analogues.
A three-core copper wire is quite suitable for installing sockets in a bathroom, but you should pay attention to the cross-section: for connecting ordinary appliances it must be at least 2.5 mm², for powerful electrical equipment - 4 mm². The domestic version is VVGng.
Shield assembly
One of the most crucial moments is assembling the shield. If you are using a soft cable, then before inserting the wire into the machine, it must be crimped (to increase the contact area). Only phase wires are inserted into single-module machines (phase marking L - can be any color except blue and yellow), all others (zero N blue, ground PEN yellow-green) are inserted into their busbars. When using RCDs or difavtomats (automatic and RCD “in one bottle”), the neutral wire is inserted into its groove (marked N - neutral, blue. The common phase connects all the machines to each other, for this, instead of jumpers made of wires, it is better and more reliable to use special combs.
For all connections in the switchboard, it is very important to use wires of the appropriate cross-section, that is, it is best to separate the phases and neutrals across the circuit breakers using a cable with a cross-section of 4 sq. mm or 6 sq. mm. Also, after tightening all the cables and combs in the machines, it is necessary to check the reliability of their clamping. Since it often happens that the wire simply does not fit into the clamp, or does not hold well in it.
Connecting machines and RCDs
The last stage of installing electrical wiring in an apartment is assembling the input panel. According to the diagram you have drawn up, you must connect circuit breakers and RCDs. There should be no difficulties in connecting these devices - the input wire is inserted from the top, and the one going out to the junction box from the bottom. We talked about how to connect an RCD. Connecting a circuit breaker is also not difficult, even for electricians. You can clearly see the installation process of these devices in the video below:
Install the RCD in the panel Connect the machine
After all the protective devices in the apartment are connected, it is necessary to test the electrical wiring with a multimeter to ensure that the work done is correct. The best thing to do for these purposes is to call an electrician so that an experienced specialist can check everything. Inspection services for finished wiring are not that expensive. If no problems are found, feel free to turn on the machine and carry out the first tests of the finished line.
Using this technology, electrical wiring in an apartment can be done with your own hands. We hope that the step-by-step instructions, diagrams and requirements provided helped you complete electrical installation safely, and most importantly, in compliance with all rules and regulations.
Related materials:
- How to replace electrical wiring in an apartment
- Replacement of wiring in Khrushchev
- How to choose an RCD for an apartment
- How to make grounding in an apartment
- Wiring diagram without junction boxes
Material taken from the site:https://samelectrik.ru/