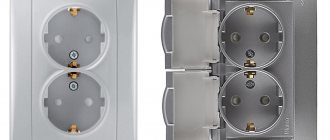
Types of double sockets
An electrical outlet is a device necessary for connecting electrical appliances to the network. The product consists of a body (cover), which isolates the working part from external influences, and a main part with a base and contacts.
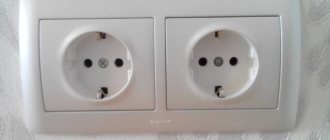
Sockets can be not only single, but also double, and even multi-socket, depending on the number of plug connectors. It is a mistake to think that doubling single sockets means getting a double one; in fact, only a monolithic device is considered two-socket.
The disadvantage of double products is the division of electric power into two parts, which should be taken into account when connecting two electrical appliances at the same time.
There are different types of double sockets according to modifications:
- Closed. The openings of the device are covered with special curtains, which is convenient for apartments where small children live.
- Open. Externally, they look like familiar sockets without closing curtains.
Devices can be with or without grounding. If grounding contacts are provided, this will protect connected devices from voltage failures. There are separate types of sockets for installation outdoors and in rooms with high humidity - waterproof. The former are protected from dirt and dust, the latter are protected from water penetration.
Double products are:
- invoices (external);
- hidden (internal);
- standard;
- polar;
- programmed, etc.
Advantages and disadvantages
The great demand for combined devices is determined not only by the desire to place additional outlets in the room. Combined models have a number of advantages:
- Reducing the number of wires. When placed separately, two power wires are supplied to each socket. Each switch has two conductors: one coming from the electrical panel and one going to the lamp. Only two wires from the panel are suitable for the combined device, and exactly as many wires go out as there are keys on the switch.
- Reduced labor costs when organizing hidden wiring in the room. When using separately located sockets and switches, a cable is laid to each device, for placement of which grooves are made in the walls. This is quite labor-intensive work. The ability to place all cables in one groove significantly reduces the amount of construction work and simplifies the installation of electrical wiring.
- Ease of use. People who live for a long time in houses with a European arrangement of switches get used to this height of placement of devices. For them, the appearance of additional sockets next to the usual switches increases comfort when controlling lighting and using household electrical appliances.
It is a mistake to assume that combined models do not have disadvantages. There are a number of reasons why many people refuse such devices. Here are some of the cons:
- Price. Combined blocks usually cost more than individual elements. If one component fails, the entire structure will have to be changed, which will increase costs.
- Increased load on power wires. Voltage is supplied to the device through two wires, which will carry the load from both the lamps of the lamp and the device plugged into the outlet. This should be taken into account when calculating the cross-section of the supply wires, otherwise there is a risk of overheating and a fire.
- Location restrictions. The conventional switch is easily accessible from any position. The plug and cord of an electrical appliance, especially massive ones, in some cases can make it difficult to use the switch key. In addition, a cable hanging next to a switch does not always look aesthetically pleasing.
Features of installing a socket with two sockets
Before connecting the device, you need to determine where the phase and zero are located. The easiest way is to study the markings of the wires: phase - brown, black, white or red, zero - blue, white-blue, ground wire - yellow-green.
If you don’t trust the markings, you can independently check the location of the phase and zero. You can do it like this:
- Wear rubber gloves.
- Apply a special tester screwdriver to each wire.
- Evaluate the signal from the screwdriver - the light will light up in phase.
Before installing a double socket, you need to de-energize the wiring - turn the switch on the machines or one (necessary) machine to the “off” position. Next, in the place where the product will need to be placed, the voltage is re-checked using a special screwdriver.
There are some features of installing a double socket as opposed to a single socket. The double socket has one socket box (cup) with two separated terminals, 1 mounting compartment for wires.
The installation diagram is as follows: a grounding cable should be connected to the central or upper terminal, with the phase on the right and zero (neutral) on the left.
You only need to choose a cable from the same material and with the same cross-section as the main wiring. If you plan to install 2 socket boxes, you will have to drill holes in the wall for them with a drill, maintaining the required distance for the holes. Before installation, markings should be applied to the walls if the old outlet was not there.
Three-phase socket connection diagram
The connection diagram is selected in accordance with the household appliances used. Most of them are connected to regular 220 V sockets. However, there is equipment that may require a three-phase socket.
A three-pole 40-amp circuit breaker is installed at the entrance. Three phase and one neutral wires are connected to it. After the machine, the same three-phase meter is installed. Next, the phases are distributed among the loads, including three-phase power sockets connected to them. For laying lines indoors, wires and cables only with copper conductors are used. In external networks, the use of cables and wires with aluminum conductors is allowed.
The connection diagram provides for the presence of multi-colored insulation, marked in accordance with their purpose.
- Yellow-green color indicates the PE ground wire
- Blue color – neutral working wire
- Phase wires L1, L2 and L3 can be designated by any colors, most often red, black and white.
This marking is mandatory for all standard stranded conductors. If a three-phase 16A socket with 4 contacts is connected, in this case there is no grounding wire in the circuit, and instead of grounding the equipment, it is grounded. This connection is known as the TN-C system, which combines the protective and neutral conductors along the entire length of the electrical circuit.
Depending on the intended use, power sockets can be connected individually, each of which extends from the power panel, or in whole groups in a daisy chain pattern. Such a scheme requires mandatory polarity when connecting contacts. Otherwise, with different polarity of the contacts, the rotors of the electric motors will rotate in different directions, as a result of which the units will very quickly fail.
Tools and materials
The craftsman will need a Phillips and flathead screwdriver, pliers, a device for stripping the braid (for example, a stationery knife), and a level. If you plan to install the device in a new location, you will need a hammer drill to drill drywall, concrete or wood.
To install the socket, additional materials are required:
- insulating tape;
- socket box;
- self-tapping screws
A cable made of the appropriate material will be needed if you have to make a new outlet rather than replace the old one. If possible, it is recommended to lay wires in corrugation - this is an additional fire safety measure.
Advantages and disadvantages
The final version of the wiring diagram
To determine the optimal wiring diagram for sockets and switches, it is necessary to prepare a wiring plan, calculate the number of devices and the possible maximum power. At the same time, in newly built buildings it is necessary to plan future possibilities without unnecessary modesty: an additional TV, the purchase of a separate freezer, and the like.
Based on the data received, the connection type is selected. The advantages of the sequential method include:
- simple connection system and circuit assembly;
- the ability to adjust the voltage level, make it less;
- You can use one fuse per circuit.
The disadvantage becomes obvious after a malfunction occurs - if one socket breaks, the rest will not work.
Double socket installation sequence
When the connection diagram for a double socket is correctly determined, the location is selected, and the materials are prepared, you can begin installation.
When the product is a solid block, it can even be placed in the former place of a single device, slightly expanding the size of the niche in the wall. This will not cause the need for repairs, but will require careful gluing of the wallpaper.
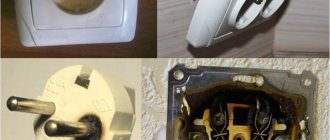
Removing the old socket
Having once again made sure that the machines in the apartment are turned off, you can begin to remove the old outlet.
The procedure is as follows:
- Unscrew all the screws that secure the product.
- Remove the outer cover of the old device.
- Unfasten the wires, unscrew the fixing tabs.
The new product that needs to be built in should also be disassembled. The front panel must be carefully unscrewed from the working part.
New socket box for double socket
You should pay close attention to the quality of the new socket - it should be high enough, and in this case you can be sure of clear fixation and normal operation of the socket.
The socket box is secured to the wall with side holders, which are sold separately or come in one set. Cheaper socket boxes are attached not with special claws, but with screws.
The procedure for mounting a socket box is simple. The screws on it need to be tightened clockwise, the holders will move apart to the right and left, securing the product itself. But as you work, the glass always weakens, so the best option is to additionally secure it with alabaster.
Instructions for action:
- Dilute dry alabaster powder (you can replace it with cement) to the consistency of sour cream. You need to take a small portion of the powder, since the composition instantly hardens.
- Place the mixture in the place of the future socket box, slightly wetting the niche with water.
- After 20 minutes, you can attach the socket box to the hole in the wall.
- Level the position of the glass using a hammer and level so that it is perfectly level.
- Next, fill the gaps between the product and the wall with a new portion of alabaster.
- Remove excess mass with a knife.
- Secure the glass with screws, making sure not to tighten them too much - this could cause the plastic to crack.
Preparing to connect
To ensure the correct two-pole connection of the wires, you need to open the cable. A sharp knife will help you quickly remove the outer insulation from the desired cable. You should not leave the supply of wires too long, otherwise it will create inconvenience when connecting the outlet.
It is considered optimal to expose the wires from insulation by 1 cm. The total supply of wires usually does not exceed 12 cm. Shorter wires can be extended. Next, you are allowed to proceed to the most important stage - connecting a double socket with grounding.
How to connect wires
At this stage, you need to clearly identify the wires present in the working part of the product, identifying the zero, phase and ground wire in them by color.
The procedure is as follows:
- Loosen the bolts on the terminals intended for connecting wires.
- Insert the socket wires into the contacts.
- Carefully tighten the bolts with a screwdriver.
The main point is to connect the grounding cable to the corresponding wire in the product (there is always a “ground” symbol at its location). It is important not to connect the phase and neutral to the same contact - a short circuit will occur.
Product Installation
Careful laying of the wires in the glass is very important: if this is not done, sooner or later the cable insulation will be damaged and the operation of electrical appliances may be impaired. The wires must be folded without sharp bends. They should not be located in the socket directly under the mounting bolts.
At the end of the work, the socket must be deepened inward and secured with fastening paws or screwed with self-tapping screws. Then you need to give it a level position using a level and connect the caliper to the installation box block.
The last thing to put on is the decorative trim - the new socket with two sockets is ready!
Existing connection methods
Connecting a group of sockets
Sockets of more than two pieces are connected in three ways: in series, in parallel and mixed. Electricians use other terms - star (for the first option), loop (for the second). Before choosing one of the methods, you need to find out the pros and cons of each, and choose the one that is suitable for a particular apartment.
If the room has electrical wiring, it is important to consider the way the cables are routed and the total power available. New ones may exceed the limit; the wire will have to be pulled from the shield.
Parallel connection
Parallel connection
The essence of the method is to connect sockets in one distribution block, which bears the entire load when the electrical equipment is turned on. A cable is pulled from the common house panel to the distribution box, and wiring is pulled from it to each power point (separate wires).
The advantage of this method is the independent operation of each power point and switch. If one device burns out, the others will continue to work. But if the main wire becomes unusable, the voltage will disappear completely. In such a situation, it is easier to find the gap and fix the problem.
Another disadvantage is cable consumption. For each outlet, a separate wire is pulled from the junction box. The length turns out to be significant.
Serial connection
Scheme of sequential connection of sockets
Connection with a loop means a sequential transition from the first socket to the next. Instead of twisting wires, device contacts are used. The phase and neutral cables are connected to the first mechanism, then to the next and sequentially to the last.
The “pure form” method is rarely used. For example, if you need to install an additional socket or switch or move one of the devices some distance. In the second situation, they leave the old access point and lead from it to a new location - this way there will be less need to scratch the walls.
It is forbidden to connect devices with high power to sockets connected by a cable. Air conditioners, microwave and conventional ovens, washing machines and other similar devices must be powered from other access points. In a daisy-chain system, many outlets are connected to the same circuit, so the load falls on each one.
Mixed connection and grounding in series connection
If you decide to use a series connection of sockets, you can strengthen the overall design by using a mixed method. The essence of the method is as follows:
- A central cable is connected to the distribution box from the common panel board.
- In the preliminary wiring plan, the most distant point of access to power is selected.
- The selected outlet is connected from the distribution box cable.
- The rest are powered from this device.
This method increases the reliability of the network. If an outlet fails, the others continue to work. Disabling the entire system is possible only in the event of a malfunction of the main cable, twisted in the junction box.
Grounding is a must. With a serial connection, if a wire burns out at one point, the rest are left without protection. The optimal way to connect sockets to each other for grounding is mixed. The main cable is fixed under the ceiling, then branches are made for each access point.
This technique has disadvantages - the large length of the wires used, the need to install several junction boxes (for each branch). To know for sure whether high-power devices can be connected to the network, it is necessary to calculate the voltage before the cable wiring stage. An accurate calculation will help you choose how to connect the sockets in the end - in series, parallel or mixed.
Ring connection
Example of ring wiring
This type of connection is rare in post-Soviet countries. The method has a number of undeniable advantages, which is why it has recently been gaining popularity.
How to properly connect sockets to each other with a ring connection:
- From the main (communal) panel to the apartment (house, dacha), a common cable is run in a circular manner.
- In each room (premises), a cut-in is made on the main wire, a distribution box is installed, and a separate circuit is drawn to a separate room.
- Lastly, branches are made to each access point.
If one part of the wire burns out or breaks, the devices continue to work with a ring connection because electricity comes from the other side of the ring. Repairs will still need to be made, but the power supply will remain intact. The reliability of the system is comparable to the parallel connection of sockets. The downside is that the wire consumption is higher compared to classical methods.
How to hide a wire
Methods of using elements to hide wires
The method of fixing the electrical outlet depends on its use. It can be screwed to the baseboard or left as a carrier. This method is used for outdoor products. The cables can be hidden in a special cable channel, which is glued to the wallpaper or secured between the baseboard and the socket cover.
If the socket is installed for a long period, the wires can be hidden under a layer of plaster. If the wall is covered with wallpaper, you can cut it along the laying line. Next, you need to carefully peel off a small part of the wallpaper and make a hole in the wall for the cables. The wires are laid in the furrow made, puttied and covered with wallpaper.
Combined wiring
Combined electrical wiring
This method is used when you need to connect additional ones from one electrical outlet, but you cannot drill into the walls. The procedure for installing and connecting wires in this case is as follows:
- Power outage. It is necessary to de-energize the entire apartment or room in which the work will be carried out. Using a tester, you need to make sure that there is no voltage.
- Removing the protective cover from the main power point.
- Removing the socket by loosening the retaining contacts.
- Connecting wires to the new power point.
- Next, it is checked whether the limiter will not squeeze the wires. If it interferes with the cables, you need to carefully break off a small piece from the socket box or wall to the size of the wire.
- Reinstalling the socket.
- Creating a hole in the decorative cover for the wire.
- Installing the cover.
The wire is led to the desired power point and attached to the wall using brackets every 30 cm.