Modern technologies make human life easier, make it comfortable, simplify access to any information, and also allow you to increase your own safety.
There are many alarms and access control devices, but if we are talking about your own safety in an apartment or house, then the very first point of “protection” is the intercom.
It is the connection of a video intercom that will allow you to be more confident about who will open the door; audio systems are inferior in reliability.
The essence of how video intercoms work is as follows:
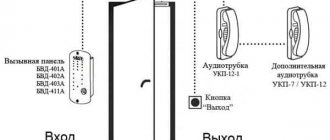
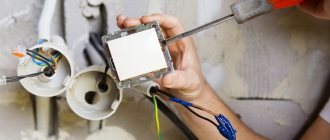
- The communication system starts when you press the bell button, which is located on the calling panel; below is its version of the Arsenal video intercom.
- A sound alert is triggered inside the room, followed by a monitor that displays the person who made the call.
- The owner of the apartment can talk to the caller through the intercom in the video intercom, be it a handset or a built-in microphone.
- The result of the system’s operation will be the opening of the door, which is done by pressing the button with the image of a key or the word “open”.
- Then the video intercom system switches back to standby mode, the monitor turns off until the next call from the calling panel.
What components are needed?
The standard set of audio intercom includes a handset and a device for calling a subscriber (calling panel), which, as a rule, has a vandal-proof design.
The video intercom system must contain a terminal with a screen and a calling panel with a video camera.
There is also a special contact on the calling device, which is necessary to control the electric lock.
This is the absolute minimum for a video intercom to work; it will allow you to identify the person calling, but you also need a lock to provide or deny access to the premises; locks are either electromechanical or electromagnetic.
The locks on the electromagnet remain locked due to the fact that current flows through the coil inside, but this is where design features come into play. If the voltage disappears, the lock will automatically open; to prevent this, it is necessary to install an uninterruptible power supply.
An electromechanical lock closes automatically and opens using a built-in electromagnet; the lock itself comes in two types, with a conventional electric latch or with a key hole. The second option should be chosen by those who want to install an intercom in a country house, since in this case the owner of the house will be able to open the gate, even if there is no one at home.
Electromagnetic locks consume quite a lot of current, which is why it is best to use a separate power supply. At the moment, there is such a thing on the market as a BUZ, a lock control unit, which can replace standard power supplies in electromagnetic locks.
The BUZ can receive energy from a weak current source and accumulate it for a long time, and when it is necessary to open the gate, it will give part or all of the accumulated energy to an electromagnet.
In Russia, the climate is especially harsh, so sometimes in severe frost it is not always possible to open the gate with a key; here you will need an additional lock in the form of an electronic key or a chip; for its operation you will need a reader and a controller for the lock.
To open the gate from the inside and at the same time, being in the courtyard of the house, a special button with good contact is useful; such a button is installed next to the gate itself.
Also, for the intercom lock to work properly, you may need a door closer.
Based on the above, to create a full-fledged intercom in the house you will need the following things:
- Intercom handset
- Call panel
- Electromechanical lock
- Power supply or replacement unit
- Reader
- Controller
- Door closer
- Button for opening the gate from the yard
When you buy components for an intercom from different manufacturers, look at their voltage and current to ensure compatibility, and do not forget about the temperatures at which devices located outdoors can operate.
In addition to the equipment described above, wires will also be needed; the main wire for the power supply can be a double copper wire called VVGng 2x0.75.
For signal wires, you can use twisted pair, as is done in computer networks; an FTP or STP pair would be a particularly good option; they transmit almost no interference and are shielded.
You can also find special wires for intercoms; they are produced by industry.
So, for a regular intercom, the KSPV cable is perfect, and for a video intercom, a good option would be SHVEV or SHVEP, they have one shielded core.
It is worth noting that the letter “P” in the ShVEP cable means that it is suspended, so it can be used for open installation.
Cables can be laid both underground and above ground; for the first option, corrugated or ordinary straight plastic pipes will be used, and in the second case, a regular cable channel, which is used for the rest of the wires, will help.
You may also need the following things:
- Termination for multiple wires
- Heat-shrinkable tubing in various sizes
- Regular insulation tape
- Terminal blocks
- Various devices for fastening wires
Necessary tools for connecting an intercom
To install an intercom in a house, you will need a standard set of electrician's tools, this includes a screwdriver, wire cutters, pliers, a drill or hammer drill and other similar tools.
To solder the wires you will need a regular 40-60 W soldering iron with flux and solder.
In addition, a hot air gun would be a good addition; it perfectly removes old insulation from wires and can be used to connect lugs together.
IP video intercoms with communication via twisted pair (PoE) and RJ-45 connectors
Equipment with Internet connection can be not only wireless, but also wired. This system is similar to Wi-Fi video intercoms, only the elements are connected to the router via twisted pair cable, like a computer with a network card. Internet access expands options for managing, recording and storing data.
PoE is a technology that allows you to transmit data simultaneously with power through a twisted pair cable. Below is an example of an elementary circuit that can work without access to the Internet and with it: just connect the cord of the router or module with a monitor to the router.
Connection features
Connection diagram
There are several features of connecting a conductor for a video intercom:
- Connect the wires through screw terminals.
- Through a foundation, wall or fence column, the wire is passed through a protective sleeve.
- You cannot lay the conductor for the intercom next to a 220 V power cable in the same plastic cup.
- When installing several lines in parallel, the distance between them must be at least 10 cm.
- Immediately before connecting, remove the sheath from the end. For reliability, they are crimped with tips.
- On the back of the call panel body there are wires with different colors and corresponding markings. The cores are connected to each other according to a certain crimping pattern. The joints are insulated with thermotubes.
Device and features of connecting a video intercom
To connect a video intercom you will need a cable with four cores. You can purchase a special wire in the store, where two copper wires are located next to a two-core coaxial wire. It's called a video combo cable. Typically, cable brand KVK-P 2x0.75 is used.
The video intercom is connected to the calling panel using a combined video cable, which has one shielded core
Two more wires are added to the lock, which will allow you to control its mechanism without leaving your home. The call panel is usually screwed at a height of 150 cm from the ground.
If we install a wireless intercom, there is no need to lay and connect a cable. You just need to supply the power correctly.
Video intercom Quantum QM-4HP
Many people prefer to install a convenient, practical and reliable Quantum QM-4HP video intercom in their private home.
Quantum QM-4HP is one of the most popular models among private home owners
Its main characteristics:
- four-inch (approximately 10 cm diagonally) CRT monitor;
- parallel operation of up to 4 monitors in one system;
- door open button;
- connection of one calling panel;
- installing a video memory unit;
- connecting an additional audio tube.
Connection diagram for video intercom Quantum QM-4HP
The video intercom is connected using a standard four-wire circuit, which we described above. Therefore, this model can be used to install an access control system in a private house according to the step-by-step instructions we provided.
Quantum QM-4HP video intercom can be used with an additional video camera and a memory unit for 32 frames
In order to install the intercom correctly, you must strictly follow all the manufacturer’s recommendations and understand the intricacies of installing electrical wires and devices. If you do everything according to the instructions, you will not have to involve specialists and spend additional money on installing this device. And in the end, you will get an excellent intercom with an audio or video system, which will make your life in a private home much easier.
Scheme options for other types of video intercom kits
Above, we examined the most typical connection diagrams for video intercoms, and also described the basics of placing wires and other elements that can be used to guide the installation of other types of similar equipment.
Let us briefly describe other schemes.
Connecting a coordinate analog product. In this example, additional calling panels with cameras are connected directly to the main module with a screen:
Connection via a controller or patch panel is often used. The process of installing wires is not complicated, since the instructions always indicate the pinout of the terminals of this element.
Scheme with switching panel:
Below is another diagram with a controller. This element allows you to connect an increased number of components in a more convenient way. The wires of the parts are connected to its terminal part, and from it to the apartment module there is not a bundle of conductors, but a reduced number of them.
You can include a recording device or video recorder in the circuit:
Device and features of connecting a video intercom
The video intercom, used instead of a handset, is designed in a special way. For example, the Quantum QM-4HP system involves connecting one calling panel, a video memory unit and an additional audio tube. The intercom of this brand is equipped with a monitor and operates on four wires. The device displays a black and white image and is attached to the wall.
Video intercoms, unlike audio handsets, are connected using a four-wire circuit
To connect a video intercom, you need to prepare by planning the installation of the device before finishing work, lay cables in the wall, install the intercom in the right place and check how it functions. In this case, the owner of the house must perform all of the following actions:
- Choose a place to lay the wires and install the power supply together with the panel before finishing the hallway, as this will allow you to hide all the elements of the system in the wall.
- Provide for the installation of a backup power source in the absence of voltage, which will guarantee autonomous operation of the intercom in the event of a power outage.
- Mount the calling panel and cameras at a height of 1.6 - 1.7 m in places where there will be no obstacles to viewing the image on the intercom.
- Lay the wires using a diagram that uses 4 rather than 2 wires, as is the case when installing an audio tube.
- Enclose the wire transmitting the picture in a braid to reduce interference from wires passing nearby. To connect a video intercom, you can use a combined cable for video surveillance systems brand KVK-P 2x0.75.
Proper connection of a video intercom is the key to stable operation of the electronic system. To ensure installation of the device without errors, technicians advise placing the monitor and calling panel at a distance not exceeding 40 meters. Otherwise, the signal will disappear before reaching the object.
Video: intercom installation
Installing an intercom is a good thing. The device acts as a barrier for those who are not invited to visit and thieves. Thanks to the intercom, events happening outside the door can be viewed on the screen at any time.
Where to buy a video intercom for an apartment: prices, market overview
| Photo | Brand/Model | Screen size, inches | price, rub. | Peculiarities |
| COMMAX/ CDV-35A | 3,5 | 4600-5800 | Compact model with tube. Connection of up to two calling panels (distance 50 m maximum), touch screen. | |
| COMMAX CDV-35A | ||||
| COMMAX/ CDV-43K2 | 4,3 | 4300-5980 | Connection distance up to 70 m, touch control, intercom. | |
| COMMAX CDV-43K2 | ||||
| Falcon Eye/FE-71C | 7 | 4700-6120 | Two call panels, the ability to connect an additional handset. | |
| Falcon Eye FE-71C | ||||
| Falcon Eye/FE-78Z | 7 | 8100-9600 | Cordless handset, volume control, touch control. | |
| Falcon Eye FE-78Z | ||||
| Tantos/NEO Slim | 7 | 15700-17200 | Intercom, selection of MP3 melodies for calls, touch screen with a resolution of 800x400. | |
| Tantos NEO Slim | ||||
Tantos NEO Slim
Which video intercom is best to choose for an apartment can be found out after a comprehensive analysis of the facts stated above. You should add data about your own preferences and the current situation in the thematic market segment.
With the right choice of equipment, you will meet only welcome guests
For additional information and exchange of views, use the comments on the article.
Features of the video intercom device
A video intercom is an intercom equipped with a video surveillance function that allows you to open the lock on your door from the inside. The door can be opened from the outside using a special electronic key.
Design and functions
Structurally, the video intercom consists of the following main components:
- a call panel with a video camera located outside the building is housed in a dust- and waterproof vandal-proof housing. Performs the functions of calling, communication and contact unlocking of the lock with a special key;
- indoor video monitor - consists of a display, a wired handset (and/or a public address system) and control buttons. Allows you to receive a call signal, carry out voice and video communication, remotely unlock and lock the lock;
- an electronic lock controlled by a signal or a special key.
Advantages and disadvantages
The main advantage of using a video intercom is the convenience of allowing visitors into your territory and into your home. By installing the display panel in the most suitable place for you, you will save yourself from unnecessary movements around the house and area. The advantages also include video monitoring of the entrance area, and by installing one or more additional video cameras in different places, you will significantly increase the level of security of your home.
I am seen in dentistry, which is located in a private home. Previously, when a client visited, the administrator had to leave the house on the street each time, walk 10 meters across the territory and open the gate manually. Their building is large, three stories high. Recently a hair salon was opened on the third floor and the flow of visitors to the premises increased sharply. I had to install a video intercom. Now access to the territory occurs based on a signal from a video intercom. Moreover, the door can be opened from all three floors of the house.
The disadvantage is that a video intercom is a technical device and there is a possibility of some kind of malfunction or breakdown. It is not always possible to restore its functionality on your own and you must resort to the services of specialists servicing your system. This will take some time, during which the intercom functions will be unavailable.
Some video intercom models allow you to install multiple monitors so that any of them can receive a call
Installation and connection of the calling panel
The calling panel should be mounted primarily on fixed building structures: the wall of a house or a permanent gate post. It is strongly recommended not to install the device on moving devices such as gates, gates or doors, as constant shaking can dislodge the lens inside the housing. Given the miniature size of the lens, even a small shift can become critical.
To prevent the lens from being illuminated by sunlight, it is necessary to use a sun visor or a corner-mounted bracket that is installed under the calling device and changes its viewing angle.
Rice. 3. Call panel with sun visor or corner bracket
Otherwise, sunlight may backlight visitors and only the silhouette will be visible on the screen, not the face.
Rice. 4. Recommendations for installing the calling panel
Installation of the video intercom panel is carried out in the following order:
- The back cover is removed from the calling panel; • Drilling locations are marked through the mounting holes;
- All marked places are drilled and an additional through hole is drilled to lead the communication line wires and lock control into the yard;
- The communication line is connected to the contact strip of the calling panel in accordance with Fig. 7 and is brought into the house to the subscriber device;
- The wire running into the yard to control the lock is connected to the contacts of the electromechanical lock.
- Connect devices to the network only after all electrical connections have been completed!
After checking all connections, the calling panel is attached to the base with special “secret” screws, which cannot be removed with a simple screwdriver.
CONNECTING ELECTRIC LOCKS TO VIDEO DOORPHONE
In general, you can install two types of locks with a video intercom:
- electromagnetic;
- electromechanical.
For detailed information about their advantages, disadvantages and installation features, go to this page.
The fundamental difference between magnetic and mechanical electric locks is in the control method. The first ones are closed when tension is present and come off when it is removed. The latter are unlocked when a short-term electrical impulse is applied.
That is, to work with electromagnetic locks, the panel must keep the circuit closed and open it only to open it, and vice versa with electromechanical locks.
In practice, the second option is more common, that is, there are no problems installing a video intercom with an electromechanical lock, but with a magnetic one you need to be smarter. In order not to build circuits for inverting the control signal yourself, you need to buy a controller.
WHEN YOU NEED A CONTROLLER
Firstly, in order to connect the electromagnetic lock to the calling panel with normally open contacts. To do this, it is enough to purchase an electromagnetic lock with a built-in electronics board. In this case, power is supplied to it separately, and the terminals of the calling panel are connected to the controller input.
But don’t forget, the owners must somehow get into the apartment, especially when no one is home. This can be done in two ways:
- install an electromechanical lock and open it from the outside with a key;
- use a Touch Memory or Proximity reader and key fobs or cards for it (for all types of electric locks).
In addition, you need to leave the premises. In the first case, again, it is simpler - self-cocking locks have a special button that unlocks the locking mechanism. Otherwise, you need to install an “output” button and connect it to the controller.
The photo above shows the ML-194 controller. Its capabilities are quite sufficient for a home video intercom. The controller has a built-in memory that allows you to store up to 500 key codes.
Programming is done using a master key. It has protection against incorrect power connection, the so-called “fool protection”.
The device automatically detects the type of exit button: normally closed or open. But you need to take into account that when using a controller, the control contacts of the calling panel are also connected to it. In this case, parallel to the exit button. Therefore, the states of its contacts must correspond to the operating mode of the panel relay.
Cable Features
The cable is selected depending on the type of intercom and installation location
Any wire consists of 2 elements:
- The conductor is made of copper or aluminum wire and transmits electric current.
- Insulation – shell. Prevents mechanical damage to the conductor, protects against moisture and sunlight, prevents the influence of external interference, and shields the current-carrying conductor.
Insulation is determined by the type of intercom and installation method. If wires are laid inside a building, especially in a private house, they are subject to only one requirement: to reliably protect the consumer from electric shock. But if the cable is installed outdoors, choose the option with a polyethylene sheath.
Noise immunity is provided by the metal braided core - screen.
Types of intercoms
Among all types of intercoms, special mention should be made of the designs of digital and coordinate matrix devices, which are used not only in private homes, but also in multi-apartment buildings.
They have their own connection diagrams and are highly reliable. In digital intercoms, the alarm bell is transmitted via a two-wire line. With the help of special jumpers, a signal is transmitted over a twisted mesh for a specific subscriber. Coordinate matrix intercom systems are quite simple to install. Switching a call to a specific handset is carried out using a switch connected to a coordinate communication device.
For connection, two cables corresponding to the individual number are used. To establish communication, the signal is transmitted to the switch. After the signal is processed by the modulator, it is connected to the desired cable. As a rule, a parallel connection is used, which requires compliance with polarity. If the connection is incorrect, not only a specific line can be affected, but the entire system.
Video intercoms for a private home: equipment and operating principle
A standard video intercom, intended for use in a private home, consists of the following elements:
- base unit, which is located indoors and equipped with a display;
- a panel that is installed outside and includes a video camera;
- an electronic lock that is activated by the influence of a key card.
One of the types of video intercom equipment
The base unit is usually installed on a wall in the hallway or any other room from which you want to have a view. Many people prefer to install the device in the kitchen, claiming that it is more convenient. Control can be carried out in two different ways: standard buttons or using the touch panel.
As for such components as a video camera and a panel, you need to understand that these are two separate elements that are simply located in one housing. But often, in order to increase the available visibility, additional cameras are connected, located in other places, for example, behind the gate or simply on the site.
The base unit of the video intercom is most often installed on the wall in the hallway
As for the calling panel, there is a special system on its surface that is responsible for reading the digital code that each key card is equipped with. Nearby there is a call button and a speaker for house guests
It is extremely important that the camera lens, as well as the entire outdoor unit, have an anti-vandal coating.
Types of electronic locks for video intercoms
Before you buy a video intercom kit, you need to pay attention to what type of electronic lock is provided in this case. There are only two options:. electromagnetic lock, which consists of a metal plate and a core
In this case, the door is locked using the magnetic field of the coil. Opening is carried out only as a result of pressing the corresponding button or a signal from the key. The operation of such a system does not stop due to the backup power system even if the power supply to the device is interrupted;
an electromagnetic lock, which consists of a metal plate and a core. In this case, the door is locked using the magnetic field of the coil. Opening is carried out only as a result of pressing the corresponding button or a signal from the key. The operation of such a system does not stop due to the backup power system even if the power supply to the device is interrupted;
The video intercom door unit is designed to monitor the entrance area
electromechanical lock is a slightly different design, which is equipped with bolts. This design allows the door to be opened using a regular key. At the same time, the lock functions perfectly not only in the absence of power, but even if the operation of the uninterruptible power supply was disrupted.
It is worth noting that when it comes to installing a video intercom in a private home, users often prefer models with an electromechanical lock. Due to the absence of the need to install an additional power source, as well as a higher level of reliability, this option takes a leading position. Electromagnetic systems are often purchased for installation in apartment buildings, where the issue of an increased level of security is not so pressing, and the door is opened many times more often.
Types of intercoms and their main manufacturers
Based on functionality, intercom systems can be divided into 2 groups: audio intercoms and video intercoms.
The first type works with a person only based on his voice, the second is able to identify a person using both his voice and video.
The second type can work not only as a regular intercom, but can also serve as a video recorder that can record what is happening on any type of media.
However, installing a video intercom in a private home does not require extra costs and skills. Such an intercom differs from a regular one only in that it transmits a video signal, and in order for you to have a video intercom, you just need to purchase a special screen and run 2 additional wires for a successful connection.
Thus, installing a video intercom in a private house is quite a simple procedure.
There are also manufacturers of intercoms that create devices that almost do not need wires; they are capable of operating via a radio signal or the Internet, only the cost of such access control systems will also increase due to the necessary new modules for communication.
There are many manufacturers of intercoms on the Russian market, we recommend that you turn to one of these manufacturers:
Products of the same price from these companies have largely similar characteristics and functional basis for operation.
Installation Specialists
As technology and equipment develop, companies that install and maintain modern equipment are also improving.
In order to avoid becoming a victim of poor-quality work, you will still have to spend some time studying reviews about the proposed contractor. If you have the opportunity to look at photographs of completed objects, you can call and ask about prices for a video intercom with installation. After hearing the consultation, try to evaluate the professionalism of the employees; do not hesitate to ask various questions, since it concerns your own safety.
If you have acquaintances or friends who already use this system, then you can ask how much it costs to install a video intercom and compare the price with the offers of different companies. The estimated cost of the work is as follows:
- Installation of a calling panel at an apartment door – 7,000 rubles and more;
- For private houses – 10,000 rubles and above;
- For offices – 18,000 rubles and above.
It is also important to inquire about the specialists’ vision of how to install a video intercom more compactly and correctly, and where to place the main and additional components of the system. And only then compare the information received and create the best option that will be convenient for the subscriber and practical from the point of view of professionals. During the installation process, it will be better to familiarize yourself with the route along which the cable for connecting the video intercom is laid, so that during possible repairs or other work on the walls, you do not damage it and disrupt the signal.
When all components are connected to each other, it is necessary to check the functionality of the entire system by applying power to it. The video intercom calling panel must send a signal to the monitor after pressing the bell button. The sound will notify the owner of the apartment, the monitor will become active and the image from the camera will be displayed on it. If there are additional connections in the form of another camera, you should immediately check it by switching the viewing mode on the monitor. The next step of checking will be the audio signal; it is worth checking with the person at the door how good the sound quality and its volume are, and in response, independently evaluate the same parameters, but from the monitor side.
The specialist who installed the video intercom is required to demonstrate the full operation of the entire system with all additional components, if any. In case of any malfunction or poor image quality, the defect must be corrected.
Connection diagrams for BUZ and electromechanical lock
We return directly to the BUZ connection diagram. Place the KSPV cable inside the lock.
If there are factory wires on the terminals, remove them. Next, place the lock control unit inside and connect the wires to it:
Connect the two ends from the BUZ to the original terminals of the lock in any order.
If you have a control unit with three wires, then the connection diagram will look like this:
Two wires need to be powered “+” and “-” (GND), and the third wire must be connected directly to the lock terminal. At the same time, one of the “lock” terminals from the calling panel is also connected to the negative wire.
The second “lock” terminal is fed directly to the door lock electromagnetic coil.
After all the described work, connect the video intercom panel to an outlet and check the operation of the system. Settings are made according to the instructions for your model.
To independently leave the house through the gate (including when there is no light), press a special button on the lock. It ensures the opening of the mechanism.
If during installation you need to turn the lock tongue over (depending on the location and direction of opening of the gate), press it with your hand and pull out the end cotter pin from the rod.
After this, loosening the spring, but not extending the rod all the way, turn the tongue around its axis. Push the rod into place and pin it.
Do not forget that all such systems are, in essence, protection from good people. If a bad person (thief) wants to get through the gate, he will only need to pull off the calling panel and short-circuit a couple of necessary wires.
Therefore, do not neglect other security systems, or turn off the intercom when you leave home.
https://youtube.com/watch?v=BLLM8TvWZLk%3F
Sources – cable.ru, Kabel.RF
Where should I install the intercom elements?
Before you begin installing all the components of the intercom, you should determine where they will be located, especially attention should be paid to where the handset for conversation or the terminal with a monitor will be located; an excellent option for the location of these elements could be the kitchen or hallway, in other words, those places where people visit most often.
The next step will be laying the wires, both power and signal, only after that the installation of the intercom itself begins.
At the end of the work, the electrical parts are connected and the overall functionality of the device is checked.
Possible problems
Problems occur both during the installation process and during the operation of an already installed video intercom system. It is also possible to eliminate them yourself at home, having some knowledge and without resorting to the help of company workers.
To carry out comprehensive and high-quality diagnostics of intercom systems, technicians use additional devices: a mini-monitor, a simple external camera and calling panel, a simple intercom unit, a spare power adapter for 12 V or other voltage, a simple USB converter paired with a mini-laptop, if digital intercom system. The higher the qualification of the master, the more auxiliary devices he takes with him. This allows him to quickly find out what is causing the problem and replace the faulty unit.
How to connect an intercom with your own hands, see the video below.
What is a video intercom
A video intercom is a security device that allows you to control the arrival and departure of people in your home, record audio and video of arrival/departure events, and remotely open the front door lock. The operating principle is similar to a conventional intercom:
- the guest approaches the door and presses the call button;
- the alarm system is activated in the house;
- the owner sees it and decides whether to open it or not.
Unlike a simple audio intercom, a video stream is also transmitted along with the sound. This way the owner sees the newcomer. In classic systems, the transmission goes to the included monitor, but phones and tablets are often used as the head unit. To do this, the intercom must be “smart” and support the appropriate capabilities.
“Smart intercom” may have additional functions:
- differentiation of access rights;
- intelligent face recognition system;
- broadcasting data to cloud services;
- remote control via the Internet.
How to install an intercom in a private house?
The main elements of the access system are:
- ringing device;
- locking lock (systems with an electric lock or a magnetic lock);
- speaking handset (or video intercom);
- power unit.
The auxiliary part is connecting cables and wires.
First, let's deal with the installation of the main parts of the system, and then we will move on to the installation and connection of wires. To understand what will be discussed next, let’s turn to a visual diagram of an intercom in a private house:
Let's first look at the installation of its elements indoors. Namely, the speaking handset (No. 1) and the power supply (No. 2).
- The power supply provides constant voltage to other elements of the system. It can be installed next to the speaking handset or near the electrical distribution panel. The connection is made using an ordinary plug into a 220 V socket. It powers the calling device and the electromechanical intercom lock.
- The tube is mounted in a convenient place. The installation location is usually the wall near the front door. We attach it to the wall and mark the points for the holes. We hammer dowels into the finished holes. Now the intercom can be securely secured with self-tapping screws. The intercom handset is connected according to the diagram below:
From it it is clear that the intercom is connected by two wires. As a connecting cable, you can use a two-core telephone wire or twisted pair.
At this point, the work on installing equipment indoors is completed - we move on to the street. Here we have to install an electric lock and a calling device.
The calling device is mounted at the entrance to the site. But it would be wrong to install it directly on the gate, since this involves the installation of an additional flexible connection, which entails a decrease in reliability and increased wear of the connecting wires. Therefore, it should be installed and connected on the fence or on a post at the entrance. We screw the calling panel in the same way as the handset - with self-tapping screws. For example, like this:
In real life it will look like this:
In a private home, an electromechanical lock is used as a locking device. It is installed on one of the “rigidities” of the entrance gate structure, and the counter part is on the frame. Connection will not be any particular problem, since a two-core cable is connected to it and connected to marked terminals. According to the design of the fence and gate, the wire is laid in plastic channels, and the transition point of the flexible connection is laid in a corrugation.
A few words about connection. It is much easier to install wires if the installation of the system is known at the design stage. Then all control and power lines are neatly hidden inside the walls, without disturbing the aesthetics of the room. Otherwise, in order not to damage the walls, the cable is hidden in cable channels.
The video below clearly shows the procedure for installing and connecting an intercom system in a private house:
Do-it-yourself intercom installation: sequence of work
Whatever connection scheme you choose, the installation technology and the sequence of work look approximately the same. The whole process can be represented in the following stages:
- Cabling.
- Installation of an external intercom unit.
- Installation of the indoor unit.
- Switching wires.
The cable laying, which will connect the external and internal intercom units, is carried out along the most convenient route for you. Indoors, the wire is routed through grooves or cable channels.
Before installing an intercom in a private house, you need to decide on the method of installation outdoors. On the street, an aerial laying based on a tension cable or underground is used.
As for the external method, you need to take into account the possibility of a wire breaking during strong winds, as well as lightning striking it during a thunderstorm. Underground installation is more appropriate, since with proper protection of the wire and compliance with the PUE (electrical installation rules), the system will operate without interruptions or malfunctions.
The cable for underground work must have reliable protection (sheath) from moisture and mechanical damage. VVG, PVS, ShVVP wires are suitable for these purposes.
The depth of the underground cable must be at least 0.75 m. Also, as additional protection, you can use HDPE corrugated hose or a special tube.
At this stage, you should take care of the set of tools that you will need when installing the device:
- construction knife;
- insulating tape;
- electric drill;
- pliers;
- self-tapping screws;
- dowels;
- screwdriver;
- a special attachment for an electric drill (for chipping walls);
- alabaster;
- pencil;
- level;
- voltmeter.
Installation of the external intercom unit is carried out in any place convenient for you. More often this is an entrance gate or a fence post near the gate. From a practical point of view, it is not recommended to install an intercom on the gate, since its regular opening and closing leads to rapid wear and subsequent cable breakage.
A fence post that is located at the entrance gate looks like a more attractive prospect. For reliability and long-term operation, it is better to place the unit inside a niche specially made for this purpose. A special box is initially installed in it, and the block itself is placed in it. The specifics of the work are reminiscent of installing a regular electrical outlet and socket box, where all the necessary wires are routed.
If the presence of an additional video camera and/or an electrically controlled lock is implied, then five more wires are routed into the installation box. Two wires will supply electricity to the outdoor unit and the lock system, the remaining three will work for an additional surveillance camera. These three wires are connected to the indoor unit, but they can also be run past the external unit box and directly connected to the location where the video camera is installed.
Installation of the internal intercom unit is facilitated by the fact that it does not require built-in (hidden) installation. The unit itself is something like a video phone, which only needs to be securely fixed (hung) in a pre-selected place convenient for you. This unit includes two parts - a video phone and a power source, which can additionally be equipped with a battery. The double block can be placed in any desired location, taking into account the laying of wires from it to the videophone. A thin 12V cable is quite suitable for this purpose.
Before connecting a video intercom, you need to thoroughly study the attached diagram and understand the principles of wire switching.
If you are faced with such a question for the first time, you may naturally have difficulties. However, it is worth noting that almost all manufacturers of such equipment always include a detailed connection diagram with the device, where all connection points, terminals, and their functions are described and indicated.
At this stage, the main thing is not to mix up the wires and methodically make the connection one wire at a time. For example, we took a blue wire, brought it to the terminal of the external, and then the internal unit, followed by a wire of the next color. The connection is made until all the wiring is connected to the places indicated in the diagram, after which the device is checked for functionality.