Illuminating a plasterboard ceiling is the most popular design solution today. There are several reasons for this: the possibility of creating a unique room design, dividing the room into zones, the ease of creating plasterboard boxes for placing lighting, and the low cost of materials.
Lighting options for plasterboard ceilings
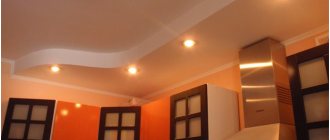
There are two options for lighting a plasterboard ceiling: open and hidden. Open lighting is organized using spotlights mounted in the plasterboard ceiling.
Fig.1.
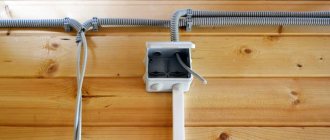
For open lighting, lamps are used in which the lamp is located below the ceiling level. To install such lamps, a box height of 3-4 cm is sufficient, and some types of lamps can be attached directly to the ceiling. In this case, a plasterboard box is necessary for laying electrical wiring and decorating the room.
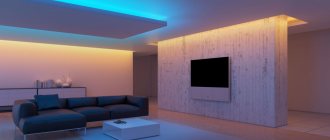
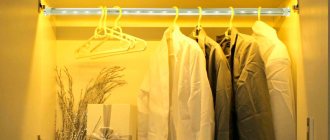
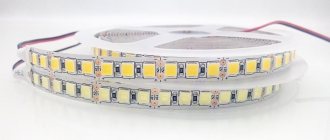
Hidden lighting is located in special boxes. Previously, such lighting was organized using neon lamps. Today neon has been replaced by LED strip. It’s easy to organize illumination with an LED strip with your own hands, since working with it does not require special equipment.
Fig.2.
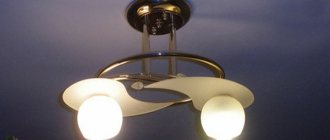
Hidden lighting can be contour or spotlights. For illumination with spotlights, the height of the box must be at least 7 cm. To organize a niche for contour lighting, the height of the box will be 10 cm.
It should be noted that both lighting options are often used. Moreover, they do it in such a way that the backlight works independently of each other.
Popular options
The most popular options for masking lighting fixtures is installing a niche or box. Both options are suitable for multi-level plasterboard ceilings. Note! The box and niche do not require large sizes. It will be enough to create a narrow structure to hide even an LED strip with all its accompanying elements (controller, power supply).
Box
The advantages of such design solutions are:
- The range of selectable lighting devices, which may become slightly warm during operation, is significantly expanded;
- allows you to install larger lamps, as the structure is strong and rigid;
- installation of lamps can be carried out to the profile itself;
- installation of the box will allow you to hide all the unevenness of the main ceiling, as well as communication means (wires, additional lighting equipment, etc.).
Note! If the LED strip is connected to a controller, then it is possible to create a controlled lighting system.
For hidden lighting, installation of the box and niche occurs according to the following scheme:
Box/niche frame
- the box is installed using guide profiles that are installed around the perimeter of the room;
- We raise the box to height using rack profiles cut into lintels;
- We connect all the profiles together with screws, and with the walls with dowels;
- Then the rack profiles are connected by guides. The result is a metal box frame;
- after that we run wires for lighting in the frame;
- then we cover the structure with plasterboard sheets.
At this stage, forming a niche involves installing the bottom sheet of drywall approximately 8-12 cm wider than the frame of the existing box. It is on the protruding part of the material that light sources should be placed. On such a niche you can place an LED strip, duralight or flexible neon.
Niche diagram
This design will look beautiful in almost any room of the house.
Note! Some experts do not recommend this solution for the kitchen. This is due to the special microclimate of this room. To ensure that the box or niche lasts in the kitchen for as long as possible, use moisture-resistant sheets of plasterboard.
The disadvantages of this design solution include:
- these are quite time-consuming and physically labor-intensive structures;
- if the installation technology or final finishing is violated, cracks and chips may appear on such a ceiling within a few years;
- The work should be carried out together, since sheathing the ceiling with plasterboard sheets alone will not be very convenient.
Problems here may arise at the stage of installing profiles at the same level and cutting the material.
Box for open lighting
As mentioned earlier, open lighting of the plasterboard ceiling is organized using built-in lamps. If the ceiling is made entirely of plasterboard, then the lamps can be mounted directly into it.
Fig.3.
If the height of the ceiling allows, then make a suspended ceiling from plasterboard, and use spotlights to illuminate the room or individual areas.
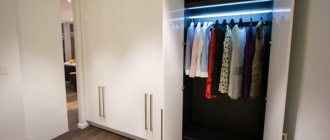
Often they do things differently; lamps are installed in special boxes. This approach contains both a design technique and a purely practical orientation. A plasterboard ceiling reduces the height of the room. With low ceilings, it is more advisable to leave the base of the ceiling the same and install the lighting in specially made boxes. The boxes can be located around the perimeter of the room, or create arbitrary patterns on the ceiling.
Fig.4.
If the height of the room is small, it is advisable to make a box of plasterboard around the perimeter for installing spotlights. You can install lamps of any type in the box, while the level of the main ceiling will remain the same.
Fig.5.
To organize lighting in the center of the room, you can also use a plasterboard box.
The easiest to manufacture is a rectangular plasterboard box located around the perimeter of the room. Typically, such a box has a width of 50 cm and a height of 50 - 70 mm. These are the most optimal box sizes.
The whole difficulty of creating a box lies in creating a frame for the box. The frame can be made in various ways. But there are only two most popular.
Fig.6.
The frame for a plasterboard box is made of metal profiles. A guide profile (PN) is fixed to the ceiling and walls, and the outer edge of the box is made from it. Ceiling profile (PP) is used for horizontal and vertical crossbars.
A guide profile for plasterboard is attached to the ceiling and wall. A rib is assembled from the guide profile, which consists of two profiles. These profiles are connected as shown in the diagram below.
Fig.7.
The outer edge of the box is made from 2 ceiling profiles, connecting them as shown in the figure. A horizontal crossbar made of PP profile will be attached to the bottom part of the structure, and a vertical crossbar to the top part.
Next, using sections of the guide profile, the stiffening ribs of the box are formed.
The second version of the box is no more complicated than the first. A guide profile is fixed to the walls and ceiling. Horizontal lintels are made from ceiling profiles and secured to the ceiling with hangers. A guide profile is also used for the ribs. It is fixed to horizontal jumpers.
Fig.8.
With a small height of the box of about 7 cm and a large width, it is possible not to install vertical crossbars, and the design of the box is simplified. A guide profile is used as a rib, and a direct suspension is used to hold the horizontal crossbar.
On the vertical side of the box, jumpers are often not installed at all, but are immediately covered with a strip of drywall.
Fig.9.
If the box has a small height, then the rib is fixed directly to the drywall without vertical crossbars or intermediate hangers. Before covering the box, electrical wiring is installed in it.
Before sewing the box, wiring is carried out for future lamps.
What is special about hidden lighting?
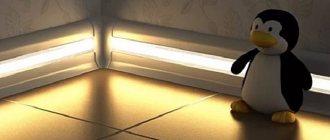
First of all, it is worth remembering that it is used mostly as a design element, and not for the purpose of full lighting. Although, quite often, I use it in dark and far corners of the room for additional lighting.
Keeping in mind the decorative purpose, it is possible to create a surprisingly easy solution and even visually expand the ceiling with a certain touch of fabulousness and mystery.
Such lighting is also recommended for low ceilings, because it can expand the boundaries of reality, making you feel as if the ceiling is floating in the sky. It is very beautiful, stylish and, perhaps, even fashionable, because the world’s most famous designers, fashion designers, actors, and creative personalities use it to decorate their homes. Having seen such a solution once, you immediately want to implement it in your home.
Schemes of plasterboard boxes for built-in ceiling lighting
Fig. 10.
Fig. 11.
Fig. 12.
Fig. 13.
Arrangement of a cornice for hidden lighting made of polystyrene foam
This design has undeniable advantages - a simple device, low financial costs and faster installation compared to the previous project. But the disadvantages are quite significant:
- low strength characteristics;
- sensitivity to high temperatures.
These two disadvantages greatly limit the number of light-producing elements that can be used with expanded polystyrene. The only light sources can be LEDs. Installation, which can be completed in 2–3.5 hours, consists of the following steps:
- marking the area where the cornice will be located. The optimal distance from the ceiling will be 5–8 cm;
- fixing the cornice with glue. It is best to attach it to a cleaned primer surface, but it is possible to attach the structure to wallpaper or drywall using liquid nails;
- Each joint between the planks must be scrupulously glued. This will give additional strength to the cornice;
- laying the wiring in a niche and placing the current converter for the LEDs outside the eaves.
Warning! A strip for decorative lighting longer than 4.8–5.2 meters must be connected to the power supply via a parallel connection. If you connect the elements in series, they will soon fail!
Box for hidden (contour) lighting
By analogy with the previous option, hidden ceiling lighting can be installed both around the perimeter of the room and along the perimeter of the shaped boxes.
Fig. 14.
Ceiling contour lighting can be used as decorative or main lighting. This type of lighting consists of a specially designed box in which an LED strip is installed.
Fig. 15.
A box with contour lighting can be located either around the perimeter of the room or in the form of decorative elements on the ceiling. The design of the box is the same in both cases.
A combination of these options is also often done.
To install hidden ceiling lighting, you also need a box. The box can be open or closed.
Fig. 16.
There are 2 types of niches for contour lighting: open and closed. If you need to have a wide band of lighting, then choose an open niche. If you need to get a clear outline, then use a closed niche.
As can be seen from the diagram above, the box is similar to the box for open illumination with spotlights, with the only exception that a cantilever niche is added for laying the LED strip.
Fig. 17.
An open niche is organized due to the fact that to cover the horizontal surface of the box, the width of the plasterboard sheet is made 5-10 cm larger than the width of the box.
Fig. 18.
For a closed niche, the width of the plasterboard sheet for the horizontal part of the box is made 10 cm larger than the width of the box. A guide profile is attached to the edge of the protruding part. A strip of plasterboard 5 cm wide is vertically fixed to the profile. This creates a closed niche.
One of the important parameters of a niche is its size. The size affects the appearance of the box and the backlight strip. The smaller the distance between the box and the ceiling, the narrower the backlight strip, and vice versa. It should be noted that the location of the LED strip also affects the width and brightness of the backlight strip.
Another solution
Expanded polystyrene cornice
If for certain reasons the formation of a niche or box is impossible (for example, there is already a single-level ceiling made of plasterboard and you don’t want to break it), then in such a situation the solution would be to install a polystyrene foam cornice.
A wide decorative cornice is the simplest way to create a hidden type of lighting. But it is rare for several reasons:
- the cornice allows you to install only the lightest light sources;
Note! Only an LED strip can be installed on a polystyrene foam cornice without additional equipment.
- low strength of the resulting structure;
- low thermal stability.
At the same time, the advantage of using such a cornice is the ease of installation and the fact that all the work can be easily carried out by one person. Installation of the cornice occurs as follows:
- we retreat 5-10 cm from the ceiling surface. This is the optimal distance;
- draw a marking line around the perimeter of the room;
- Glue the cornices along the line. They can be glued both to wallpaper and to bare plaster (a more preferable option, but only after priming);
- We use liquid nails or acrylic putty as an adhesive;
- the joints between the cornices also need to be glued for camouflage;
- after this, the entire structure can be painted to match the color of the overall interior or ceiling:
- then install the backlight.
Ready cornice
As you can see, installing a hidden type of lighting for plasterboard ceilings has several implementation options. Choose the most optimal one for you and forward to achievements!
Schemes of combined lighting boxes
Fig. 19.
Fig.20.
Fig.21.
Fig.22.
Installation
Start installing the ceiling by taking measurements with a tape measure, visually transferring the sketch of the room onto a sheet of paper according to the calculations obtained. When carrying out repair and construction work, make sure that the room is warm enough, at least 15 degrees. And if you started renovating the entire room, start installing the ceiling after leveling and treating the walls, but leave the painting work for last.
At the same time, pay attention to the fact that there are no temperature jumps or changes in humidity levels in the room, as this may affect the quality of the drywall. Store gypsum board sheets exclusively in a horizontal position, without allowing deflections
Before installing the lighting, the plasterboard structure itself is installed. First, a frame made of a metal profile is fixed, while the necessary holes or niches for lighting are thought out. If you have construction skills, you can fix plasterboard boards to the ceiling yourself. Or invite a team of professionals who will not only install the ceiling, but also help with choosing the type of lighting.
Let's consider the main stages of work:
Clean the ceiling from any remnants of wallpaper, old whitewash and putty, remove the chandelier and other lighting fixtures. Along the perimeter of the room, draw a line a few centimeters from the ceiling along which you will attach the profiles. First, hangers for the main frame are mounted; to do this, you can apply a grid with markings to the ceiling and secure them with a hammer drill at an equal distance from each other. Then a guide profile is attached around the perimeter. As a result, you will get a “metal belt” into which the main profile will be inserted. It is attached with self-tapping screws to hangers that carry the load of gypsum board sheets. We insert the ends of the profiles into the grooves of the guides
Some craftsmen use adapters - “crabs” made of metal or profile extensions, which allows you to make a plasterboard ceiling in a large space and without the involvement of additional help.
Now comes the turn to sheathe the frame with gypsum board sheets. Mark the sheets and cut the drywall with a knife so that the parts fit together without gaps.
- Process gypsum board sheets exclusively on a flat surface.
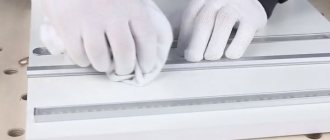
- Once you have marked the cutting lines, place a ruler on the line and use a knife to cut through the top layer of drywall. Next, bend the sheet along the cut line and carefully break it.
- To achieve perfectly smooth edges, sand them with sandpaper.
- The resulting fragments are screwed with self-tapping screws to the main profiles. Self-tapping screws must be screwed in at an angle of 90 degrees and at least 1 cm deep into the profile so that the sheets are fastened with high quality. The caps should be “recessed” 1-2 mm inside the gypsum board sheet and then puttyed. Finally, level the surface to perfection by gluing the seams with reinforced tape and filling with putty.
- If you accidentally left a dent during installation, it can be filled with putty before painting, so that the defect will not be visible. After drying, the ceiling is sanded and covered with water-based paint of any shade. You can also cover the surface with wallpaper or even install stained glass windows, which will make the room unique in design.
The times when standard apartments had standard ceilings are far in the past. Modern technologies and innovative finishing materials make it possible to create incredible designs with unique lighting to decorate the ceiling space. Each owner is free to choose the option of decorating a living space to their liking and in accordance with their financial capabilities. The most affordable and at the same time effective option is a single-level plasterboard covering with a slight lowering of the ceiling level by 10-15 cm.
Installation of LED strip
The easiest way is to install an LED strip in an open niche. It is glued to the inner side.
Fig.23.
The LED strip is installed in a niche. The appearance of the contour lighting depends on the position of the tape in the niche. To extend the life of the LED strip, it is recommended to install it on a metal strip, which will ensure good cooling of the LEDs. You should also not use a tape longer than 15 m connected to one power supply.
It is important to note that the LEDs heat up well during operation. To extend their service life, they need to be cooled. To do this, you can install an aluminum profile in place of the LEDs and stick an LED strip on it.
Installation in a closed niche has options: sticking tape on the back wall of the box, sticking tape on the profile located on the front wall of the box.
Fig.24.
Depending on the width of the lighting strip required, the strip can be installed in different places in the niche.
Often the LED strip is placed at the bottom of the box. This is quite a risky option. The fact is that in certain cases a shadow may form from the front wall of the niche. This may make the backlight less aesthetically pleasing.
To install an LED strip, in addition to the strip itself, you will need a transformer, and in the case of multi-colored LEDs, also an RGB controller.
Fig.25.
Using RGB tape you can change the color of the contour lighting. To do this, you need to install a controller next to the tape.
We looked at all the options for lighting a plasterboard ceiling and how to create it. In most cases, a box is used to install spotlights, since it does not reduce the height of the room. Using the box you can decorate the room and organize the illumination of the required area. A good solution is a combination of spotlights and contour lighting; with their help, you can create a sufficient level of illumination, and by using LED lamps in lamps you can significantly reduce power consumption and reduce the cost of lighting an apartment.
In conclusion, some interesting design solutions for lighting various rooms. These solutions use various lighting options and their combinations.
Light source - how to make the right choice?
A beautiful gypsum board ceiling with hidden lighting as a result of designer imagination and skillful installation will only come out after you have made the right choice in favor of certain LEDs. The tape is presented in a wide range and without delving into the essence of the properties of individual models, it will be difficult not to make a mistake with the choice.
In combination with plasterboard structures, the following lighting options are best combined:
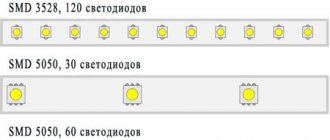
- SMD 5050;
- SMD 3528;
- RGB.
It should be taken into account that the first two options will lose their original brightness and light saturation after several years of moderate use. On average, the brightness drop is equal to 40% if the tape acts as the main lighting and 10% as additional lighting.
That is why designers recommend choosing an RGB strip for lighting plasterboard structures, given that the product:
- maintains glow intensity regardless of service life;
- practical;
- allows you to create a diffused light flux of 12 lumens.
You need to choose an LED strip not by the color in the photo, but also by taking into account the number of LEDs per meter. On average, this number ranges from 30 to 120 pieces. The more LEDs per meter of product, the brighter the light from the strip will be and the more expensive the installation will be. This is primarily due to the need to install a powerful power supply.
For normal lighting in an ordinary living space, a strip with 60 LEDs per meter is suitable. Such models will not be so expensive, in addition, the lighting during their use will be as natural as possible without unnecessary brightness.
So, to summarize all of the above, we note that a plasterboard ceiling with a niche for lighting can be planned after the final choice in favor of one or another light source. In the case of LED strip, consider:
- type and density of LEDs;
- glow color (color and monochrome models);
- color temperature;
- device voltage;
- water resistance class.
The last parameter is especially important for rooms where the ceiling will require frequent cleaning. Sealed models can be washed and cleaned every day without the risk of damage.
In the bathroom, kitchen, and loggia, lighting with a sealed LED strip is the only correct solution.
Flush mounted LED lighting for home and office
Concealed lighting has a modern appearance and is extremely elegant. Our recessed lamps are available in many designs and colors. In addition to the already mentioned colors that can be matched to the interior design, the variety of shapes and decorative finishes also deserves attention. The range also includes mobile, antique, double and other models. Considering that LED recessed lighting is also energy efficient, our collection is ideal for both the home living room and the modern office.
Square LED panel
The lamp is made of high-quality materials and is additionally equipped with an efficient, irreplaceable LED light source, which has reduced energy consumption by up to 60% compared to lamps with fluorescent lamps.
This is a modern replacement for lighting fixtures that use classic light bulbs.
A 12W flat lighting device emits light to the eye with a temperature in the range of 3000K-4000K-6500K (CCT) with a luminous flux of 1150lm.
A very narrow body and shallow installation depth are not all the advantages of the presented lamp; the reflector is made of non-yellowing PMMA with a long service life.
The first method of installing a frame made of profiles
The first method is quite easy to implement and understandable. Marking and installing a single-layer frame around the entire perimeter of the ceiling is simple. But there are several subtleties in the arrangement of ceiling profiles. They will help make the structure strong and reliable, at a reasonable cost of effort and money.
Scheme for a two-tier ceiling, first option
To make such a frame of a two-level plasterboard ceiling, you will need guide ceiling profiles (PNi PP) and ceiling profiles (PP). The guide profile is attached to all walls of the room. In this case, the marking line should not deviate from the selected horizontal line. Marking the line is best done using a laser level and a paint cord. The minimum distance from the former ceiling to the future line is 6 cm. The PNP is positioned so that the marking runs from below. The profile is attached to the wall using dowel-nails Ø6-8 mm with a distance between them of 40-60 cm.
The ceiling profile in the lathing is divided into longitudinal and transverse. They form rectangular cells, usually with sides of 60x50 cm. The longitudinal one is the basis of the structure and is located parallel to the long walls of the room. It is attached to the ceiling with direct hangers, which take on most of the weight of the gypsum board sheets. The suspension is fixed to the ceiling with anchor wedges for reliability.
Ceiling profile connection diagram
The distance between the centers of the longitudinal profiles is 60 cm if the ceiling area is large. One end of the PP is inserted into the guide profile and attracted to it with a self-tapping screw. The other is secured by a straight hanger closest to this end. The horizon is controlled by a laser level. The metal parts of the frame are connected to each other with 9mm self-tapping screws. When the length of the profile is not enough, the missing section of the PP is attached to it with a straight extension. This piece, naturally, is fixed in the guide profile and to the ceiling with at least one hanger (depending on the length of the segment).
Transverse profiles are sections of PP, the length of which is 0.5-1.0 cm less than the distance between the longitudinal profiles. They are attached to the frame using a single-level connector (crab) with a distance of 50 cm between centers. The crab is fixed on all sides for reliability. The resulting frame looks like this:
For narrow rooms and corridors 2.5-3 m wide, it makes sense to place the longitudinal profiles transversely at a distance of 40 cm. In this case, it is enough to lay only one line of transverse profiles in the middle of the ceiling (see photo below).
Frame design for narrow spaces
The second level is created in this way. A guide profile is attached to the wall as for the first level; the distance is equal to the planned height, but not less than 6 cm. A line of a new level is applied to the assembled sheathing. The guide profile is attached along this line using PSh self-tapping screws. Then pieces of PP are inserted into this profile and secured with screws; their length corresponds to the height of the 2nd level of the ceiling. From below, their ends are closed with another PNP and fixed with self-tapping screws.
The installation of a two-level plasterboard ceiling ends by connecting the guide profile attached to the wall and the border of the new level with parts of the ceiling profile of the required length. One end of the segment is inserted into the PNP, and the other is cut 3 cm along the fold line with metal scissors. The side petals bend back. Then all three resulting petals are attached with self-tapping screws to the level boundary profile.
The second ceiling level is attached to the first
Often, to create a wavy border of the second layer, an arched profile is used instead of conventional profiles. In this case, the ceiling height will increase by the width of the arched profile.
Electrical wiring is being laid to the future locations of lamps and chandeliers. The wires are covered in special dielectric corrugated tubes, which are attached to the hangers with plastic clamps. It is not recommended to lay open wiring inside the control panel! The frame for a two-level plasterboard ceiling is ready.
DIY installation of floating lines on the ceiling
Let's consider a couple of options for installing floating light lines on a suspended ceiling with your own hands.
The first option assumes the presence of a special separating profile, LED strip, and accompanying equipment, and includes the following steps:
- At the stage of installing the suspended ceiling frame, the profile for the lamp is fixed to the fastening elements (dowels or screws).
- Next, wiring is connected to it, a transformer and, if required, a dimmer or controller are mounted on the base ceiling surface.
- Then the prepared ice strip is placed in the profile and connected to the wiring, and a diffuser plug is installed.
- Upon completion of the electrical installation work, the circuit is connected to power and checked for functionality.
- After all the electrical equipment is secured and the metal frame is assembled, the installation of the tension fabric is carried out according to the production instructions.
The second option (simplified) assumes the presence of T5 LED lamps, which will act as light lines. Unlike its analogue tape, it does not require the installation of an additional reflector and already has the necessary lighting parameters. You can attach it using small clamps (two metal strips drilled along the edges) to a piece of plywood that was previously fixed to the base ceiling.
After the lighting devices are installed and connected, the canvas is installed. When you turn them on, light lines will appear on the membrane, like on a screen. However, this will not be enough to fully illuminate the room. Therefore, at the location of their stencil, the film is cut with a sharp knife or scalpel, and the edges are sealed with a harpoon.
Step-by-step instructions for installing perimeter lighting
Installation of lighting around the perimeter completes the design of the plasterboard ceiling with LED lighting.
Instructions for installing perimeter LED ceiling lighting.
- Cutting the LED backlight into sections of the required length in specially designated areas. If the length of the tape exceeds 5 meters, then it will need to be powered in parallel;
- The pieces remaining after cutting must be soldered together with the wires from the kit and insulated with a shrink tube. When a continuous chain is planned, the tape is laid with a bend on the sides and only the last piece is cut to length;
- Connecting wires. Take a 25 W soldering iron, 4 wires of different colors for each section with a cross-section of 0.75 mm2 and a length that depends on the connection diagram. The ends are trimmed 1 cm on both sides;
- Next, you need to tin it using tin and rosin, solder it to the board in accordance with the color, put on a heat-shrinkable tube and, using a hair dryer or matches, heat it up.
Concealed luminaires and their advantages
In addition to the undoubted advantage of hiding all elements of the lighting module inside the wall or ceiling, recessed luminaires are also much more durable and robust, even in difficult environmental conditions. This is due to the fact that all sensitive components of the installation are isolated from the environment. Each of the flush mount fixtures we offer is also made from durable material. Most often this is aluminum with a white or black powder coating, but there are also options in the color of natural metal or with a patina.
Recessed aluminum luminaires are pressed from a single piece of material, so they are also resistant to mechanical damage, especially falling loose elements. Carefully selected lamps form a single unit with them, thanks to which the interior and installation parts are protected from moisture and dust.