Where and how to install photodiodes
In order to minimize the number of unnecessary lights turning on when the door is opened, the type and characteristics of lighting are determined.
To do this, select the direction of installation of the device and the angle of its action. There are three main styles of lighting the interior area of the wardrobe:
- Directional;
- Scattered (decorative);
- Changeable by program.
To ensure lighting efficiency, photocells are positioned in such a way that the areas adjacent to the doors are best illuminated. Thus, the backlight will work as soon as the cabinet starts to open. If the doors are placed in a room illuminated by natural light, the devices are installed deeper, closer to the back wall of the wardrobe. In this case, the backlight will work later, and the nature of the illumination will be more strongly influenced by the design of the cabinet.
Installation sequence
It is more effective to install motion sensors at a height of 250 to 400 mm from the floor level in the cabinet and position them so that most movements occur through the sensitivity zone, and not directly to the detector.
The solution is determined by the type and number of backlight sources. It would be optimal to purchase devices whose technical characteristics allow for a maximum distance between each other. The wires connecting them to the light source are low voltage, so the user will not need to enclose them in metal or plastic conduit.
Attention! Before starting work, turn off the power supply. Then, using a tester, check the presence of voltage in the network. To do this, touch one wire of the voltage tester to the ground wire, and the other, first to the active wire, and then to the neutral
The warning light on the tester should not light up.
The motion detector sensors are easy to install, but each brand has different characteristics, so please read the included instructions carefully. And in general, before purchasing a photocell, you should familiarize yourself with its purpose. For example, power photodiodes, which are used for industrial purposes, are designed for a voltage of at least 220 V, and therefore are not needed (and even dangerous) in everyday life.
For reasons of aesthetics, all internal lines that are laid in the wardrobe should be enclosed in plastic protective housings. They must be protected from moisture (for example, during cleaning).
Connection method
The method of connecting the control network using fragments of the previous wiring is not always appropriate. Sometimes this wiring is made without a ground wire or includes other means of grounding, such as metal conduit. In this case, all distribution boxes will need to be grounded. Which will make the circuit cumbersome and inconvenient to use.
Additional installation tips:
- The cover of the outer electrical box must be waterproof. Carefully install the rubber gasket into a specially prepared hole, which is then closed. It’s good if the design of the wardrobe provides for the presence of plugs: they can be used for hidden installation of electrical connections.
- Sealing joints. Moisture can seep into the sensor and/or wiring and cause them to become unusable. To prevent this, the device is placed either under a protective curtain rod (usually located in the corners of the inside surface of the closet) or under another protected area. The problem will disappear if store-bought photocells already have protective lamp seals. In this case, it is enough to simply turn the backlight LEDs down so that water cannot get into the cartridge.
- The use of backlighting on incandescent lamps is not only impractical from an economic point of view, but will also contribute to unstable operation of the sensor, since the heat generated by the lamp will turn on the device every time.
- The range of adjustment of the position of the photodiodes should be such as to take into account all possible changes and redevelopments that the owner of the system will make with the wardrobe over time.
Important: Aluminum wiring will require special handling. When using it, the temperature inside may increase, which will affect the accuracy of the backlight sensor. It is recommended to use copper wiring
Overhead furniture lamps
They are distinguished from the previous type by power and size. The advantage is ease of installation, and the lamps in the ceiling can be replaced even by a non-specialist. Their range is represented by models similar to long lamps or spot light elements; there are also rod overhead furniture lamps.
Overhead lamps come in square, round, oval, triangular and rectangular shapes.
Some types of lamps are equipped with switches, dimming sensors and motion detectors. Such models can be easily attached to furniture using the existing clip or adhesive plate.
The motion detectors of the lamps are activated when the doors are opened; thanks to their high sensitivity, they are triggered within a radius of up to 2 meters. And built-in day-night sensors regulate the light intensity depending on the time of day.
What's the best way to backlight?
You can create lighting inside the cabinet using different light sources: halogen, fluorescent, LED. Assembling lighting using halogen lamps is the most labor-intensive task, as it requires special tools and knowledge of installing spotlights. During operation, halogen lamps become very hot, have a short working life and consume a lot of energy.
Cabinet lighting using a fluorescent tubular lamp is more economical and can be easily assembled by one person. But the bulb of a fluorescent lamp is thin glass, inside of which there are toxic mercury vapors. Therefore, such lighting is not suitable for a wardrobe. The most reliable way to illuminate the contents of a cabinet is to use LED-based light sources. They are safe to use, barely heat up and can be easily mounted on any type of cabinet. For general lighting of the cabinet, it is better to use an LED strip or ruler, installing it along the entire interior space.
For illuminating individual shelves and compartments, ready-made LED modules, which are compact in size and operate on +12V, are ideal. In a closet where spotlights are already built-in, you can replace power-hungry halogen lamps with LED lamps of a similar form factor.
In this article we will dwell in detail on LED cabinet lighting. This option can be easily implemented with your own hands in a closet, both a compartment type and a hinged one.
For this we will need: LED strip with power supply (60-200 RUR/m+200 RUR);
- aluminum profile (optional) (150 RUR/m);
- limit switch (50 rub.);
- wire type ShVVP 2x0.75 (15 rub./m);
- switch (100 rub.).
Now let's look at each component separately.
It is advisable to purchase an LED strip of neutral white light so that the shade of the illuminated objects is less distorted. If it is assembled on SMD 3528 LEDs, then any material (cabinet chipboard, plastic) can be used as a base.
To remove heat from higher-power chips, you will need a small radiator in the form of an aluminum profile. In the simplest version, the LED strip is glued directly to the chipboard ceiling sheet behind the top rail along which the sliding doors slide. But there are guides that do not completely hide the light flux and part of it falls into the field of view and blinds a person. In this case, you should use a plastic corner, on one shelf of which an LED strip is glued, and the other prevents the passage of light out. For greater effect, the vertical shelf of the corner is covered with reflective tape on the inside.
Anyone who puts the aesthetic component first should use an aluminum profile with a diffuser as the base for the LED strip. It simultaneously performs a useful and decorative function: it prevents the rapid degradation of crystals and blends harmoniously with the design of the cabinet.
A microswitch (limit switch) is necessary to turn on/off the light when opening the doors. In a wardrobe, it is convenient to install two end switches symmetrically on both sides to divide the lighting into two parts. Each of them must withstand the maximum load current. For a cabinet up to 3 meters long, the consumption of a powerful LED strip will not exceed 5A, 12V.
The required amount of wire depends on the distance of the junction box/socket from the cabinet. To control the lighting, you can use either a wall switch or a push-button switch on the wire.
Installation locations of lamps in the closet
It is important to decide on the location where the lighting will be located. There are many options for its installation, depending on the purpose of the installation:
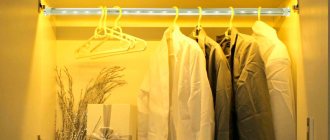
- on the doors. Such lighting performs more of a decorative function than a practical one. It can be used not only in a new cabinet - installing lighting on the doors of old furniture can significantly refresh it. As a rule, an LED strip is installed along the contour of the door;
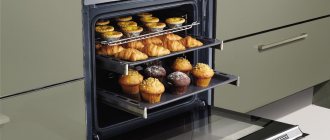
- on the shelves of the closet. Lamps on the shelves illuminate their contents. These can be lamps of any type, except halogen ones - they get very hot and can damage things stored on the shelf;
- on the tramp rod. This solution allows you to illuminate the most spacious and deep compartment of the cabinet. It is made in the form of one long fluorescent lamp or LED strip;
- on the cabinet cornice - the protruding upper part of the product. This is a universal option, in which both the space in front of the cabinet and its internal contents are moderately illuminated. Traditionally, cornice lighting is done using several spotlights;
- in the lower base of the cabinet - used to illuminate the lower compartments, such lighting is especially relevant for shoe racks.
Illumination installed along the inner contour of the cabinet is gaining popularity - it allows you to illuminate almost the entire depth of the furniture.
How to choose backlight
In modern wardrobes presented on the Russian furniture market, halogen lamps (made in Italy, Poland, Germany and China) are installed.
When organizing cabinet lighting with halogen lamps, you should pay attention to the following points:
- the temperature of the flask can reach five hundred degrees Celsius, so you should adhere to fire safety rules;
- halogen lamps are very capricious, and it is better not to touch them with bare hands. Otherwise, greasy stains may form on the surface, which will subsequently lead to melting of the glass;
- lamps are very sensitive to voltage changes, so it is recommended to turn them on through a stabilizer, and some types of halogen lamps can only operate through a step-down transformer;
- If the lamps work constantly, they will quickly fail. In addition, continuous operation of lighting devices in dynamic light mode leads to a reduction in their service life.
An alternative to halogen lamps can be LED lighting, which will not only refresh and diversify the interior of the room, but will also illuminate the interior of the cabinet. It is often used to illuminate walls, cabinets and other furniture - beds, bedside tables, shelves, kitchen cabinets.
The photo shows the cabinet lighting with LED strip:
The LED backlight consists of several elements connected by a cable. This type of lighting will allow you to obtain the necessary light dynamics (change the color and intensity of the glow).
If we compare two lighting options for furniture - LED and halogen lamps, then the LED system is much more expensive. But even the high cost does not stop buyers, because this backlight will pay for itself during operation, and will also save energy.
Advantages of LED backlight:
- low power consumption;
- will last more than sixty thousand hours;
- resistance to repeated switching on and off;
- high resistance to shock and vibration;
- compact;
- the ability to adjust the lighting intensity;
- low operating voltage;
- does not heat up and meets fire safety regulations;
- environmentally friendly, as the materials do not contain mercury;
- has a low operating voltage;
The use of modern LEDs will provide lighting for seven years of continuous operation.
Choosing a mounting location
What kind of LED lighting would you install in your closet?
ExternalInternal
The installation result directly depends on the correct choice of location for installing the lighting system. It is important to consider the type of room (hallway, kitchen, wardrobe, bedroom), type of furniture (dressing room or kitchen). Also, depending on the location of the devices, cabinet lighting is divided into internal and external.
External lighting
External lighting is provided by embedding lamps in furniture elements. Soffits can be placed on the doors and open shelves of the cabinet, as well as on the protruding canopy above the doors (if there is one). Soffits can be built not only into cabinet elements, but also on the surface above and below it.
Before installation, you need to check how this lighting will affect the appearance of the furniture. In the wrong place, open lighting can ruin the overall impression of the cabinet design.
Interior lighting
There are several principles from which to proceed when choosing the location of the backlight:
- On the top surface of the cabinet in the middle. Suitable for large internal compartments.
- On the front edge of the shelves. Used for multi-tiered cabinet sections. Such equipment will ensure uniform illumination of all shelves.
- On the rear top edge of the shelves. Suitable for small compartments, as it provides sufficient lighting and visually expands the space.
- On the side walls. Suitable for both low and high sections.
Expert opinion
Korzhavin Daniil Dmitrievich
Designer of stylish home furniture
The lighting should be located so that doors and drawers do not touch lamps, switches or wires. In addition, the lighting system should not interfere with the free use of the interior space of the cabinet.
Working with glass
To make your own LED strip lighting, you must first build glass shelves. Of course, you can always buy ready-made products, but they will not always fit your room in size or style. The solution to this situation would be to manufacture products to order. But it will be quite expensive than if you did everything yourself. Therefore, it is best to make a shelf with your own hands so that you are satisfied with everything. To work with glass you need the following set of tools:
- oil glass cutter It must be of good quality;
- ruler;
- sander It is better to use a tape type device. In this case, the grain size for the working skin should correspond to the value of 120 units. Making an incision
Before you start working with glass, if you have not encountered such manipulations before, it is better to practice. This is due to the fact that the cut must be made the first time. If you run the tool over the cut again, you can easily scratch the glass.
After the cut has been made, the glass should simply be broken along the intended line. In addition to the correct cut, the stage of processing the sections is also important. It will give the glass a decorative and beautiful look.
Note! Processing of cuts is necessary for the further safe use of glass products in the house. If you do not do this, you can very easily cut yourself on the sharp edge.
Grinding the cut
So, glass processing involves the following steps:
- incision;
- breaking glass into pieces along the cut line;
- grinding the cut using a grinding machine;
- If you don’t have a grinding machine, you can process the cut yourself. But this one will take much longer;
- During grinding, it is necessary to wet the surface being treated with water. This must be done to prevent microscopic pieces of glass, which are very harmful to human health, from spreading in the air.
Perform the manipulations described above for all the glass, and you will get beautiful shelves that will need to be attached to the permanent location.
Choosing wardrobe lighting
Classic incandescent lamps with spiral coils are practically no longer used in furniture lighting. Main types of lighting: halogen, fluorescent, LED. The latter are in the form of spotlights or LED strips.
Types of lighting
Cabinet lighting, main types of lighting:
- Luminescent.
- Halogen.
- LED, including LED strips.
Cabinet lighting performs two functions at once: practical and decorative.
How to choose the right one
As when choosing any other product, you should first evaluate its health safety. Fluorescent and energy-saving lamps can pose a real, and more often potential, threat to the body. The former contain a small amount of mercury, which theoretically can lead to poisoning, including small doses of vapor if the seal of the product is broken. However, the concentration of the harmful substance is so low that the threat should not be taken seriously.
Illuminated products have significant advantages.
Prolonged exposure to ultraviolet radiation from fluorescent sources is also unsafe. However, for a cabinet where the need for lighting occurs for a short time, this threat is also not relevant. The German endocrinologist Wunsch, in an interview with Neu Osnabrücker Zeitung, argued that the stroboscopic effect of fluorescent lighting at a frequency of 50 Hz can lead to epilepsy. However, over the next ten years, the scientist’s assumption was not confirmed by anything.
Lighting elements allow you to diversify the design of furniture and make the interior of the room interesting and unique.
When choosing, you should take into account the interior style, room features, existing lighting and lamp characteristics:
- brightness;
- power;
- energy saving features;
- color and design features of the lamp.
Power supplies. Rechargeable batteries and batteries need to be periodically charged and replaced. USB-powered LED lights are usually not practical for cabinet or other furniture lighting. Light sources that connect to household power may require an additional outlet.
Lighting the filling and contents of the closet allows you to quickly find the things you need in it.
Please note that ready-made lighting kits are available for sale. Including automatic ones, with motion sensors, and those triggered by opening the cabinet door
The lighting can be mounted in any type of cabinet.
And the last aspect is the integrity of the cabinet walls and doors. If you have to saw and cut furniture to install the lighting, problems will certainly arise when you subsequently replace the lamps. It is highly likely that you will have to mask the holes... or buy a new wardrobe.
The modern furniture market offers a variety of types of cabinet lighting.
DIY installation
Let's look at how you can make your own wardrobe lighting. For this you will need:
- LED Strip Light;
- impulse power block;
- limit switch (ideally, it should be installed on each door);
- connecting wires;
- aluminum profile for installing the tape;
- switch.
As a rule, an aluminum profile is used for mounting a diode strip with SMD 5050 elements. They are quite large and need heat removal. Considering the specific nature of working in confined spaces, the presence of a radiator becomes an important condition. Overheating is detrimental to LEDs, which quickly fail as a result.
Typically, the lighting is located behind the sliding door guides, on a horizontal ceiling plane. This allows the light to be directed into the cabinet without blinding the user. In the dark, such a decision is very justified. If the size of the guides is small and does not cover the tape, install a plastic corner. It serves as a screen that cuts off the beam of light.
To fasten an aluminum profile or corner, use self-tapping screws 1.5 cm long. It is recommended to first drill out the screw installation points with a 1.5 or 2 mm drill
You must act carefully so as not to drill through the chipboard
Users prefer to install lamps deep in the cabinet, close to the back wall. This allows you to illuminate the entire volume and also creates an attractive decorative effect. The installation method is practically the same, only the aluminum profile should be unfolded so that the beam of light does not hit the eyes.
Procedure:
- things are temporarily removed from the closet;
- bearing surfaces are marked;
- an aluminum profile (or a plastic corner screen) is installed;
- limit switches are installed;
- all electrical connections are made;
- The functionality of the backlight is checked.
If no problems arise, the closet is filled with things and the lighting begins to be used for its intended purpose.
https://youtube.com/watch?v=T3zuw363DM4
How to install halogen lamps
Halogen lighting is often used to illuminate shelves in a closet. Stores sell ready-made kits consisting of three or five lamps. Choose a set of the appropriate size to illuminate the cabinet shelves.
The standard lighting kit includes:
- transformer;
- halogen lamps;
- wires;
- connector;
- switch.
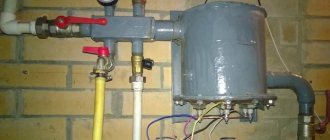
Before installing halogen lamps, you must familiarize yourself with the diagram:
When choosing a step-down transformer, you should consider the following parameters:
- input voltage;
- power (total sum of power of lamps connected to the transformer).
In addition, study the following rules for installing the backlight:
- The power of the transformer should be five percent higher than the sum of the power of the halogen lamps.
- The transformers must output twelve volts. For example, if you need to connect five lamps (the power of each lamp is twenty watts), with a voltage of twelve volts, then you need to multiply the number of lamps by the power and add five percent to the resulting figure. Accordingly, the power of the transformer will be 105 watts.
- Take into account the compliance of the operating voltage of the connected luminaires.
- The length of the wire for connecting the lamps to the transformer should not exceed two to three meters. If you take a longer wire, the power supply over long distances may be reduced.
- It must be taken into account that during operation of the transformer it will heat up, so it should be located at a distance of twenty centimeters from heat sources (heater, battery).
Step-by-step work on connecting lamps:
- To prepare a place for halogen lamps, you need to use an electric drill and put on a cutter (crown).
- Drill a hole five to ten millimeters deep, and then turn the cutter over and drill the hole. Without this technique, you can tear out a piece of chipboard from the cabinet wall.
- On a flat surface, connect the lighting elements into a single chain.
- To connect the lamps, you need to connect the lamps to each other and connect them to a transformer.
- To make a parallel connection, you must use blocks or terminals.
It will be easier to do lighting in the closet with your own hands if you look at the connection process in the photo:
How does automatic lighting work on a kitchen set?
Sensors are used to turn automatic backlight systems on and off. Usually this:
- Sound sensor - to use it, you need to configure it so that it responds exclusively to the sound of opening headsets or clapping.
- A proximity (motion) sensor is a common option that is easy to install and configure. It works this way: the sensor is adjusted to an obstacle in the form of a furniture door and as soon as it opens, the obstacle disappears and the sensor gives a signal to turn on the light.
You can also use a light sensor that will automatically adjust the amount and intensity of light in the kitchen throughout the day.
Advantages
There are many advantages of lighting automation, here are the main ones:
- Saving electricity. The light will turn on automatically and only in those places where it is necessary. This system eliminates the “forgot to turn off the light after leaving” situation, thereby reducing electricity bills.
- Convenience. Most people have several switches, outlets, adapters, etc. in their kitchen. Automation allows you to get rid of all mechanical buttons.
- Design. From a design point of view, a clutter of electrical equipment looks unsightly. Automated systems take up much less space than classic light switches.
Types of automatic backlight
Any light source can be automated, even one that is not initially adapted to it. This can be done using a combination of microcontroller and relay. But on the market you can find ready-made options for automatic backlighting, such as:
Spot light – conveniently mounted on a headset and illuminates the desired area.
Spots are a group of light sources that are attached to the wall and focus on a specific area.
Light beams are long strips that are attached to the wall and are used to illuminate the work area.
Single LEDs and strips - used for local lighting of small areas, such as cabinets, shelves and furniture.
All types of lighting can be purchased with built-in sensors, or you can assemble an individual version yourself and add the necessary functionality.
Wired sensors
A motion sensor is the best option for creating automatic lighting. This element can be flexibly configured to suit any needs. For example, program the sensitivity of the sensor to turn on if movement is detected within a radius of 50-100 cm. By installing such a device in the work area or near the stove, it will turn on automatically when someone approaches this area and turn off after leaving.
You can also install a sound sensor that will respond to cotton. On the market you can find lamps already equipped with a sensor. It is enough to screw such a device into the socket and automatically turn the light on and off with a clap. Any lighting element can be connected to such sensors.
Wireless sensors
Wireless sensors are much more expensive than wired ones, but they allow you to control home lighting via Wi-Fi. Simple models control lighting remotely using a remote control. The functionality of such a remote control allows you to regulate the number of lamps, lamps, etc. that are turned on.
Cabinet lighting controls
When choosing a backlight, pay attention to the control method.
It could be:
- control system using a switch. This is the easiest way. In order to turn on the lighting you must use the button. But turning the light on and off manually all the time is not always convenient, especially if the cabinet is used frequently;
- automatic control: the light turns on automatically when any of the doors is opened or at the moment when a person approaches the cabinet, and turns off when closed. This method is implemented using motion sensors.
To control the characteristics of the backlight - its brightness, intensity and color, a special controller or remote control is used.
Bathroom lighting
The main criterion for choosing bathroom fixtures is the moisture resistance of the housing. It is better to choose a sealed LED strip with a protection rating of IP65. Strictly speaking, when installing it not only in the bathroom, but also in the kitchen, along the base and bases, where there is a risk of moisture, steam and dampness, you should follow the same recommendation.
Bathroom lighting is generally installed above the mirror or along the contour of the mirror for a greater decorative effect. Usually, above the mirrors in bathroom furniture, there are already cornices for inserting a spotlight - quite carefully, in compliance with safety measures in conditions of high humidity, connect it to the general network. Or use a wireless model.
Inventory
To install a lighting system, you must first draw up a power supply diagram for the devices. Batteries, lamps and switches should be marked on it. It is most convenient to make a drawing on the cabinet diagram that comes with it. The next step is to transfer the markings to the cabinet frame, marking the places where the wires will be laid and where the lighting fixtures will be installed.
To carry out installation work, the following basic equipment is required:
- LED strips or individual spotlights;
- cables (the determining factor is power consumption);
- 12 V power supply;
- controller (when connecting a color RGB strip);
- light box (for completing closed LED strips);
- flux, solder and terminal connectors (for making electrical connections);
- switch or control panel (for manual control of the backlight);
- motion sensor (to create “smart” lighting with automated on/off).
Also during installation you will need the following tools:
- drill with attachments;
- screwdriver or screwdriver;
- construction stapler;
- stationery knife;
- soldering iron;
- pliers;
- wire cutters;
- scissors.
Preparation for installation
Technical requirements
When installing the lighting yourself, you must comply with the requirements to ensure comfortable and safe use of the equipment.
Lighting for a furniture cabinet must comply with the following standards:
- the degree of illumination for the hallway is not lower than 50 Lux, for the dressing room - not lower than 75 Lux, for the kitchen - not lower than 150 Lux;
- since there is a possibility of direct contact during operation of the backlight, a reduced voltage should be used to power it;
- wires must be connected to the lighting system in one of the following ways: crimping, soldering, terminal connection;
- if the backlight is powered from a standard network with a voltage of 220 V, the network must be protected by an RCD, which will ensure that the lighting is turned off if the insulation is broken;
- The lighting should not be too bright and comfortable enough for the eyes.
Application ideas
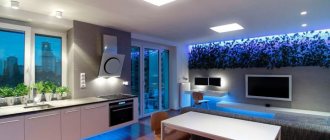
Apartment lighting
LED strip goes very well with other types of lighting. There are a lot of ideas for using them. It gives the room an unusual interior. If there is enough local lighting, it should be used as an addition to the existing one.
Ladder
The use of LED strip in the interior of a staircase The staircase is illuminated not only because it is original and beautiful, but also for the safety of moving along it. The LED strip can be mounted in a variety of ways: on the side of the steps, on each step, every other step, or can be built into the railing. Lighting with a motion sensor is often used. It is extremely economical and very convenient.
Walls
Lighting or illumination of walls allows you to visually change the size of the room and give the interior a decorative look. Paintings, photos, walls and any materials on the wall are usually illuminated. LED wallpaper is also used to decorate walls. They are very easy to use and install. They are also attached using the back adhesive side.
Curtains
This is a relatively new design move, but it is rapidly gaining momentum. In this case, the LED strip will highlight the structure of the fabric and give the interior a wonderful look. Usually it is placed in a niche near the cornice.
Furniture
It is illuminated, albeit less often than everything else, but still illuminated. LEDs cope with this task very well, as they are flexible and easily attached exactly where needed. They make furniture special and highlight its advantages.
Kitchen
In the kitchen, LEDs are used in several options:
- Diode strips are used as illumination for the work area. They are mounted under kitchen furniture.
- They illuminate the kitchen apron from the inside. Usually an apron is made of glass and illuminated with a ribbon, in which case it turns into an independent lamp.
- Illuminated glass cabinets from the inside.
- They zone the room and highlight specific zones or objects.
Small living room
Lighting the bedroom at night LED lighting is extremely versatile, it can be applied to any type of room, regardless of its size. When using it in a small room, it is advisable to immediately buy a dimmer to adjust the brightness of the LEDs, as well as automatically turn it on and off. Using a dimmer, you can give a room a more homely look by adjusting the shades and brightness.
If the room is equipped with a suspended ceiling, then you cannot do without an LED strip. It will help bring additional coziness and comfort to the room.
Types of lighting: pros and cons of options
Halogen lamps for furniture
Battery-powered LED light with motion sensor for closet
Not all lamps are suitable for interior lighting of furniture. For ease of use, preference is given to two types of lamps: overhead and built-in. At the same time, halogen and LED lighting fixtures have become the most popular.
| Type of lighting | pros | Minuses |
| Halogen | Increased light output. Evenly distributed light that maintains brightness throughout the entire life of the lighting fixture. Compact design. High degree of security. | They get very hot and are a fire hazard. Strength is low. React to voltage changes. The service life is relatively short. |
| Luminescent | They don't heat up. High light output. Long service life. Brightness that does not blind the eyes. Various color composition. | Limited power with significant size. Difficulty connecting. Dependence on external temperature. |
| LED | Slight heating. Energy saving. Durability. Fire and environmental safety. | Relatively expensive. They do not provide scattered light. Requires expensive switching power supplies. |
| LED Strip Light | Any configuration is possible. Easy to install. High reliability. Operates on low voltage Safe. | Poor color rendering ability. The need to connect power supplies. |
How LED cabinet lighting works
LED Strip Light
The design of the LED strip is quite simple; it is a flexible strip of plastic. There is a conductor inside, as well as LEDs. There are several parameters that affect the characteristics of the tape; we list the most important ones.
- Glow color. Diodes come not only white, but also in other colors. LED strip can be single-color or multi-color. If only white LEDs are used in a strip, they are divided according to the heat of luminosity.
- LED type. Marked with four numbers. The first two show the length of the diode, the third and fourth its width.
- Based on the direction of the glow, they are divided into end and frontal. Usually the second type is used.
- Density of light elements. The number of LEDs per linear meter is calculated. There are tapes with a density of 30–240 pieces/meter.
- Voltage. There are modifications for voltage of 12, 24 and 36 V. At the same time, you can also choose a strip connected to a standard 220 V in-house network. The permissible voltage parameter affects the choice of control unit.
- Power. Indicated per meter of tape, it affects the luminosity of the product. Is in direct connection with the number of LEDs. On sale you can find LED strips with a power in the range of 4.8–25 W/m.
- Degree of protection. Calculated depending on the number of open parts; it is optimal to select tapes with an IP60–IP rating
Brightness control
An LED strip in a closet definitely requires brightness adjustment. Dimmer controllers are used for this. They work by adjusting the power of the supplied current. They are divided into the following types.
- Managed. Allows slight changes in power as needed.
- Pulse. Perform automatic adjustment depending on the specified parameters.
There is a division by type of work - mechanical and electronic.
It is also worth remembering that dimmers are available for a single-color connection scheme and for a multi-color RGB strip. In the second case, you must carefully monitor the correct connection of the device to the tape.
power unit
The power supply is selected based on the total power of the tape. You can make a choice yourself. To do this, it is enough to take into account the following parameters.
- Pl is the load of one meter of tape. This parameter is specified in the documentation. Let's say we have 12 W.
- L is the length of the entire tape used. We have 5 meters.
- K is the safety factor. Usually they take 1.2.
The calculation follows the formula.
Ptotal=Pl×L×K
In our case.
Ptotal = 12 W × 5 m × 1.2 = 72 W.
That is, the power of the power supply must be at least 72 W.
If you look at the layout of the device, the optimal solution would be a unit with a sealed plastic case. It is the safest to use.
On/Off Switch
The last thing you should do is select the switch. In practice, several types are used.
- Regular push-button. Switching occurs by mechanical switching, a completely standard “switch”.
- Sensory. It reacts to touch, the principle of operation is similar to the previous one, just a more modern version.
- Infrared. It has a sensor that reacts to movement, for example, the opening of a sash.
- With drimmer. Allows you to adjust the brightness as needed, divided into touch and button.
- Control block. Allows you to adjust the operating mode of the tape, usually used on RGB tapes, controlling blinking, turning on colors and other additional settings.
What are the advantages of LEDs?
LEDs are some specific conductors that produce light when electricity is generated. The compositions may differ in chemical properties, which determines the brightness level of the light stream that they emit.
Lighting in a cabinet using LED strip is not always done directly. And all because the tape can overheat, or even crack over time. Therefore, a voltage stabilizer is needed.
The LED strip is a kind of strip, which is made of a fairly flexible material. One side of it is glued to the same cabinet, mirror, etc. On the second side there are LEDs and resistors.
Whatever tape you take, they have five-centimeter segments, each of which has three LEDs, and also has a special one. markings for easy cutting. The LEDs are first connected using a circuit.
Among the main advantages of LED cabinet lighting are the following:
The tape is quite resistant to mechanical influences. Therefore, even if you accidentally catch it with clothes, hangers, or just your hand, don’t worry.
Durability, which is very important. If you purchase a high-quality strip with LEDs, it will serve you for at least ten years, working fifteen hours daily!
Variety of backlight colors. LEDs come in white, yellow, red, purple and others. There are a lot of color variations available, so they can be matched to absolutely any interior design. IR and UV LEDs are available for sale. All of them are perfect for modern, high-tech interiors.
You don't have to wait for the LEDs to warm up because they don't need to. They immediately work fully.
Low pricing policy, even if we talk about the highest quality LED strips.
Tapes can have very different radiation variations. That is, from a completely different angle.
These products are environmentally friendly. You don't have to worry about the safety of the tape when installing it in your child's closet.
The LED strip operates at different temperatures in the room.
Advice! When using RGB strip for cabinet lighting, you should know that it is made with four outputs, which contain red, green, blue, and the main mass.
DIY installation
How to make additional lighting in a closet with your own hands? The easiest way to install LED strips. It is not surprising that more than 90% of owners of apartments and private houses prefer to use this type of lighting for illuminating cabinets and other furniture.
LED lighting combines several advantages: efficiency, durability, safety and high quality lighting.
There are other advantages:
- energy saving parameters (consume energy 10 times less than classic incandescent lamps and 2 times less than fluorescent sources);
- safety (“classic” ones break easily, leaving sharp fragments; luminescent ones contain mercury vapor, albeit in small quantities);
- “lifetime” (mean time between failures reaches 50 thousand hours, fluorescent lamps – up to 7 thousand, incandescent lamps – up to 2 thousand).
- maximum approach to natural light.
Unlike halogen and fluorescent lamps, LEDs do not tend to get very hot.
Connection method
Most often, lighting devices are connected either directly to a household power supply, or through a 12 or 24 Volt power supply. The converter may have to be purchased separately. When planning lighting, it is worth considering the proximity of sockets so that you do not have to make wiring at the last moment.
LED strip is sold in skeins of 5 meters or by meter. It is recommended to take accurate measurements before purchasing a backlight.
Installation sequence
Let's consider the stages of installing LED strip, the most popular option for cabinet lighting.
- Determine the location of the tape. When attaching to shelves, it is recommended to mount the tapes on the bottom side. The likelihood of mechanical damage is reduced. Better lighting for the bottom shelf.
- Decide on the location of the switch (bottom of the shelf, side panel of the compartment, wall near or behind the cabinet).
- Take measurements. Cut the tape (only in specially designated places!).
- The tape is installed either by laying it in a plastic box or in a cable channel attached with liquid nails. Self-adhesive tape is also sold. In this case, it is easiest to mount.
- Install switches in predetermined locations, connect the strip to a power source, and check the operation of the newly installed backlight.
The process of installing cabinet lighting requires care. It is advisable to think through its scheme in advance.
Electrical backlight circuit.
Before proceeding with assembly, you must have a diagram of all future electrical connections on hand. It looks approximately as shown in the figure.
The only difference from the standard LED strip connection is the presence of a microswitch. Its contacts are connected to the break of one of the power wires along the +12V circuit.
To ensure that the power supply is not constantly under mains voltage, the microswitch should be installed in the break of the phase wire going to it.