Kitchens have a common characteristic feature - functionality. In this relatively small room there are all types of household communications and a lot of equipment. The center of the kitchen has always been the oven or its prototype, the stove, and only then the hob appeared. Nowadays, the oven and stove are increasingly becoming separate devices, and the importance of the second has grown. But at the same time, technology is developing, and new oven cooking functions are becoming available to customers. Thus, the quality and variety of the modern human diet is increasing. Buying an oven for your kitchen is not a matter of one hour. The dimensions of the equipment are directly dependent on the kitchen set, and if it is not there or has not yet been assembled, then the overall picture will have to be “assembled” in the process. Installing the oven is simple in terms of the structure of actions, but you will have to carefully read the instructions and carefully carry out the connection.
Types of oven
Ovens are distinguished according to several classifications:
- type of accommodation;
- management method;
- source of energy.
Depending on the type of placement, there are free-standing and built-in ovens. Some options are placed anywhere, but next to the power source. For those being installed, special furniture sections are provided. Based on the control method, a distinction is made between autonomous and dependent ovens. The second subtype only works in conjunction with the hob, and adjustments are made through one interface. Autonomous ones have become increasingly common in recent years. The third classification option is by energy source. The devices are divided into gas and electric models. The former remain in demand due to the prevalence of the energy carrier, but cannot heat the chamber evenly. Electric ovens are the most popular at the moment. Users select a certain temperature, and the device, in turn, maintains it with high accuracy and at a stable level.
Kitchen cabinet calculations
As a rule, the instructions for the oven contain data not only on the dimensions of the model itself, but also on the requirements for the installation niche.
This should be used in calculations. The dimensions of the cabinet under the oven are equal to the parameters of the installation niche plus the thickness of the material used. In fact, it is a box with a double bottom - horizons 1 and 2 and a horizontal crossbar at the top - the body strip. The latter is required for normal fastening of the hob to the countertop
In addition, this part maintains the distance between the sidewalls, which is also important
First you need to make calculations, then cut out the following parts from sheets of chipboard or MDF:
- sidewalls - the sum of the height of the niche, the thickness of the table top and the height of the legs - 2 pcs;
- horizon - that is, the bottom, the dimensions are exactly equal to the parameters of the installation niche - depth and width - 2 pcs;
- body strip - its length is equal to the width of the niche, and its own width does not exceed 100 mm.
The back wall of the drawer, as a rule, is not included in the detailing: it is made from fiberboard scraps. Usually its height does not exceed 100 mm.
The drawer parts are calculated using the residual method. It's easy to do:
- the height of the facade is equal to the difference between the height of the kitchen cabinet, the height of the legs and the thickness of the first horizon. The façade does not block it due to the installation features of the oven. The width corresponds to 60 cm minus 3 mm. As a rule, there is no handle here: to make it more convenient to use, a recess is made on the second horizon;
- the side parts are equal in length to the depth of the cabinet minus the gaps, and in height - the distance between the two horizons minus the gaps;
- The length of the rear wall takes into account the thickness of both sidewalls and the thickness of the guides.
Product assembly
The kitchen cabinet for the oven and hob is assembled using confirmations or dowels. The fastening of the latter is duplicated with glue. The holes for them are drilled in advance.
Self-tapping screws are allowed.
- First you need to assemble the box itself - the sides and horizontals.
- Then secure the body strip, lowering it 10 mm from the edge of the sidewall.
- The legs need to be attached to the bottom of the product with self-tapping screws.
- If you decide to make a drawer, then before installing the first horizon, guides - hinged or telescopic - are attached to the walls.
- Install the back wall.
- The product is assembled and installed on the guides.
The do-it-yourself oven cabinet is ready. In the photo you can see a product that is in no way inferior even to well-known brands like Ikea.
Hello, dear reader! If you are now thinking about the design of a cabinet for an oven, then read the article to the end and you will find out almost all the possible options. I'll tell you in detail about the pros and cons of each version.
The result of reading the article will be your informed choice of a specific module. You will know exactly why you need such a cabinet and will get maximum pleasure from your choice in the future.
There are two main types of oven modules. Moreover, each of them has its own additional variation. The most common type is an oven under the hob. And the second, in my opinion more convenient, is an oven in a pencil case.
The design of the cabinet under the hob has two options - with a drawer at the bottom of the oven and with a drawer at the top of the oven. I will tell you about the pros and cons of each design in the following paragraphs.
The design of a cabinet in a pencil case, at eye level, has an option with a work surface above the cabinet and in a pencil case at eye level without a tabletop. I will tell you about the pros and cons of each design in the following paragraphs.
Choosing an installation location
Whatever the design, all options are installed in the central part of the wall, closer to the edge, and also away from the corners of the room. The stove is placed where the hood is planned. In addition, take into account the rule of the working triangle with vertices in the form of a stove, refrigerator and sink. Autonomous ovens are usually installed under the same autonomous cooking zone, so the triangular shape criterion is relevant for all oven models. In this case, the rule can be modified by replacing the sink or refrigerator with a work surface or dining table. These are not all the nuances. Maintain a safe distance between the oven and other objects. For example, the distance from flammable materials: oil, towels, curtains. The distance from water sources is ideally 1.5 meters or more, and the permissible minimum is 60 cm. Leave 60-70 cm of free space above the hob surface of the stove. Electric ovens are mounted next to a grounded power outlet.
Possible problems
The main problem with installation is the height of the oven. At the same time, the strict dimensions of the niches should seem to correspond to the technical parameters, but in reality, ovens with handles may not fit into niches with a height of 598 mm. If the oven has a front control panel, a niche of at least 600 mm is required for it.
The design of the oven should not be changed if:
- the device is under warranty service;
- you don't understand anything about electrical engineering.
If during the warranty period you decide to return an unsuitable device, they will accept it from you. However, the following cases will be considered an exception by the warranty service personnel.
- Traces of attempted opening. These could be removed seals, cut bolts, or other signs.
- The components or mechanical parts of the device have been damaged by rodents that you may have at home.
- The manufacturer's recommendations were not followed when transporting the device.
- Unsuitable voltage parameters caused damage to the electrical part of the device. Critical possible limits are usually indicated by the manufacturer in the instructions.
Door hinges of appliances, power regulators, elements responsible for heating, ignition, thermostat, rubber seals, rods, retaining springs - all these are elements that often become a problem for owners of home appliances. If a cracked power regulator does not interfere with the operation of the appliance, but only causes discomfort, then a broken heating element will make it difficult to use the oven.
A common user problem is a burnt out light bulb or a crack in the glass. All this interferes with the normal operation of the device.
You can continue to comfortably use your oven only after the repair is completed. It is permissible to carry out minor repairs yourself. After all, original spare parts for common branded devices are by no means in short supply. For complex repairs, it is better to call a specialist at home or take your equipment to the nearest workshop.
Rules for installing and preparing a furniture niche
Installation is carried out between sections of the kitchen working surface, under its countertop or in a niche designed for this purpose in a set or a separate module. The wall is designed to match the parameters of the oven, and is ordered or purchased taking into account all dimensions and installation method. The segment suitable for installing the oven is disconnected from the rest, if such a fastening is present. After meeting all the criteria and taking into account aspects of the compatibility of furniture and ovens, all that remains is to prepare the furniture niche. In this sense, you should start with protection against surges in the power network. Then grounding is done. They also leave gaps between the oven and the walls of the furniture. To maintain an acceptable level of ventilation, at least 40-50 mm are left between the back wall of the niche and the oven, and a margin on the sides is 50 mm or more. In addition to ventilation, the lower part of the furniture should be protected from heating: a rise of 90-100 mm is needed.
Important points:
- The connection to the electrical panel must be made through a separate circuit breaker.
- Do not directly connect copper and aluminum wires.
- It is forbidden to connect electrical wires by twisting.
Installation of a gas cabinet is only permissible in the presence of a specialist.
Preparing the site for installation of equipment
In order for the stove to serve for a long time and not break down in the first month of operation, it needs to be found in the right and convenient place. Let's consider several types of location.
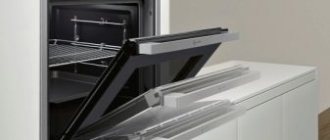
Under the countertop
The layout of the oven is very simple - it is installed under the countertop at a certain distance from the sink and other sources of water. There is a hob above it. The result is a full-fledged cooking area. The kitchen set and oven along with it are placed at waist level or even a little higher.
Here the cutout in the kitchen set is adjusted to the size of the oven in advance. After this, all edges are covered with protective tape so that installing the oven is not problematic. Upon completion of all work with the furniture, the oven is simply inserted into the prepared cutout.
In column
In modern design projects you can also find separate installation of the stove and hob. For example, when the hob is located on the countertop, and the microwave and oven are located above each other in a column cabinet along with drawers.
This arrangement not only looks stylish, for many it is also more convenient, since the oven is at eye level, you don’t need to bend over to it, and it’s easier to keep an eye on the dishes inside. The advantage of this arrangement is that children or animals will not be able to reach the dashboard on the oven. Often such a kitchen set is more expensive.
There is also an option for placement in a cabinet; it differs from the previous one in that the stove is located on a slight elevation from the general level of the countertop. Here, when designing a kitchen, it is very important to think about a structure that will support the weight of the appliance and not deform when heated.
DIY installation
Self-installation is possible if you have knowledge and experience working with electrical circuits. They are almost always mounted in the lower tier, but autonomous products without a hob are installed in different places, provided that the gaps are maintained. Manufacturers take into account the complexity of this moment and provide cameras at a distance of 5 cm from the back and sides, and 10 cm from the bottom. Special furniture sections, in turn, have 10-centimeter legs. During the installation process, they first check the capabilities of the installation site, the serviceability of parts, connections, and communication points. Set up a system of electrical wires and make grounding. Sometimes you have to look for sockets with special parameters. Installation of the device proceeds after preparing the working tools and the installation site. The device is fixed only with factory fastenings.
Checking electrical wiring and connection
Without checking the quality of the wiring, further actions are prohibited. The first step is to find out the resistance level. Next, check the cross-section of the electrical wires, because it must correspond to the power of the oven. Next, the quality of the cores is determined. Typical system needs result in the presence of a grounding structure. Then they look at the circuit breaker, which reacts to failures and overloads. The current level for operation of this element is selected, depending on the declared power of the device. The built-in device is connected using a thick copper wire. In general, it is recommended to make an additional branch. New sockets of a non-standard configuration may be needed. The relevant information is indicated in the technical passport. The more powerful the oven model, the more likely it is that a special connector will be required. Screw terminal blocks should be used to connect the wires.
Installing and fixing the oven
For installation into the set you will need a painting knife, a fork, insulation, a drill and a Phillips screwdriver. As for the installation location, for stand-alone devices without a hob, an option with a second tier is possible, but it is better to place the device in the bottom row. Install equipment only in a level space that has been verified by the building level. The connection has a clear algorithm. They start by replacing the aluminum cable with a copper cable with three wires. Replacement is carried out from the device to the shield itself. For a device consuming 3-3.5 kW, you need a wire with a cross-section of 2.5 mm² and a 25 ampere circuit breaker. If the energy consumption is higher, then a core with a cut area of 4 mm² and a 40 ampere circuit breaker. The wires are connected to a 3-phase outlet. For houses with double cable, the shield is grounded. If the oven has a two-pin connector on the back, then the grounding on it is a separate screw - you can work with a simple wrench.
Electrical connection
Built-in ovens are characterized by high energy consumption, which requires the installation of an additional cable with a larger cross-section. The best option for most models would be a 2.5-4 mm core.
This type of technology usually works with grounding, where the current-carrying cable is led to a separate circuit breaker. The latter must have a power reserve of at least 10%. If installation takes place in an apartment building, then the equipment is grounded to the bus of the common panel.
The oven cannot be plugged into a regular outlet.
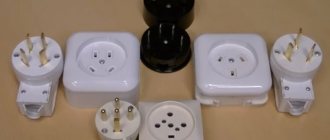
In the private sector, connection to special sockets (European type with three contacts) is allowed, but only if the local wiring has a sufficiently large cross-section. If the wires come from a distribution box, and a regular socket is used as a receiver, then you will have to ground it manually, taking into account the color of the wire and the types of terminals.
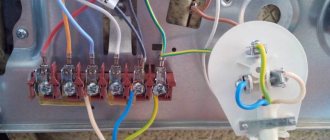
Cable marking:
- green – earth;
- brown – phase;
- blue - zero.
Terminals (letters on contacts):
- RE – earth;
- L – phase;
- N – zero.
You need to decide how you will connect the device: directly to the wire or into an outlet. When choosing the second connection method, you will need a 40A plug (a regular one is not enough here, due to the high power of the oven) with grounding. It needs to be unwound. Then strip the three-core cable. The blue and red wires need to be connected to the “phase” and “zero” contact groups, and the remaining white wires are secured in the “ground” connector (the colors of the wires may be different). We assemble a plug, which we then plug into an outlet that can withstand the power of an electric oven.
Electric oven cable markings
Now we insert the oven into the niche. We adhere to the above indentations. Next, the built-in oven needs to be secured. To do this, open the door of the device and find the mounting holes. Using a screwdriver or Phillips screwdriver and four self-tapping screws, screw the electric oven to the walls of the niche.
How to properly prepare a new oven for use
After installation, the device should be discarded of anything left after unpacking. Even before turning on for the first time, the oven must warm up to +25 °C, so if the appliance was cold, then leave the doors open. Subsequently, the stove requires calcination. It should be heated together with all grates, baking sheets and everything that is included and intended for indoor use. Then the oven is turned off, opened and left to cool completely. After a few hours, the inside of the oven, including all its elements, is washed with non-abrasive products. First they work with a sponge, and then wipe everything dry with a rag or thick cloth. For normal calcination, 2-3 hours at maximum temperature are enough - as a result, technical materials and liquids will be eliminated. Simultaneously with calcination, it does not hurt to use the convection or top heating mode.
Warming up is also used:
- After washing.
- After glass replacement.
Features of installation in an MDF tabletop
Installation of ovens in MDF countertops is carried out according to the following algorithm:
- Holes are cut in the countertop corresponding to the dimensions indicated in the oven instructions. It is recommended to carry out the work with a jigsaw with a fine-toothed file. The latter will reduce the likelihood of defects appearing on the surface of the countertop.
- The sawn edge is treated with a sealant that will protect the material from water.
- The oven is installed in the hole and then secured.
When sawing a hole, you must guide the jigsaw strictly along the marked mark. If there is a deviation of 10 millimeters or more, you will have to completely change the tabletop.
Features and rules for installing a gas oven with a hob
To connect a gas oven, you do not need permission from the gas service, but at the same time, there is a fine for incorrect installation. The optimal installation option looks like this: first, the shut-off valve is released, and a triple fitting is screwed onto its outer pipe. Screw on using lubricated tow. Next, taps are installed on two free branches of the fitting, just like a fitting on a pipe. All joints are then checked for tightness and tightness. They are coated with soapy water and then the central tap is opened. If bubbles appear, then all manipulations begin again. Even barely noticeable bubbles are enough. When everything is done perfectly, proceed to connecting the cabinet. It is connected by a line to the tap. A gasket with grease is placed in the union nut. The nut is tightened tightly, but so much so that it does not put pressure on the connection.
The best material for flexible hose is a corrugated metal hose.
How to choose
Built-in cookers and ovens are sold as a set or separately.
For this reason, hobs are divided into dependent and independent:
- for dependent surfaces sold complete with the oven, the control buttons are located on the oven door;
- for independent ones, the controls are located on its surface.
Ovens designed for built-in have the following sizes:
- width 60, 90, 45 cm;
- height 45, 55 – 60 cm;
- depth 50 - 55 cm.
The design of the module takes into account the dimensions of the hob: the distance to the wall or other vertical surfaces must be at least 50 mm for air circulation so as not to cause overheating. The cabinet for the hob and oven can have a drawer at the top or bottom.
But which gas stove is best to use and what parameters should be selected, this will help you understand
In the video - how to make the right choice:
Do not mount the stove above an oven without ventilation.
The installation of the hob must have a perfectly flat surface so as not to interfere with its performance characteristics.
Connecting a hob to electrical wiring requires professional knowledge, since the cross-section of the connection wire is calculated independently depending on the power of the stove.
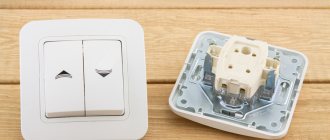
The electrical wiring must be protected; a switch must be installed to turn off the stove in an emergency.
When installing a built-in oven, the following rules must be observed:
- the room must be dry;
- have a good
- The location of the oven should provide easy access to the controls.
In the design of the box, it is necessary to take into account the width, depth of the oven and the size of the gap under the lower (upper) drawer.
When installing a gas oven, you need to connect the main line to the hose from the oven.
The connection must be made by a specialist.
After placing the oven in the box, it is necessary to adjust its position vertically and horizontally and secure it.
Video: connecting the panel to an outlet
The video shows the rule for connecting the panel to the network:
In traditional kitchen ovens, the oven is combined with a hob. But not all housewives are satisfied with this option for organizing their workspace. To make the cooking process as convenient as possible, and the kitchen interior stylish and compact, special furniture is used to build in ovens.
Tips and tricks for choosing an oven
The leader in consumer preference is electric models. The latter provide more options regarding temperature conditions and cooking methods. When choosing, you can use standard criteria: ease of use, efficiency, safety, appearance, compatibility with the environment and environmental friendliness. Gas ovens have a significant drawback: you often have to check the condition of the dishes from below, as they dry out from one-sided exposure. As for the dependent/autonomous division, the size of the room is important in this regard. Dependent ones are in a sense more universal, but autonomous ones are suitable if there is a separate hob, and an additional one will be superfluous due to the lack of another hood. In terms of the built-in/free-standing parameter, none of the options has a clear advantage. The first type is better for design, and the second can be represented by compact options.
Regardless of the type of device, you need to pay attention to the presence of a smart interface, a built-in microwave, and automatic cleaning capabilities. The buyer should be interested in the presence of Let's Taste and StreamFunction. Operating savings depend on energy efficiency.
Adviсe
When purchasing a built-in wardrobe, you should pay attention to the following tips. It is recommended to first allocate space for equipment. The location of the device must be determined in advance. Even in the smallest kitchen you can install a convenient and multifunctional oven , as the market offers a wide variety of options. The functionality of the technology matters. A timer, a readiness sensor, and many temperature settings – all these are the main indicators of almost all ovens. If the equipment is equipped with additions in the form of a grill or steamer, its cost will be higher.
A lot of functionality is convenient for those people who really love to cook and constantly experiment in the kitchen. Electric ovens are sometimes equipped with a self-cleaning function, for which you will have to pay a considerable amount. However, if you have difficulties putting things in order in the kitchen, it is better to take care of this important detail.
When choosing, you can highlight the following main parameters:
- safety;
- functionality;
- design;
- fastener
Note that manual ovens are generally inexpensive, simple, and reliable options.
However, they often do not fit into standard built-in niches. Multifunctional ovens are equipped with an electronic control unit, which has smaller dimensions. Such a device is convenient with keyboard or touch buttons.
You can store recipes for your favorite dishes in the device’s memory. The desired process is subsequently selected in accordance with the cooking program used. Combined control options, with mechanical knobs and an electronic display, are also considered convenient and fit standard niches.
The choice of equipment design is a personal preference of each buyer. Usually the oven is selected in accordance with the basic style of the room.
When choosing, it is worth considering that designer-designed models can cost tens of times more than regular classic options.
When choosing, you should also consider that the built-in oven may or may not be connected to the hob. Interconnected equipment is connected via one power cable. The manufacturer recommends connecting dependent devices to each other according to the instructions. Independent devices can be connected via two different wires and installed at any distance from each other. If the equipment is low-power (no higher than 3.5 kW), it is allowed to use an outlet.
Kinds
The type of oven you purchase directly affects the order in which your cabinets are installed. These devices are divided into the following types:
- independent and embedded;
- gas and electric.
The most stringent requirements apply to the installation of gas ovens. This is partly due to the fact that such devices must be installed in places determined by the apartment plan.
The above means that you can only install electrical devices yourself. Gas household appliances are installed with the involvement of appropriate specialists.
By installation method
Based on the installation method, ovens are divided into independent and built-in. The former are easier to install than the latter.
Independent
Independent ovens differ from built-in ovens by the presence of a full-fledged casing, which hides the internal parts of the device and protects key elements from external contact. Such devices can be installed anywhere and do not require a high time investment.
Built-in
This type of device is characterized by the absence of a protective housing. These ovens are mounted in a pre-prepared structure and are part of the set. Built-in devices provide the effect of a unified space in the kitchen, without standing out from other household appliances and without taking up additional space.
By heating method
Ovens heat food using electricity or gas. The first option is convenient because during installation, such devices must be placed next to a source of electricity. The second type of device is rigidly tied to the exit point of the gas pipe, since the latter, according to current standards, cannot be transferred to other areas.
Gas
These ovens are distinguished by the presence of gas burners stretching along the bottom. Devices of this type are complemented by modern control systems for the supply of blue fuel and automatic ignition. The main disadvantage of gas ovens is that food is heated from the bottom up. In addition, these devices are allowed to be installed only with the involvement of appropriate specialists and in strictly designated areas.
Electrical
Electric ovens differ from previous ones in the following features:
- warming up to three thousand degrees;
- presence of convection;
- accurate timer;
- presence of a self-cleaning mode;
- built-in redundant protection system against overheating and fire.
The disadvantage of such ovens is the increased energy consumption. This ultimately leads to an increase in the cost of maintaining the apartment.