Most often, the socket for an electric stove is structurally different from standard devices, since it is designed to connect devices of maximum power. In such cases, a separate line is required for connection, which is led directly to the main panel. If it was not carried out when the electrical wiring was installed, then you need to be prepared for additional work.
Distinctive features
Regardless of whether the outlet will be installed for the hob or oven, a power outlet must be installed for them. There are quite a few varieties of them - each manufacturer can make a design at its own discretion, while complying with the requirements of GOST or PUE. Its main difference from household ones is the ability to work with high power currents, which is reflected in the thickness of the conductive contacts.
The vast majority of electric stoves, hobs and ovens have external metal parts that, under unfavorable circumstances, can become live. To protect people and equipment from electric shock in such cases, grounding is used, the contacts of which in ordinary sockets have the form of clamping antennae. The oven socket cannot be equipped with such protection, since it is insufficient for high amperage currents. As a result, the socket grounding contact is located on the plug itself with a separate pin. Some people confuse a three-prong plug with a three-phase one, but in fact it is phase, neutral and ground.
How to move an outlet to another location
Moving a power outlet by chipping a wall
In accordance with SNiP, it is prohibited to use household extension cords to connect powerful equipment. This may cause overheating, fire and short circuit.
You can move the point by installing it in a new socket box using the old channel and new grooves for the wires.
Voltage is supplied in the following ways:
- special extension cord;
- laying a new line;
- cable extension, when the wires are connected by soldering, welding, crimping or terminals.
Each option has its pros and cons. The decision is made on a case-by-case basis based on the circumstances.
Wiring Requirements
If the wiring on which the oven socket will be installed does not meet the following requirements, then it must be changed, and it is advisable to clarify this issue before purchasing the device:
Separate line. The standard wire and outlet are rated at 16 amps. The voltage in the network is always 220 Volts, so you can calculate the maximum power of the socket for an electric stove and what you can connect through it. Power is equal to the product of current and voltage - 16 times 220 equals 3520 watts or 3.52 kW. This means that if the socket for the purchased hob and oven is connected to a common kitchen circuit, then these devices can only be used one at a time, turning off everything else - the microwave, kettle, etc. If you connect an oven to one outlet, and to another, on the same line, for example, a hob or other fairly powerful device, then the wiring will heat up and will soon fail if it does not close immediately.- Wire section. In closed-type wiring, a copper cable with a cross-section of 2.5 mm² can withstand connecting devices with a power of up to 4.6 kW. If the device is more powerful, then you need to select the wire according to the following table:
Using this data, you can calculate not only all the wires in the kitchen, but also which socket is needed for the connected hob. It is clear that if the cross-section of the wire is selected end-to-end, then it will not be possible to connect more than one device to one socket, even a double one, therefore, in case such a need arises, the wiring in the kitchen should be selected with reserve.
Connecting the hob and oven to a single-phase network
Cable selection
For a single-phase network, a three-core cable will be required. In order to correctly select the cross-section of the cable cores, you need to know exactly the value of such a parameter as current strength (measured in amperes (A) and denoted by the letter I).
This value can be calculated using the formula:
I=P/U
P is the total load of the electrical appliance (measured in watts (W))
U – voltage in the electrical network (measured in volts (V))
Next, using simple calculations and a cable cross-section table, we determine that to connect a 7500 W hob to a 220V network, a cable with a cross-section of at least 6 mm is required. And for an oven with a power of up to 3.6 kW, a cable with a cross-section of 3x2.5 mm should be laid.
Selecting a machine
The main parameter when choosing a circuit breaker (circuit breaker) is the rated current in the network. As when choosing a cable, when choosing the desired machine, we use the formula I=P/U. After calculations, we determine that for a hob with a power of 7.5 kW, a 40A automatic is required. and for the oven, a machine with a nominal value of 16A is suitable.
Selection and connection of residual current devices (RCDs)
For the safety of the electrical network, in addition to the circuit breaker, it is recommended to use residual current devices (RCDs). In addition to protecting the electrical network, this device protects a person from electric shock by tripping if the leakage current exceeds a specified parameter.
At the moment, there are RCDs designed for differential current (leakage current) of 10mA, 30mA, 100mA, 300mA.
So, for a 220V network, a residual current device (RCD) of type AC 40A is suitable and with a leakage current of 30mA for the hob, and 16A 10mA for the oven.
Connection
Once we have decided on all the network parameters and selected the components that correspond to the specified parameters, we can proceed directly to connecting the outlet.
To do this, first of all, you need:
- Select installation location.
- Lay (if necessary) a new cable.
- Connect the RCD and the machine.
- Install boxes for mounting sockets (for internal sockets).
After which we:
- We make sure that there is no voltage in the network. Using a tester or an indicator screwdriver.
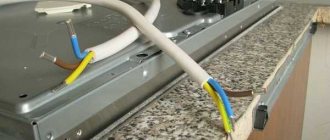
- We strip the cable cores. To make it easier to connect the socket, we need to strip the ends of the cable with a special tool or an ordinary stationery knife.
- We connect the outlet. We insert the exposed cable cores into the places designated for this purpose according to the markings (brown (red) wire - phase (L), blue (blue) wire - neutral (N), yellow-green wire - ground (PE)), and then secure them with fasteners screws. The screws must be clamped firmly, but without much force, so as not to strip the threads.
- We install the socket in the box. We carefully lay the wires inside the box, place the socket there and securely fasten it with the help of special claws.
That's it, the socket is installed. But before using it, you need to make sure there is voltage in the network. To do this, we turn on the machine and the RCD, and using a tester or an indicator screwdriver, we make sure that there is voltage. The socket is ready for use.
We insert the exposed cable cores into the designated places according to the markings.
Selecting an outlet based on the number of phases and grounding
Since the manufacturer does not know which socket will be used for a specific electric stove, most devices are sold without them. It’s not even that the sockets are different - it’s just that most devices can be connected to both a single-phase household network and a three-phase source. Accordingly, only after determining the type of device that will be purchased, it is decided which outlet to choose.
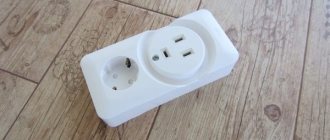
A single-phase power socket is larger than a regular one and can supply a phase, working zero and grounding to the device. If the apartment does not have grounding, then one contact remains empty.
A three-phase socket for an electric oven or under a hob is a power outlet by definition - even the weakest of them is designed for a current of 32 Amps. Depending on the presence or absence of grounding, it may have 4, 5 or 7 contacts. The last option is rare, since it is a way to install additional protection and is not used in the vast majority of cases.
As a result, the main choice of an outlet for electrical equipment comes down to determining the power for which it should be designed, the number of phases from which it will operate, and the presence of grounding.
Features of three-phase sockets and plugs
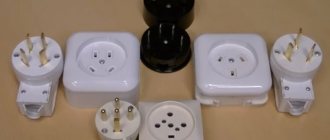
The voltage of a three-phase socket, in contrast to the usual 220 V, is 380 V. More often, such sockets and plugs are used outside of everyday life, although it all depends on what household appliance needs to be connected to the power supply. There are many types of three-phase sockets sold in the market.
Their main difference is design.
Power sockets have 4 or more contacts: 3 are phases, and the 4th is grounding. A plug for such an outlet is also needed with a similar “structure”. There are electric stoves that can only operate on a 380 V network, and the outlet must match this power.
To move the socket, do the same work as before:
- The wall is being chipped;
- The socket box is installed;
- A groove is also made for the wire.
To install the socket, you will need a standard set of tools.
Using the indicator, check that there is no electricity in the socket itself that you are going to move. After removing the old power outlet, it is important to check that all wires are connected to it in the same order. If the wires are painted (neutral wires are blue, protective wires are yellow-green), then this is great. However, if there is no such marking, you should label the wires and terminals on the socket to avoid short circuits in case of incorrect connection. The removed old socket can be reused, or you can immediately use the new one. The new socket cannot be placed under or above the sink, or in kitchen furniture, and it is better not to use an adapter. It must be mounted on the wall (surface) or flush-mounted.
Tips for choosing a design
When you know what type of outlet the stove you are purchasing should have in terms of power and number of phases, you can evaluate the secondary characteristics that will affect the comfort of its use.
internal socket for electric stove
External or internal. The first option allows you to install a socket for an electric stove directly on the wall surface - in some cases, a stand is first installed for this, but more often it is attached with ordinary dowels. In the second case, the installation of a power outlet for an electric stove is done inside the wall, for which you will have to cut out a socket in it. This is more convenient because the hob plug will not protrude so much above the surface, and from a safety point of view, such a connection is more reliable.
Presence of a lock. If it exists, then this is very good, since electric current, especially high power, creates a vibration effect on the contacts. In most cases, contact clamps cope with this, but it will never be superfluous to play it safe with powerful devices. Fixation occurs due to the latch, which is raised with a button or threaded - with a union nut.
power socket with protective shutter
Safety curtains. Most often, sockets are installed low, which poses a potential danger if there is a child in the house. The curtains in the power socket under the oven are made in such a way that you cannot insert anything into them except a plug.
Degree of protection. In documents and on the outlet itself they are designated as IPXX. Instead of XX, a digital code is placed, indicating the degree of protection of the contacts from foreign objects and moisture. The minimum value is IP00, and the maximum is IP68. The fully protected socket and plug for the electric stove prevent water from entering the contacts even when their housings are immersed in water. In the kitchen, it is allowed to use devices with a protection class of at least IP24 - this means that the housing protects the contacts from direct contact with splashes of water, regardless of which side they come from.
socket with built-in RCD
There are also models with built-in RCDs and other additional protection, but how justified their use is and whether it is worth overpaying for such “goodies” should be assessed in each case separately, depending on the overall quality of the device.
For more information about choosing an outlet for an electric stove, watch this video:
Single or modular
Another point that you should pay attention to when choosing a socket and connectors for it is that it should be a separate socket or a module consisting of several sockets.
Also in this case, you must first think about where the socket will be used. In the kitchen, you should use a module with two or three sockets, additionally specially insulated.
This type of socket is recommended in humid areas, but in this case it is worth paying attention to better insulation in the form of waterproofing so that, for example, steam from the oven does not create a risk of short circuit.
Connecting the socket
In general, connecting a power outlet for an electric stove in a sequence of operations is no different from installing a regular household one. The most important feature is the strictly defined connection of contacts. If for a household outlet there is no difference in how to connect phase and zero, then mixing up the contacts of the power ones, under the hob or for the oven, is fraught with a short circuit or the appearance of a phase on the metal parts of the device, regardless of whether the device is connected to a single or three-phase device. Power sockets are made in such a way that it is impossible to insert the plug into them incorrectly, but you must be careful when connecting.
Single phase sockets
It would seem that the only important thing in them is how to connect the grounding wire - the rest are ordinary phase and zero. In practice, the hob and oven are connected to certain contacts, since many models are designed to operate from one or three phases - you just need to remove or install a special jumper in the right place.
In order not to confuse what and where to connect, there are marks on the body on the inside of the socket and often on its cover indicating which contact should have a phase, where is zero and ground. All you have to do is watch carefully so that each installed wire is in its place.
Three-phase sockets
It is necessary to install and connect a three-phase outlet in the same way as a single-phase one, with the difference that there are some liberties with connecting the phases. If the neutral and ground wires must be installed strictly in their place, then the phases can be attached to the remaining contacts in any order - there is no difference.
Since the neutral and phase wires must be connected to a specific place, each contact is marked - phases with alphanumeric designations L1, L2, L3, neutral wire with the letter N, and grounding with three horizontal lines, each of which is shorter than the previous one.
A special point concerns the cable that will power the outlet. Depending on the number of phases, devices of different power can be connected to wires of the same cross-section, and the difference can be 50-80%. In this case, it is still advisable to choose the wires of such a cross-section as if the connection would be made in a single-phase way. The fact is that if, for example, we take a three-burner electric stove, then each of them can be connected to its own phase. Accordingly, when one of them is turned on, then only one phase wire is in operation. Most often, this does not matter, since the power of one burner is 1.5-2 kW, which can be handled by a thin wire of 0.5-1 mm², but once again it would not hurt to find out what connection diagram it is, or even better, just take the cross-section wires with reserve.
Replacing the socket box
A common malfunction of the contact device is the unreliability of its fastening in the glass, caused by the following set of reasons:
1) Previously, the contact connector was replaced, without replacing the socket.
2) During the initial installation of the power supply system, the inner cup was made of metal and its diameter slightly exceeds the maximum opening value of the spacer mechanism of modern contact devices.
3) The metal cup, among other things, does not allow the spacers to cut into the material; as a result, when the plug is pulled, the contactor flies out of the socket.
You can compensate for the deficiency in two ways:
— make linings from multilayer cardboard, paper or rubber under the feet of the spacer mechanism;
— Replace the socket box with a plastic one.
Replacing the glass consists of the following operations:
1) Dismantling the old socket box.
2) Widening the recess for installation (if necessary).
3) Installation and fastening of a new glass - fixation is achieved by using foam, sealant or plaster.
4) Elimination of gaps between the body of the glass and the wall.
A well-installed plastic cup has 4 holes for fastening the quick-release frame, and the material allows the arms of the spacer mechanism to carry out preliminary fixation.
Connecting contacts to the stove
Most stoves and electric stoves have a standard connection diagram, which shows whether the device can be connected to only one or three phases. If the device has a universal circuit, then it consists of 6 contacts, three of which are for connecting phases, two for zero and the last one for grounding. The markings are exactly the same as on sockets - phase contacts are L1, L2, L3, zero is designated as N, and grounding is indicated by a standard symbol.
single phase electric stove connection diagram
If a three-phase connection is made, then all wires are simply connected to the corresponding contacts. In the case of a single-phase network, you need to look for jumpers in the device kit - one of them closes the phase terminals with each other, and the second is neutral. Accordingly, the phase wire can now be connected to any of the first three terminals, zero to any of the next two, and ground to the last. If suddenly there are no jumpers, then you need to make them yourself, for which a piece of wire will do, the same one that was used to install the socket.
Important! On some devices, jumpers are already installed from the factory - if they are to be used in a three-phase network, then the jumpers must be removed. Otherwise, a non-warranty malfunction will occur immediately after connecting to the network.
Some devices do not have contacts, but instead simply have a wire that must be connected to a plug. Regardless of the number of phases, the insulation colors of the grounding wire will be yellow-green, the neutral wire will be blue, and the phase wires will be any other.
In any case, before connecting, you need to study the instructions - if the device is from a normal manufacturer, then it should have a diagram that is understandable even to a layman.
Very detailed instructions for connecting an electric stove are contained in this video:
and short instructions can be found here:
What sockets are suitable for electric stoves?
@stroy-podskazka.ru
You need to focus on the power of the device; ask a consultant for a suitable socket option.
Important! Hobs do not have plugs by default, but there are also models that come without a cable included. Consider this question, do you really need an outlet? It would probably be more correct to connect the cables through a small electrical panel. Then a plug-socket is simply not required.
Single-phase connection
For powerful single-phase stoves and cabinets from 3.6 to 7 kW, you need a 32 A/220 V outlet.
Three-phase connection
A three-phase electric stove must be supplied with a 380-volt power supply with a 20-amp three-phase socket. If a plug is not supplied, a 3-phase plug with a suitable current rating is required.
Attention! Plugs and sockets need to be grounded, which is why they have more pins and holes. If you do not arrange grounding, this can lead to death during further operation of the device!
A few words about safety
The above instructions are enough for a person with at least some knowledge of electrical engineering or who wants to figure out what to do and how to do it to connect the electric stove. Otherwise, it is better to include in the purchase budget the funds to invite a professional for this purpose, especially if you need to carry out grounding or cut grooves in the wall for cable supply.
Despite the fact that installing a socket for a kitchen tile or oven can be compared to assembling a construction set, you should remember that electricity never forgives mistakes and requires not only respect, but also sufficient skills when handling it.
Extension cord for electric stove
The easiest way to move an electric stove or hob some distance from a power outlet in the kitchen is to use an extension cord.
Everything is simple here, we plug the extension cord into the existing socket, connect the connector itself to the new installation location of the stove, and this, in fact, completes the transfer.
The main advantages of this transfer method are:
- Simplicity. Using an extension cord, any person who does not have any special knowledge and skills in electricity and electrical installation can easily move the outlet for the stove to the place they need.
- Low cost. This solution will most likely be the most cost-effective, because you will only need to buy an extension cord for the electric stove.
Unfortunately, this method also has serious disadvantages that make this method of transfer undesirable:
— Lack of extension cords for electric stoves . It is quite difficult to find an extension cord for an electric stove on sale, especially if a three-phase connection is used. Since the electric stove is the most energy-intensive device in the apartment, the extension cord uses a large cross-section cable, as well as a special power outlet designed for high current. In addition, a large variety of power connectors of various types complicates the selection task.
Most likely, you will have to assemble such an extension cord yourself by purchasing the appropriate cable, plug and socket.
— Unreliable connection . When using an extension cord, several unnecessary connections appear in the power supply circuit of the electric stove, some of them detachable, which sharply reduces the reliability of the entire system. There is a high probability of contacts loosening and heating, which often leads to fire.
— Possibility of mechanical damage to the power cable . When moving an electric stove, the electrical cable is most often laid openly, simply placed on the floor or passed through furniture, for example, across a kitchen unit. In such conditions, there is a high probability of mechanical damage to the cable under various circumstances - this could be rodents, chafing of the cable, pets or children, or simply a break as a result of careless work nearby.
- The appearance of the room is spoiled. In everyday life, we are surrounded by many electrical appliances, all of which are plugged into an outlet. The kitchen is probably one of the most loaded rooms with various equipment; if you do not organize the connection points correctly, you can simply “drown” in the wires; they will interfere not only with cleaning the room and moving around it, but also simply irritate you with their appearance. Therefore, an extension cord for an electric stove lying on the floor will not add attractiveness and practicality to your kitchen.
— Possibility of electric shock to a person . Elements of electrical wiring accessible to people, which include an extension cord, are dangerous in themselves because they can, under certain conditions, for example, if the insulation is damaged, cause harm to human health through electric shock. In addition, due to the presence of water in the kitchen, these risks increase significantly, because pipes or plumbing fixtures may burst, and, what happens even more often, your neighbors above may flood you. In such conditions, using an extension cord becomes especially dangerous.
As you can see, this method has more disadvantages than possible benefits; the extension cord should be used only as a temporary solution, until the implementation of a more reliable, complete, comprehensively safe one, such as those presented in the following paragraphs of our article.