An electric stove is an excellent choice for a modern kitchen. If installed and used correctly, the device will serve well for many years. Of course, you can invite a qualified technician to connect the electric stove, but if you wish, you can do everything yourself and save a lot!
Connecting an electric stove yourself
Familiarize yourself with the basic requirements for connecting modern electric stoves, existing circuits, as well as guides for direct installation of the device and its grounding.
Connecting an electric stove yourself
What are the benefits of electric stoves?
The main element in the kitchen has always been the stove, because without it the concept of “kitchen” loses its meaning. In gasified houses, gas stoves are mainly used, but recently more and more people prefer electric ones.
Electric stoves are easy to use, do their job well, and are safe, but only if connected correctly.
When purchasing a new electric stove, many stores provide the services of an electrician who will connect it.
Even if such a service is not provided, sellers strongly recommend using the services of an electrician to connect the device.
And all this because a modern electric stove is a very powerful consumer of electricity, which means that special requirements are placed on the safety of its connection.
But it is not necessary to call a specialist; even with basic knowledge in the field of electrical engineering, it is quite possible to connect this device yourself, there are no particular difficulties in this, but some conditions must be met.
DIY ground loop
Grounding a private house
Having familiarized yourself with the theoretical part, you can begin to create a ground loop. The work is relatively simple and is performed in several steps.
First step. Calculate the contour. To do this, you need to find out the soil resistance value in your area. Find out this information in the relevant reference literature or local services. The same service can give you recommended circuit parameters. This will save you from unnecessary hassle, because the calculation formulas are quite complex and voluminous.
Second step. Choose a suitable location for the circuit. Install the circuit in some place that is rarely visited, the minimum distance from the foundation of the building is 100 cm.
Third step. Prepare the electrodes. They can be made from steel angles. The minimum width of the product is 5 cm, the optimal length is 250-300 cm.
Fourth step. Dig a square or triangular hole about 100 cm deep. The electrodes will be placed in the corners of the pit. Therefore, select the depth and width of the pit so that the distance between the installed electrodes is equal to the length of these products.
Trench for ground loop
Fifth step. Drive the prepared electrodes into the corners of the dug hole. A sledgehammer will help you with this.
Sixth step. Weld a strip of metal to the electrode pins. The welded connection must be reliable and of high quality. Be sure to treat the welding areas with an anti-corrosion compound, for example, bitumen mastic.
Grounding circuit of a private house
Seventh step. Pull the metal strip to the input shield. Next, you will need to connect a ground bus to the strip.
If it is not possible to use a full bus, connect a high-quality copper wire to the metal strip. The cross-section of this wire must be at least 10 mm2. Use a bolt and nut to secure the wire. Treat the connection point between the metal strip and the copper wire with an anti-corrosion agent.
Eighth step. Fill the hole. Firmly compact the backfilled soil.
Features and conditions of the connection process
The first and one of the most important conditions is the ability of the wiring to withstand significant loads.
The house or apartment must have copper wiring with a cross-section of at least 4 mm. sq. If the power of the stove is significant, then a wire of 6 mm is required. sq. section.
The best option would be to lay a separate line for connection; this will allow you not to load the general wiring of the house, especially if it is an old building and the wiring is not designed for significant loads.
The second condition is the ability of the automatic switchboard to work with significant loads.
Therefore, the wiring that will power the stove should be connected to the circuit breaker with the highest current value, or an additional powerful circuit breaker should be installed under it in the distribution panel.
In this case, the current value of the machine should be one rating higher than this parameter of the plate in order to avoid critical loads. That is, when connecting a device with a current consumption of 20 A, a 25 A machine is used.
The third condition is the availability of additional means of protection. They can be differential circuit breakers or a residual current device.
The last condition is the correct connection. The stove can be connected to an outlet, which provides some convenience, allowing you to turn it off at any time.
But the socket and plug must be powerful and capable of operating under loads.
How to properly make grounding yourself
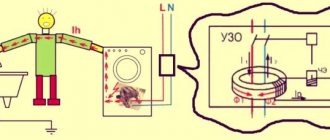
Ecology of consumption. Homestead: Proper grounding of electrical equipment is important for safety.
Let's look at how to ground a house with our own hands, ground a washing machine and stove in an apartment, and what tools we need for this. Proper grounding of electrical equipment is important for safety. Electrical current always follows the path of least resistance, and this path can change each time if there is no reliable grounding. Let's look at how to ground a house with our own hands, ground a washing machine and stove in an apartment, and what tools we need for this.
Instructions for installing the grounding system:
- Place the ground rods and bonding strips in an open area, such as a front yard or behind a garage. In this case, choose a place close to the area where the grounding wire enters the building. The shorter the path of this conductor, the better the system dissipates “stray” electrical charges.
- Drive the grounding electrodes as deep into the ground as possible. To do this, we recommend using a special hammer. Most often, the total length of the ground electrode immersed in the ground is 1.5 meters, but only 20-30 centimeters should be visible above the ground. The deeper the ground electrode is in the soil, the better it works;
- Use sandpaper or a metal brush and thoroughly clean the surface of the ground rod to remove any dirt, rust, or paint. Treat the surface until a bright iron shine appears - this is a guarantee of improved conductivity and strong resistance to external irritating factors;
- Using welding, connect all parts of the grounding device into a single whole. The strips connecting individual grounding conductors are made with a cross-section no less than that from which the grounding conductors themselves are made. Welding is done with overlap. Avoid poor contact as these welds will not be inspectable in the future.
- Also, at the entrance of the grounding conductor into the building, a copper distribution plate is installed in the form of a distributor of the outlet grounding conductors.
Diagram: grounding system
Security measures
When connecting, it is important to take security measures seriously. The wiring, socket with plug or terminal block must be designed to withstand significant loads.
The most important thing is to choose the right cable cross-section.
All connections must be well tightened; loose loose bolts or screws when connecting wiring are not allowed.
It is also important not to confuse the wiring when connecting to the stove, socket, RCD plug and machine.
Let's summarize.
In order for the electric stove to operate with maximum safety, it is necessary to ensure the supply of electricity to it with the appropriate parameters - the wiring, socket and circuit breaker must withstand a load greater than that created by the electric stove, but the RCD in terms of current strength must be as close as possible to this parameter of the electrical appliance. And it’s better if a separate line and automatic machine are used to power the electric stove.
But compliance with the conditions is not enough; you still need to connect the wiring correctly. After all, stoves can operate from a single-phase or three-phase network; there are also two-phase stoves, and it is important to connect everything correctly.
Do-it-yourself grounding at home. How to do it.
Grounding is a mandatory element of organizing the electrical wiring of a private home. After all, in the event of an unexpected breakdown of electricity, it is grounding that protects against electric shock. And those who have tried to grab a washing machine connected to the network from behind know how its open metal parts “pinch” noticeably.
In addition to the washing machine directly, and not through a European socket, it is advisable to ground:
- microwave ovens - if there is poor contact with the socket, it can shock quite noticeably, so almost all models have a separate grounding screw terminal on the back;
- electric stoves (ovens and hobs) – due to the high power, the probability of breakdown is very high, so grounding through an outlet is not enough;
- personal computers - are grounded using any mounting screw on the back of the case, which allows you to remove floating potentials and improve the speed of wireless Internet.
In addition, electrical appliances and lightning protection (if there is an SPD) can be connected to one grounding circuit, which will save time and effort during construction.
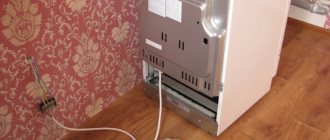
Connection to a single-phase network
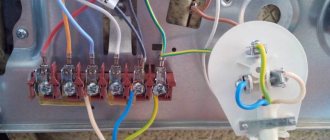
In the electric stove, under the protective cover, there are contacts to which the wire is connected.
For a single-phase network, this cable must be three-core.
One core is phase, the second is zero, the third is grounding. In the cable, each core has its own color. It is important to remember that the neutral wire is always blue or light blue, and the ground wire is yellow-green.
In the plate, there are usually more contacts for connection, but each of them has its own designation.
All terminals marked with the letter “L” are phase, no matter how many there are, zero is marked with the letter “N”, there may also be several of them, grounding is indicated with the letters “PE”, usually this is one terminal.
Knowing this, you can easily connect the cable. If, for example, there are several “L” terminals, and there is only one phase in a single-phase network, then you need to use the jumpers that come with the stove.
First, we connect the ground wire to the “PE” terminal, then the zero wire to the “N” terminal.
If there are several such pins, we use a jumper, connecting them together, and then connect the blue wire to one of the pins.
The last phase is connected. We connect all the pins marked with the letter “L” with a jumper (if there are three of them, then they are designated as “L1” “L2” “L3”).
After connection, connect the phase wire. In a three-core cable, it may be brown, gray or black.
DEPENDENT KIT
The dependent set is connected to electricity according to the principle of an electric stove, and is mounted as a separate hob and oven, which are connected to each other by special connectors. That is, the power wire from the power plug or line is connected to the connectors of the oven, and the hob is connected with special connectors directly to the oven and controlled from the oven control panel.
It must be remembered that the electrical connection diagram, the number and cross-section of the wire cores depend on the number of phases connected to the device. Before you start using the electric stove, carefully read the instructions.
Our specialists are always ready to connect an electric stove in Moscow and the Moscow region in the shortest possible time. Feel free to call our technician, who will not only do his job efficiently, but also answer all your questions about the operation of the device, and also give a three-year guarantee on all work performed and materials used.
Installation and connection of an electric stove in Moscow and the Moscow region is inexpensive and with a 3-year guarantee!
- We also carry out electrical installation work, furniture assembly and apartment renovation.
- We work throughout Moscow and the nearest Moscow region!
- Warranty service for household appliances is performed by authorized service centers, which are indicated in your warranty cards.
- Our specialists will always answer all your questions.
- The professionalism and experience of our technicians will allow you to start using the equipment in the shortest possible time after purchase.
- We guarantee high quality work, comfort during execution and efficiency!
We provide a 3-year warranty on work performed and installed materials!
Applications are accepted from 8.00 to 23.00 by phone 8 (495) 795-74-59.
Call us, we work seven days a week!
Connection to a two-phase network
A rare, but still common connection method.
The connection diagram for an electric stove operating from a two-phase network is somewhat different, since this requires a cable with 4 cores, two of which will be phases, the other two will be zero and ground.
The connection is made as follows: connect the ground wire, then use a jumper for the zero terminals and connect the neutral wire.
If the plate has three phase terminals, then connect two of them with a jumper and connect one phase wire to one of the terminals, and the second phase wire to the remaining third terminal.
Incorrect grounding
In accordance with the requirements of the relevant regulatory documents, it is prohibited to ground electrical installations on any kind of pipelines.
Correct (right) and incorrect (left and center) ground connections
- Grounding to water pipes is also prohibited. The consequences can be very sad, even death while taking a shower - electricity is not to be trifled with.
- Conductors must not be connected to unprepared grounds of the grounding bus. The problem is that each metal has its own indicator of electrochemical potential. Outdoors, circuit elements will be exposed to moisture.
- In unprepared areas this will lead to the development of electrocorrosion. The process will spread inside the conductor. In the event of an accident, the affected conductor instantly burns out and becomes simply useless.
- It is prohibited to ground electrical appliances in series, i.e. through each other. If one device breaks down, other installations will inevitably be damaged.
- You cannot connect more than one conductor to one grounding bus pad. This will lead to potentially dangerous situations.
Unsuitable grounding according to the PUE
Connection to a three-phase network
To connect a stove operating from a three-phase network, you need a cable with 5 cores, 3 of which will be phases, the other two - ground and zero.
Again, first connect the ground and zero, having previously shorted the zero terminals with a jumper, if there are several of them.
We connect one phase wire to the three phase terminals.
The colors of the phase wires may be different, but it is important to remember that the neutral wire is always blue or light blue, and the ground wire is yellow-green.
Keeping this in mind, you can easily connect the cable to the stove, and it does not matter what network it is on.
Complete connection diagram via socket
Now let’s look at the complete connection diagram for an electric stove; for example, let’s take a model operating from a 220 V network (single-phase), and we’ll lay a separate line for it.
First, let's connect it using a socket. Before starting work, the switchboard must be de-energized.
So, first of all, we connect the wire to the machine on the distribution panel.
We connect the phase and neutral wires to it, the ground should be connected to the grounding of the house or apartment.
Regarding grounding - a little lower. Immediately behind the machine we connect the RCD in series and secure it.
Then the wire is pulled to the location where the socket is installed. This can be done in an open way (using a corrugated tube or plastic box).
Read more here: How to properly install electrical wiring.
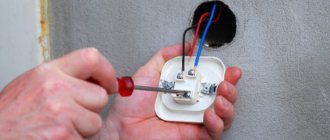
The socket and plug for a single-phase network must be three-pin.
When connecting wires to an outlet, be careful not to tangle the wires. The earth must be connected to the ground contact, the zero to the zero contact, and the phase to the phase contact.
And you definitely need to make sure that the cable from the stove is connected to the plug in the appropriate way. It is very important not to confuse the wiring.
We fix the socket on the wall, it is important that it is located at a distance from metal structures (pipes or radiators), that it is not affected by heat sources, and that water does not enter.
Then we connect the power cable along with the plug to the stove. After this, we carefully check all connections, they must be well tightened, all elements of the circuit must be securely fastened.
Next, a trial run is carried out. First, the machine turns on, then the RCD, and the stove itself.
After turning on the stove at full power, everything is turned off and all elements are checked for heating.
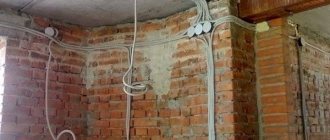
Nuances of grounding a private house
Connecting grounding elements to the distribution panel
There are several options for arranging a ground loop. The specific method is selected taking into account the type of soil on the site and the characteristics of the house. Regardless of the chosen method, it is recommended to make grounding electrodes from pipes, one of the ends of which is pre-flattened to a point.
On the lower section of each pipe (the length of the section should be about 50 cm), 10-15 holes with a diameter of about 5-7 mm are made randomly.
In hot weather, it is recommended to pour a saline solution inside the grounding pipes. To prepare it, just dissolve half a pack of salt in a bucket of clean water. This solution will help maintain resistance at a normal level.
The grounding bars also remain the same regardless of the method chosen. You should refrain from using galvanized steel to create metal bonds - the material will very quickly lose its performance properties.
Connection without socket
Connecting a stove without using an outlet, but using a terminal block, is practically no different.
The wire is connected to the machine, then it cuts into the RCD circuit, and the wire is pulled to the installation site of the stove.
A recess is made in the wall into which a protective box is installed. The terminal block is placed in this box.
The wire coming from the distribution panel, as well as the cable from the stove, is supplied and connected to it.
They are fixed in the terminal block; it is important not to confuse which wire is which.
After this, the protective box is closed with a lid. Well, then – a performance check.
It is noteworthy that the connection diagram for electric stoves is almost the same.
Many people are familiar with Hansa and Mechta electric stoves. Buyers often ask how to connect them correctly.
Since there are many models of stoves, it is difficult to guess which one you purchased. But we described all possible connection methods above.
See the power consumption and what wiring your model is designed for (single-phase, two-phase or three-phase) and apply our recommendations.
The Hansa stove from a foreign manufacturer is connected to the network, just like the domestic Mechta stove. It is only important to choose the right wiring and all other elements included in the power line.
Popular among readers: Methods for replacing electrics in an apartment.
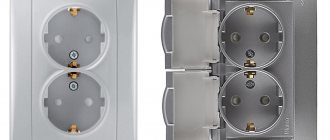
Types of power points for electric stoves
The installation of a new stove, especially an electric one, is necessarily accompanied by a connection procedure. Sometimes an electrician is invited to do this type of work, but more often they do it on their own.
To ensure that new equipment lasts a long time and that problems do not arise during operation, you should carefully consider the technical standards for its installation.
Particular attention should be paid to the selection and installation of the appropriate power connector. The opinion that for an electric stove it is enough to install the most ordinary socket is wrong.
It will not be able to withstand high loads and, at best, will simply melt. For powerful electrical appliances, special sockets are used that can withstand 7 kW or more.
Power sockets on the market differ in color, material, shape, installation method and load capacity. When purchasing this device, you must immediately buy the corresponding plug. Often, manufacturers of electric stoves equip their equipment with a power plug and socket - all that remains is to install them correctly.
Based on the material used, power sockets are made of carbolite and high-quality plastic. The first option is black, they are usually cheaper. Plastic ones are mainly available in white. They are more expensive, are of high quality and have a higher level of wear resistance.
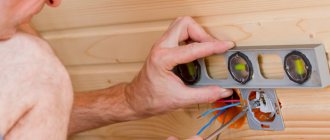
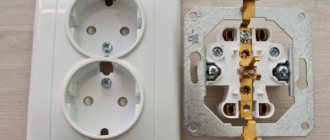
According to the installation method, power sockets are distinguished:
- for open installation;
- hidden installation.
If it is to be installed behind a stove that sits tightly against the wall, then it is better to choose hidden installation models, the working mechanism of which is hidden in the wall.
Among high-power sockets you can find both options with a grounding contact and without grounding. For an electric stove, you should buy a grounded outlet.
The power supply in the house can be single-phase, three-phase and rarely two-phase. Based on this feature, you need to select a socket that has the necessary contacts and lay the appropriate power cable.
In order to choose the right power connector suitable for the electrical network entering the house, you need to find out in advance from the electricians servicing the site, the type of network and the presence of grounding. Their answers should be unambiguous and clear. Only after this can you begin to purchase and further install a power outlet yourself.