About ways to create
In fact, only one way is known about how to make a left socket in a private house: attach an additional cable to the input wire immediately before connecting it to the electric meter. Thus, the left cable outlet must be connected to the meter. There are no other options for creating an alternative and free power supply line.
Another question is which method and where to connect the additional cable. Each home owner must decide for himself regarding the individual location of electrical objects. The left cable can be located in two places - outside the house or inside.
In this case, the choice of location must be safe, hidden from prying eyes, since the left socket is illegal. If it is discovered by inspectors, then this is fraught with a fairly substantial fine!
Features of connecting the socket
Let's start with a way to connect an alternative cable outside the house. First you need to determine the place where the left socket will be located. To establish this accurately, you need to examine the path along which the wiring reaches the electric meter. Electricity is supplied to a private house via a cable with branches attached to poles. Based on this, it is clear that the wire goes in two ways: through the air or underground. The first option is used due to its simplicity and affordability of installation. The second option is used by people who take care of the landscape of their site and do not want to spoil the appearance with concrete pillars. However, in the latter case, it will be difficult to install an alternative cable to a private plot in the future.
Creating a line over the air
When laying power transmission over the air, bare aluminum wires with a steel core are used. Directly to a private house, branches of the main line are made from the same wires or from wires with an insulated core. If we have the first option - non-insulated wiring, then this is great luck. Before us is an almost finished unaccounted for outlet. To complete the job, you should throw a regular wire over the incoming cable. This allows you to bypass the meter and get an additional outlet with free electricity.
By the way, this type of fraud is used when a welding machine is connected to the network. It is very difficult to notice such a design, so it is considered the most reliable and safe. However, it is worth understanding that the wire line should not be visible from the street. When the branch of wires to the house is visible along its entire length, there is no need to talk about secrecy. Also, if the house is located close to the road, then there is a chance that someone may notice this illegal structure. Those whose house is located deep in the yard are lucky - a small view will hide the outlet.
You should carefully mask the insulators, which often give out left cables. Please note that in this case safety comes first, so you need to regularly inspect the wires for hot spots. They are often created by thrown wires. Alternatively, you can use homemade clamps that cling to the wire. This device protects the cable well from melting. It will not be difficult to remove them when the inspector visits.
Creating a line underground
To lay the left cable, large-scale excavation work will have to be carried out. They will be required to ensure uninterrupted operation of the additional system. It is worth understanding that the soil, its moisture, and various rodents negatively affect the wires. Therefore, the power line is dug up, the insulation is removed from it, the wire is laid and the junction is insulated. Insulation is made by a coupling. It can be either homemade, with epoxy resin poured into it, or purchased, treated with a special compound. All work is performed under voltage, so you need to be careful.
It is almost impossible to detect such a design, but some owners are let down by lack of forethought. Controllers can easily find the left wire laid away from the main line using ultra-sensitive equipment. To prevent this from happening, it is better to lay part of the wire together with the main one, which is constantly energized, and direct part of it to a branch and mount it in the starter. In this case, the control phase is necessarily located near the input machine. It turns out that if you turn off the electricity in the house, it automatically disappears into an alternative outlet.
There is one more nuance that owners of private houses miss when installing an additional electrical outlet. Many people use grounding rather than a home neutral for it. It turns out that when the “zero” phase is turned off, electricity remains only in the left structure.
The left wire can be laid in the apartment. The same installation principle is used here as when creating a line underground. However, this will be more difficult to do than in a private house. The whole problem rests on the fact that the cable in residential high-rise buildings runs inside the wall.
Left socket in a private house, how to do it. Some tips
First you need to understand some techniques for removing insulation.
For example, professional electricians remove it in their own way. Side cutters are used to cut through the wire insulation. This should not be done all the way; you cannot cut through the copper part and then pull it to the side. In this matter, the main thing is to get better. Professional craftsmen perform such an operation “blindly”, and the possibility of formation of bites is very unlikely. It’s a different matter for novice electricians, who develop problems in most attempts. It is also important to understand the general principles of wire splicing. You need to do this operation if you need to move the socket to another location. According to safety regulations, splicing wires is not recommended. But if you need to install an outlet in a certain place, then all that remains is to break up the decorative trim. Therefore, sometimes you can neglect the general rules.
When installing in a concrete wall, you need to know the thickness of the finish. The edge of the socket box should be flush (parallel) with the wall. The device is mounted in drywall using special socket boxes with sliding supports.
Installing an outlet or switch in the house is not difficult even for an inexperienced novice master. The main thing is to adhere to a clear work algorithm and listen to the advice of electricians. Here you need to do the work carefully, and the result will not be long in coming. At the same time, the house will never smell of burning from burnt insulation. It is also worth installing only high-quality equipment and using professional tools.
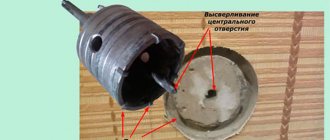
How to make a hole for a socket
In an ordinary concrete wall, a hole for installing a socket is made simply. Take a hammer drill and hollow out a “nest” of the required diameter. Nowadays a particularly popular question is: how to install a socket in drywall. And this, in fact, is even easier than working with a regular wall.
First, a hole is cut in the drywall, which in itself is not particularly difficult. Then, if hidden wiring sockets are installed, a “gypsum board socket box” specially designed for this type of installation is used. You can attach such a box with a screwdriver in a couple of minutes, and how to do this will become clear to everyone who picks it up.
How to make a socket in the wall
1. Before proceeding with the installation of the socket, it must be disassembled: remove the supporting protective and decorative parts, remove the outer cover. This is not difficult to do, since almost all cover models are fixed with one or two bolts, unscrewing which opens access to the “contents” of the socket.
2. Find out what kind of wire fixation is provided in the device. Most often, sockets are equipped with special clamping terminals. Therefore, in order to clamp the wire, it will be enough to insert it into the hole (slot) provided for this purpose and tighten the bolt more tightly. But, more often than not, the electrical wire is simply screwed on with a bolt and washer.
3. In the first option, we strip the ends of the wire by 5 - 7 mm, insert them and tighten them tightly. In the second option, we strip the ends of the electrical wire by 10 - 15 mm (depending on the diameter). Round nose pliers are best suited for these purposes. Using them, small rings are made from the stripped ends, the inner diameter of which should be slightly larger than the diameter of the mounting bolts. The fastening bolts with washers are inserted into the wire rings and screwed into place, while clamping the wire.
4. Installation of the device is completed by fixing the socket. This stage is especially important, since if the plug is pulled out frequently and sometimes incorrectly, the sockets begin to fall out of their seats.
Socket Installation Tools
To properly make a wall socket with your own hands, you will definitely need at least a minimum set of tools designed for electrical installation work. Actually this:
Note: tool handles must be made of (or covered with) insulating material, or have special insulating attachments.
Perhaps, when installing a socket, it would not hurt to have special pliers designed for stripping the ends of the wire. The thing is very convenient and inexpensive.
Electrical wiring in the garage: connection options, wiring diagrams, installation
Even the simplest garage needs lighting, but if the wiring is done in a hurry, it would be unreasonable to expect it to be reliable and fireproof. When creating proper working conditions in this room, one must not neglect the rules for working with electrical wiring, otherwise the consequences can be the most unpredictable. In this article we will tell you how to do electrical wiring in the garage with your own hands, adhering to the standards and regulations.
A socket so that the meter does not turn. Left socket outside a private house
In order to determine the location of the left socket, you need to find out the entire wiring path to the electric meter. The cables are routed along poles, from where they enter the house. The cord can be routed into private property in two ways:
Before you make a left socket in a private house using grounding, you need to study the wiring diagram in detail. More often, houses are connected to the network over the air, due to its cheapness and simplicity.
The cable is usually laid underground to preserve the landscape of the yard. Owners of such property usually do not care about saving energy. But still, services can often see the left line to the underground wire.
The connection diagrams for both lines are different, but they have the same thing. To install a power point, you need to have basic electrical knowledge or skills. But someone who knows how to hold a screwdriver and pliers, following the instructions, will also be able to install the left socket.
Connecting to an overhead line
This connection method can only be used to a house that is located deep in the yard. The wiring must be visually invisible. The inspector will immediately notice an illegally connected power line if he has access to the yard and the wires connecting to the house. Since most homes are connected to the power grid via air, many have difficulty wiring the left power point. Superimposed wires are usually clearly visible, which makes it impossible to draw an additional line.
Connection to an underground line
The method for making a left socket in a private house according to the underground scheme is invisible. It is almost impossible to detect such electrical wiring without a thorough inspection of the equipment. Such a connection requires large-scale excavation work.
In the ground, the cord is affected by various factors that interfere with uninterrupted operation. The wiring must be insulated from moisture, acidity, rodents and various microorganisms. Inattentive insulation will lead to the need for repair work after some time. First you need to carefully dig out the line.
Left socket inside a private house
The principle of connecting the left line in the house is almost the same as connecting an outlet to an underground cable. In this case, you need to break the wall so that the left wire can hide. Otherwise, an illegal outlet can be quickly detected.
If all repair work is carried out efficiently, such a left socket will not be noticeable. Reliable insulation of connections is quite important.
One of the main electrical elements in an apartment or house is a socket. Without it, it is difficult to connect a household appliance to the network. Every owner should know and also be able to install it, since the process is quite simple and can be mastered by anyone without special skills. The ability to use simple tools is enough here. In addition, it is necessary to have a basic understanding of electrical safety.
How to connect the socket from the meter. Action plan
Electrical wiring in a private house is done before finishing work begins. The frame of the house is out, the walls and roof are ready - it's time to start work. The sequence of actions is as follows:
- Determination of the input type - single-phase (220 V) or three-phase (380 V).
- Development of a scheme, calculation of the capacity of the planned equipment, submission of documents and receipt of the project. Here it must be said that the technical specifications will not always determine your declared power; most likely they will allocate no more than 5 kW.
- Selection of components and components, purchase of meters, machines, cables, etc.
- . Performed by a specialized organization, you need to decide on the type - overhead or underground, install an input machine and a counter in the right place.
- Install electricity into the house.
- Laying cables inside the house, connecting sockets and switches.
- Ground loop design and its connection.
- Testing the system and obtaining a certificate.
- Electrical connection and operation.
This is only a general plan; each case has its own nuances and features, but you need to start by obtaining the technical conditions for connecting to the electrical network and the project. To do this, you need to decide on the type of input and the planned power consumption. It must be remembered that the preparation of documents can take six months, so it is better to submit them even before the start of construction: two years are given to fulfill the technical conditions. During this time, you will probably be able to build a wall on which you can put a machine and a counter.
How to choose a good smart plug?
A simple “SMS socket” is the best option for a dacha, where there is not always normal high-speed Internet access.
The first thing you need to decide on is the required functionality. You should not buy those sockets that “have everything for any occasion in life” - they are expensive, bulky in size, and their settings may not be so easy for the average consumer to understand. Therefore, initially you need to estimate how many sockets you plan to install and what each of them will be used for. For example, a GSM socket with a temperature sensor will be relevant not only for connecting electric heaters, but also for monitoring the temperature not only in the house, but also in a greenhouse, basement, or at work, even without connecting anything to the socket itself.
The second is the power limit. The second is the power limit. If you plan to connect a water heater, heater, electric kettle, or washing machine to the outlet, then you need an outlet with a permissible load of up to 16A.
Third is the remote control option. Most often people buy Wi-Fi sockets - they are the cheapest and easily connect to the Internet. A smart GSM socket will be relevant if the user does not always have access to the Internet, since the devices do not depend on it. The undoubted advantage of such outlets is their cheaper monthly maintenance compared to others. There are also radio-controlled ones (or with a BlueTooth module), but they are less popular, since to control them you need to be in close proximity to the outlet itself. And their functionality is quite poor - control via a radio signal is considered an outdated standard.
The last guideline is the price of a smart plug. There is no point in saving in this regard. Especially if you plan to buy a socket from some Chinese manufacturer. They are cheaper, but have a number of disadvantages:
But now there are Russian manufacturers of such gadgets. All of the above disadvantages are absent in them, and as for quality, their characteristics are regulated by GOST provisions, and there is no doubt about their reliability. The average cost of a good master socket is about 5 thousand rubles, for a slave socket - 3 thousand. If the price is significantly lower, then the manufacturer has clearly saved on materials or functionality.
Making a wiring diagram
To properly create a wiring diagram, make a list of electrical appliances that you plan to use in the garage. The number of lamps and their location must be taken into account.
If the garage is used only for parking and minor car repairs, then there is no need for a large number of sockets and lamps, but you also don’t need to save much. Above the workbench or near the entrance, you can install several sockets and a two-key switch so that you can divide the lighting lines into groups.
A multi-use garage should have good lighting and plenty of conveniently located outlets. It is also necessary to ensure safe lighting of the inspection pit.
Left electrical connection. If the cable goes underground
To insert the left socket, large-scale excavation work will have to be carried out. It is not even connected with connecting the wire to the input cable, but with ensuring its further uninterrupted operation. Underground, it is affected by many factors: moisture from the soil, its acidity, microorganisms and various rodents. As a result, to connect the left socket, in addition to the fact that you need to dig out the cable, you will have to remove the insulation from it, screw the wire onto it and carefully insulate the connection. This is done using a coupling - homemade, into which epoxy resin is poured, or purchased - with a special composition. In addition, in most cases, all this has to be done with a live wire.
It is almost impossible to detect such a connection - the owner of the house can only be let down by two factors - the well-equipped team of inspectors and his own lack of foresight. If you are unlucky in the first case, then if electricity theft is suspected, electricians with sensitive instruments capable of detecting the electromagnetic field of a phase wire at a distance of about a meter will arrive to inspect the site. If the left wire is laid away from the main line, it can be detected.
A simpler way is to turn off the input circuit breaker on the meter and bypass all sockets with a voltage indicator. If the left socket is visible, then the presence of voltage in it will give it away, as they say, with your head.
To prevent this from happening, prudent craftsmen pull part of the wire next to the main one, which will always be energized, and if it is necessary to make a branch, they place a starter there. In this case, the control phase, which keeps it in the on state, is taken after the introductory machine. It turns out that when there is a power outage in the house, it also disappears in the left outlet. This requires additional installation work, but in this case, anything can be proven to the inspector only by digging up the entire route along which the input cable goes to the house, which requires very good reasons.
Another mistake that a person installing the left socket can make is to take it from the grounding rather than the home zero. In this case, the left connection is determined by disconnecting the zero - the desired outlet, unlike all the others, will work.
What to include in the diagram?
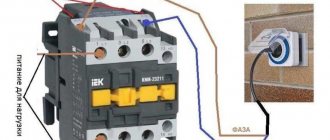
Any garage must have an RCD (residual current device) installed. Although this device is not cheap, it will protect the owner from electric shock. The rated current of the RCD must be selected in accordance with the load current of the electrical wiring line, otherwise the device may not operate at the right time.
Also, you should not save on purchasing circuit breakers - it is better that each line is connected separately. Of course, it is necessary to take into account the total power of the connected devices so that the cross-section of the wire to be laid can be calculated.
Simple scheme
Often, owners of garages used only for car storage are limited to installing a paired circuit breaker at the entrance, one or two sockets and several lamps, which are controlled by a single-key switch. This scheme has its advantages: to pick up a car from the garage or put it there, you just need to turn on one switch, and the light will be on throughout the entire room.
One socket is connected directly to the machines, the second is included in the same circuit with the lamps. When leaving the garage, you can be sure that when you turn off the lights, you have cut off the power to the distant outlet. Even if the garage owner accidentally forgets to turn off the charger, it will turn off along with the light. The simplicity of the design implies some limitations. So, all 4 lamps will turn on at the same time, and the second socket is only suitable for powering low-power devices through it, otherwise the switch contacts will burn out.
Wiring bypassing the meter. How to steal electricity from an apartment
In Russia, illegal connection to the power grid is quite common, through which electricity is stolen. Electricity is stolen from private and apartment buildings. There are several ways to steal electricity from the network.
With certain skills and knowledge of the design and operation of meters, you can remake them in such a way that they begin to count electricity by 30 - 50% less. For this purpose, these devices are equipped with additional elements.
For example, if the meter is electronic, additional transistors and electronic devices are soldered into its circuit, with the help of which the meter is remotely controlled.
If the device is mechanical, then in this case, the operation of its mechanical parts is changed. For example, they reduce the number of teeth on a gear.
Note! You are responsible for illegal connection to the power grid. If electricians discover an illegal connection to the electrical network, then a huge fine is imposed on the consumer.
There are several ways to influence the operation of the meter. But in most cases, you will need access to the electrical elements of the device. In older models, it was possible to change the polarity of the connection, due to which the counter began to spin in the opposite direction.
To bypass the meter, some craftsmen will shorten the phase input and output of the meter with a jumper. Thus, the phase bypasses the counting mechanism of the device.
Older models of devices were stopped mechanically, using various wires or plates.
How to connect electricity bypassing the meter. We connect a three-phase electric meter
There are two types of connection of a three-phase meter, direct and indirect, through isolating current transformers.
If it is necessary to take into account the consumption of a relatively small number of three-phase low-power consumers, then the electricity meter is installed directly into the gap in the supply wires.
If it is necessary to control sufficiently powerful consumers of a three-phase electrical network, and their currents exceed the rated value of the electric meter, then it is necessary to install additional current transformers.
For a private country house, or small production, it will be enough to install only one meter, designed for a maximum current of up to 50 amperes. Its connection is similar to that described above for a single-phase meter, but the difference is that when connecting a three-phase meter, a three-phase power supply is used. Accordingly, the number of wires and terminals on the meter will be greater.
Connecting a three-phase meter
Consider direct connection of the meter
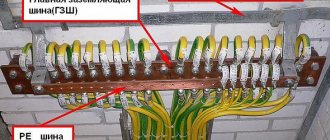
The supply wires are stripped of insulation and connected to a three-phase circuit breaker. After the machine, three phase wires are connected to the 2, 4, 6 terminals of the electric meter, respectively. The output of phase wires is carried out to 1; 3; 5 terminals. Input Neutral wire is connected to terminal 7. Output to terminal 8.
After the meter, for protection, automatic switches are installed. For three-phase consumers, three-pole circuit breakers are installed.
More conventional, single-phase electrical appliances can also be connected to such a meter. To do this, you need to connect a single-pole circuit breaker from any outgoing phase of the meter, and take the second wire from the neutral grounding bus.
If you plan to install several groups of single-phase consumers, they must be evenly distributed by powering the circuit breakers from different phases after the meter.
Connection diagram for a three-phase electric meter
Indirect connection of the meter through current transformers
If the consumed load of all electrical appliances exceeds the rated current value that can pass through the meter, it is necessary to additionally install current isolating transformers.
Such transformers are installed in the gap of power current-carrying wires.
The current transformer has two windings, the primary winding is made in the form of a powerful bus threaded through the middle of the transformer; it is connected to the break in the power wires supplying electrical consumers. The secondary winding has a large number of turns of thin wire; this winding is connected to the electric meter.
Meter connected via current transformers
This connection is significantly different from the previous one; it is much more complex and requires special skills. We recommend inviting a qualified specialist to work on connecting a three-phase meter with current transformers. But if you are confident in your abilities and have similar experience, then this is a solvable task.
It is necessary to connect three current transformers, each for its own phase. Current transformers are mounted on the rear wall of the input cabinet. Their primary windings are connected after the input switch and a group of protective fuses, into the break of the phase power wires. A three-phase electric meter is installed in the same cabinet.
The connection is made according to the approved diagram.
Current transformer connection diagram
A wire with a cross section of 1.5 mm² is connected to the power wire of phase A, before the installed current transformer, its second end is connected to the 2nd terminal of the meter. Similarly, connect wires with a cross-section of 1.5 mm² to the remaining phases B and C; on the meter they go to terminals 5 and 8, respectively.
Where to find a free socket. Map of Rosettes - a truly useful social network
Appendix: Map of Outlets | Free | Universal application | Install
Nowadays, when smartphones and even watches barely survive the day, and cars are gradually switching to electric power, having a power source at hand is a real necessity. But what if your battery runs out while you are on the road, and even in an unfamiliar area? In this article, we will tell you about a new startup that can be extremely useful for you.
The Outlet Map service, as the name suggests, is an application that can tell you the location of the nearest available outlet, no matter where you are in the world. Are you nearing the end of your charge? Launch the program, find out the address of the nearest power point, specify the desired search parameters - and run to charge!
At its core, it is a kind of social network designed for those who are ready to help each other. For the convenience of users, the developers decided not to introduce an additional registration system. For full use, only availability is required. Having selected the desired outlet on the map or in augmented reality mode, you can explore its location using Google Street View or simply build a route to it.
To give back to users who leave information about the outlets they found, you can also add a power source to the service that has not yet been marked on the map. This is easy to do, but can bring a lot of benefits. The application will either add the outlet itself when the device is connected to charging, or you can do it manually.
After adding an outlet, it is automatically moderated. The user can also rate an outlet, and power points with an unacceptably low rating will be removed automatically.
Finally, if you choose to purchase a premium account, you'll be able to download an offline map and search for outlets without needing an internet connection. Having spent once, you can save on mobile traffic, which is not affordable and truly unlimited in all regions.
The developers came up with a rather interesting idea, and if a large number of users hear about it, then the Outlet Map application will be able to bring even more benefits to mobile device owners. We hope that you will also contribute to replenishing its database.
Connection diagram of switches to the network
Wiring diagram for a single-key light switch Wiring diagram for a two-key light switch The black phase wiring is connected with a screw to the block terminal marked with the letter L (phase).
The blue neutral wire connects to the terminal marked N. The cable should be screwed tightly, but not too tightly so as to break it. Useful: Microwave motion sensor: circuit and connection to Arduino
Connecting the phase conductor to the switch Screwing the phase conductor Connecting the neutral conductor to the button
Typically, a grounding conductor is not required for mounting the switch, so its tip is insulated and inserted into a small clamp (or tightly wrapped with electrical tape using this method).
Insulated end of grounding conductor
Socket device
To reduce connection problems, you should adhere to the same standard for sockets. Previously, domestic products of type C5 were installed in apartments, where there was no grounding, and the diameter of the pins was 4 mm. Now it has been completely replaced by a Euro socket C6 with a 4.8 mm connector (German standard). Its power can reach several kilowatts. The basis of the socket is a contact block, which includes the following elements:
- Identical phase and neutral contacts.
- Ground contact located separately.
- Plastic or ceramic base (block).
- Fastening feet.
- Terminals for connecting wires to contacts.
Sockets are available in indoor and outdoor versions. The first is installed in the socket box, and the second is installed through the substrate on the wall surface.
How to find the left socket. Creating a line underground
To lay the left cable, large-scale excavation work will have to be carried out. They will be required to ensure uninterrupted operation of the additional system. It is worth understanding that the soil, its moisture, and various rodents negatively affect the wires. Therefore, the power line is dug up, the insulation is removed from it, the wire is laid and the junction is insulated. Insulation is made by a coupling. It can be either homemade, with epoxy resin poured into it, or purchased, treated with a special compound. All work is performed under voltage, so you need to be careful.
It is almost impossible to detect such a design, but some owners are let down by lack of forethought. Controllers can easily find the left wire laid away from the main line using ultra-sensitive equipment. To prevent this from happening, it is better to lay part of the wire together with the main one, which is constantly energized, and direct part of it to a branch and mount it in the starter. In this case, the control phase is necessarily located near the input machine. It turns out that if you turn off the electricity in the house, it automatically disappears into an alternative outlet.
There is one more nuance that owners of private houses miss when installing an additional electrical outlet. Many people use grounding rather than a home neutral for it. It turns out that when the “zero” phase is turned off, electricity remains only in the left structure.
Do-it-yourself wiring in the house
This is especially important if the wiring is installed using a hidden method. This kind of forethought will make life easier in the future. Wires should be placed strictly along straight horizontal and vertical lines. They cannot be drawn diagonally or curved, even to save money. During any construction work, you must consult the wiring plan. This is especially true for various drilling operations, when there is a high risk of touching the wire. If the wiring is located in an open manner, then it must be placed in a box. All switches and sockets should be located on the same side of the door and at the same height.
Conclusions from the editors
In summary, a smart plug is not a luxury, but a necessity for a modern home. Proper use of such a gadget will make your home safer, and at the same time save on energy bills. But the main thing is the ability to remotely control the outlet; this is a really convenient feature. It is also worth noting that overhead sockets are more popular and practical, because... they can be used exactly where it is needed now.
(6 votes, average: 3.8 out of 5) Share with your friends!
Protection of sockets from external influences
Protection of sockets from environmental influences is classified according to European standards. Its degree is indicated by IP with two digits. The first means resistance to dust and solid objects. If it is 0, then the model is not protected in any way. The maximum level is expressed as 6. This means that dust and solid particles cannot get inside. The second number (from 0 to) indicates the degree of protection against liquid ingress. Here, complete moisture insulation is ensured at a value of 8. Maximum protection should not always be strived for. Already at number 5, complete moisture insulation is achieved in domestic conditions.
Read also: Stringed musical instruments