Lightning striking a building is a fairly common occurrence. The elements can cause irreparable damage to any structure. At the same time, animals, people, and equipment are at risk. The only way to avoid this is to install special protection. Let's look at how to make a lightning rod in a private house with your own hands: what materials, equipment and components are required for this, how to optimally choose the option that suits specific conditions, and also how to install it yourself.
DIY lightning rod Source roof-tops.ru
Design and principle of operation
The lightning rod is designed to receive and transmit to the ground an electrostatic discharge that occurs between a thundercloud and a receiver on the roof of a house. The device consists of three parts:
- Lightning rod.
- Current carrying conductor.
- Ground loop.
A lightning discharge occurring during a thunderstorm is immediately transmitted to the lightning rod. Then, through a conductive conductor, the electric current is transmitted to the ground loop. After that, it goes into the ground. According to this scheme, the electrostatic lightning charge is completely transferred to the ground, without damaging the building structure at all.
At the same time, there are several options for how to make a lightning rod in a private house. This can be a classic option - in the form of a metal pin rising above the roof, or in the form of a special mesh on top of the roofing material, or as a free-standing structure next to the structure.
Lightning protection on a house pipe Source izion.pro
Note! The presence of a lightning rod does not prevent lightning from entering the house. However, it reliably protects equipment, people, animals and the building itself from colossal electrical discharges. The most common consequence of such exposure for a structure is excessive heating of materials and, as a result, extensive combustion.
Lightning rod design rules
To correctly select the design of a dacha lightning rod, you must first study the building design and, in accordance with the “Instructions for the installation of lightning protection of buildings and structures” (Instruction RD 34.21.122-87), determine the required level of protection. Low-rise and small-sized private houses usually belong to lightning protection category III .
Effective lightning protection is one that reliably protects the building and everything inside it from direct lightning strikes and from its secondary discharges in electrical networks. A country lightning rod is usually a lightning rod, which is connected to grounding using a down conductor system.
Lightning rod
A device that directly receives a lightning strike is called an air terminal. This is the most noticeable and significant element of an industrial or country lightning rod design. There are rod, cable, and mesh receivers.
The most popular and famous thanks to Benjamin Franklin is the lightning rod, which is a metal pin made of stainless steel, aluminum or copper. It is usually installed 2 m above the highest point of the protected building. This type of lightning rods is the simplest to implement and quite cheap.
A cable lightning rod consists of two masts installed around the perimeter of the protected object, and tensioned steel cables between them. An lightning protection network is a mesh of metal rods laid on the roof of a building with a certain pitch.
For small private houses, a metal roof can be an excellent lightning receiver. If the roof of the house is made of a different material, then it is better to choose a lightning protection mesh for the protection device, and for wooden country houses active protection is more often used.
Down conductors
Current flows to the grounding device through down conductors. In accordance with the above Instruction RD 34.21.122-87, down conductors in a residential building can be various building structures made of steel, aluminum or copper (frames, fire escapes, reinforced concrete slab reinforcement). Special down conductors are usually laid outside along the perimeter of the building in 25 m increments. The effectiveness of down conductors depends on the continuity of the electrical network. They are usually connected to the lightning rod and grounding devices by welding.
Grounding
The lightning charge in the soil is dissipated using grounding devices. In accordance with Instruction RD 34.21.122-87, they are most often reinforced concrete foundations or vertical electrodes that go deep into the ground. The latter type of grounding is necessarily protected from corrosion (therefore, it is usually made of copper-plated or galvanized steel), and the electrodes are securely connected to the horizontal busbar and to each other using special connectors.
Main components
To learn how to make a lightning rod in a private house, you first need to study its structure and the purpose of its main components. The lightning rod includes a receiver, a down conductor and a ground electrode. Let's take a closer look at what makes each of them special.
Lightning rod
The first element of a home's lightning protection system, where a lightning discharge directly hits, is the lightning rod. As a rule, it is made in the form of a metal rod rising 2 meters above the highest point of the roof (ridge). It can also have a linear design - in the form of a cable or mesh located on the roofing material.
Roof lightning protection Source buildup.ru
The main task of a lightning rod is to receive and transmit electric current to the next protection element in the circuit. The voltage in a lightning discharge can reach 1 GV. To ensure the safety of the material and, most importantly, safety for the entire environment, increased requirements are imposed on the device:
- The steel rod must have a cross-section of at least 70 mm², aluminum - from 50 mm², and copper - from 35 mm².
- The elevation of the rod above the highest point of the roof is from 0.5 to 2 meters.
- When using a cable on a skate, its thickness should not be less than 5 mm.
- For a mesh receiver, steel conductors with a diameter of 6 mm or more must be used.
- The mesh lightning rod must rise above the roof by at least 15 cm.
Important! Various metal roofing elements - pipes, fences, parts of drains - can be used as a lightning receiver. However, the cross-sectional thickness of their continuous layer for steel should not be less than 4 mm. At the same time, their structure must be integral, and the surface must not have an insulating layer, with the exception of anti-corrosion spraying.
Lightning weather vane Source roof-tops.ru
See also: Catalog of companies that specialize in electrical work
Down conductor
The part of the lightning rod that connects the receiver to the ground loop is called a down conductor. As with the system element discussed above, no less stringent requirements are imposed on the conductor:
- The path from the receiver to the ground electrode should be minimal.
- It is not allowed to mount the conductor with turns, sharp corners and other distortions - in order to avoid discharge breakdown in these areas.
- The cross-sectional area of the wire must be at least 16 mm² for copper, 25 mm² for aluminum, 50 mm² for steel.
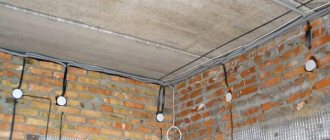
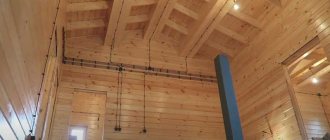
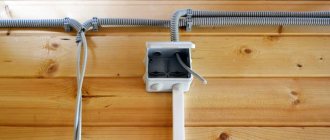
Advice! In private homes, the down conductor is often rolled wire or metal strips. Conductors can be mounted directly inside the wall - from non-combustible materials (brick, concrete). For wooden buildings, it is better to use metal brackets that allow you to install the wire at a distance of at least 10 cm. In addition, in small residential buildings, various metal structures can be used to discharge lightning discharges - stairs, frames, reinforcement elements of reinforced concrete slabs.
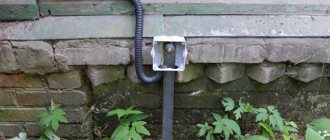
Down conductor near the drain Source buildup.ru
Ground electrode
The caught lightning discharge is transmitted through the down conductor to the grounding circuit. Its design also has special requirements:
- The minimum cross-sectional area for steel is at least 80 mm², for copper – from 50 mm².
- The grounding rod is driven into the ground at least 0.8 m.
- The distance from the wall of the house is at least 1 meter, and from passage areas - from 5 meters.
The grounding circuit is made either in a linear form - two driven rods at a distance of 3 meters and interconnected by a bus, or in the form of an equilateral triangle - from three buried conductors. All connections are made by welding. In this case, it is recommended to immerse the entire structure to a depth of about 0.5 meters from the ground surface.
Ground loop Source hotel-a.ru
How to make a lightning rod in the house
If you know how to work with a welding machine, then you can easily make a lightning rod with your own hands. It is also easy to install a down conductor and ground it. The only place where it is better to seek the help of a specialist is installing surge protectors in the panels of the house.
The simplest lightning rod can be made from a piece of reinforcement with a diameter of 10 mm or more and a length of 2-6 m. The pin must be sharpened on top with a grinder and attached to the pipe or gable with clamps or anchor bolts. The second option for a lightning rod is a 3/4˝ steel pipe welded at the edges. The main thing is that the welding is of high quality. Self-manufacturing of a lightning rod allows you to save $60-100 on a lightning protection device - this is the price at which you can buy an industrially produced lightning rod.
The current conductor is made of a steel rod with a diameter of 10 mm. It is clear that such a route will have to be made from separate parts, welding them together or fastening them with special adapters. This is inevitable, but it is necessary to think through the down conductor path so that there are as few rod connections as possible. It is better to order the rod already bent, so as not to bend it with improvised means.
When installing a down conductor, holders are used, possibly metal ones, but a composite non-conducting material is better. To avoid breakdown, the down conductor is laid at least 30 cm from any metal elements: drains, window grilles, ebbs.
The last stage is the installation of a grounding loop. It is done according to the same principle as grounding in a private house:
- away from the paths and porch, a trench 2 m deep is dug;
- three steel angles 40×40 mm are driven vertically into the bottom of the trench at a distance of 1.5-2 m from each other;
- a steel strip with a thickness of 5 mm or more is welded on top of the corners;
- a down conductor is welded to the steel strip;
- The grounding loop for lightning protection is buried, and it must be at least a meter from the surface.
Since it is not always possible to make grounding in a linear type house, the circuit is often closed in the shape of an equilateral triangle. Regardless of the shape of the circuit, the down conductor is welded to it so that the connection rises at least 25 cm above ground level.
When installing lightning protection for a building, it is important to remember four rules:
- You cannot paint either the lightning rod, the down conductor, or the grounding rods, otherwise the lightning protection simply will not work.
- Check all connections carefully and more than once - a charge of millions of volts will pass through them.
- Try not to use dissimilar materials: at the junction of steel and copper, electrochemical corrosion will begin over time, which will greatly increase the resistance in this area.
- Monitor soil moisture near the ground loop. On dry days, sandy and sandy loam soils must be periodically shed with water, since grounding becomes ineffective in dry sand.
Also, remember the rules for working at height: always use a safety net, never walk on a roof unattached, and do not work on a roof on very hot days.
Lightning rod options
There are three options for making a lightning rod in a private house covered with corrugated sheets :
- Vertical rod.
The most common and effective lightning rod. Basically it is a steel pin with a diameter of about 10 mm and a height of up to 2 meters. Often, especially in home-made versions, metal structures of various rolled products are taken as the basis - a corner, a rectangle, a circle. It can be mounted either on the house itself or on a separate pole in the immediate vicinity. The lightning discharge is received only at one point, so the rod is suitable for structures with a small metal roof.
- Skate rope.
It is a cable fixed in parallel at a safe height (at least 50 cm) from the ridge using small pins on opposite gables. Well suited for roofing made of slate or other non-conductive materials. In this case, the cross-sectional area of the receiver conductor must be at least 50 mm². The peculiarity of such a system is that grounding is installed on each side of the house. However, the advantage of this is that the protection sector increases - along the entire length of the roof, and not at one point, as in the first case.
Cable lightning rod Source izion.pro
Why is it needed?
The lightning rod in the photo often looks rather unattractive and many “actively under construction” townspeople believe that it is quite possible to do without it. If a serious construction organization is engaged in the construction of a country house. The lightning rod still appears on the roof, but when building it yourself, it is very often neglected.
At the same time, to say that people do not understand why a dacha lightning rod is wrong; many simply believe that such a protection system is necessary in areas with frequent thunderstorms, somewhere closer to the south, and so on. This is partly true, the further north the area is, the less active lightning is during a thunderstorm, and, accordingly, the less likely it is to strike a house.
House lightning rod diagram
It is also a very common opinion that lightning rods attract lightning strikes, like an iron magnet. And there is part of the truth in this too - these structures actually “attract” lightning, without this quality they simply would not be able to function. However, they “attract” it only in cases when a discharge of electricity with a power of at least 200 amperes is already flying towards the building.
As for rare thunderstorms, even in the Moscow region lightning strikes on houses occur very often. The fact is that, saving on installing a lightning rod or simply considering it unnecessary, most citizens who build their own buildings do not forget to install antennas on the roof.
That is, in the event of a “close” thunderstorm and the absence of a lightning rod, this role is taken over by the antenna, and the consequences of a lightning strike on a satellite dish are not so difficult to imagine.
If only for this reason, based on the saying “God takes care of those who are careful,” a lightning rod cannot be neglected, regardless of what climatic zone the building is located in, how often thunderstorms occur and how high the statistical indicators of the Ministry of Emergency Situations of lightning strikes in buildings in this area. A lightning rod is needed both for safety and as a kind of “insurance” for the money invested in home improvement.
DIY making
There are many folk ways to make a lightning rod at your dacha with your own hands. It is best to entrust this matter to a professional team specially engaged in the installation of protective anti-lightning systems. However, for those who decide to act independently, it is recommended to follow a proven algorithm. First, you need to correctly calculate the design, then select the right materials, as well as determine the installation location, and only then proceed with the installation procedures. Let's look at each of these stages in detail.
Correct calculation
The first thing you should start building lightning protection with is determining the height of the top point of the receiver. The easiest way is to calculate it for the pin modification using the following formula:
H=(Rx+1.63Hx)/1.5
H – distance from the ground surface of the highest point of the receiver,
Hx – height of the ridge of the house,
Rх – protective radius of action,
The numbers 1.5 and 1.63 are calculated coefficients.
For example, if it is necessary to create protection within a radius of 15 meters on a site with a house 7 meters high, the height of the top point of the lightning rod, according to the formula, should be:
(15+7x1.63)/1.5=17.6 meters.
In this case, it is necessary to take into account that the protective zone in space has the shape of a cone with its apex at the receiver’s peak point and its base.
Installation of lightning rod
It should be noted right away that the requirements of the PUE provide for connections between all parts of the lightning rod exclusively by welding. If this is not possible, a threaded connection with bolts and nuts is permitted.
The area of washers used for threaded connections must be increased. It is not allowed to install system elements by twisting wires or any other methods.
Of course, the height of the lightning rod, which mainly determines its effectiveness, must be maximized. According to the RD instructions, to ensure reliable protection, the lightning rod must be raised at least 3 m above the surface of the structure. This applies to rod devices.
The height of installation of a cable lightning rod depends on the length and height of the building, the design of the ground electrode and the resistivity of the soil; it can be 3-4 m. To install the cable, it is recommended to strengthen wooden supports on both ridges of the building, and stretch the cable lightning rod between them if we are talking about ridge roofs .
The design features of mesh lightning rods allow such devices to be mounted much lower. Depending on the grid pitch, they can be located ten or several tens of centimeters from the flat roof. A mesh with 6x6 cm cells can be laid directly on the roof surface or even under a layer of insulation if it is not flammable.
Video description
Watch the video on how to inexpensively make a lightning rod with your own hands:
Advice! The protective area in space is the shape of a cone with the apex at the peak point of the receiver and the base in the form of the calculated radius. Knowing this allows you to choose the only correct way to install a lightning rod in a private house so that it protects nearby buildings - a greenhouse, a bathhouse, a garage, a barn, a gazebo, etc.
Selection of materials
You can effectively solve the problem of how to make a lightning rod in a wooden house if you choose the right materials. It is recommended to use copper, steel or aluminum as conductors. For example, to build a standard pin lightning rod, you will need to purchase the following consumables:
- Steel rod for the receiver with a diameter of at least 50 mm².
- Copper wire for down conductor with a cross section of 16 mm².
- Asbestos cement pipe of suitable height.
- Copper pins for ground loop.
- Fastening elements.
It is cheaper to use steel to construct a lightning rod for a private house, but copper has the best conductive properties and requires a smaller cross-sectional area of conductors, which means the installation will be easier and faster.
Rod for lightning rod Source ytimg.com
Classification of external protection of buildings
Atmospheric lightning is usually understood as a high-power electrical discharge that obeys all known physical laws. It is well known that the propagation of electric current occurs along paths that have the least resistance. A lightning rod is, in fact, a path that will pull danger away from a structure that has high resistance values. A building equipped with such a device will not be damaged during a lightning strike, because the entire flow of energy will be directed along the contour deep into the earth's cover.
In common parlance, this protection of buildings is usually called differently: “lightning rod”, “lightning rod”, “grounding”, etc. Interestingly, the concept of "lightning rod" is not entirely correct, since thunder, which is the sound effect during a lightning strike, does not require a lightning rod. However, the name has taken root deeply in colloquial speech. The main task of all of the above devices is to remove atmospheric electricity from housing, and they do an excellent job of it.
A lightning rod in a private house, as a rule, is divided according to three factors: design specifics, as well as the method and type of protection.
Option for a building lightning protection project Source terrazn.by
Protection method
This concept can be divided into two subcategories: active and passive lightning protection.
The active option provides for the presence of an air ionizer in the design, designed to accumulate static electricity from the atmosphere for discharge. In fact, the function of the active type of protection is the ability to attract lightning to itself, thereby protecting the structure (and buildings located nearby).
The design of the passive version does not provide anything additional. This does not provide a 100% guarantee that lightning will hit it, but it significantly increases this chance, especially when there is a discharge of electricity above a building.
It should be noted that household appliances will not be protected from the accompanying electromagnetic effects of a lightning strike. Installation of additional elements will be required.
Installation of lightning protection on a metal roof Source 2gis.com
Types of protection
The division of building protection by type can be internal or external. The task of the first is to preserve housing from the effect of the concomitant impact of the discharge, and the second - from the discharge itself. Due to the rather rare use of active protection by ordinary people, a lightning rod device for a private building is usually equipped with two subsystems - external and internal.
See also: Catalog of companies that specialize in electrical work of any complexity
Specifics of the structure
The external part of the lightning protection system for private housing is usually divided according to the design features of the external part of the lightning rod. They exist in three main types: pin (rod), mesh or cable version. Everyone has their own strengths that make them apply. Thus, the pin type of lightning rod is the cheapest, but not as effective as other options for receiving elements.
Organization of a lightning protection system Source prezentacii.info
Video description
Watch in this video how complex lightning protection for a cottage is designed and works:
DIY installation instructions
Self-installation of a lightning rod is carried out as follows:
- The installation height of the receiver is calculated based on the required protective radius.
- The material is selected.
- The installation location is determined.
- The lightning rod is being secured.
- A down conductor is being carried out.
- A trench or pit is dug, the grounding rods are driven in and connected to each other.
- The down conductor is connected to the ground loop.
Recommendation! Upon completion of installation and connection of all parts, it is recommended to check the lightning rod with an ohmmeter. The resistance on the device should not be more than 10 ohms.
Features of internal lightning protection
The result of a strong atmospheric discharge, as a rule, is the appearance of a powerful induction field, from the effects of which it is necessary to protect household appliances and electrical equipment in the house. This task is beyond the capabilities of external lightning protection.
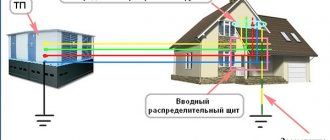
Reliable internal lightning protection in a private home is an automatic surge control device in the network during a thunderstorm, i.e. a special electrical device called a surge protection device (or SPD). It is installed in the distribution panel in front of the power lines entering the home.
The modern market is saturated with a large assortment of these devices, which have different capabilities and levels of protection against possible voltage surges.
Installing an SPD in the distribution panel after installing an external home protection system will lead to complete blocking and neutralization of all possible negative impacts of an atmospheric discharge strike.
Briefly about the main thing
A properly constructed lightning rod protects a house from fire, equipment from damage, and people and animals from the terrible consequences of electric shock. The device does not prevent lightning, but effectively catches and safely transmits it to the ground. There are several options for making a lightning rod at your dacha :
- Kernel.
- Cable.
- Net.
All of them consist of a lightning rod, a down conductor and a grounding circuit. When making a lightning rod with your own hands, first of all you need to correctly calculate the height of its installation, based on the required protective radius. Next, you need to choose the right materials for its main parts, correctly determine the installation location and perform installation in accordance with recommended safety requirements.
Tree as a lightning rod
To create a lightning rod with your own hands, an ordinary tree will do. Moreover, its height should exceed the level of the roof of the building by approximately 2.5 times. The distance to the house should not be less than 3 m.
One end of a five-millimeter wire is welded to a grounding device and the connection is buried in the ground. The remaining end will be the receiver. He is brought to the top of the tree.
Selecting a lightning rod for a lightning rod
The protection radius of the Satelit 3 lightning rod is calculated in accordance with the formula defined by the NFC 17-102 standard (France) and depends on:
- choosing a lightning rod model;
- required level of building protection;
- height at which the device is installed.
| Lightning rod model | Satelit 3-25 | Satelit 3-45 | Satelit 3-60 | ||||||
| Height, m | Protection level | Protection level | Protection level | ||||||
| I | II | III | I | II | III | I | II | III | |
| 2 | 17 | 23 | 26 | 26 | 34 | 36 | 32 | 34 | 44 |
| 3 | 25 | 34 | 39 | 38 | 48 | 50 | 48 | 48 | 65 |
| 4 | 34 | 46 | 52 | 50 | 64 | 72 | 64 | 64 | 87 |
| 5 | 42 | 57 | 65 | 63 | 81 | 89 | 79 | 81 | 107 |
| 6 | 43 | 58 | 66 | 63 | 81 | 90 | 79 | 81 | 107 |
| 10 | 44 | 61 | 69 | 64 | 83 | 92 | 79 | 83 | 109 |
| 15 | 45 | 63 | 72 | 65 | 85 | 95 | 80 | 85 | 111 |
| 20 | 45 | 65 | 75 | 65 | 86 | 97 | 80 | 86 | 113 |
| 45 | 45 | 70 | 84 | 65 | 90 | 104 | 80 | 90 | 119 |
| 60 | 45 | 70 | 85 | 65 | 90 | 105 | 80 | 90 | 120 |