Advantages and disadvantages
Before implementing a scheme, it is necessary to consider its strengths and weaknesses, and then make a decision to implement such a project into reality.
| No. | pros | Minuses |
| 1. | Spectacular and stylish appearance. | Not suitable for modern interiors. |
| 2. | Ease of repair work. All wiring is visible, so a break or other type of damage is not difficult to find. | Afraid of mechanical influences. |
| 3. | Small labor costs. | Not suitable for rooms where wires quickly become dirty, for example, dining rooms. You can get around this limitation by using rubber/vinyl sheathed wires. Their feature is ease of cleaning. |
| 4. | Fewer materials. | Large financial expenses due to the purchase of additional components and increased cable consumption. |
| 5. | High installation speed. | Low safety, because if the insulation is damaged, you can become energized. |
| 6. | Increased load due to improved cooling. | Difficulty in choosing wires that match the color/texture if replacement is necessary. |
| 7. | Fire protection. | Problems with cables stretching over time. |
| 8. | Compliance with current standards and regulations. | The need to purchase a larger length of wires due to the wiring features. |
Distinctive features from conventional wiring
Retro wiring has a number of characteristic features that distinguish it from the usual circuit:
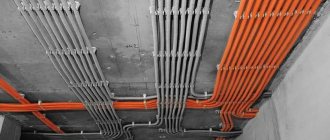
- Laying wires without laying them in grooves. The cables run outside the walls.
- The wiring is mounted on insulators having a height of at least 10 mm from the wall.
- Use of a ray circuit with a minimum of branching. This means that each consumer has its own line due to the small cross-section of the wires (up to 2.5 sq. mm).
- The insulators are fastened to the wall using self-tapping screws/dowels.
- Use of surface-mounted switches and sockets.
As for the remaining installation requirements, they are no different from conventional wiring.
It is necessary to take into account the requirements of the PUE, and use automatic machines and a residual current device at the entrance.
Disadvantages of decorative wiring
The main disadvantage is the limited conditions for using the wiring. The maximum cross-section of retro wires does not exceed 2.5 mm2, so the cable cannot withstand high current loads. High-power electrical appliances cannot be connected to it; the cable will heat up, which can lead to a short circuit or even a fire.
To use powerful electrical appliances and modern household appliances together with decorative wiring, you will have to install wires with a large cross-section. And these are additional costs not only for retro components, but for decorative materials.
At the same time, prices for component materials are quite expensive, especially imported ones. Not all stores offer retro wiring; sometimes you have to order it abroad.
Important! If the area of a country house is large, you will have to hire specialists to install a complex electrical wiring diagram.
Where can I lay it?
Retro-style wiring has special recommendations for use; it is relevant for the following objects:
- Frame/log cottage made using SIP panels.
- An apartment with an interior made in loft, vintage, country or Provence style.
When deciding on retro wiring, keep in mind that it is most suitable for the following styles.
Provence and country
They involve arranging the interior in the style of a rural house. It requires the use of natural materials, which are no longer used in modern interiors or have gone out of fashion.
Vintage
One of the types of retro style, which involves the use of pre-war lamps, old types of wallpaper, radiograms and other items from the times of the USSR.
Loft
Characteristic features of the style include the use of open communications.
This applies not only to electrical wiring, but also to water or other types of pipes.
With this design option, preference is given to bare brick walls without the use of plaster.
Removing partitions to create more space is also encouraged.
When installing retro wiring in a wooden house, you can avoid problems with laying wires in special cable channels with strict adherence to fire safety rules.
You can do without slicing walls, puttingtying them and performing other related work.
Installation
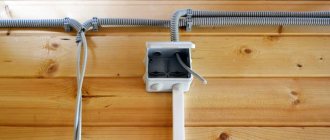
Due to the high cost of open wiring and the lack of a large cross-sectional diameter of a retro cable, it will not be possible to electrify a wooden house using only an external installation.
According to load calculations, power input will have to be done using other wires with a cross-section of at least 4 mm. sq., and according to safety requirements - laid in a pipe and hidden under the cladding of the room in compliance with the relevant fire safety standards. An electric stove and a boiler for heating water will require additional safety measures in a wooden house. To protect the power supply to these consumers, specialized boxes or small-diameter plastic pipes are used. It is recommended to select the wire using non-flammable materials of suitable cross-section.
To save money in a wooden house when working with open wiring, a combined wiring scheme is used. Installation of wiring from the switchboard to distribution boxes is carried out with different brands of wire, followed by installation in a non-flammable box provided for this purpose and suitable in characteristics and dimensions.
In this case, the consumption of retro material when decorating a wooden surface will be reduced, and open wiring will approach the consumer directly from the distribution boxes. At the same time, the laying of the outer part of the wire looks attractive in a vertical position.
Methods for connecting groups of wires in junction boxes:
- The wire is “twisted” and then soldered.
- After tinning the conductor, you need to make a connection using terminal clamps.
- Use special tips (for the same purpose as tinning the wire) and make connections using the terminals.
Installation of retro wiring in a wooden house
Preparation for installation
Before laying wires, you need to prepare for work and buy the necessary material.
You will need:
- A cable of suitable cross-section and length taking into account the electrical consumers in the house/apartment.
- Insulators.
- Surface-mounted switches/sockets.
- Distribution boxes for wiring connections.
- Ties.
- Tool.
- Circuit breakers, RCDs.
Installation of retro wiring is carried out after finishing the finishing work in the room. The wiring is attached to wooden walls, on top of wallpaper or painted walls.
On sale you can find many original antique electrical appliances with multi-colored insulation.
The cost of sockets/switches in this case will depend not only on the quality, but also on the color. For example, “gold” wires will cost twice as much as brown wires.
Material selection
Before starting work, it is important to study the market and select a material that is suitable in terms of characteristics and prices. Let's look at each of the stages in more detail.
Wiring selection
When choosing a cable, keep in mind that it is divided into two categories.
| Budget | Classical |
| If you have a limited budget, you can do the wiring yourself. To do this, take two cables and twist them using a trill. The result should be a twisted pair. This kind of work can hardly be called simple, and many do not complete the job. If you manage to endure it, you can save a lot of money. | Unlike the previous version, you don’t need to twist anything. All you have to do is go to any online store, find the appropriate material and buy it. When choosing a retail outlet, give preference to those that provide certificates of conformity. This allows you to be confident in the quality of the purchased products. |
When choosing wires for retro-style installation, copper products with a PVC sheath and synthetic braid are used.
This combination provides resistance to high temperatures and fire. Additionally, the outer layer is impregnated with a special composition.
The cables that are commercially available come in 2- and 3-core types. They can have different colors: brown, black, white, caramel, copper and others. The cross-section can be different - 0.75, 1.5 and 2.5 square meters. mm.
When choosing a cross-section, you must remember the load, which is up to 2.9, 4.4 or 6 kW, respectively.
Current manufacturers
The most popular manufacturers of cables for retro wiring include Gemini Electro, Bironi, Villaris.
Among foreign brands, it is necessary to note Fontini, Cordon Dor and others.
Special attention should be paid to the products of the Gi Gambarelli company, which produces high-quality wires that are extremely resistant to fire and do not sag even after prolonged use.
If you don’t have enough money to buy foreign products, you can buy domestic wires that are not inferior in quality. Let's look at a few popular options on the market.
Retro Electro, 2x1.5
High-quality twisted electrical cable, which is designed to implement retro wiring in your home. It is made in an antique style, so it looks harmonious in any room.
Made from modern materials, which guarantees a long service life of the product. The cores are made of high-quality copper, and the insulation is complemented by a special coating made of special polyester threads.
Sold in a length of 20 meters and in several color options - brown, ivory and white.
Advantages:
- Stylish design.
- High quality wire.
- Affordable price.
- Has a stylish appearance.
- Perfect for retro, country or loft style.
Flaws:
- There is no single-core option.
- Limited selection of colors.
"Eco" 2x1.5 twisted GOST white (20m) TDM
The product for retro wiring, which is produced in Russia, meets all modern quality standards. It can be laid in wooden houses at the construction stage without fear of possible shrinkage.
They are actively used to implement various design solutions in eco-style. Can be used for organizing internal and external wiring.
It is made in white color, has a multi-core design and a cross-section of 1.5 square meters. mm. The length is 20 meters, the material is copper, and the insulation is PVC. Meets GOST requirements for such products in Russia.
WERKEL 2x1.5 mm2 gray
Reliable and high-quality retro cable 2x1.5 sq. mm. Made in gray color, sold in a 50-meter bay and priced at one meter.
It has a multi-core design, which ensures its flexibility, ease of installation and improved performance.
The outer braid is made to look like natural silk and does not support combustion.
There is a decorative and protective braid made of polyester thread, which gives the product an aesthetic appearance and is highly durable and hygienic.
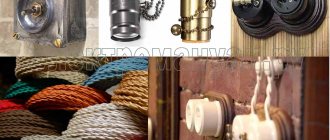
Insulators (rollers)
Pay special attention to the choice of insulators on which the wires will be fixed. They measure from 18 to 22 mm in diameter and from 18 to 24 mm in height.
Structurally, they are a cylinder with a thinner neck for attaching wires to it.
The top cap can be narrow or wide. In the first case, it is used to fasten a wire with two, and in the second - with three cores. Fixation of insulators (rollers) is carried out using screws: ordinary, decorative.
Can be made from the following materials:
- Ceramics. In greatest demand. It is distinguished by ease of fastening, reliability of use and low price.
- Porcelain. Insulators made of this material are transparent and highly durable.
- Plastic (non-flammable). The simplest and most cost-effective material. Recommended for use in extreme cases when other options are not suitable for some reason
Ceramic and porcelain insulators are made in different colors, which allows you to implement different design ideas. When choosing a shade, you can focus on the tone of the walls themselves, the color of the wires, or choose the classic white option.
Calculation of the number of insulators
An important point is to calculate the required number of insulators, in which take into account two parameters:
- Wire length.
- The distance between insulators, which should be about 0.4-0.5 m.
For example, the calculation showed the need to use 100 m of wire. Next, this quantity must be multiplied by two (provided that it is placed every 0.5 m). It turns out that you need to buy 200 insulators.
Other retro wiring elements
During the installation process, other installation products may be required, which are permanent elements of retro wiring.
The main ones include:
- Terminal/distribution boxes. They are used for switching wires and can reduce their number. They have dimensions in diameter/height from 7 to 9 and from 3.5 to 5.5 cm, respectively. With the right choice, the box becomes a real interior decoration.
- Passages. They are decorative and protective elements in the form of a sleeve with a collar. The latter covers the hole through which the cable exits the wall surface. The material most often used is porcelain.
- Ammo. They can be made of aluminum, copper, carbolite, brass and polymers. Metal options have been gaining popularity lately. In most cases, the design of such units involves the installation of a switch and provides many special holes.
- Switches. They are made in the form of toggle switches or rotary devices. They are an invariable element of a modern interior.
- Sockets. Must have an overhead type. During installation, a substrate is placed under the socket, which acts as a barrier that protects against overheating. It is a decorative element.
- Additional elements - socket boxes, lamps, chandeliers, etc.
1 of 4
— +
1.
2.
3.
4.
When choosing accessories, you can focus on products from Russian and foreign manufacturers.
In the first case, popular products are from the Gusev brand, which produces products in a variety of styles.
Among the foreign manufacturers, Thomas, LLinas and others stand out. If you want to save money, you can use Chinese options, but they are less reliable.
Vintage style lighting fixtures
One of the finishing touches to any retro wiring is lighting fixtures, which should be made in the appropriate style.
1 of 4
— +
1.
2.
3.
4.
You can buy them ready-made, created in vintage style, or make them yourself. To do this, you can combine old-style lamps and unusual decorative lamps.
The most commonly used materials are wood, which combines well with different types of finishes. It is easy to process and can take on different textures. Optimal shades are gray, greenish, white, beige and dusty blue.
Hanging of lighting fixtures is carried out using an electric cable, which is fixed on two or more rollers.
This option provides the necessary reliability, allows you to create the appropriate style and do without additional costs.
Security elements
When making retro wiring, all devices that are typical for conventional wiring are installed and used in the power panel.
- Three-phase voltage relay.
- Residual current device to protect against electric shock.
- Automatic switches in all directions.
- AVR unit providing power backup. As an option, you can use the option from Euroautomatika. If compared with ABB, the price will be 3-4 times lower.
As an addition, you can use a leakage protection system, as well as an emergency notification system for the owner.
For example, in the event of a power outage, a person receives relevant information on their phone in the form of SMS and can quickly respond to it.
RETRO WIRING IN A FRAME WOODEN HOUSE