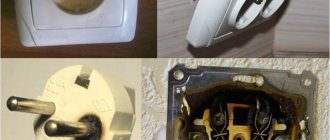
During electrical installation work, electrical wiring is sometimes performed in an open manner. The cable must be protected from thermal and mechanical influence. It is important to ensure aesthetics and create a neat appearance of electrical networks. For these purposes, a corrugated tube is used. In professional language, this material is “corrugation”.
Corrugated wiring on the ceiling Source 5watt.ua
Errors and rules for cable installation
The most common mistakes made by electricians when laying cable networks stretched inside the corrugation are:
- Creating sharp corners.
It is necessary to lay the routes in such a way that the corner transitions are flexible. Sharp corners should not be allowed when turning.
- No special components are used to increase the length.
When you need to make an entire section of wiring longer, you need to use tees, transit boxes, and couplings.
- The corrugation is connected using electrical tape.
According to the PUE, it is unacceptable to connect 2 corrugated pipes with each other using insulating tape. There are connecting components for this. This applies to turns, corners, and the middle of a long section.
- One corrugation has been laid, into which several lines of power cables are stretched.
This is a very serious mistake made by electricians. According to the PUE, it is correct when each cable power line is pulled into a separate corrugated pipe. It is unacceptable to lay several conductors in a corrugated cable at once.
Wiring output Source arte.net.ua
Grilling and laying wires
Laying the strobe wiring
After all preparatory measures have been completed, you can begin work. Using a pencil or felt-tip pen, draw lines along which the groove will be cut.
Using a hammer drill bit, holes are drilled for switches and sockets. It is important to use a Euro-crown during work, since the dimensions of the mounting boxes are based on European standards. According to modern standards, sockets are mounted at intervals of 0.4 meters from the floor, and switches - 0.9 meters.
Next, they begin cutting out the grooves. The work is carried out using a fence cutter. The tool is expensive, so as an analogue you can use an ordinary angle grinder of the smallest number. You need to use a stone disc. Two cuts are made parallel to the marked lines, the distance between them (15-20 mm) is hollowed out with a hammer drill.
Now you can start laying the wires. They are securely fixed to the wall using alabaster and putty. When preparing building material, the proportions are 1:1.
If you plan to install a suspended ceiling in the future, the wires are threaded into a special protective armored hose and secured to the ceiling using impact dowels.
Laying corrugated cable
The finished corrugated pipe is laid along the ceiling using special clips. The diameter of this part is selected taking into account the cross-section of the selected material. This option for attaching a corrugated pipe to the ceiling looks more aesthetically pleasing. For invisible, internal places, special metal brackets are mainly used. These parts are secured using electrical dowels.
To connect 2 corrugated pipes, couplings are used. They are cheap. In the case where in this section an integral cable line that does not have connections is stretched inside the corrugated protection, according to the PUE, those sections where the pipe is attached to the coupling are allowed to be sealed with a sealant. Otherwise, you need to choose other insulation methods that are considered the most reliable. When laying, do not bend the corrugated pipe too much. The acceptable parameter is printed by the manufacturer on the packaging box of the material.
Corrugation in section Source media2.24aul.ru
Methods for laying communications
For installation of electrical wiring, an open or hidden method is used.
Outdoor
In this case, the cables are laid directly, without using corrugation, ducts or pipes. The wires are secured to the ceiling with special clamps. This method is considered quite dangerous; if the cores overheat, the likelihood of a fire increases.
Internal
In this case, the wiring is hidden from the eyes of others. This method is considered more aesthetic and safe. When using the hidden method, the cables are laid in channels. The method is not used when laying wiring in a private house built of wood.
Laying cable lines in a protective corrugation: errors and misconceptions
When performing electrical installation work, regardless of the chosen method, there is a universal requirement regarding:
- soldering process;
- terminal installations;
- crimping wires at joints.
Access should be provided for inspection of contact sections of cable lines. Therefore, when installing a corrugated pipe with a cable, distribution boxes are installed for installing joints.
According to the PUE, it is necessary to separate the main cable line from the backup one. For this purpose, they use different corrugated pipes. This also applies to working and emergency lighting cores. Corrugations with such wires are necessarily separated geographically.
Plastic corrugation does not belong to the category of fireproof products. They can be laid inside a brick or concrete wall (they need to be tapped).
In any case, for example, when passing hidden wiring through wood (if the house is wooden), you need to use fireproof gaskets:
- plastered;
- cement;
- asbestos.
An example of correct wiring Source stroypomochnik.ru
The spacer layer will allow you to separate the corrugation from the wall surface by about 10 mm (less than that is not allowed according to the PUE). If you choose a plastic corrugated pipe for laying a line on a fireproof surface, you must ensure a distance from combustible places of no less than 10 cm.
Tips and tricks
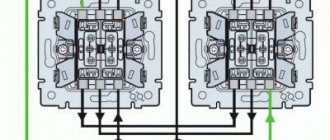
When drawing up a diagram, it is important to take into account where the main elements are installed, including distribution boxes and sockets, switches.
As for wires, it is recommended to choose the variety designated as VVGng.
Suitable even for those who do their own work, even in wooden houses.
What is recommended to pay attention to?
The use of suspended ceilings will solve many problems at the same time.
- There is no need to level the surface.
- Maintaining an attractive appearance.
- Easy dilution of components using a separate method.
But problems often arise. Especially when the wiring requires maintenance and was initially done incorrectly.
What problems do you encounter most often?
Often they encounter incorrect placement of the mounting molding. Installers do not pay attention to the fact that the junction box intersects with the mounting profile. Such errors are considered gross violations of standard rules.
The installers are doing the work even though they don't have all the equipment in stock. For example, there is no detector. There is a high risk of damaging hidden wiring if you do not check in advance for invisible elements inside the structure.
There are options when installation is carried out without the use of standard corrugated pipes. This option is only permissible when installing low-voltage systems to which a step-down transformer is connected. Where the voltage is up to 24 Volts. In other situations, you cannot do without corrugation during installation.
Lamps are the main consumers of electricity, which are connected to the ceiling, and wiring installation is organized for them. PVC coatings require less powerful devices. The film will melt if the indicator does not meet the standards.
LED lamps are the best choice for owners of suspended ceilings. They do not require special skills during installation and are not capable of melting the canvas. But the tension remains the same as in other situations.
There is no universal answer to the question of which installation option is better. You should not initially concentrate on only one option and ignore others. The choice is made depending on the material of the ceiling base. Each option has negative and positive sides; you need to understand which characteristics are preferable for a particular consumer.
If you don’t have confidence in your abilities, only professionals are hired to do the work. After all, increased voltage poses a health hazard and can cause harm if handled incorrectly.
The main thing is to comply with the requirements and technology, from the first to the last stage. In this case, the result will be safe. And the design will last a long time without the need to open access to specific elements within the system.
How to quickly pull a cable into a corrugated pipe?
To work you will need:
- strong, long rope (thread) from any material;
- a piece of fabric or rag;
- vacuum cleaner.
To pull the cable inside the corrugated pipe, take a rope or piece of fabric. Both elements are tied together in such a way that the rag is not squeezed. It is best to tie the fabric to the middle of the corrugated material.
Next, a vacuum cleaner is connected to one end. If the corrugated pipe is very thin, you can make an adapter from scrap materials. Now you can turn on the vacuum cleaner and bring a rag tied to a rope to the other edge. Due to the pressure of the vacuum cleaner, the fabric will enter the pipe. The thread is then unwound to ensure that it follows the rag. This must be done until the rag reaches the vacuum cleaner, passing through the entire corrugation.
At the next stage, the cable is threaded inside the corrugated pipe. To do this, its end is tied to a rope, then stretched along the entire length of the material.
This method is used at home to pull a cable through a corrugated pipe of small diameter.
Watch the process in the video:
Compliance with standards
When carrying out electrical installation work in residential premises, it is necessary to comply with the standards established for them regarding the following parameters:
- Section of veins. You need to select conductors with a calculation of the maximum load that will affect them. If the permissible power is exceeded, the metal heats up, which leads to the formation of smoke, melting of the insulation and the risk of fire.
- Laying lines. Network fragments can only be located in the vertical and horizontal directions; they should not intersect each other during internal installation. Groups of sockets should be located at the same distance from the floor.
- Switching. The main rule is the prohibition on directly connecting copper and aluminum conductors. To do this, you need to use an indirect connection in a bolt and nut, tires or spring terminals. Wires made of the same metal can be twisted and then insulated.
- Location. The slightest possibility of mechanical damage, melting of wiring elements and water getting into them must be excluded.
How to attach the corrugation to the ceiling?
To fasten corrugations with a cross-section from 16 to 25 mm, special clips are used. They come in 2 types:
- Open.
This type of clip looks like curved flat horns. The part holds the corrugated pipe due to its elasticity. On the side, the clips are equipped with couplings that allow you to connect them to each other. This makes installation and further maintenance of the electrical network easier.
Models with latches are used for corrugations with a diameter of more than 40 mm, as well as when installing cables along the ceiling.
- Closed.
This type of clip is similar to a simple clamp. The part presses the corrugated pipe to the surface to which it is attached. The process can be mechanized using a mounting gun. A clip of clips is placed there, then the electrician “shoots” the corrugation to the ceiling.
Electrical panel Source verchinskiy.ru
Preparing the circuit
To form a future electrical circuit, it is not necessary to follow the drawing rules. It is necessary to clearly reflect the electrical wiring throughout the room, as well as the connection points of individual components. The location of lamps, sockets and switches is also displayed.
If desired, you can draw a rectangle of any shape, which will indicate the junction box. Draw the wires in the form of a simple line, and mark the places where they connect and connect with a dot. It is advisable to use two colors. Select the phase wire for one and the neutral wire for the other. You can also immediately number all sections of the future circuit by transferring the markings to the prepared cables. This will help facilitate the installation process and minimize the likelihood of errors.
Ceiling wiring diagram
It is recommended to save the completed diagram. If there is a need to eliminate any shortcoming, you can use it to quickly determine the required actions.
Basic rules for installing ceiling wiring
Installation work is carried out on the basis of a pre-developed plan. During its preparation it is necessary:
- determine the location of the local network connection to electricity;
- highlight points of electricity consumption;
- select a location for installing protective equipment.
- draw up a diagram of laying a cable line from the connection point to electricity consumers.
At the preliminary stage, the brand, section of corrugation and cable are selected. For these purposes, there is a special table that makes selection easier.
Preparatory work
Dismantling plaster
It is necessary to carry out all preparatory measures, which will subsequently simplify the execution of the main work and reduce the time spent. To do this you will need:
- Remove finishing materials from the surface of the walls, for example, wallpaper, decorative plaster, etc.
- Disconnect the old wiring. To do this, you will need to remove the conductive wires from the power supply in the entrance and connect to it a temporary carrier intended for power tools.
- If an electric meter is installed in an apartment and the protective seal needs to be removed to carry out work, you will additionally need to visit the energy supply company and write a corresponding application.
- Remove all old sockets, switches, electrical panels and distribution boxes.
When carrying out work to dismantle old wiring, it is important to take care of personal safety precautions.
Rules for choosing material and wire cross-section
Table for selecting cable cross-section depending on the load
Before installation work, it is important to familiarize yourself with the type of wires and their cross-section. The assortment in construction stores is incredibly large.
There are two main types - PVS and VVN. The latter's abbreviation means vinyl-naked vinyl: each conductive core is in vinyl insulation, and everything is held together by another insulating layer. As a rule, in hardware stores you can only find cables of this type that are single-core, which means that the core is cast.
PVC: connecting wire with vinyl insulation. The most common wire is made of copper. It is used not only for wiring, but also for the manufacture of electrical appliances. The core consists of a large number of small wires. This design feature has a beneficial effect on electrical conductivity and service life.
To select a wire with the correct cross-section, you need to familiarize yourself with the tables from the PUE manual (Rules for Installing Electrical Appliances).
Making a circuit
This is an important and integral step, which will allow you to find out which wires are directed where and what they are powered by. As a rule, it is enough to draw up a banal electrical diagram, which is not drawn in accordance with drawing standards; the main thing is to understand it.
This is done as follows: schematically, on a sheet of blank paper, the mounting boxes in which the twists will be concentrated are shown. The assembly panel of the machines, switches and light bulbs is also indicated. The twists in such boxes are represented by rectangles, and the points are the wires that are twisted in it.
Violations committed when pulling a cable line along the ceiling surface
To ensure an aesthetic appearance of the ceiling covering when stretching corrugated protection with a cable inside, you need to buy the material, laid in strands, not tightly twisted. When choosing products, the following mistakes are often made:
- Purchased orange or black type of corrugation.
A hazardous material was selected because it supports combustion. It is recommended to use only gray PVC corrugation.
- The corrugation is laid along the combustible base behind the suspended ceiling.
In case of short circuits, corrugated protection for the power line will not save it. It is necessary to install cable wiring in steel materials.
- More than one 90 degree rotation of the corrugation has been made.
Access for maintenance becomes more difficult. We must try to avoid such turns.
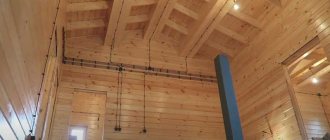
Installation of ceiling wiring in a house Source mos-elektrika.ru
Disconnection - the final stage
Three-phase residual current device (RCD)
It is important not to forget about disconnection. Using a previously prepared diagram, the wires are insulated and twisted into junction boxes. Next, automatic machines, RCDs, switches and sockets are connected to the network. If a suspended ceiling is installed, you must first insert soffits and lamps into the prepared holes.
When performing all activities, the operability of the network is checked; there should be no short circuit.
Which cable option requires corrugated protection?
The choice of corrugation is either determined by existing standards, or is simply selected according to expediency:
- Open installation of electrical wiring indoors.
The method is used for laying material on concrete and brick surfaces. They are considered non-flammable. If the ceiling is wooden, you will need a special non-flammable substrate or use corrugation made of metal.
- Installation of electrical routes with a high probability of causing damage to cable lines.
- When laying cables and then pouring them with concrete, it is recommended to provide additional protection. For this purpose, corrugated material is used.
- If the surface is made of a combustible base, then installing a cable line from VVGNG without corrugated protection is allowed only when choosing an open method.
In this case, the wiring is performed on insulators, using plastic boxes or special plinths.
- If you plan to replace the cable later.
To facilitate the process of replacing the cable line, it is better to use corrugated material one size larger.
Features of the formation of electrical wiring on the ceiling surface
Laying of current-carrying conductors under a suspended ceiling is carried out in accordance with the rules for installing electrical equipment. They state that the cables being laid must have fireproof insulation. When using conductors with a combustible protective layer, they should be laid in metal pipes. Pipe joining must be done by welding or threaded connection using additional gaskets.
Laying cables in copper pipes
According to the PUE, it is required to install distribution boxes in such a way that they have constant access. Suspended ceilings do not always provide this opportunity. In this case, it is necessary to be guided by building codes and regulations. They allow the use of hidden junction boxes provided that the cable cores are connected by welding or special sleeves.
The most common violations of the PUE requirements
The most serious mistake made at home during the installation of a power line is when the electrical network is laid without paying attention to the locations of various communication pipelines taking into account the perspective. This applies to the location of cable wiring, interior accessories located on the ceiling.
Other errors:
- laying telephone and television cables inside one corrugation along with a power cable line;
- the electrical wiring project involves calculating the load for each room without taking into account the simultaneous inclusion of electrical appliances;
- electrical wiring is calculated without reserve;
- a cable or corrugation of insufficient cross-section has been selected.
To create a reliable, safe cable line on the ceiling, it is better to avoid such mistakes.
Electrical installation with wiring along the ceiling Source profi220.ru
Electrical calculation of electrical wiring for kitchens
The electrical calculation of kitchen outlets is based on several provisions.
- All kitchen appliances cannot be powered from one outlet or, what is the same, they cannot be powered from one power line.
- It is advisable to make sockets in the kitchen with a grounding contact to protect people from electric shock, and it is imperative to ground all household appliances connected to running water (washing machine, dishwasher, waste disposer).
- A separate supply line is made for the electric stove. The line runs directly from the apartment's electrical panel. If the electric stove is assembled from a hob and an oven, then a separate power supply is supplied to them.
- All household appliances connected to running water and metal bodies that can be touched (washing machine, dishwasher) are powered separately with the installation of a residual current device (RCD) or a differential circuit breaker (difavtomat) on the supply lines.
We will proceed from these provisions in further calculations. Let's start with uniform distribution of the power of household appliances or, in other words, dividing the kitchen electrical wiring into groups.
Dividing kitchen wiring into groups
An electrical wiring group or group circuit is several sockets and (or) lamps connected in series and protected by one common circuit breaker.
- First of all. To connect a washing machine, dishwasher, oven, separate power lines are made, which correspond to separate groups of electrical wiring.
- The hob also requires a separate supply line.
- We make a separate supply line for the remaining sockets connected in parallel: mid-level sockets, refrigerator, microwave oven, lighting and waste disposer.
Calculation of circuit breaker ratings and cable cross-sections for kitchen electrical wiring
In principle, you can not delve into the physics of the process and accept the following postulates for execution.
- All electrical cables must have copper conductors. Electrical cables of the VVG and NYM brands are perfect.
- The electrical cable for electrical wiring must be three-core. Each core must be single-wire.
- For a hob, the cable cross-section should be 3×4 mm² or 3×6 mm². Which means three conductors with a cross section of each conductor of 4 (6) mm².
- For a washing machine, dishwasher, waste shredder, you need a 3 × 2.5 mm² cable.
- The same cable (3 × 2.5 mm²) needs to be used to power the middle level socket blocks.
Or use a table compiled, believe me, by very professional people. But, you can independently calculate the ratings of circuit breakers and cable cross-sections of groups.
How to independently calculate the ratings of circuit breakers and cable cross-sections of groups
For example, let's calculate a group of mid-level sockets for a refrigerator, microwave oven, lighting and waste disposer with a switch. Let's assume that all planned outlets in this group include household appliances. First, let's calculate the total power of all devices. To do this, we will use the table of power of household appliances. You can view it here or find it on the websites of household appliance sellers.
We count:
- Refrigerator 200Watt,
- Chopper 400Watt,
- Microwave 2000W,
- 6 household appliances in two blocks of additional sockets 6×1000 W=6000 W.
- Total: 9000 W.
Maximum operating current in the network
The maximum operating current in the network is the current when all devices are connected to the electrical network. In our example, this current is equal to: I work.= Ppower⁄U voltage=9000⁄220=41 Ampere.
The current of the circuit breaker must be no less than the maximum operating current in the group circuit. That is: I automatic protection ≥I slave. At the same time, the rating of the circuit breaker cannot be greater than the permissible current of the cable. That is, such a current at which the electrical cable of the circuit will not heat up and burn. I automatic protection≤I cable.
As a result, we obtain a general condition for choosing the rating of the circuit breaker: I work.≤I automatic protection≤I cable.
Let's move on to the table of correspondence between the operating current and the required electrical cable for wiring. From the table we see that a current of 41 Amps will “hold” either a cable with wires of 4 mm2 (with open wiring) or 6 mm² (with hidden wiring). Calculation of electrical wiring in the kitchen, table for calculating cable cross-section. As a result we get. According to direct preliminary calculations, 41 Ampere≤I automatic protection≤42 Ampere. We can assume that everything is calculated. We take the machine with a slightly lower rating, 40 A, and we take the cable with 6 mm² wires.
Electrical wiring on the ceiling: pros and cons
Advantages of electrical wiring on the ceiling:
- Installation is simplified, since a screed has already been made on the ceiling surface of the room, suitable in terms of parameters for corrugated material.
- You can immediately lay the cable line, since there is no need to re-fill the ceiling.
This refers to a situation where the quality of the coating is at an acceptable level.
- The perspective is taken into account, since then suspended or plasterboard ceilings can be made.
Advantages and disadvantages
The main advantages of this method of laying electrical cables include:
- Increased level of safety compared to installing wiring in the wall. Any accidental damage to the line associated with driving in nails, dowels and other fasteners, which is accompanied by the use of a drill, jackhammer or grinder, is excluded.
- The total amount of cable required to organize the network is reduced. A lot more wires are required to run in the wall.
- You don't have to be a qualified specialist to handle the task yourself. Difficulties can arise only when placing the cable inside a corrugated or metal pipe.
- The junction boxes are located near the wall or at the bottom, which eliminates the possibility of cable breakage.
- There is no need to chisel the walls, apply a thick layer of plaster or perform other finishing work.
Installing wires on the floor allows you to get rid of wall slitting.
Floor wiring scares people for the following reasons:
- Serious difficulties when performing repair work or when it is necessary to replace the electrical cable. Sooner or later the chain may break. It is almost impossible to find the emergency area on your own, so you will have to dismantle the system and lay a new wire. However, the problem can be avoided if you follow the rules and recommendations for installing floor wiring. For example, you should make sure that the cable placed in the pipe moves freely through it. Before pulling out the cable, tie a strong rope or wire to the far end so that you can then easily pull the new wire into the pipe.
- The cost of the work increases due to the need to purchase corrugation, which is not needed when installing in walls, when the cable is hidden inside the groove or under a thick layer of plaster.
With floor installation, replacement becomes more complicated and the cost of work increases.
There are only two shortcomings, but the first is easily eliminated if you follow the installation technology flawlessly.
Hidden wiring device
Hidden wiring can be done using two methods. The first, classic option is to place cables and network elements inside the grooves or under the casing. The second option, which has been gaining popularity recently, is the use of special pipes and cable ducts. In fact, the wires are hidden from view, but not located inside the wall.
Wiring can definitely be called hidden only in the first case, when the cable is hidden inside building structures. The latter include partitions, various ceilings, floors, walls and ceilings. In most cases, this option involves making special grooves. To make them, use a wall chaser or grinder, but you can get by with a hammer drill or a scarpel with a hammer. The same pipes and channels from the second method should also be present in the first: they are laid in grooves to increase the protection of the wires.
Laying wires in grooves
Attaching cable ducts to the surface of walls and ceilings and then placing wires inside is more of a method of organizing open electrical wiring.
Photos of wiring to help the master
As you can see from the article, the installation process is not as simple as it might seem.
During the work process it is worth considering:
- requirements of current safety standards;
- norms of the Technical Operation Rules;
- features of the tension structure;
- availability of the necessary tools for the job.
Photo gallery of an example of installing electrical wiring under tension
If you encounter any difficulties with installation, use photographs or videos that help you complete the work step by step and eliminate gross mistakes.
The photographs clearly show the methods of fixing pipes and cable products, as well as the features of connecting wires. With the help of photos, even a beginner in this field can do the job perfectly.
Cable laying methods
Now let's talk about how to make safe wiring on a wooden ceiling. Let us consider separately the features of open and hidden gaskets. When installing open-type power supply systems on a wooden ceiling, the same rules apply as for concrete floors. The old method of laying wires on porcelain insulators is used very rarely today and only if the stylistic design of the interior requires it.
Hidden wiring
Hidden electrical wiring on a wooden ceiling is laid in metal pipes and sleeves.
In this case, it is worth considering certain rules:
- The ends of the pipelines are thoroughly cleaned of burrs and nicks so as not to damage the cables. Instead of stripping, special plastic plugs are used.
- Sleeves and pipes on the inside must have a protective coating - painted or galvanized.
- Copper hoses are best suited for hidden installation in a wooden house because they resist moisture and electrical discharges well during a short circuit. In addition, copper pipes, if necessary, are bent to the shape of the surface. However, such products are quite expensive.
The hidden installation method involves installing channels inside the plaster layer, behind a suspended ceiling made of plasterboard or inside a wooden ceiling. If the installation is carried out in a layer of plaster, then before fixing the channels, a steel tape or a layer of asbestos is laid. The cables are secured to steel clamps or brackets. After laying the wires into the grooves made in the plaster, the recesses are covered with a quick-drying compound with the addition of alabaster.
When laying wires behind suspended ceilings, the installation is done inside copper or steel pipes for water supply systems or gas pipelines. In this case, there is no need to groove the surfaces. In the event of a short circuit, the pipes completely localize the source of ignition.
To select the appropriate pipe diameter, take into account the cable cross-section and the number of passing wires. After purchase, the pipes are cut into sections of the required length. Then threads are cut at their ends. All threaded connections are thoroughly cleaned of burrs. The individual pieces are connected to each other using corners or couplings. Copper pipes can not be cut, but bent using a pipe bender.
Open wiring
Installation of open power supply systems is much easier. In addition, open wiring on a wooden ceiling does not have the same disadvantages as hidden wiring. The only disadvantage of open installation is its unattractive appearance, because all the wires are laid in a channel or corrugated plastic.
When choosing a corrugation or channel, consider the features of each:
- corrugated sleeves are very difficult to lay perfectly evenly without sagging and curved areas;
- in order to somehow even out the corrugation, they increase the number of fixation points, but this does not completely solve the problem, but the cost of installation increases;
- Dust quickly collects in the folds of the corrugation, and it is quite difficult to remove it;
- it is difficult to pull a large bundle of cables through a corrugated pipe (the products will constantly cling to the ribbed surface);
- for laying a large number of cables, it is better to use plastic channels;
- plastic boxes not only look better than corrugated ones, but also allow you to choose colors to match the style of the interior and even with an imitation of a wooden surface.
Sleeves made of metal or plastic are attached to the ceiling using clips or clamps. To pull the cable through the channel, use a steel wire, which is attached to the end of the wire.
It is much easier to lay the cable in a plastic box because it has a removable cover. During installation, a U-shaped channel without a cover is first attached to the ceiling. Then they put the wire in it and close it with a lid that has a latch at the ends. To bend a plastic box, it is cut at the desired angle and the two parts are joined. Instead, you can use special plastic splitters, corner and rotary elements.
Instead of channels, you can use installation on an asbestos substrate. Such a protective lining should protrude 1 cm from both sides of the cable. In this case, there can be no talk of aesthetic appeal, because the cable and the lining protruding from both sides are visible.
Distinctive features of modern electrical wiring
At the end of the 20th century there was a breakthrough in modern household technologies. In addition to televisions, other devices began to be used inside homes:
- Wireless connection.
- Powerful household appliances.
- Video surveillance and security systems.
- Computers.
Therefore, work with the installation of electrical networks has become more complicated. The principles of operation and arrangement remain the same. Even the first stage - design - causes difficulties. It is necessary to know the locations of household appliances and the power they absorb. The lighting system for each room is thought out at the same stage.
Now they use not only power, but also low-current systems. These are wires for TVs, telephones, and computers. This also includes acoustic and security equipment. Power and low-current systems are not separated. The power source for the devices is a classic 220 V network.
The number of devices and devices with simultaneous operation is changing upward. Previously, one chandelier was enough, now local or a system of spotlights is added to the overhead light. The total power consumed by the devices also increases.
Organization of lighting (modernization of ceiling wiring)
Installing suspended ceilings allows you to organize room lighting in a new way. You can install spotlights instead of a chandelier, saving space in height. In this case, the supply cables must have vertical branches opposite the installation locations of the light points.
If you plan to drill holes in drywall, the wires should be temporarily lifted and then removed from the resulting holes for the light spots.
First, a plan for the placement of light sources is drawn, then their projection is marked on the load-bearing ceiling. When marking, novice craftsmen often turn the plan over to the ceiling (180°). The result is a mirror marking. Don't forget about it! The plan must lie on the floor (on the table), and the markings on the ceiling are transferred without a virtual spread.
Power cables (220 volts) must be attached to the main ceiling; they should not sag to the drywall. But the placement of low-voltage power supplies (the so-called drivers) is allowed directly on the suspended ceiling. For modern LED lamps this is a normal solution.
Installation of wiring for a suspended chandelier under a suspended ceiling will require the installation of a rigid mount. Hanging on a hook in this case is impossible - even slight vibrations of the lamp will deform the stretch ceiling.
A rigid plane (for example, moisture-resistant plywood) is attached to the load-bearing surface. It provides a hole for electrical wiring.
Before installing the stretch ceiling, the wire is fixed above the hole so that it can be easily brought out. The suspended ceiling is stretched, the location of the hole is measured, and a neat hole is made. The wire is brought out and the chandelier is screwed on.
Tip: Even if you install a light source with one power button, it makes sense to run a triple phase cable from the chandelier to the switch box. When you decide to install a three-key player with a multi-track lamp, you won’t have to redo the wiring - the “extra” wires will come in handy.
In general, when organizing wiring above a suspended ceiling, it always makes sense to leave several backup lines. Of course, this is only relevant in cases where there is access to the inter-ceiling space. For example, one edge of a suspended ceiling ends not at a vertical wall, but in a mezzanine niche.
By the way, quite often several mezzanines are placed in the corridors. By organizing access to the inter-ceiling space from both sides, you will provide unlimited possibilities for upgrading the wiring. Of course, we are not talking about stretch ceilings - only plasterboard or ceiling panels.
True, you will have to deviate somewhat from the rules: new wiring (necessarily corrugated) will be laid on a false ceiling.
Installation of hidden electrical wiring
Concealed electrical wiring is quite simple. The only significant difference from the open one is the way the wires are hidden from view. Otherwise the actions are almost the same. First, we install the lighting panel and RCD circuit breakers, after which we start and connect the input cable from the side of the distribution panel. We also leave it unconnected. An electrician will do this. Next, we install distribution boxes and socket boxes inside the made niches.
Now let's move on to wiring. First we lay the main line from VVG-3*2.5 wire. If it was planned, then we lay the wires to the sockets in the floor. To do this, we insert the VVG-3*2.5 wire into a pipe for electrical wiring or a special corrugation and lay it to the point where the wire exits to the sockets. There we place the wire inside the groove and insert it into the socket box. The next step will be to lay the VVG-3*1.5 wire from the switches and lighting points to the junction boxes, where they are connected to the main wire. We isolate all connections with PPE or electrical tape.
At the end, we “call” the entire network using a tester for possible errors and connect it to the lighting panel. The connection method is similar to that described for open wiring. Upon completion, we seal the grooves with gypsum putty and invite an electrician to connect it to the distribution panel.
Installing electrical wiring in a house or apartment is quite easy for an experienced technician. But for those who are not well versed in electrical engineering, they should take the help of experienced professionals from start to finish. This, of course, will cost money, but this way you can protect yourself from mistakes that could lead to a fire.
—
—
Advantages and disadvantages
The main advantage of placing electrical wiring behind a suspended ceiling is its invisibility. There is no need to groove the slabs or come up with other ways to hide the hated wires, because the canvas will reliably hide all the finishing flaws.
At the same time, you will have to spend much less effort, time, and materials on laying the cable without gating.
True, the right decision would be to conduct the light according to all the rules, connecting the wires at right angles. This arrangement of cables is done so that during repairs it is possible to easily determine their location, in order to avoid accidental damage.
It is impossible to damage the wiring without damaging the tension fabric. If repairs are required, the PVC film will have to be removed, and the wires will be visible. Therefore, it does not matter much how the cables are routed.
This is interesting: How to install electrical wiring in an apartment without gating the walls: let’s learn all the nuances