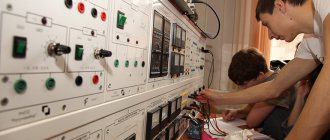
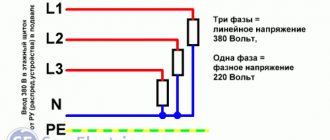
The subtleties of good soldering
To solder a part to the board, you need:
1) Apply flux to the soldering surface; 2) Tin them with solder; 3) Apply flux to the contacts again; 4) Solder the gap between the contacts.
The first important rule is to avoid temperatures above 400°C or more. Many beginner (and even experienced) radio amateurs neglect this. These are critical values for microcircuits and boards.
Solder melts at approximately 180 to 230°C (lead-containing solders) or 180 to 250°C (lead-free). This is far from 400 °C. Why then set the temperature high?
What you need for reliable contact
Main criteria:
- Choose the right flux. For example, liquid flux is suitable for soldering wires. It wets wires best and allows for better tinning of such contacts. Low-quality flux quickly boils and spreads over the board.
- Use high quality solder. It is the solder that determines the further reliability and strength of the connection. Also, the quality of the solder can affect the operation of the circuit as a whole; due to slag and low-quality alloys, interference may occur in the operation of the electronics and, over time, cracks may appear.
- Use proven tools and equipment. Soldering irons of poor quality can maintain temperature unstably and overheat.
- Maintain temperature conditions. Do not overheat the parts and stay within the melting temperature of the solder. The temperature is too low and the solder will not melt well, and if it is too high, the material will evaporate, making it worse to tin the contacts.
- Long hours of practice, trial and error. Without practice, there will be no soldering method.
These criteria are interrelated with each other. And with a poor choice of components and materials, the same result will occur.
Possible soldering problems
Common mistakes to avoid:
- Working under voltage. All electronics must be unplugged. High temperature affects the physical processes in the elements, which leads to their failure.
- High level of pollution. The tip and treatment areas must be cleaned before starting and ensuring the process progresses.
- Mechanical damage to the soldering iron. As a result, the required temperature may not be reached for efficient operation.
- Using consumables that are no longer suitable. Repeated use of the same material leads to a decrease in the quality of the result.
Soldering elements and circuits efficiently is difficult for beginners, even if the best tools are used. It will be possible to reach the heights of mastery only after acquiring solid experience. And although the first attempts will be very modest, in the future you can count on successfully completing more complex tasks, such as repairing car wiring.
Where to begin
First, you need to decide for what purpose you need soldering. For amateur radio, this is an entry-level level; for soldering wiring and a simple level, more professional tools are needed. And to repair and solder SMD and BGA microcircuits, you will have to learn all the basics of soldering and purchase special tools and consumables.
Choosing the Right Soldering Kit
Solders come in different types and diameters. A large solder diameter is convenient for soldering wires, and small diameters are suitable for spot soldering SMD components or connectors. Solders also come with or without rosin. With rosin, solder is very convenient. It is easiest to use it on a soldering iron tip.
Starter Kit
For radio amateurs, stores sell everything at once in one pack. Such sets are the cheapest, since everything will cost more separately. For example, there are sets with a soldering iron and tips, as well as tweezers.
Soldering iron or station
For soldering radio components and wires, a simple soldering iron with a copper tip is sufficient. But for more advanced soldering you will need a station. A soldering station usually consists of a hair dryer and a soldering iron. Using a hair dryer, you can solder SMD components, and you will be able to warm up the board better.
It is best to start with a soldering iron and choose one that has temperature control and changeable tips.
Soldering iron tips
There is an arsenal of tips for soldering irons. Cone, flat, hatchet, wave, etc. They can all be of different sizes and shapes.
Soldering tip selection
A mini wave is perfect for beginners. This type of tip is the easiest to tin and is capable of a wide range of tasks.
Features of application
For soldering wires these are massive tips, and for planar contacts these are usually conical and curved tips. For example, to solder a cable from a board, a hatchet is best suited. This type has a wide working surface, which allows you to massively heat a large surface of the board.
Eternal stings and rules for their use
The main rule when using permanent tips is that there should always be solder or flux on the tip. If you ignore this rule, black dots will begin to appear on the sting, which will eventually spread to the entire surface.
This is a layer of soot that forms when air oxidizes on the working surface. Solder or flux perform a protective function, and during operation of the soldering iron they, and not the soldering iron tip, are oxidized.
Why did the soldering iron start to solder poorly?
If the soldering iron melts the solder, but does not take it to its working surface, then it needs to be tinned. It is highly oxidized, but should not be thrown away.
Preparing for work
After turning on the soldering iron, you need to wait for it to heat up. All preparation comes down to cleaning carbon deposits from the working surface and applying solder. When working with stings, do not use cutting tools. Do not remove carbon deposits from the soldering iron with blades or other sharp objects.
Soldering iron tinning
Tinning a soldering iron occurs in stages:
- The heated tip needs to be cleaned. Using a wet sponge or copper shavings.
- Solder was applied to a clean surface.
The black surface of the tip is removed by long tinning. This is done using a lump of solder and flux. The tip is drowned in solder until it is clean. Periodically it should be dipped in solder. And then clean again with a sponge. In this case, it is best to use copper shavings; they remove oxides and carbon deposits much better. A wet sponge only removes solder, not carbon deposits. If the above methods do not help, then you will have to use a tip activator or soldering acid.
Hair dryer nozzles
The soldering gun also has its own attachments. They come in different diameters, shapes and fastenings. It all depends on what kind of work is being done.
Soldering flux selection
Soldering work has a wide range. And different tasks require different materials. For example, for soldering wires, nothing beats regular rosin. Rosin is cheap, practical and easy to use. But for microcircuits a different approach is needed. Paste-like flux and syringe for precise dosing of flux to SMD components.
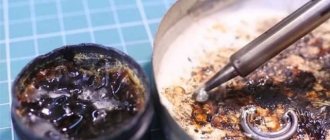
How to clean flux after soldering
Using Galosh gasoline or alcohol. Tools and consumables for cleaning:
- Cotton wool;
- Cotton pads;
- Cotton sticks;
- Toothbrush.
Workplace and additional tools
A wooden table is suitable for the workplace. If you don’t want to spoil the surface of the table, you can use a wooden plank. Wood absorbs little heat and does not act as a radiator. And if you don’t have such a board, you can purchase a silicone heat-resistant mat. This mat has a convenient area for disassembling electronics, various pockets and places for tools. The mat can be cleaned with regular alcohol after use if there are any stains or traces of solder.
Tweezers and spatulas
Using tweezers, you can move parts when soldering, position and install parts. They are also made from different materials, they can be angular, straight, with fixation, etc.
Optics and microscopes
Magnifiers are not very convenient, so it is much more convenient and practical to use microscopes. It's best to start with a budget option. For example, a simple USB microscope will allow you to evaluate the result of soldering on a computer screen.
Of course, the frame rate does not allow you to work normally under it, but it allows you to examine small details of the board without harm to your eyesight.
Room ventilation and safety rules
The room must have good ventilation. When soldering, you need to keep your distance and not get too close to avoid solder getting on your face. After soldering work, be sure to ventilate the room and wash your hands and face with soap. You should not eat food while soldering, because smoke residues remain on mucous surfaces.
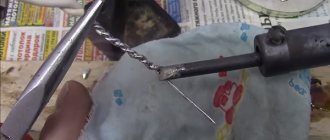
What you need for soldering
To connect cables with solder, you will need an electric soldering iron; the power of the device depends on the cross-section and material of the wire. To improve the quality of work, the tip is cleaned of carbon deposits and traces of rosin using an abrasive tool. At home, a file or emery cloth on a thick base is used for cleaning. A file allows you to remove coarse carbon deposits, sandpaper is intended for finishing the working surface of the tip.
When soldering copper wires, additional tools will be required for cutting and removing the insulating layer. The cables are adjusted to the required size using electrical cutters; it is recommended to use a tool with insulated handles. To remove the insulator, use a utility knife or special pliers, which allows you to evenly strip the cable.
Additional devices used for soldering:
- Base designed to store a soldering iron and additional accessories. The device is made of metal or heat-resistant plastic.
- A stand that allows you to correctly position the parts to be connected. When holding thick cables with your hand, the parts will move apart, which deteriorates the quality of the connection. There are stands with additional clamps, a magnifying glass and lighting. The equipment is designed for soldering small-sized parts.
- A metal mesh that allows you to remove excess solder from the joint line.
- Tweezers or clamps designed to facilitate the process of joining parts with solder.
Simple soldering of wires
The first example is soldering wires.
What you need
To strip the insulation from the wires you will need a stripper. It can be used to quickly remove insulation. Side cutters, wire cutters, a knife, teeth or a soldering iron will not be able to cope with this task as easily.
Liquid rosin, or FKET, is suitable for soldering wires.
Liquid rosin best coats the wire veins. It is cheap, practical and convenient.
Which sting is better to choose
Wires require a lot of solder. A mini wave is more practical for soldering any wires than a regular cone or flat tip.
Step by step process
We remove the insulation with a stripper and twist the wires. We apply flux to the wires to be soldered, and take the solder onto the tip. The temperature of the tip is no more than 300 °C. With several movements back and forth we tin the twisted wires. If the solder has formed into lumps, then add it and wait for the soldering area to cool down so as not to damage the brush. Add more flux and run the soldering iron over the soldering area again. There should not be much or little solder.
It's best to tin both wires before soldering them together, but you won't be able to twist them together securely. Therefore, it is easier to immediately twist and then solder them.
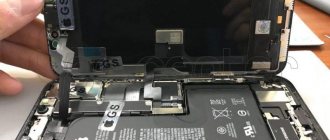
Headphone repair
The main problem when repairing headphones is the resistant insulation of the wires.
Features of wire tinning
To tin such wires, you need to carefully walk over the soldering area using solder and rosin. For soldering you will need a massive tip, a large drop of solder and liquid rosin. Flux is applied in the same way, but soldering is a little different. Now the main task is to burn the insulation. This can be done with a large drop of solder. Using longitudinal movements back and forth, apply solder to the soldering area. Insulation burns slowly. There is no need to raise the temperature above 300 °C or use acid. If we can’t tin, then we try again, but instead of rosin we use LTI-120. This flux will help tin the wires no worse than soldering acid.
Solders and fluxes
Now it’s time to accurately select the working solder and flux for it, because... soldering, unlike half-solder, must not only adhere tightly to the base metal, but also be strong itself. A summary of information about solders and fluxes of widespread use from the old reference book is given in Fig. In relation to the present time, there is not much left to add to it.
Characteristics of solders and fluxes for wide application
Solders
Solders from POS-90 to Avia-2 are soft for low-temperature soldering. Only electrical contact is guaranteed. POS-30 and POS-40 solder copper, brass, bronze with inactive fluxes, and the same with steel, and steel with steel with active ones. POSSr-15 can be soldered galvanized sheets with inactive fluxes; other solders corrode the zinc to steel and the soldering soon falls off.
34A, MF-1 and PSR-25 hard solders, for high-temperature soldering. Solder 34A can be used to solder aluminum in a flame (see below, about soldering aluminum) with special fluxes, see ibid. MF1 solder is used to solder copper to steel with activated flux. “Low strength requirements” in this case means that the strength of the joint is closer to the strength of copper than steel. When soldered with a dry soldering iron (see below), PSR-25 is suitable for soldering jewelry, Tiffany stained glass, etc.
Fluxes
Soldering fluxes are divided into neutral (inactive, acid-free), which do not react chemically with the base metal or interact to an insignificant extent, activated, which chemically act on the base metal when heated, and active (acidic), which act on it even when cold. In regard to fluxes, our century has brought the most innovations; mostly still good, but let's start with the unpleasant ones.
First, technically pure acetone for washing rations is no longer widely available due to the fact that it is used in the underground production of drugs and itself has a narcotic effect. Substitutes for technical acetone are solvents 646 and 647.
Secondly, zinc chloride in activated flux pastes is often replaced with sodium teraborate - borax. Hydrochloric acid is a highly toxic, chemically aggressive volatile substance; Zinc chloride is also toxic, and when heated it sublimates, i.e. evaporates without melting. Borax is safe, but when heated it releases a large amount of water of crystallization, which slightly impairs the quality of soldering.
The good news is that there is now a wide range of fluxes on sale for all soldering occasions. For ordinary soldering work, you will need (see figure) inexpensive SCF (alcohol rosin, former CE, second in the list of acid-free fluxes in Table I.10 in the figure above) and soldering (etched) acid, this is the first acid flux on the list. SKF is suitable for soldering copper and its alloys, and soldering acid is suitable for steel.
SKF rations must be washed: rosin contains succinic acid, which destroys the metal with prolonged contact. In addition, accidentally spilled SCF instantly spreads over a large area and turns into an extremely sticky muck that takes a very long time to dry, the stains from which cannot be removed from clothes, furniture, or the floor and walls. In general, SKF is a good flux for soldering, but not for slow-witted people.
A complete substitute for SCF, but not so nasty if handled carelessly, is TAGS flux. Steel parts are more massive than is permissible for soldering with soldering acid, and more durable, they are soldered with F38 flux. The universal flux can be used to solder almost any metal in any combination, incl. aluminum, but the strength of the joint with it is not standardized. We'll come back to soldering aluminum later.
Tinning of enameled wire
Enameled copper wire has a heat capacity and is difficult to tinning. But it can be easily tinned using ordinary rosin. Sandpaper is enough. We remove the enamel coating using sandpaper, apply rosin and the wire is successfully crimped and ready for soldering.
Preparation
Work place
Soldering is always done under normal general lighting (no worse than 500 lux); if it is necessary to create more comfortable conditions, a local lighting source is used.
Good ventilation should be ensured. The best results are obtained by a hood; in its absence, solder intermittently to ventilate the room from rosin vapors (every hour during intensive work).
Selecting a soldering iron by power
Solder using soldering irons of varying power. It is usually assumed that:
- low-power soldering irons (20 – 50 W) are convenient for working with electronics and allow you to solder thin wires;
- A 100-watt tool is used to solder layers of copper no more than 1 mm thick;
- 200 W or more allows you to solder such massive parts that initially require the use of powerful soldering irons.
The power of the device is easy to judge visually: a 50-watt soldering iron turns out to be slightly larger than a fountain pen, while a 200-watt soldering iron has a total length of approximately 35-40 cm.
Soldering iron for work
Before using it for the first time, remove any remaining factory grease from the housing. Their burnout leads to the appearance of smoke and an unpleasant odor. Therefore, the soldering iron is turned on through an extension cord, exposing it outside through the window for a quarter of an hour.
Then the soldering iron tip is forged with a hammer: compacting the copper increases service life. The tip of the sting is shaped:
- at an angle or cut - for spot work (an example is shown in Figure 5);
- knife-shaped - with such a sting several contacts are soldered simultaneously (typical for microcircuits);
- special - they are used to solder some types of radio components.
Figure 5. An example of universal sharpening of a soldering iron tip and proper maintenance of its working area
Before you start soldering, you should clean the tip from the oxide film. This procedure is carried out with fine-grained sandpaper or a velvet file, as well as chemically: immersion in rosin. The cleaned tip is tinned with solder.
If necessary, you can solder at the point with a powerful soldering iron. To do this, a copper wire with a diameter of 0.5 - 1 mm is wound onto its tip, using its free end to heat the solder.
Parts for soldering
They always solder in several stages. First, prepare the surface of the metal conductor:
- removal of the oxide film followed by degreasing;
- tinning (applying a layer of tin to contacting surfaces).
Then you can connect the parts.
Be sure to clean used wires.
The oxide film is removed with a file, sandpaper, or a knife blade. In the case of flexible wires, each wire is processed.
The insulation of the enameled wire is removed by dragging it along the surface of a PVC tube, to which it is pressed with a heated tip.
A sign of readiness is a uniformly shiny surface without any remaining oxide film.
They always solder with degreasing, i.e. wipe the surface with a lint-free cloth or napkin moistened with acetone or white spirit.
New wires do not have an oxide film. They are serviced immediately after the insulation is removed.
It is necessary to tin the copper conductor using flux; after heating, the solder should cover the surface of the metal with a thin layer. If there are nodules, it is not recommended to solder; the wire is placed vertically, passing the soldering iron from top to bottom. Excess molten solder flows onto the tip.
If it is necessary to solder aluminum, then the stripping and tinning procedures are combined. To do this, place a wire coated with rosin in sandpaper, heat it while rotating it.
The quality of some types of flux decreases during long-term storage, as well as under the influence of air moisture. Therefore, such fluxes are soldered with additional shelf life control.
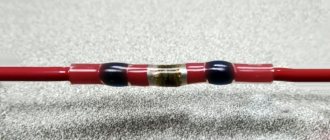
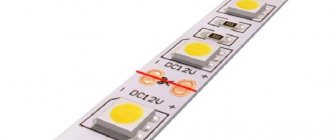
Soldering LED strip
The LED strip has the same heat capacity as a thick wire. It contains a copper substrate, which absorbs heat when heated. We tin the contacts using rosin. We use a mini wave and very little solder. There should be some solder at the soldering site.
Next, we take the soldering iron away from us with the handle, lean the wire against the contact and on top with the tip of the soldering iron. Soldering should take no longer than a second while there is flux. This is due to the fact that the copper substrate quickly absorbs heat, and the burning flux is no longer able to assemble the solder into a single whole. Therefore, if soldering work lasts more than a second, then there will be lumps of solder on the tape with signs of cold contact. If this happens, apply flux again and correct the bad soldering with one touch. Rosin (flux) can be cleaned from the tape using alcohol (or gasoline) and a cotton pad.
Soldering process with a soldering iron
Pre-tinned parts are joined together; to increase the strength of the joint, twisting the copper cores with pliers is allowed. Then solder is introduced into the joint area, which is transferred to the soldering iron tip. It is allowed to use a special wire with rosin inside, which is fed to the junction of the wires. The heated tip of the soldering equipment melts the lead-tin material, which fills the voids between the parts being connected. Excess solder is removed with a metal mesh.
Novice installers have a question about how to properly solder wires made from dissimilar materials (for example, copper and aluminum). There are special fluxes that provide wetting of surfaces with solder. But it is not recommended to connect such parts by soldering, since electrochemical corrosion processes begin at the joint. To connect dissimilar metal parts, special couplings are used to prevent corrosion and destruction of conductors.
Educational program for beginners
To desolder a part from a board, you need to make sure that the contacts are heated until the solder melts (approximately 230 °C). The main mistake beginners make is to immediately heat the place where they are soldering to 300 - 350 °C.
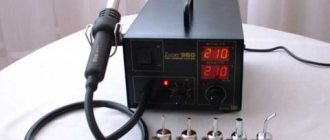
For example, you need to desolder a microcircuit from a board using a Lukey 702 soldering station.
Many radio amateurs and electronics engineers set heating parameters above 300 °C.
At the first moment, the part is exposed to about 200 °C. The contacts and the surrounding area of soldering work are at room temperature.
The heating of the part reaches 300 °C, but the contacts have not yet reached 200 °C.
The microcircuit experiences a critical temperature of 350 °C. Meanwhile, the surrounding soldering area is heated unevenly, even if the hair dryer is evenly moved across the soldering area. A noticeable temperature difference appears at the contacts of the part. 400 °C and the microcircuit begins to fry. A little more, and it will unsolder due to the fact that the contacts have practically heated up until the solder melts. But this happens because the board has warmed up. And in this case, it happened unevenly. High temperatures lead to thermal breakdown of the microcircuit and it fails. The board bends, turns black, and bubbles appear due to boiled PCB and its components.
This soldering method is very dangerous and ineffective.
How do you solder parts without damage?
It is necessary to analyze the soldering area and equipment:
- Estimate the thickness of the board. The thicker the board, the more difficult and longer it takes to warm it up. The board consists of layers of tracks, masks, pads and many metal parts that are very heat-intensive.
- What's nearby? To avoid damaging surrounding components, they must be protected from temperature. The following will cope with this task: thermal tape, aluminum tape, radiators and coins.
- What is the ambient temperature ? If the air is cold, the board will have to be heated a little longer. Of particular importance is what is located under the board. No need to solder on a metal plate or on an empty bench. A wooden board or a set of napkins works best. And at the same time, the board must be in the same plane, without distortions.
- Equipment. Many soldering stations are sold without calibration. The difference between the temperature shown on the indicator and the actual temperature can reach either 10 °C or 50 °C.
Soldering for beginners from A to Z
This article is for those who want to learn how to solder with their own hands or are just starting to solder.
At the beginning of the article, the theory will be presented; closer to the middle, practice will be considered; we will also talk as briefly as possible about the tool, about the chemistry that is necessary in soldering, about additional tools. In order to get really high-quality soldering, you should study all these issues well, find out the details somewhere, but we will try to explain everything as clearly as possible “on the fingers,” so that after reading you are guaranteed to be able to complete the assigned tasks.
Overview of equipment you may need
1. nichrome electric soldering iron with a power of 25W. This is an ordinary household soldering iron, which previously could be found in almost any amateur radio electronics technician. Now they are also common and are quite cheap, about 200 rubles. You can buy any soldering iron, including Chinese ones, they also last a long time - with constant use, up to 8 years. The simplest soldering iron consists of a tip, which is a copper rod, sharpened at an angle at the end, and a heater spiral. Handle made of wood or heat-resistant plastic. This is definitely a working tool, which is suitable in 90% of cases for use in domestic conditions, and even in some repair shops it is still used.
2. A 40-80W soldering iron with a tip sharpened to a wedge, reminiscent of a slotted screwdriver, for easy soldering of heavy elements. We do not recommend buying such a soldering iron for your home, although it is cheap. Some people buy it right away by mistake, but then problems arise: some components burn out, traces peel off from printed circuit boards because they overheat. For a home, 25-30W is more than enough.
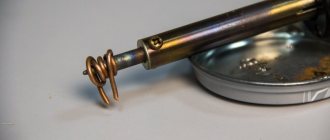
3. Buy a gas soldering iron. Designed for soldering in the absence of an electrical outlet. The equivalent (if converted into electrical power) is about 100W.
3 in 1 tool: • soldering iron, which is sharpened to a cone, the tip is durable, made not of copper, but of a special heat-resistant alloy. Suitable for garage work, car repairs. • the tip is removable and can be used as a hot air gun (heating up to 600 degrees). It is quite convenient to use if you need to warm up a heat-shrinkable tube or just a part. Large jobs cannot be performed with a hot air gun, since the air flow and gas pressure are small. • the nozzle is changed and the tool turns into a good working gas burner with a temperature of 1300 degrees. Thus, you can solder massive parts or simply heat something up as needed.
4. The latest type of soldering iron that is gaining momentum is the ceramic soldering iron . If someone wants to start right away with the good stuff and not save money, we recommend buying it. Pros: very thin tip, suitable for precision (millimeter) work - soldering connectors on mobile phones, mounting or dismantling SOIC, QFP, PLCC, BGA components, etc. There is enough power for any work. It heats up quickly. If a nichrome heater takes 1.5-2 minutes to reach operating mode, then here heating occurs in 20 seconds. - and you can already solder.
The ideal option is to have a soldering station attached to it and adjust the temperature from 200 to 480 degrees, adjusting it to the solders and soldering conditions. With its help, you can change parts on motherboards, video cards, and solder large wires. If you want to learn how to solder efficiently over time, we recommend that you start learning by purchasing a soldering station.
Let's look at the chemistry needed for soldering
Since the soldering iron tip should never be dry, it must be moistened with rosin or other fluxes. Let us list their main types, which are more than enough for soldering at home and in professional workshops.
- Pine rosin can be used in any type of work and you should definitely acquire it.
- ALCOHOL ROSSIN FLUX FKEt with a brush (aka CE, SKF,
FKSp). They are convenient for covering radio installation elements, pins, printed circuit board tracks, hard-to-reach places - they covered them with a brush and soldered them. Thus, you can get away from lump rosin and not wet the parts again. - Chemically active flux LTI-120 . Contains orthophosphoric acid in its composition in order to more effectively combat the oxide film. It is more convenient to solder old, heavily oxidized elements than with the fluxes listed above. Note. Rosin, FKEt, LTI-120 do not require rinsing. After soldering, you can leave them directly on the boards, on the contacts, and nothing bad will happen; moreover, there will be a kind of protective layer against further corrosion. Some people still recommend washing LTI-120, since it is active. This is usually done in workshops. washing takes place in Galosha type gasoline, 92, with chemically active substances such as isopropyl alcohol, or ethyl alcohol, but it takes a little longer. For household work (repairing televisions, tape recorders, etc.) it is not necessary to wash it.
- Flux F-38N . Highly active, acidic. Used for soldering nichrome, aluminum parts, stainless steel, bronze. It is convenient to solder ground connections to terminals, housings, and radiators. When it burns, it “hits you in the nose.” It is used quite rarely, mainly in cases where it is necessary to deal with large oxides, for example, on dirty wires. In a car, of course, it is indispensable: dirt and oil don’t need to be washed, but simply coated with this flux and everything is sealed quickly and comfortably. Requires mandatory cleaning with gasoline, otherwise the corrosion process will begin.
- Soldering acid , a cheaper version of F-38N flux, has the same property
- Thick transparent liquid - pure medical 99% glycerin . An excellent product for soldering construction kits, amplifiers, automotive electronics and tinning printed circuit boards. Has excellent wettability and can be applied with a brush. Soldering is easy with it, the solder spreads over the contact pads and wires perfectly. There are no oxidizing properties, since these are polyhydric alcohols. Does not contain acid - safe and harmless. It does not emit much odor, at least when soldering on a soldering station at a temperature of about 270 degrees. Wash off with plain water!
- Modernized FKEt prepared according to its own recipe : • pour 200 g of isopropyl alcohol per 200 g of isopropyl alcohol. ethyl alcohol (vodka will not work due to the fact that it contains water), • plus 200 grams of glycerin is added to all this (to make the liquid viscous and stick better to the contacts) • lump rosin is added until it stops dissolve. Once every two or three days it needs to be shaken until it stops diluting. No rinsing required. Doesn't leave any dirt. This flux does not conduct electricity - tested with a multimeter up to 10 MOhm.
- Lastly, I would like to especially consider the TT indicator flux . It is in the form of a gel, which means it does not flow, has an interesting paste-like structure, and is soft. According to the manufacturer, cleaning is not required; moreover, the quote: “flux residues after soldering protect the soldering seam from corrosion, provided that the red color disappears.” Consists of: petroleum jelly, emulsifier, tetraethylene glycol and KRS-78. The manufacturer promises protection against corrosion, but on the other hand, since the flux is active (allows you to solder heavily oxidized and dirty contacts, conductors, including old Soviet ones, which are covered with a thick layer of oxide), we do not recommend leaving it unwashed. It is washed off with plain water. The flux is also suitable for soldering SMD components, since it has sufficient viscosity (unlike other fluxes) for their precise positioning on the pads and tracks of the printed circuit board.
In any case, the choice of chemistry is yours, which of the presented elements to use.
Our recommendations:
• for normal everyday soldering – FKET flux (for the final pack); • rosin is required for cleaning the soldering iron and wetting contacts, tinning, etc. (for preparatory work). First we tin with rosin and solder with flux. • To work with old electronic components and household appliances that are oxidized, it is better to use LTI-120. • If you need to tinker with automotive electrics, you can purchase an F-38N. But for household needs, it is not necessary to start soldering.
Soldering tool
Let's consider the tool that you need to purchase to start amateur radio activities, for mounting/dismantling electronic components.
Nippers (side cutters) - they are required for work; they are convenient for molding excess leads, biting off and stripping excess leads. Pliers – for crimping/pressing elements of radio electronics. If the pliers have an extended working part, they can be used as tweezers. It is very convenient if you need to pull something out from the board, tighten something, hold a nut or bolt. A technical scalpel with replaceable blades (some use medical or knives) for stripping wires, more expensive than varnish, cutting. A desoldering pump, which is a reverse-action syringe. If the syringe squeezes out, then this one, on the contrary, retracts. For removing excess solder from contacts and contact tracks, desoldering elements. For the same purposes, you can use a special copper braid, which absorbs molten solder under the action of capillary forces. Braid is a disposable item that runs out and is thrown away (you can’t clean it). Unlike a desoldering pump, which can be disassembled and the solder can be taken out, screwed back on, and used again. Those. This is a universal, reusable tool. If you soldered something wrong, you can remove the soldering and re-solder everything again. There is an electric desoldering pump, which is somewhat reminiscent of a soldering iron and is powered from a 220W network. It is mounted on a pin soldered to the printed circuit board and, under its heat, melting the solder, draws it into its body. But for beginners, a braid and a regular desoldering pump will suffice.
This set is necessary and mandatory for use to begin soldering work in amateur radio practice; you cannot do without it in any repair, especially when assembling your own construction kits and complex devices.
The third hand (mechanical hand, holder) is a kind of assistant, we recommend it for use. Consists of: • a tripod, which includes crocodile clips, in which you can clamp the conductor so as not to hold it with your hand. • a small bath in which you can put rosin or solder. • soldering iron holder The tripod of this hand is comfortable, rotates in all directions, and is adjustable in height.
Practice
If you took out an old soldering iron with a dirty oxidized tip and rosin residue on it, then it needs to be “reanimated”. If the soldering iron is new from the package, in any case it will need to be prepared for work, since its working part is oxidized in air and, accordingly, it will not take on solder - soldering with such a soldering iron will not work. What needs to be done: the working part of the tip in a cold state must be cleaned with a needle file, a file or a whetstone, holding it firmly in your hands. Copper is a soft, pliable material, so you shouldn’t apply much effort during stripping; a few movements will be enough to process everything to clean, light metal. It is not necessary to clean the diameter of the tip, because soldering is done with a heel. Before the stripped part has time to oxidize, you need to turn on the soldering iron and heat it up, but not just by placing it on the stand, but by drowning its tip in rosin. You need to heat it immediately in a cold state and wait until it warms up. In parallel with this process, you need to prepare tin rods. It is necessary to tin the working part of the tip so that in the future it will absorb solder well, warm up the contact area, and also for the safety and durability of the tip itself. Conventional soldering irons undergo this process. At soldering stations, preparation is much simpler; there is no need to sharpen or tin, as special chemicals are used. For conventional soldering irons, the operating temperature is 300 ... 350 degrees, although today Chinese soldering irons heat up to temperatures of up to 500 degrees, which is not good, since components and printed circuit board tracks overheat. Before the rosin on the soldering iron tip burns out and dries, you need to apply tin to it and dip it into the rosin again. Wipe the working part of the soldering iron tip with a soft sponge. The tip should be evenly tinned: the red-pink tint of copper should disappear, the tin should have a pure silver tint. Everything is ready to go. As a worker, dip the soldering iron into rosin a couple of times and place it in the holder. Disable it if you do not plan to use it further. Rosin serves as protection, it has a pleasant smell of tree resin, there are no chemicals in it and there is nothing harmful in this smell, respectively. Therefore, you don’t have to worry about smoke - it is a harmless substance, unlike the substances that are currently used.
Soldering
Take copper wire. Using wire cutters, cut it in half and use a scalpel to remove the insulation. Place one of the wire halves on the scalpel and, turning it around its axis, press the cable against the blade. The insulation layer is cut and subsequently easily removed. Twist the cable strands into a “pigtail” to make it easier to work with and the strands will not fluff up. Tin the prepared wire with POS61 solder. Take a heated soldering iron tip and apply solder to it. Dip the cable outlet in rosin and drown it in it so that it floats. In this state, run the soldering iron several times along the cable veins without removing it from the molten rosin bath. The result is an evenly applied tin layer. Dip it in rosin again to varnish the wire. The second wire is tinned in exactly the same way, there should be no drips, the color is the same everywhere. Now, in order to solder the two ends of the cable together, you need to hold them stationary (for this you can use the third hand, which we discussed above). The tip is again wetted in rosin (it is used constantly), a little solder is taken and the connection is pressed lightly with it. When tested for tensile strength, such a connection must be strong (the gap must not be soldered).
How to solder with a hairdryer correctly
It is necessary to cover all small components that are vulnerable to overheating with protection. In this case, aluminum tape is used. It protects components well from temperature and holds board components tightly. However, it adds heat capacity to the soldering area. Thermal tape also protects well, but sticks to the board less well.
The board is placed on a material that has the least heat capacity and slowly releases temperature to the environment. You can use, for example, a wooden plank. And at the same time, the soldering area should not be inclined.
It is best to apply flux to the contacts. It distributes heat well compared to heated air, but you should not add too much of it. It may boil, hiss, or interfere with soldering.
The first step is to warm up the soldering area. The hair dryer is set to about 100 °C and maximum air flow.
It is necessary to warm up both the part itself and the surrounding soldering area with contacts in a circular motion.
Next, after about a minute, you should gradually increase the heating. The difference with the contacts will be small. Thus, within a few minutes, increase to 300 °C.
Steps of about 20 - 30 °C for every tens of seconds.
Working with solder
When heated sufficiently, the molten solder should become flowable. For small jobs, you can take a drop of alloy on the tip of the tool and transfer it to the parts to be joined. But it is more convenient to use thin wire (rod) of different sections. Often inside the wire there is a layer of rosin, which helps to solder correctly with a soldering iron without distraction from the process.
With this method, a hot tool heats the surface of the connected conductors or parts. The end of the solder rod is brought to the tip and pushed a little (1-3 mm) under it. The metal instantly melts, after which the remainder of the rod is removed, and the solder is heated with a soldering iron until it acquires a bright shine.
When working with radio components, you need to take into account that heating is dangerous for them. All operations are performed within 1-2 seconds.
When soldering connections of single-core wires of large cross-section, you can use a thick rod. When the tool is heated sufficiently, it also melts quickly, but you can distribute it over the surfaces to be soldered more slowly, trying to fill all the grooves of the twist.
How to understand that a part is already soldered
A glare appears on the contacts. Using tweezers, gently push the chip. If it moves easily and smoothly from side to side, then it can already be removed; if not, we heat it further.
This technique must be individually adjusted for each soldering and soldering station. For example, sometimes you will have to heat the board longer, and sometimes about 240 °C will be enough. The soldering method depends on the case.
Selecting a soldering iron
If you are not involved in radio work professionally (most likely this is the case, otherwise you would not have studied this material), you have in your arsenal an ordinary soldering iron in one copy. We are not talking about a soldering station at all, since it is quite expensive (albeit a very convenient kit). But for a novice master this is overkill.
Let's return to soldering irons. The classic is a nichrome heater and a copper tip. In fact, this is the best combination, but for manual control. No temperature control, smooth slow heating. At the same time, the copper tip holds the temperature perfectly, and often compensates for the heat dissipation at the soldering site. Another advantage is that the soft material allows you to mold any tip configuration. You can literally rivet and cut out a tip for a specific type of soldering.
The only drawback is that copper burns out quickly, and this type of tip is actually a consumable item. It constantly has to be sharpened with a file.
The illustration shows the classic “screwdriver” shape. A universal tip for most amateur jobs.
If your “heating device” is equipped with a temperature controller, you must take into account the inertness of copper. It dials the set number slowly and also slowly cools down.
The ceramic tip with silver plating is a modern accessory. If the question is how to work with SMD format parts, or how to desolder a chip from a double-sided board, this is your option. However, they are not so convenient for soldering powerful heat-intensive wires and contacts.
Such a soldering iron heats up instantly, and you can precisely control the degrees on it (if there is a regulator).
The heating method can be any. The same ceramic heater as the tip, or nichrome. Induction heaters are also used on copper soldering irons, but these are rather exotic.
Alloy Rose
To reduce the risk of overheating, Rose alloy can be used. It will help reduce heat to 120 °C. In this way, you can remove the part from dangerous and sensitive areas. Just add a couple of solder granules and a little flux.
After tinning the contacts, the part is easily desoldered. You need to carefully desolder the contacts; they can easily be damaged due to sudden movement. The resulting solder must be removed from the board. It is very fragile and not suitable for use.
How does a soldering iron work?
Soldering devices that produce heat are called soldering irons. Depending on the heating method, they can be electric, gas, hot air, or induction. Most often, electrical devices are used, the power of which is selected for soldering certain materials:
- to connect electronic components, the power of the soldering iron must be up to 40 V;
- for parts with thin walls up to 1 mm, a power of 80-100 W is required;
- workpieces with wall thicknesses of 2 mm or more require a device power above 100 W.
The most energy-intensive soldering irons include hammer devices, the power of which can reach up to 550 W. They can heat up to temperatures of 600C. Hammer soldering irons are used to connect massive parts.
A small acoustic soldering iron is useful for electrical engineers. The device has a low heat capacity, so it is used for fine soldering work.
In addition to the massiveness of metal products, the required power of a soldering iron is influenced by the thermal conductivity of the material being processed. For example, for copper products the device should be heated much more than for working with steel parts.
The optimal required temperature of the tip of the soldering device can be maintained either manually or automatically. Thyristor regulators are used for this.
Combined method
Another very effective technique. If during soldering the part is poorly soldered or does not desolder, this is a consequence of low-quality solder, flux, or insufficient heating of the board.
To do this, while working with a soldering iron, you need to help from above with a soldering hair dryer. The hair dryer should be set to 200°C. This way, heating will occur faster, and the temperature at the contacts will stabilize, and the surrounding air will absorb less heat.
Other types of soldering
Dry soldering with a soldering pencil is used in cases where spreading of solder from the working area is undesirable - in the manufacture of jewelry and artistic objects. The tip is made of bronze and is not tinning.
Twisted conductors of large cross-section are soldered by immersion in a cup filled with molten solder, or a futor. The futorka is electrically heated; on the surface there is a layer of boiling flux through which the ends of the wires pass during dipping.
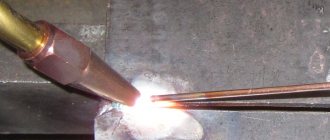
For copper products of large mass, such as pipes, soldering is used in a torch flame. The high temperature of the torch removes the oxide layer.
Torch soldering
First, tinning is carried out with refractory solder, after which the parts can be soldered with low-temperature compounds.
In what cases will soldering with a hairdryer not work?
A soldering gun usually reaches a power of no more than 500 W. The lower the power, the less the board area can be heated.
Using a soldering gun will not adequately desolder massive parts or computer BGA chips (bridges, CPU, GPU). A hairdryer will not be able to warm up such areas.
It's like boiling a glass of water with one match. Increasing the temperature is also not an option; this will destroy both the part itself and the board.
A massive board requires bottom heating. Most often this is a stove that heats up to 100 - 200 °C. The printed circuit board will be heated evenly. And use a hair dryer to bring the solder to melt.
You can also use a hair dryer. It has a larger nozzle and its power can be up to 3000 watts. However, a hair dryer is not a solution either. Due to the fact that only the part and a small surrounding space around it are heated, after soldering the board is deformed due to the high heating difference, thereby tearing off the leads from the pads (this is especially true for large BGA parts).
Popular questions
How should I strip the ends of the wires?
It is not recommended to use coarse abrasives for cleaning. Their particles get stuck in the surface and it is not possible to completely remove them. And during operation, abrasives provoke the development of the oxidation process. High-quality cleaning will be ensured by: scraper, knife, file, needle file. When working with conductive wires, it is recommended to pre-coat them with activated flux, the remains of which should be removed after soldering is completed.
What power should I choose a soldering iron for household needs?
Power determines the function of the tool. If the main part of the work is planned with profiles and thick conductors, then a device up to 65 W is suitable. Soldering of wires with a diameter of up to 0.6 mm is carried out with a soldering iron up to 25 W.
Does the method of twisting play a role in the strength and functionality of the connection?
Each method has its own purpose:
• simple twists are suitable for single-core and stranded wires, but they must first be cleared of the insulating layer;
• bandage connections are used when working with thick live wires;
• grooved ones are made with conductors having fusible insulation;
• simple but consistently performed twisting (British) is used to connect current-carrying cables with a cross-section of up to 1.4 mm2.
How long does it take to heat the solder?
When soldering, some people put solder on a soldering iron. There is no need to do this. It is enough to place the solder over the twisted conductors and warm it up, barely touching the tip. 3-4 seconds are enough for the substance to melt.
By what signs can you understand that soldering has been completed successfully?
The following signs indicate a successful job:
• a layer of solder must cover all ends of the conductors;
• soldering color should be shiny, not matte;
• under mechanical influence (light!) the connection maintains its integrity.
Is there any preparation required for a new soldering iron?
Yes, the tip of a new tool must be cleaned of oxide and coated with tin. After heating, the tip is rubbed against an ammonia stone, after which a drop of solder is melted on it. The preparation of the soldering iron is completed by the usual cleaning of the tip.
Soldering parts from boards with one soldering iron
Small-sized SMD parts can be desoldered using a conical tip. Both contacts of the part heat up and it quickly comes off the board. Also, a conical tip is convenient when soldering SMD parts, since you can accurately dose the amount of solder onto the contacts.
Braided soldering
Braid consists of strands of thin copper wires.
You can use shielding insulation from the antenna as a braid. Using a braid, you can quickly and easily remove solder from a contact. It is necessary to apply flux to the braid and contact. Next, using a soldering iron, the soldering area is slowly heated and the tin is transferred to the braid. This soldering method is good for small parts and small DIP contacts. If you need to unsolder the PCI connector, then the braiding will quickly be wasted.
Vacuum syringe and needles
The vacuum syringe quickly removes massive burnt parts of solder. And with the help of DIP needles, the contacts are easily unsoldered from the board. The needle is put on the contact and heated up using a soldering iron. You need to have time to pass the needle through the board contact onto the microcircuit body while the solder is in a molten state. Or vice versa, when the contact is already warmed up, and at the same second the needle is inserted.
Such soldering methods are outdated. Modern boards are manufactured for machine assembly, so the gap between the contacts and pins of the parts is minimal. The needle is already weak, and the vacuum syringe does not have time to pick up the sharp drops of solder. It is no longer possible to desolder a regular electrolytic capacitor using a syringe. In this case, the liquid sting method will help.
Liquid sting and its advantages
The liquid tip is a drop of solder, which allows you to avoid using additional tools (braid, hair dryer, needles or syringe). The technique is the same as with the Rose alloy. The main difference is in temperatures. The hatchet-type sting has a massive longitudinal working surface. It allows you to capture multiple contacts at once.
Apply solder to the tip. A paste-like flux is applied to the chip to be soldered using a syringe. The part and its contacts are heated with a sting until the tin melts, and the same must be done on the other side.
Using this technique you can also remove DIP contacts.
How to learn to use a soldering iron?
It’s very simple: a minimum of knowledge, everything depends on practice, a small amount of materials and, most importantly, one or another soldering iron.
Above we named one parameter of these hand tools (power). It is important to understand:
- What to solder.
- How to work faster.
The more powerful the soldering iron, the thicker its copper tip, the slower it heats up, but also the longer it maintains the soldering mode after disconnecting from the mains or blowtorch.
- Features of choosing building materials for a home
- What should you pay attention to when choosing the type of rolled metal for a classic seam roof?
Why do you need to play sports from childhood?
But they are not suitable for soldering small electrical parts, thin wires, like lower-power heaters.
There are also soldering irons, and they are not the last in this line, for instant heating of the tip and rapid cooling after spot soldering of radio and electrical circuits - electric pulse ones. They are used to connect hardware products in various household workshops.
The process is simple. If you have ordinary pliers and wire cutters, tweezers with thin and wide (up to 1 cm) legs, then you only have to purchase or take out three specific things from the pantry:
- soldering iron;
- soldering material (solder) – often an alloy of lead and tin;
- antioxidant and degreaser (flux).
To this we add a minimum of general knowledge on materials for soldering.
Tin-lead combines well with precious materials and poorly with iron and aluminum.
Additional training
For additional training, you can try soldering various unnecessary boards from computers and smartphones. There are many SMD and DIP components on motherboards. Only long and hard hours of practice will help you develop your soldering skills.
Net
As an exercise, you can try soldering a grid of wires. The quality of soldering is assessed by the load on this soldered wire mesh. If the solder joints do not break under load, then the soldering is excellent.
Constructors
Radio designers are also a great help.
They teach you to understand electrical circuits and the intricacies of soldering. You should start with simple constructors, such as flashing lights or door locks. As your skill increases, you can increase the level of difficulty, reaching complex LED cubes.
Soldering with acid
Acid is used only as a last resort, when a heavily oxidized surface cannot be tinning. All parts, wires and connectors can be perfectly soldered without acid. More about soldering acid
Soldering - very simple but useful tips
- If possible, opt for a soldering iron with a replaceable tip;
- Be sure to clean the soldering iron tip every time after soldering. When using for the first time, do not forget to tin the soldering iron tip;
- Do not leave a heated soldering iron without flux. It protects the tip from oxidation;
- Use metal cans to store solder, maybe from canned food;
- Remember that the quality and reliability of a soldered joint depends entirely on how uniform the temperature of the surfaces being soldered is.
Lastly, we should never forget about the temperature limits of some electronic components. Elements such as field-effect transistors and integrated circuits are afraid of overheating, so they can be soldered for no more than 5-10 seconds at a temperature of 260-300 degrees.