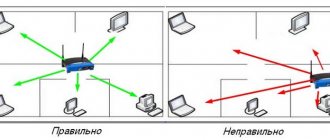
The installation of electronic circuit components is carried out in different ways. One of the most common options is soldering, which ensures reliable contact and strong attachment of parts to the printed circuit board.
It is not very difficult and is accessible even to novice radio amateurs. Soldering SMD LEDs has different features and rules. They are designed to preserve the elements and protect them from overheating. Failure to comply with the requirements leads to the loss of lamps, so it would be useful to consider the issue in more detail.
Factory soldering
In the factory, other soldering technologies are used that allow several boards to be soldered simultaneously. A special robot installs the necessary elements on the base, on the working side of which solder paste is applied using silk-screen printing. It contains solder and flux; when heated, they change phase and perform their tasks. The flux degreases the contacts and provides wetting, and the solder, under the action of capillary effect, flows into the gaps of the connections and ensures a strong connection of the SMD elements.
The process takes place in a special oven, where the board is kept for a certain time. The contact duration and heating mode are selected in such a way as not to harm SMD LEDs. The procedure occurs quite quickly and ensures soldering of elements in industrial quantities.
Important! It will not be possible to repeat this technology at home, since you need to have a full set of equipment and materials. Therefore, it is important for hobbyists to master the process of manual soldering of SMD LEDs using conventional tools and materials.
It is impossible to make the sting not tremble
Not a single person is able to make a tool (any tool, not just a soldering iron)
) did not tremble in my hands.
Once upon a time I read about masters who paint miniature paintings or murals. The technology they use in their work was described there. Its essence is that it is necessary to coordinate the movements of the hand with the beats of the heart. The inevitable
actually occurs from heartbeats .
There is no need to fight trembling - it is useless. You need to learn to adapt to it.
Required materials and tools
To solder SMD LEDs you will need:
- soldering iron with the necessary parameters;
- side cutters, tweezers, scissors;
- mounting needle or thin awl;
- solder and flux. Regular rosin or a special liquid composition, which is an alcohol solution, will do. An aspirin tablet is often used;
- thin brush for applying liquid flux;
- a magnifying glass on an adjustable stand (bracket), which is used by jewelers;
- soldering gun (component of a soldering station).
It will not be possible to do without flux, since molten solder without it does not wet the contacts and does not settle on the metal. Experts do not recommend an alcohol solution of rosin, as it is ineffective and leaves an indelible white residue.
Choosing a soldering iron is an important preparation step. The best option is a soldering station with a temperature control function. However, a regular low-voltage unit with a supply voltage of 12 to 36 V and a power of 20-30 W is also suitable. It is not recommended to work with a standard 220 V device, as their tip gets too hot. As a result, the flux evaporates faster than necessary, not fulfilling its task within the required limits. The maximum heating temperature is 260°.
The type of sting tip is of great importance. A regular cone is not the best option; the optimal choice would be the so-called. microwave. This is a rod cut at approximately 45° with a small recess made in the axial direction. It is filled with liquid solder and allows you to more efficiently apply the material to the SMD LED pads and boards. If necessary, the microwave acts as a suction for excess solder, which avoids drips and drips.
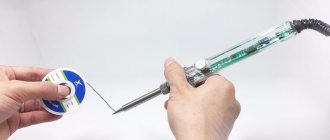
The optimal type of solder is a thin wire with rosin inside. This type allows you to successfully solder LEDs with almost any soldering iron.
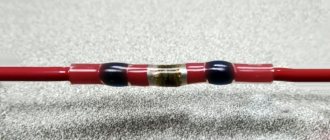
How to properly solder two wires?
- soldering iron for soldering SMD contacts;
- tweezers and side cutters;
- an awl or needle with a sharp end;
- solder;
- a magnifying glass or magnifying glass, which is necessary when working with very small parts;
- neutral liquid no-clean flux;
- a syringe with which you can apply flux;
- in the absence of the latter material, you can get by with an alcohol solution of rosin;
- To make soldering easier, craftsmen use a special soldering hair dryer.
Useful tips Connection diagrams Principles of operation of devices Main concepts Meters from Energomer Precautions Incandescent lamps Video instructions for the master Testing with a multimeter
How to solder SMD components
Installation of LED elements is technologically significantly different from connecting a lamp. Soldering SMD LEDs requires some experience and skill. If there are none, it is recommended to first practice on some unnecessary pieces of wire. This will help you master the art of soldering and keep your LEDs in working order. Before starting work, you should inspect the surface of the board. If it is coated with varnish or a layer of silicone, the current-carrying paths to which the LEDs will be soldered should be freed from them.
The specificity of installing SMD LEDs is the absence of conventional long leads. The elements are installed on the board and soldered to the tracks, for which there are small areas on the sides of the LED device housings. The work requires accuracy and attention. It is important to remember the danger of heating, reducing the time the soldering iron touches SMD parts as much as possible. If there is no appropriate tool, a copper wire about 1 mm thick is wound around the tip of a regular soldering iron. One end of this winding serves as a sting, the heating temperature of which is significantly lower than that of the main element. Let's look at the procedure in more detail:
Work order
The soldering process consists of the following operations:
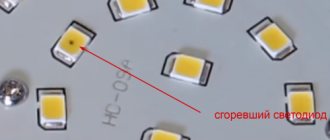
- removing a burnt-out LED (if necessary);
- cleaning conductive paths, applying flux to the soldering area;
- installing a new LED element in place;
- soldering of contacts;
- cleaning the soldering area from flux residues.
What you need for good soldering
- 1. Soldering iron EPSN 25 watt, with a tip sharpened into a needle, for mounting a new microcircuit.
- 2. Soldering iron EPSN 40-65 watts with a tip sharpened to a sharp cone, for dismantling a microcircuit, using Rose or Wood alloy. A soldering iron with a power of 40-65 watts must be turned on via a Dimmer, a device for regulating the power of the soldering iron. You can have one like the one in the photo below, very convenient.
- 3. Rose or Wood alloy. We bite off a piece of solder from the droplet with side cutters, and place it directly on the contacts of the microcircuit on both sides, if we have it, for example, in a Soic-8 package.
- 4. Dismantling braid. It is required to remove solder residues from the contacts on the board, as well as on the chip itself, after dismantling.
- 5. SKF flux (alcohol rosin flux, crushed into powder, dissolved in 97% alcohol, rosin), or RMA-223, or similar fluxes, preferably based on rosin.
- 6. Flux Off flux residue remover, or 646 solvent, and a small brush with medium-hard bristles, which is usually used in school, for painting in art lessons.
- 7. Tubular solder with flux, 0.5 mm in diameter (preferably, but not necessarily this diameter).
- 8. Tweezers, preferably curved, L-shaped.
054-We solder SMD components. :
Of course, it’s much easier to desolder with a hairdryer, if you have additional attachments, then it’s a blast. If you warm up, you take off. Your method is slightly vandal, it is quite possible to tear off the track under it along with the leg of the microcircuit, it’s good if you only need the microcircuit, but what if it’s the other way around?...
On this I agree. But this is a less vandalistic method than, for example, pouring rosin or heating it with a kilowatt spotlight or an industrial hair dryer. We must understand that this method is only suitable for single desolderings; if this happens often, a soldering hair dryer is a must!
Also, are SMD elements only found on computer boards??
Why only on computer boards? They are used very widely. It is more profitable for manufacturers to make electronic equipment using SMD components for the following reasons: - SMDs are cheaper - there is no need to drill holes in the boards for SMDs (this significantly simplifies and reduces the cost of production) - SMDs take up less space and are stored in tapes convenient for automatic installation - SMDs are easier to install machine guns
For the same reasons, except for the last point, for radio amateurs it is also more profitable to use SMD components
Greetings. What hair dryer do you recommend for the job? What brand, type. Not only desolder, but also solder. Fan in the handle, in the block? Why is one or the other better? What is the price, approximately within what limits?
I won’t say anything about a hairdryer - I don’t have one myself. I make do with a soldering iron.
@GetChiper Fen rules!! And even cooler is a technological convection oven