On hot summer days, only those with air conditioning feel good. The rest have to spend long periods of time in stuffy rooms and offices. The situation for them can be improved by even a slight air flow, which can be generated by a cooler removed from an old system unit.
Making a fan using a computer cooler
To make a fan at home and not have to strain at all, we found this method on the Internet. The entire manufacturing process will take no more than 20 minutes, you can use old coolers or just buy a new one in the store, the price for them is now a pittance.
We begin preparing the USB wire; to do this, cut off one half at the main cut and remove all the insulation. We will get four wires: two black and two red, we also strip them. If there are other green or white wires on the cooler, cut them off, they only get in the way. Learn how to make a thermoelectric generator with your own hands.
This is how the guys in the video suggest we make a fan from a cooler. The method is actually simple, we don’t promise strong airflow, but working at the computer will be much more pleasant.
How to make a USB fan with your own hands using a motor
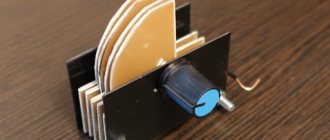
First of all we need to make the blades for our fan, we recommend using a regular CD drive, it looks great and is quite easy to make. Also read an interesting article where we make a laser level.
- We make 8 identical marks on the disk and cut everything along them.
- Then we heat up the disk and bend all the blades in the desired direction. To heat up the disc, just use a regular lighter, bend the blades carefully, if you do something wrong, you will have to buy a new disc.
- Now let's move on to the base of the fan itself, for this it is best to take cardboard and bend it into three parts, or a cardboard base, for example, wrapped in cling film.
- We glue a special mount to the disk.
- We make the base of the case more stable; you can attach a regular disk.
- We hide all the wires and bring one out (to connect to the network).
- We attach the motor to the paper tube and immediately attach it to the base.
- We attach the blade to the engine.
- Now we connect the wires from the motor with a USB cable, as described above.
- This is the final result; if desired, the cardboard base can be painted over or decorated in some way.
Here are the guys with the video showing a really cool method. In a similar way, you can make a fan out of paper, but remember, the paper must be thick; it is optimal to use cardboard.
It will be interesting to know: Do-it-yourself water leakage sensor.
Source: https://dekormyhome.ru/remont-i-oformlenie/delaem-mini-ventiliator-svoimi-rykami.html
Advantages and disadvantages
Of course, this technique has its advantages and disadvantages. The advantages include:
- compactness;
- ease of use;
- the ability to make a USB fan with your own hands;
- multifunctionality.
There are very few disadvantages. For example, if you do not know how to handle technology and electronics, you should not make your own USB fan. In addition, mini models (plastic) are not adjustable in the direction of air flow. More precisely, it is possible to solve this problem, but it will require special efforts.
As for bending fans, the only downside is that all functions work together. For example, if you have a model with light bulbs that are needed to illuminate the keyboard, you will have to constantly endure a directed air flow. Turning off the fan and leaving only the lighting will not work.
How to make your own USB fan? To do this, take the power supply and remove the cooler from it. Now find the wire with the connector, and then connect it to the “blades” by color: red to red, black to black. The joint must be soldered and insulated. Ready! If you did everything correctly, you can connect the unit to your computer. It will start working. This is the simplest and fastest option for making a fan yourself at home.
How to make a fan with your own hands, how to make blades
You are sitting at the computer, it’s summer outside, there is no air conditioning. My hand is already tired of endlessly fanning myself with newspaper, and sweat from my forehead is dripping onto the keyboard.
Common situation? If you don’t have extra money, a homemade fan will help. To make it, you don't need to run to the store for parts. Everything you need for a leaf blower is in the house.
Don't know how to make a free fan at home? Follow the text!
What does an air cooler consist of:
- engine
- fan blades
- stand
- power supply
The last point can be omitted if you make a USB fan with your own hands. The computer has a voltage of 5 volts. You will need a printer cable, an old mouse, or any unnecessary device with a USB cable.
If you are a fan of DIY projects, you probably have some useful junk in your house. Otherwise, you have no need to know how to make a fan yourself.
Can't find an electric motor in a box of unwanted parts? You can make a fan from a motor from an old disk drive or a broken toy. Let's look at a few examples of how to make a mini fan from scrap materials.
Glue, cardboard, toy motor
To make a small propeller you will need a piece of corrugated cardboard 30x30 cm.
We glue the support in 2-3 layers, the area is at least two palms. We make the rack for the engine in the form of a prism 10–15 cm high. For cutting, we use a stationery knife. We bend the structure along a ruler.
How to make a mini fan durable and stable? Let's use a glue gun. No other glue will allow the connection to be made as reliably.
Next comes the most difficult part: the propeller. The center sleeve does not have to be made of wood or plastic. We cut it out of the same cardboard.
We connect with hot glue, and as thickly as possible: the structure should turn out to be monolithic. The blades can be made from thinner cardboard. The packaging for a mobile phone accessory is suitable.
This is the most critical element: the blades must be absolutely identical in shape and weight. Otherwise, your propeller will vibrate during operation and will quickly fall apart.
We glue the blades (carefully) onto a cardboard sleeve, observing aerodynamics. The planes should be rotated 30–45 degrees in opposite directions. To simplify the design, we assemble a USB fan with two blades with our own hands. They are easier to balance, and such a propeller can cope with cooling no worse than a three-bladed one.
Test run and balancing
We make a hole in the very center of the bushing (using an awl), place it on the motor axis, and carry out a test run. Of course, before assembly it is necessary to coordinate the angle of attack of the blades with the direction of rotation of the motor.
Otherwise, the fan will blow in the opposite direction. If there is vibration, the propeller can be easily balanced by simply lifting the blades. After making sure that the propeller rotates smoothly and blows where required, we glue the motor onto the stand.
Don't spare glue!
We connect the USB cable to the power wires of the engine. Of course, it is better to do this with a soldering iron, but given the scanty power, you can get by with simple twisting. The main thing is not to forget to insulate the connection using electrical tape or tape.
How to determine the power pins of a USB cable
Any USB connector consists of 4 pins. We are not interested in averages, these are information wires. The 5 volt power supply is on the outermost contacts. Wiring in the illustration:
If you reverse the polarity, nothing bad will happen. The motor will just spin in the wrong direction. How to determine the motor supply voltage? There is no need to look for markings. If the toy (where it was installed) is powered by three batteries (1.5 volts each), then the motor is 5 volts. If it runs on two batteries, it will not be suitable for USB power.
CD
Don't know how to make an efficient CD fan? It's easier than it seems. We divide the disk into 8 sectors. An even number of blades is easier to balance if axial runout occurs.
We cut out the blades with ordinary scissors. You can do this work with a construction knife, or melt the sectors with a soldering iron - there is not much difference. If you accidentally break a CD, get a new one.
The extra segments are broken out, the rest are given the aerodynamic shape of a propeller. To do this, just heat the workpiece over a candle or using a hair dryer. If you make a mistake with the geometry, you can always correct the situation by reheating. This is the advantage of crafts made from a CD.
In the center of the structure we glue a thickening: any piece of plastic 5–10 mm. We drill a hole in it for mounting on the electric motor shaft.
Where to get an electric motor
This design uses a drive from a floppy drive. Power supply is 5 volts, speed is moderate. Most likely, you do not have a separate disk drive collecting dust on a shelf; it can be found in the system unit. Nobody uses floppy disks anyway, you can safely disassemble it for spare parts.
The convenient flat motor housing allows you to assemble the fan on a flexible leg. To do this, twist a piece of single-core copper wire into a pigtail and attach it to the power cable using electrical tape.
The motor with the propeller is glued to the flexible stand either with hot glue or wrapped with the same electrical tape. Unless you're entering a fan design competition, you don't have to worry about aesthetics.
After spending 2–3 hours, you get a convenient, portable “device” that can be installed anywhere without leaving your computer.
Advantages and disadvantages
After consulting customer reviews, we have compiled a list of advantages and disadvantages that USB fans have.
There are many more benefits.
- Small dimensions - thanks to this, the accessory can accompany you anywhere. At home, in the office, on short trips.
- Easy to use – just connect the fan to an energy source via a USB cable and press the “on” button.
- Low price - the cost of accessories varies from 100 to 1 thousand rubles, depending on the model.
- Large selection - a wide range of models will allow you to choose a fan based on any requirements.
- Varied design - can be both strict and original. You can choose a model based on your preferences.
- Additional Features – Some fans have additional designs. For example, there are models with a clock, with backlight, or both.
Now a little more about the shortcomings, the list of which is not so wide.
- Low performance - when compared to conventional electronic fans. The USB accessory is designed to blow air over the face and neck of one person. It is not able to provide a sufficient level of comfort at high temperatures.
- Lack of settings - you cannot adjust the direction of air flow on mini fans.
- Complex operation – if a fan supports several functions, then they only work simultaneously. For example, you cannot turn off the rotation of the blades while leaving the backlight running.
Do not turn on the fan if it is not secured to the surface! Otherwise, you can harm both the mechanism and your own health. It is not recommended to leave fans without blade guards unattended, especially if you have children or pets. They might get hurt
An adult can get hurt through negligence. These rules apply to larger table fans. Mini models are not capable of causing serious damage
Mini models are not capable of causing serious damage.
It is strictly forbidden to cover a running fan with a cloth.
The mechanism may burn out or even cause a fire. Do not turn on the device if the power cable is damaged. If liquid gets on the fan, it must be turned off immediately and not turned on until it is completely dry.
How to make a USB fan using improvised materials
Very often, in the sultry heat, there is not enough air flow in the room.
To solve this problem, many people buy table fans; they are convenient and compact, some of them work from USB, that is, they can be connected to any charger, power bank or laptop, so that the coolness is always with you.
But why buy something that you can make yourself using available materials? For readers of the site, we have prepared two simple instructions that will clearly explain how to make a USB fan at home with your own hands.
So, all you need to prepare is a sharp knife, good scissors, electrical tape, an unnecessary USB cord and, in fact, a homemade executive body. As for the latter, it is customary to use one of two options: an old cooler from a computer or a motor from a car or other toy.
Idea No. 1 – Use a cooler
It will take no more than 15 minutes to assemble a USB fan from a cooler. First you need to prepare the cooler. Two wires come out of the device - black and red, and sometimes yellow, even less often - blue. Yellow and blue are of no use to us.
We strip the insulation by 10 mm and put the prepared element aside.
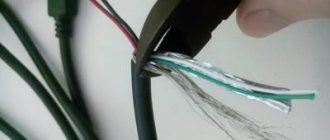
Next you need to prepare the USB cable. We cut off one half of it and clean off the insulation at the cut point with a sharp knife; a stationery knife works perfectly. Under it you will see four wires, of which two are necessary: red and black.
We also clean them, but it is better to cut off the other two (usually green and white) and insulate them.
Now, as you understand, you need to connect the prepared contacts in pairs, according to the color marking of the wires: red to red, black to black using twisting.
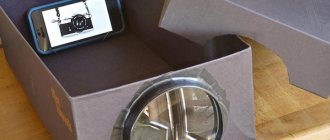
After this, you need to carefully insulate the cable connections using electrical tape or heat shrink and make a stand. As for the stand, it’s up to your imagination.
Some people successfully use wire, while others cut out a nest in a cardboard box in a very interesting way.
In the end, a homemade mini fan is connected to a computer or charging unit, and you can enjoy the operation of your own electrical appliance.
Idea No. 2 – Use a motor
In order to make a USB fan from a motor and a CD, it will take a little more time, but you can still easily make such an electrical device with your own hands in an hour. A motor for such a homemade product should be chosen with an operating voltage of approximately 5 Volts, maybe a little more.
If you take the motor to a lower voltage, too much current will flow through the circuit and the motor will quickly fail.
First, we prepare all the elements of the device. In this case, you will need to make an impeller (blades).
To do this, we recommend using an ordinary CD. We draw it into 8 equal parts and carefully cut it with good scissors, almost reaching the center. Next, we heat the disk (it’s convenient to do this with a lighter), and when the plastic becomes more elastic, we bend the blades at an equal angle (as shown in the photo).
If the impeller is not bent enough, then no air flow will be created during the rotation of the disk. However, if you overdo it, the homemade product will also work poorly and unstable.
When the blades are ready, move on to creating the main mechanism. Inside the disk you need to insert an ordinary champagne cork, cut to the required size, which must be placed on the motor shaft. Next, we move on to creating a USB fan stand for a laptop.
Here, as in the previous version, everything depends on your imagination. Of all the available means, the option with wire is the most suitable. When the homemade USB fan is ready, we connect the motor wires to the USB cord wires, as in the previous version, carefully isolate the twist and proceed to testing.
Visual video instructions:
As you can see, in order to make a fan from a cooler or a motor from a machine, it does not require much time and skills in working with electrical appliances. Even a beginner can cope with this task! Be sure to watch the videos we provide, they will help you better understand the principle of operation. If you have any questions, feel free to leave them in x.
Source: https://samelectrik.ru/kak-sdelat-ventilyator-usb-svoimi-rukami.html
Models
On the shelves of specialized stores you will find a wide variety of models from manufacturers. Such abundance can make your eyes run wide. Which one should you choose so that it can serve faithfully for at least one hot summer? There are a number of criteria by which you need to choose USB fans.
- The intensity of the airflow depends on the size of the blades. If you need a fan that will blow on you specifically, and not the whole workplace, choose a device with small diameter blades.
- Amount of noise. Depending on the power, fans can create different noise levels. The maximum, as a rule, does not exceed 30 decibels. Such sounds can distract you from your work and make it difficult to concentrate.
- Security level. We have already discussed the possible consequences above.
And, of course, the price. Choose a fan based on your financial capabilities. We will tell you about the models that, according to customer reviews, have become the best this summer.
Ambielly is an example of a good table fan. Using a meter cord, it can be connected to any device with a USB input. Equipped with a stand and an adjustable head, so you can adjust the air flow yourself. One of the main features of the model is the built-in battery. So the fan can work for some time without being connected. It also makes virtually no noise.
Tacson is a flexible mini fan with an interesting appearance. We can say that it is equipped with a built-in clock, although it is also one. The fact is that the blades have green and red LEDs, which form a dial during rotation. By the way, they are made of soft materials and are not capable of causing harm if accidentally touched.
Prettycare is the quietest fan available. It is ensured by an oil-free axial motor and anti-vibration cushions. Another advantage of the model is the presence of a stainless steel mesh, which guarantees safety during operation. The air flow can be adjusted as desired.
IEGROW is the most highly rated accessory by customers. It can not only cool the air, but also humidify it. Has several operating modes. The model is also equipped with a battery to operate without being connected to power. The fan can work not only while standing in one place. The case has a convenient carrying handle. The model is almost silent.
How to make a USB fan using improvised materials?
So, all you need to prepare is a sharp knife, electrical tape, an unnecessary USB cord and, in fact, a homemade executive body.
As for the latter, it is customary to use one of two options: an old cooler from a computer or a motor from a typewriter.
Next, we will look at two instructions that will clearly explain how to make a USB fan at home with your own hands!
Idea No. 1 – Use a cooler
As a rule, it will take no more than 15 minutes to assemble a USB fan from a cooler. First you need to prepare the cooler. There are two wires coming out of the device - black and red. Strip the insulation to 10 mm and set the prepared element aside.
Next you need to prepare the USB cable. Cut off one half of it and peel off the insulation at the cut point. Under it you will see four contacts, of which two are necessary: red and black. You also clean them, but it’s better to cut off the other two (usually green and white) so that they don’t get in the way.
Manufacturing.
We cut out the connector on the USB cable that we don’t need.
2.
Carefully remove approximately 3 cm of outer insulation from the cord so as not to damage the wires located inside. Usually, with a fairly sharp knife, apply slight pressure, around the wire and then pull out the cut part.
Under the insulation there are usually just 4 wires
In my case, the wire is shielded and in addition to 4 wires there is also foil and the screen itself, but this is not important
We cut off everything unnecessary, leaving only the red and black wires
And carefully strip the remaining wires by approximately 1 - 1.5 cm.
5.
We cut off the connector from the fan.
In my case, the fan is without a sensor, so there are only 2 wires, but if the fan is with a speed sensor, then there may be 3 wires (a yellow one is added) or 4 wires if the fan is controlled, as a rule these are processor fans
It doesn’t matter how many wires you have, but if there are more than 2 of them, then just like with the USB cord, we leave only red and black (if there is no red, then yellow and black.), we bite off the rest a couple of centimeters at a time
), we bite off the rest a couple of centimeters.
And carefully strip the wires from the fan in the same way as on the USB cable, by 1 - 1.5 cm.
Twist the black and red wires together. DON'T BE CONFUSED! BLACK SEPARATELY! RED SEPARATELY!
What you will need
1.
The main thing we need is the fan itself. Any fan for a system unit or processor will do, the main thing is that it has a stable design and can be placed on something. As an example, I took a 12 cm fan, without a sensor, for a system unit.
If you have a choice, it is best to take fans with the highest possible rotation speed, since the power supply for such fans requires 12 V, while the USB port only has 5 V power and, accordingly, the rotation speed will be slower. Rotation speed is measured in revolutions per minute (RPM) and can usually be found on the fan packaging or from the retailer, sometimes it is indicated on the fan itself. In my case, a fan with a rotation speed of 1200 RPM, when connected to USB it will be somewhere around 500-550 RPM, which is extremely low and only enough to create a small draft :). It is advisable to take fans with 2500 – 5000 RPM (some can operate up to 8000 RPM).
2.
Next, of course, you will need a USB cable
Any cord with a standard USB plug on one side will do, and it doesn’t matter which connector on the other, we’ll cut it off anyway
This could be a cord from an old printer, mobile phone, mouse or keyboard, in general, from anything. The length of the cord should not exceed 2m.
3.
We will need any insulating tape.
Well, or as a last resort, the great and irreplaceable one is adhesive tape, but I highly do not recommend it.
Homemade gas heater
The main advantage of this model is that its production requires a minimum of parts, which can always be found in the household of any craftsman.
Preparation of materials and components
To make a gas heater for the garage, you need to prepare in advance:
- burner with valve;
- tin sheet;
- metal scissors;
- drill with a thin drill bit;
- rivets;
- riveter.
To make the grille, you will need a piece of fine-mesh metal mesh. It’s great if you have a regular wire colander sieve on hand, it will act as a protective grid.
Collet cylinders are convenient because when using them, you don’t have to use up all the contents at once. The presence of shut-off valves allows the devices to be used repeatedly.
If desired, the heating structure can be made using not only disposable cans used for refilling lighters, but also using a small refilled cylinder.
Cutting blanks and assembling the structure
When making the structure, the first thing to do is fix the heater to the burner.
Four rectangular ears are added in the direction of the four sides of the workpiece applied to the galvanized sheet. One of the ears should be made twice as long as the others. The blanks are cut along the intended contour, trying to make smooth, burr-free cuts.
The burner is screwed to the cut-out tin blank using bolts. The ears located on four sides of the workpiece are bent in the opposite direction and used to fix the strainer.
To attach the second protective mesh, take another piece of sheet metal and cut out a circle of exactly the same size from it. Elongated ears are added to the workpiece, necessary for attaching the mesh.
Stepping back half a centimeter from the edge of the circle, drill 10 through holes along the circumference. A strip is cut from a piece of fine-mesh metal mesh, the length of which corresponds to the diameter of the cut tin blank.
The bent ears of round tin blanks are fixed to opposite sides of the mesh strip using a riveter and rivets. When assembled, you should get a cylinder with mesh walls and tin ends.
At the final stage, all that remains is to turn on the gas water heater and check its performance. The heat produced by this small device is enough to heat a small room or garage.