A chandelier is one of those interior items that people begin to become familiar with almost from birth. A baby lying in a stroller or crib looks with interest at a beautiful glowing device on the ceiling. Any large room in an apartment or house is necessarily equipped with a chandelier, which is fixed in the center of the ceiling. It not only becomes an interior decoration, but also allows you to evenly distribute the lighting load throughout the room. To vary the illumination of a room, chandeliers with 5 or more bulbs are most often used. Such lamps will be discussed in this article. Let's talk about how to connect a chandelier with 3 wires, what is needed for such work and can this be done by a person without special electrical engineering education?
Device
The modern market offers a wide range of lighting devices with intricate designs, a large number of LEDs or lamps, with remote controls. However, most people still prefer to install a five-arm chandelier in their living rooms.
If such a chandelier is connected to a single switch, this will entail a large consumption of electricity. Agree, it is not always necessary for all five horns to glow in the room; sometimes two or three are enough. Therefore, the most popular connection diagram for a chandelier with a double switch is considered. It is this kind of circuit that we will talk about below, and before connecting the chandelier to a household two-key switch, let’s figure out what such a lamp consists of and how it is designed.
First of all, this is a basic design with 5 horns. Regardless of where the lamps are directed (down or up), the fastening of sockets and lampshades with horns is carried out in the same way - using threaded connections. Each horn at the end looks like a threaded tube; a decorative cap is attached to it using a nut. But very often the fastening occurs due to the bottom of the cartridge, which is screwed onto the horn thread. You need to connect the wires and screw the light bulbs into the socket; this is where their direct contact occurs. Lampshades serve to diffuse light and also perform a decorative function; most often they are made of metal, glass or plastic.
The wires on the chandelier most often run inside the metal structure. The lampshades are attached to the lamp body using latches, bolts or a plastic ring that is screwed onto the thread of the socket. A 2-wire wire runs from each socket inside the horn to the connection box of the lamp.
You can install a variety of lamps on a chandelier - incandescent, fluorescent, LED, energy-saving.
A power supply or ballast for starting LED and fluorescent lamps can also be installed in the chandelier body.
There are chandeliers equipped with reflectors that have a white or mirror surface and create directional light.
You can learn more about how to choose a chandelier and lamps for it in this video:
How to connect spotlights
One of the most common types of LED lamps installed on a ceiling surface are spot models. Their installation can be carried out using several methods:
The first two options are best suited when the ceiling in the room is made of difficult-to-process monolithic material, for example, reinforced concrete. Built-in, on the contrary, is ideal for a tension or suspended structure.
Depending on the material of the ceiling surface, its features and thickness, the following methods of installing LED lamps are used:
- For floor slabs on a monolithic reinforced concrete base - fastening wires, hooks and staples. Suitable for wall-mounted lighting fixtures. Fixation of the device into the material is carried out using special anchors and dowels.
- For a base with a small cross-section - fixing elements with fastening on the outside. To hang the lamp, the ceiling is drilled through, hooks with stop plates or bolts with similar washers (where possible) are inserted into the hole.
- For wooden planes - a hook with a thread.
- For hanging options - a system of mounting adapters located under the material (plasterboard, PVC panels or films and fabrics).
As a rule, spotlights are installed not one at a time, but immediately in a chain in accordance with the diagram:
When choosing the installation option in a suspended or suspended ceiling, first of all, install the wiring, drivers and control equipment in places with good ventilation. Then, in accordance with the location of the mounting adapters and holes for LED lamps, the material itself is suspended. After this, lighting devices are installed.
Useful tips Connection diagrams Principles of operation of devices Main concepts Meters from Energomer Precautions Incandescent lamps Video instructions for the master Testing with a multimeter
Tool
Before connecting a chandelier with three wires, prepare the necessary tools:
- Indicator screwdriver (it will be needed to determine phase and zero).
- Pliers with insulated handles.
- Knife (to remove insulation on conductors).
- Multimeter.
- Insulating tape.
- Screwdrivers (flat and Phillips).
- Wire cutters.
- Marker.
Devices with which the wires will be connected. These can be special blocks in which the connected wire is clamped under a screw, spring or connecting insulating clamps (PIC). Well, don’t forget, of course, about the stepladder.
Safety precautions
When connecting a chandelier or any electrical work, you must be careful and be extremely careful. Receiving an electrical injury causes cardiac arrest, and a spasm of the respiratory muscles may occur. The rules are quite simple:
- Any work is carried out only when the power is turned off, even if it is necessary to change the light bulb;
- The voltage is switched off at the common input circuit breaker of the residential premises. Clicking the switch keys is not enough, since the initial connection may be incorrect;
- All instruments must have handles covered with insulating material and no signs of damage;
- Before starting work, you must make sure, using an indicator screwdriver, that there is no voltage;
- It is advisable to lay a dielectric mat under your feet, or use a material that does not conduct electricity.
Purpose of wires
Before connecting an indoor chandelier with a two-key switch, let's figure out how many wires we need and why each of them is needed.
example of instructions for assembling a chandelier (click to enlarge)
Any lighting device must have a passport with the diagram indicated in it. Study it carefully, it describes the purpose of the wires by color. As a rule, the phase is made in white or brown, the blue wire means zero, and there may be a third protective ground wire, it is usually made in green or yellow. In total, 4 wires should come out of the chandelier - zero, protective grounding and 2 phases.
If there is no passport for the lighting device, then we will decide for ourselves where the phase is and where the zero is.
So, you have a hole in the ceiling from which three wires protrude, one of them is neutral, and the other 2 are phase wires from a two-key switch. If your chandelier has a protective grounding, then there will be a separate fourth wire for this.
- Turn off the power supply to the apartment and set the double switch keys to the “Off” position.
- To avoid short circuits, separate the three wires that stick out from the ceiling at a distance from each other to the sides.
- Remove the insulation from each core by about 1 cm.
- Apply voltage by turning on the circuit breaker and then the switch. Touch each core with an indicator screwdriver; the one on which the indicator does not light up will be zero. Mark it with a marker.
- Now turn off the keys on the switch one by one and check the presence of the corresponding phase.
Determine the purpose of the cores in the lamp using a multimeter:
- To begin, set the device to the “Dial” mode and short-circuit the probes for 1 second. An audible signal should sound, this means that you have chosen the correct measurement limit and the device is working.
- The socket has 2 contacts, one of them is phase, it is springy and is located in the center, the second is zero, it is located on the side (when the light bulb is screwed in, it touches it with its base).
- Also strip 1 cm of all four wires extending from the chandelier.
- Now we need to find the zero core. Place one multimeter probe on the zero (side) contact in any of the cartridges. Using the second probe, touch the stripped wires in turn. As soon as you hear a beep, it means that this core is the zero wire, also mark it with a marker.
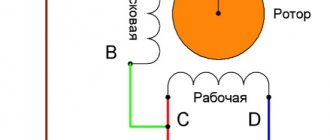
- In a similar way, determine the correspondence of the two phase conductors extending from the lamp. This time, use the multimeter probe to touch the central phase contacts in the sockets one by one. In a five-arm chandelier, one phase core is connected to three sockets, and the second goes to the remaining two.
- To check the grounding wire, you need to touch it with one probe and the metal body of the lamp with the other; a sound signal will confirm the correct choice.
The most common mistakes in connecting a chandelier
Errors during installation and connection occur not only among novice electricians; even among experienced specialists, it often happens that the chandelier does not shine at all the way it should. These mistakes are typical and banal.
Incorrect connection of double switch
This is the most common mistake, which consists in connecting the incoming phase wire to one of the output contacts of the switch. With such a connection scheme, the chandelier cannot function normally, since one section of the lamps turns on only if voltage is applied to the other section. That is, if the incoming phase is connected to the left contact of the switch, when the left key is pressed, the phase enters the distribution box through the lower input contact and turns on one section of the lamps. The next time you press the right key, another section is turned on. But when you open the left key, all sections are turned off.
When the left key is pressed, it is impossible to turn on the right key.
The reason for the dependence of the right key on the left is that initially the phase entered through the input contact of the left key switch, and the left key, when turned off, breaks the phase in both sections at once.
To eliminate this error, you should swap the connections of the incoming and outgoing phases of the switch.
Instead of a phase wire, a neutral wire passes through the switch
According to the rules of electrical installations, there is a procedure for connecting a switch that closes and opens the circuit by breaking the phase. How does it look on the diagram? The neutral wire, bypassing the switch, is laid from the distribution box directly to the neutral wire of the ceiling lamp. The phase wire from the junction box passes through the switch key, which breaks the circuit.
However, in practice, sometimes an incorrect connection occurs: it is not the phase wire that passes through the switch, but the neutral wire. That is, when the switch key is turned off, the electrical wiring remains energized, despite the fact that the lighting is not on. This is fraught with the possibility of electric shock when replacing a lamp, if you accidentally touch the exposed parts of the chandelier shade, or if the insulation of the wire is broken.
Therefore, if possible, it is advisable to eliminate such a connection error.
This violation of the connection diagram can be detected using a voltage indicator, which, when the switch is in the “off” state, shows the presence of a phase on the ceiling wires.
Incorrect connection diagram for the neutral wire of the chandelier
This error is the reason that only part of the light bulbs in the chandelier turn on normally, the rest either shine weakly or do not turn on at all. As previously discussed, if there are three wires, the phase wires are each connected to a separate section of light bulbs, while the neutral wire is common to all light bulbs, which are all connected to it in parallel. If you mix up the wires and connect the interconnected light bulbs, say, of the first section to zero instead of the phase, and connect all the light bulbs of both sections to the phase (instead of zero), then when you press the first key in the first section, the light bulbs will turn on, since they go there at the same time both zero and phase. When you press the second key in the second section, the light bulbs will not light, since both incoming wires will be phase, and in order for the light bulb to shine, a phase with zero must be supplied to it at the same time.
Single-key switch circuit
First, let's look at a simpler diagram - how to connect a three-arm chandelier with 3 wires. Here are three detailed step-by-step instructions. First, check the equipment of your lamp:
- Having opened the original packaging, immediately find the list of kits included in the chandelier and check the list for the presence of all components.
- Find the bracket that will attach the chandelier to the ceiling. It is a strip that is directly screwed to a wooden base in the ceiling, and the chandelier cover will be attached to this strip.
- Check the presence and integrity of all lampshades.
- Next, there should be a device (you can call it a chandelier connection box) in which the wires will be disconnected, three horns are attached to it, and this mechanism itself is connected to the bracket cover. A double wire (phase and neutral conductors) is pulled through this device. One end of it will be connected to the phase and neutral conductors, which come out of the hole in the ceiling, the second end is intended to connect to the conductors in the horns.
- Usually the third grounding wire comes separately with the lamp. On the metal case (most often on the lid) a special icon indicates the place where the protective grounding should be connected.
- Check for the presence of three horns; cartridges should be attached to them and a phase and neutral conductor should come out of each.
Now let's look at how to connect the wires in a chandelier:
- Take one horn and the connection box of the lamp where the connection will be made. Two wires come out of the horn (blue - zero, brown - phase). Pull them through one of the three holes and secure the horn.
- Do similar actions with the other two horns.
- As a result, in the connection box of the lamp there were 6 wires from the horns - three blue and three brown, and a double 2-core wire that will be used to connect to the network.
- Strip the insulation on all 6 wires from the horns and on the double wire.
- Connect the three blue wires to one core of the double wire, and in the same way connect the three brown wires to the second core of the double wire. Do this using twisting, you can also solder it on top. Put on the insulating caps, as a rule, they are included in the kit.
- Carefully lay all the wires in the connection box of the chandelier and close the lid on top.
- Connect the protective ground wire at the indicated location.
All that remains is to connect our chandelier with three wires to the network:
- Before starting the electrical part of the work, de-energize the room by turning off the power supply.
- Attach the mounting frame to the wooden structure in the ceiling using ordinary wood screws. This must be done as firmly and reliably as possible, because the bar will have to support the full weight of the chandelier.
- To avoid having to redo anything later, immediately try on the lamp, lightly tightening the decorative bolts. Look, if you are satisfied with everything, then unscrew the bolts and start connecting the wires.
- It is advisable to do this work with a partner, so that one person can hold the lamp to be connected, and the other can handle the connection. If there is no partner, then secure the lamp to the installed bar, tightly tying it with a cord or a piece of strong wire.
- Start by putting self-clamping terminal blocks on the wires sticking out of the hole in the ceiling. Then connect the corresponding lamp cores to them.
- Now turn on the machine and switch to check proper operation. If all three lamps light up, turn off the switch, the circuit breaker and finish the job by finally screwing the lamp to the bar.
Now you know how to properly connect a chandelier with three arms, let's look at a more complex option - connecting a chandelier to a double switch.
What will you need for work?
To properly connect a light fixture with three contacts, you will need the following set of tools:
- Voltage indicator
- Pliers
- Multimeter
- Knife
- Insulating tape
- Terminal block
- Marker
- Ladder
Pliers are needed to strip the insulation from all contacts. You will also need a passport for the chandelier. Instead of a voltage indicator, you can use an indicator screwdriver; instead of a stepladder, you can use any stand high enough to reach the ceiling without complications. The terminal block must have 3 terminals.
One of the terminal block options
When all the necessary tools have been selected, we can begin work, for which we are completely ready.