Loggia and balcony are increasingly used not as auxiliary, but as full-fledged living space, for which they are insulated and illuminated. The area being remodeled is small, but the organization of its illumination has its own nuances. We’ll figure out how to correctly install lighting on a loggia or balcony, how to choose light sources and arrange them effectively and conveniently.
Local illumination Source roomble.com
How to choose a connection point
In most cases, lighting on balconies and loggias is not initially provided, so the first thing to do before repairs is to choose a connection diagram (location) and decide on the type of lighting fixtures. You can connect your new living space to electricity from three sources.
From the apartment switchboard
The most complex option, but you can’t do without it if you are planning a complex lighting system, plus connecting household appliances. The socket will be removed if the room is warm (with insulation, full finishing and warm glazing), and a convector will be used for heating.
Lighting is installed at the renovation stage Source rusenergetics.ru
Connection from the apartment panel is only possible if repairs are taking place throughout the entire house. The process is expensive and time-consuming, because the wiring will have to be pulled through the corridor and rooms. For such work, you need a person with professional knowledge who is able to select wires of the required quality and with the required number of cores. Connecting on your own can be problematic and even dangerous.
If you are not going to undertake a full-scale renovation with replacement of wiring throughout the entire apartment, you should refuse to connect directly to the junction box, especially since there are more affordable options.
Loft style lamp Source abstinencedu.com
From the nearest room
A simpler and more economical way to provide a balcony with electricity is to use the power of the next room, and there are two ways:
- Through the installation box. The task is somewhat simplified: a new line is drawn from the junction box in the wall of the nearest room. If the wiring is old, there may be problems with additional load in the network: it may not be able to cope with connecting new electrical equipment.
- The simplest and most economical option is to connect to the nearest outlet (daisy chain connection). It is especially convenient if the installation box is located far from the balcony; you will eliminate the need to run wires around the room.
Garland on an open balcony Source pinimg.com
Open balcony lighting
Lighting on an open balcony
The main difference between an open balcony and a living space is the aggressive impact of weather factors on lighting devices and other elements of the power supply circuit. Therefore, to illuminate open structures, closed lamps with a sealed housing are used.
If in the intended installation location moisture will fall directly on the lighting device, then the degree of moisture resistance should be maximum. If during installation it will be covered by a canopy or a balcony located above, models with IP44 rating will be suitable.
How to choose the type of lamps
For a standard balcony with a more than modest area, one light source is quite enough. To illuminate the loggia, you may need more of them, especially if several functional areas or decorative lighting are planned. But in any case, when choosing the type of lighting, they start from whether the balcony will be open or warm (glazed).
In order to make an open balcony or loggia cozy, you cannot do without lamps designed for outdoor (street) lighting. For reliable operation in conditions of fluctuating temperature and humidity, you will need devices with a moisture- and dust-proof housing and markings within the limits of IP-53-IP-54. On balconies without insulation, the temperature regime is not much different from the street temperature, so outdoor models are also suitable here.
Hanging chandelier in Provence style Source j.etagi.com
The choice of lamps for insulated rooms is limited only by the budget, design and taste of the owners. The following types of devices are used for lighting:
- Ceiling . They are divided into pendant (chandeliers) and built-in (shades, spotlights) lamps. Hanging models are appropriate only on a large loggia, where they do not hide the space so much and can become an original accent. Built-in models require a false ceiling made of plasterboard or panels. A good solution would be a track spot system: a lamp with a compact arrangement of two or three directional light sources.
Chandelier in a modern interior Source of peace-comfort55.rf
- Wall mounted . Wall lighting (in the form of various sconces) is suitable for highlighting zones and creating an environment conducive to relaxation. For a small space, a couple of compact lamps are enough; a traditional sconce can be replaced with a modern model of directional light. Sometimes a garland plays the role of wall lighting; it can be formed by incandescent lamps or decorative LED lamps (Edison). The latter externally imitate traditional models, and can be used to decorate the interior in a retro or loft style.
Wall lighting Source sakh.com
See also: Catalog of companies that specialize in electrical work of any complexity
- Floor-standing . Used if you plan to create a cozy area for reading or relaxing. A floor lamp can be traditional or have a directional light function. Floor-standing models create a soft twilight that is pleasing to the eye and promotes relaxation.
Floor lamp in a bright interior Source inmyroom.ru
- Tabletop . If a table becomes a mandatory attribute of a balcony or loggia, you cannot do without a table lamp. Depending on the purpose, whether it will be a desktop or a place for your favorite hobby, a modern, classic or designer model is chosen. If there are shelves or a rack near the table, a lamp on a clip (on a clothespin) may be a suitable solution.
Workplace of a creative person Source pinimg.com
Types of lamps
Modern models of lighting devices are divided into several types:
- ceiling They allow you to get fairly powerful lighting, while also acting as a decorative element;
- wall-mounted Such models are designed to create a warm and cozy atmosphere in the recreation area. As a rule, they are presented in the form of a complex multi-layer structure with forged elements;
- floor lamps. Basically this is a floor lamp or floor lamp. The model is used as an additional light source. It is suitable for reading and cozy gatherings.
For an open balcony, the most suitable models are ceiling or wall lamps.
How to choose a lamp
If the main thing for lamps is that they are not afraid of moisture, then no restrictions are imposed on the choice of lamps. Any types of lamps are suitable for organizing lighting on the balcony; this has no effect on the design. Another thing is the technical characteristics: the advantages and disadvantages of each type must be analyzed independently. Proven solutions include the following categories of lamps:
- Incandescent lamps . They remain a popular option, despite the significant electricity consumption and service life not exceeding 1.5 thousand hours. The popularity of the choice can be explained by habit and cheapness, as well as the relative variety of models. Transparent, matte and mirror varieties are available with a power range from 15 to 300 W.
Garland in a Scandinavian interior Source atischler.ru
- Luminescent . They are significantly more economical than incandescent lamps: with the same power, their luminous efficiency is 6-7 times higher. They also last longer (up to 8 thousand hours) and heat up less during operation. The disadvantage of fluorescent sources is their high cost and uneven glow, which can intensify over time and cause eye fatigue. Another significant drawback is the chemical hazard (they contain mercury).
- Halogen . They shine with the same brightness as Ilyich lamps, while consuming a minimal amount of energy. The working life is 8-9 thousand hours of continuous operation. An interesting feature of halogen sources is the variety of shapes and color temperatures of light. Lamps are interesting from a design point of view; they can produce diffused or directional light, but are more expensive.
Original lighting solution in the workshop Source okonti.ru
Wiring Tips
- The first and most important tip: if you have never conducted electricity, seek help from a professional
- All the work that you carry out on the balcony falls into the category of reconstruction or even redevelopment. This means that their implementation requires appropriate permission and subsequent approval by architectural and operational authorities
- Wiring on the balcony must be done with double insulated cables. When installing external wiring on open and “cold” glazed balconies, the cable must additionally be placed in special corrugated tubes. Electrical equipment protection class - at least IP 44
- In order not to complicate your life, balcony lighting needs to be thought out in advance - before insulation, cladding and arrangement
- Decide in advance on the function of the room. There is a big difference between lighting a study room and a winter garden
- Before starting work, be sure to draw a diagram of the future wiring: where the energy-consuming devices will be located, how much power will be needed for their operation, etc.
- Open wiring is easier to do than closed wiring, but it looks less aesthetically pleasing. This option is good if you plan to cover the balcony with panels behind which you can hide unattractive communications
As you can see, lighting a balcony is not such a simple matter. You need to have certain knowledge and skills to carry out all the necessary communications here. If you feel that you have the necessary competencies, all that remains is to choose the type of lighting and get down to business. If not, it’s better to seek help from a professional and just enjoy the result.
Organization of space
If a balcony or loggia is planned to be used as a technical, secondary space, then you can get by with one light source. It is convenient to place it centrally on the ceiling to obtain uniform lighting. A good option would be a model with an adjustable suspension, which allows you to direct the light flux in the desired direction and adjust the height of the lamp.
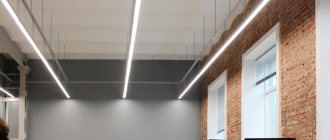
In other cases, to create full-fledged lighting, a comprehensive solution is required, especially for spaces with elongated geometry. On a narrow long balcony, you can install lighting only in the side part, but in order for it to be uniform, you will have to use both sides.
Lighting solution for narrow spaces Source prom.st
On a loggia, one source for improvement will also not be enough. If you use a ceiling model (chandelier or lampshade) as the main one, then the resting place will need its own light source.
Furniture (for example, a table and an armchair) and suitable lighting will help zone the space; on the loggia, the lighting design for the recreation area is selected based on convenience and personal tastes. It can be either a sconce, a table lamp or a model on a clothespin.
Winter garden on the loggia Source i-okna.ru
The first option is battery-powered lamps
Today, manufacturers can offer a very wide selection of battery-powered lamps. They can easily be used to decorate your balcony and add comfort to the most romantic place in your beloved home.
Advantages of this lighting method:
- A huge selection: you can find something for every taste, for any task and for any budget and for any interior.
- The light on the balcony will be where you want it: it’s easy to attach such a lamp in any place, even the most inaccessible one.
- Different options for operating the lamps: 1. on batteries (3 pieces = 100 hours of operation), 2. rechargeable batteries (can be recharged).
- There are two options to turn on the lamp manually or from a motion sensor.
- Easy to install: even a teenager can install it.
- Safely. You don’t interfere with electricity, which means you won’t be able to harm your health. There is only one downside: you will have to change the batteries, and not everyone likes this.
Briefly about the main thing
It is recommended to organize lighting on the balcony for anyone who plans to fully use this space. First of all, you need to choose the optimal connection diagram, then decide on the type of fixtures and lamps. To select suitable lighting fixtures, their technical characteristics, pros and cons, as well as compliance with the interior style are assessed.
Lighting helps you create your home or work environment to your liking. If the size allows, several functional zones are arranged on the balcony or loggia, providing each with a suitable light source.
Loggias and French balconies
“French” refers to small balconies, most often in the form of a small area fenced with a wrought-iron lattice. Where you can just stand. But the door to it is made as large and glazed as possible. But in our climate, you can more often find a small balcony with huge floor-to-ceiling windows.
The loggias stand apart. As a rule, there is much more free space here. You can use your imagination to the fullest and create a truly unique personal corner. And in almost any style. The main thing is that it matches the overall interior of the room to which the loggia is connected.
Connecting a full power line or powering it from an outlet
How to install electricity on a balcony at the lowest cost?
When equipping a room with lamps, one of the important tasks will be to determine the source of electricity. There are two ways:
- Simple - using the socket closest to the loggia or balcony, suitable for a balcony room with low electricity consumption;
- More complex is the installation of a full-fledged power supply line from the distribution box; this method allows you not only to connect lamps, but also to create power points for household appliances, which is especially valuable when organizing a work office on the balcony.
When using the first method, you should not choose energy-intensive lighting sources, this will create an excessive load on the outlet. The consequences can be disastrous - from heating the parts of the power point to a short circuit and fire in the room. The best option would be halogen or LED lamps.
The second option also has its drawbacks - you will have to carry out serious electrical installation work with gating the walls in the apartment, many are stopped by this fact - dirt, dust, the need for at least minimal skills in electrical installation. How to install light on the balcony is up to the owner, but one should not forget about safety standards.
Rules for choosing a location for an electrical outlet
For the normal functioning of household appliances, electricity must be installed on the balcony. Thanks to this, the room can be used for working on a computer. It can also be used as a workshop or TV installation. At the same time, using an extension cord will not be very convenient - it will not allow you to close the door to the room.
In this case, the ideal solution would be to install sockets and switches. When choosing a place for them, you need to take into account personal preferences. It is important to ensure convenient use and ease of installation.
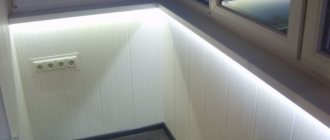
As a rule, the outer wall under the loggia window is considered the thickest. Therefore, making a hole for wiring there can be problematic. Installation is usually performed under the window - near the internal window sill. The wiring here will be invisible. There is no need to drill into the walls to install the socket. If this is not possible, you will have to place them on the side walls of the room.
If there is no electricity on the balcony, an LED strip will be suitable as lighting
The second option is solar panels
Many people want to use the free energy of the sun. Solar panels are a great option and alternative to wired electricity. Install solar panels on the balcony and you can illuminate not only the balcony. There are two options: buy a ready-made kit or assemble it yourself. Both cases have their pros, cons and nuances. Let's look at which ones in detail, and you can calmly and confidently make a choice.
First, let’s look at what is included in the standard package of a solar battery.
- Battery. Accumulates generated energy.
- Inverter. Converts direct voltage in the battery into alternating voltage, i.e. just like a regular outlet.
- Modular control system. Battery management is clear and simple.
- Semiconductor wafers. They convert solar energy directed at them into electrical energy. In the Russian climate, it is recommended to use polycrystalline modules. They are highly sensitive to low levels of sunlight. Such modules are laminated with durable material that protects the plates from snow, rain, temperature changes and other vagaries of the weather.
- Additional devices. The controller does not allow the battery to recharge. USB outputs are needed for charging lamps, phones, laptops, and small household appliances.
What you need to consider when purchasing and installing a solar battery so as not to lose money, time and nerves.
For a standard balcony, 4 polycrystalline panels are most often chosen. They are directed to the south side. Modules should not be shaded by neighboring houses or trees. In the summer, such a system is capable of generating up to 2 kWh of electricity per day, which is enough for energy-saving lighting not only for the balcony, but for the entire apartment. You can charge your mobile phone and laptop, or run a small refrigerator or TV.
It is important to consider the location of the batteries. There must be a positive temperature there. In winter, batteries can lose a significant portion of their charge due to exposure to frost.
It is also the most voluminous element of the system. It is recommended to place them under the ceiling. They will take up less usable space and maintain the aesthetic appearance of the balcony.
The location where you install the plates is important. It is advisable to do this on balcony glass. The plates will block sunlight from entering the room, but this is very beneficial on clear and hot summer days. Plus, protection from ultraviolet radiation will be provided. Can also be mounted in place of lower ones below the window frame structure.
It is best to place the inverter and control unit slightly below the batteries.
Legal question. Installing solar panels on a balcony does not require additional legal approvals as long as they do not disturb neighbors. If in doubt, just in case, contact the Housing Office or the Main Architectural and Planning Department and find out if there will be any complaints about changes in the appearance of the building. In a number of cases, when we are talking about houses that are objects of cultural heritage, architectural monuments, changing the appearance of the building facade is possible only after obtaining permission.
To finally weigh the pros and cons and make a decision, read about the pros and cons of solar panels.
Need to know: the pros and cons of solar panels
pros
- environmental friendliness - do not pollute the environment
- efficiency: inexhaustible and universally available energy. The sun is everywhere and will not go anywhere
- wear begins after 25 years of operation
- You're your own boss: no worries about power outages
- ability to increase power if space allows through additional plates
- does not depend on electricity prices, fuel supplies and uninterrupted energy supply
- industrial kit does not require special skills for installation
- the system does not require special care or constant attention.
Minuses
- Operating efficiency depends on weather conditions, climate and time of year
- difficult to calculate battery payback
- high cost of industrial kits.
This shortcoming can be corrected. Do-it-yourself solar panels will help with this. All details can be easily found on the Internet. The advantage of a solar battery assembled at home is its price. Compared to a factory panel with the same characteristics, the costs will be three times less. You will also take into account all the necessary technical nuances and your personal needs.
Now you know two simple ways to make balcony lighting without electricity. You don't have to undertake a grandiose renovation to turn it into a place of work or leisure. You can also share your experience with others.
Related article: How to beautifully decorate the inside of a balcony
If the article was useful to you, add it to bookmarks and share with friends.
Tell us in the comments about your experience with balcony lighting.
You might be interested
Description of design options
First you need to figure out how to provide lighting on the loggia. Therefore, I will tell you how to supply electricity or do without it altogether, yes, yes, this option is also possible. You need to choose the optimal solution for your conditions and repeat all the steps outlined in the corresponding section below.
Option 1 - open wiring
This option is used when the finishing is already completed or the surfaces are already sheathed with clapboard or other material.
For work we will need the following materials:
| Cable | I recommend using three-core copper options with a cross section of 1.5-2.5. Choose products with soft insulation so that they bend easily, this will simplify the installation process and reduce the likelihood of damage to the line during installation. All recommendations will be given to you in the store where you will buy the wire. |
| Cable channel | This is the name of the elements that are mounted on the walls and in which the wires are laid. These are a kind of pencil cases with an opening top, which can have different sizes, so choosing the best option will not be difficult |
| Fasteners | Cable channels and other elements of the system need to be secured; for this, self-tapping screws or quick-installation dowels can be used. It all depends on what material the walls on your balcony are made of. |
| Junction box | It is installed in the apartment and a branch goes out to the balcony. Choose the same option as installed in your apartment so that the designs are of the same type |
| Mounting boxes | They contain switches and sockets, and their number depends on how many such elements will be on the loggia. Boxes come in plaster or plasterboard or other finishes, choose the options you need |
| Terminals | The times of twisting and electrical tape are in the past; there are more modern and safer solutions that allow you to quickly and efficiently connect wires to each other. You need to count their number and remember to buy them along with the rest of the components |
Modern terminals have clamps that securely fasten all connections
To make light on the balcony, you will need a certain set of tools:
- Hammer drill – it will be used to chip the walls, and it will also help us drill a hole from the room to the outside. If you have walls made of brick or concrete, then for installation of mounting boxes you will need to make holes with a crown of the appropriate diameter;
- All measurements are taken with a tape measure, and markings are made using a pencil;
- Pliers, side cutters and screwdrivers are also needed when carrying out work; it is better to have a small set on hand, since you will never guess what you will need in a given situation;
It is advisable to have such a set in every apartment.
- A tester will be needed to determine the supply wire and, if necessary, diagnose problems in the circuit.
Now let's look at the workflow, the instructions for doing it look like this:
All steps of the process are very important, there are no trifles here
- First, you need to calculate the approximate voltage of all consumers that will be used on the balcony . This is very important, because if we connect to a weak line, big problems can arise. After this, you can decide which place to connect to; most often, the socket that is located closest to the balcony is selected;
To find out what wires are laid in your walls, you need to take a project that every homeowner should have and look at all the necessary information, everything is quite clear there and you can figure it out without any problems in a couple of minutes.
- Before wiring the light from the outlet, do not forget to turn off the power at the distribution panel, otherwise the installation may end at the very beginning. It is unlikely to kill you, but the desire to continue carrying out work will most likely disappear, and you will start calling electricians;
- You should not pull the cable directly from the outlet; it is better to run it into a junction box, which should be placed in the room and then pull the wire further from there . Grooves are made in the wall into which the wiring will be laid, this process is very dusty and very noisy, so choose the right time and do not forget to buy a respirator and safety glasses;
The junction box allows you to make the connection reliable and accessible for repairs in the future
- Next, a groove is made to the wall bordering the balcony, after which a through hole needs to be made in it (that is, the wall). I really hope that your house is not pre-revolutionary and you won’t have to look for a meter-long drill; for standard walls, buying a drill of the required length will not be difficult, it is better to take a product with a diameter of at least 12 mm, it is stronger and the hole is more convenient for pulling the cable through;
When choosing a long drill, pay special attention to its correct geometry; it must be perfectly level. It’s easy to check: roll the drill over a flat surface; if there are any curvatures, they will be immediately visible. I somehow forgot about this important nuance and, upon arriving at the site, I discovered that instead of holes, my drill was drawing circles on the walls.
In order not to drill the wall, you can make a hole in the corner of the plastic window block
- Along the balcony, the wire is laid in a cable channel; it should be brought to the locations of sockets, switches and a lamp or lamps. Elements are attached to concrete surfaces with quick-installation dowels, to plasterboard - with special types of dowels, and to wood - with self-tapping screws. Everything is quite simple and clear, it’s difficult to confuse something;
- With an open installation method, it is better to use surface-mounted switches and sockets; they are much easier and faster to install . Since there may be high humidity on the loggia, all equipment must have a moisture protection class of 4 or more (in the marking this is the second digit of the two-digit code), do not miss this factor when purchasing;
The easiest way is to use a block of socket and switch
- All connections are made using terminals, no twists or tape, do everything carefully, and the result will not be inferior to the work of professionals.