Most often, you may encounter the question of why an LED lamp is blinking after repairing or replacing conventional light bulbs with energy-saving ones.
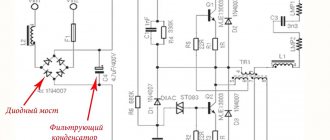
There are 6 different ways to solve this problem. But to find out the reason for this strange behavior of the lamps, let’s first delve into the theory. Here is one of the typical diagrams of an energy-saving lamp.
A voltage of 220V is supplied to the diode bridge. The result is a constant voltage of a certain ripple. To level out these ripples, capacitor C4 is used. It is this capacitor that is the culprit.
Switch backlight
The most important reason for blinking of switched-off LED and energy-saving light bulbs is the presence of backlight in the switch. When the switch is turned off, a small current still continues to flow through the backlight circuit, charging the filter capacitor. Having charged, the capacitor tries to start the lamp power circuit, but there is not enough “power” and it immediately discharges, and the light flashes briefly. Then it all repeats itself over and over again.
There are 6 common methods for eliminating the flickering of switched off energy-saving lamps:
- shunting with a resistor
- capacitor bypass
- connecting the backlight with a separate wire
- using a pass-through switch
- dismantling the backlight inside the switch
- connecting a conventional LED light bulb in parallel
Search for reasons
For many, it may be a mystery why an LED light bulb blinks when the light is off. After all, the user, by manipulating the switch, actually breaks the electrical circuit, and no more current actually flows to the consumer. There are several reasons why the ice light blinks in the off position.
Faulty Wiring Factor
When the LED lamp flashes at any arbitrary frequency, first find out where the power phase is connected: directly to the lampshade or to one of the switch contacts.
Connection diagram
The correct assembly of the circuit is considered to be the one in which the phase is broken in the switch. In another situation, the starting circuit will be at potential, and the lamps will constantly glare when they are off.
You can determine which contact is “phase” and which is “zero” using a multimeter or an inexpensive indicator screwdriver.
After correcting this situation, the problem may remain. In this case, interference in the network (induced voltage) helps to understand why the LED elements are blinking. The potential appears even on unconnected wires, but with another power line located next to it. It is worth taking care of replacing power cables if a switch is used in the circuit that does not have an indicator light.
Operation of backlit switches
When changing from an incandescent bulb to an LED system, what users experience is that the LED bulbs flicker. This occurs in the form of instantaneous flashes of low power. The effect manifests itself due to the passage of microcurrents in the network even in the “Off” position. The available electrical circuit is closed to the power source of the indicator light located in the switch. In this case, the capacitor gradually accumulates charge from such a network.
Illuminated switch diagram
Having collected a sufficient volume in microfarads, the capacitor transfers its charge to the LED consumers. The small power is enough for just one modest blinking of the LED lamps. Then after the discharge the cycle repeats again.
You can overcome this on your own. It is enough to solder a capacitor of the required capacity or resistor in parallel with the light source. Usually the circuit is placed at the rear of the switch or everything is hidden in sockets if there is space there. When the LED lamp blinks after turning off, install a capacitor with a capacity in the range of 0.11-1.1 microfarads, designed for operation at 630 V. It is preferable to choose models 105-630V or 104-630V will do. Both of them are metal film. The advantages of such a solution are obvious:
- does not gain temperature;
- smooths out possible network noise from other parts of the network;
- does not use active power.
For those who get rid of the blinking LED lamp using resistors, we suggest using elements with a resistance of 1 MOhm and with a power of half to one W. This resistor takes up several times less space, providing an advantage in limited spaces. Its retail price is several rubles.
For two-key switches, it is necessary to mount either a pair of capacitors or a pair of resistors for each lamp individually.
It is necessary to take into account that new elements introduce an additional element of fire hazard. During the installation process they are provided with increased precautions:
- the exposed ends are insulated with shrink film;
- contact with other internal and body elements is avoided;
- Twisting of wires is not allowed.
The reason why blinking occurs is eliminated more simply in a chandelier that has a block of sockets connected in a parallel type. No additional electronic parts are needed for this. You can screw an ordinary low-watt lamp with an incandescent filament into one of them. In the existing circuit, it will act as a shunt resistor.
A switch with motion and light sensors also causes glare on the device
The lamp will flicker not only due to the backlight on the switch, but also if there is a motion sensor, photo relay and other devices. Everywhere the relay contacts will be bypassed, which will lead to short-term flashes.
Low quality lamps
High-quality ice lamps are quite expensive. In our country, this factor is decisive for a certain category of people to give preference to a more budget-priced product. The market is overflowing with cheap Asian goods, which sometimes do not correspond to the parameters stated on the packaging.
It is not uncommon for a power supply to be supplied with inappropriate 4.7 µF capacitors. They are recharged via a diode bridge. It is enough to unsolder it and replace it with a higher quality analogue so that the blinking of the LED lamps stops.
Shunting with a resistor
You can combat blinking by shunting the circuit with a certain resistance. To do this, take a resistor with a resistance of 1 mOhm and a power of 0.5 to 2 W.
For safety, it is better to insulate it with heat shrink.
The best connection location for the resistor is at the junction box. Connect it between the neutral and phase wires of the light bulb (in parallel with the energy-saving wire). It is especially convenient to connect this resistor through Wago clamps.
After this, your lamp will stop blinking.
If your junction box is hidden and there is no access to it (although this is already a violation), or there is no free space in it, then the resistor can be soldered directly to the phase and neutral wires of the chandelier. Then hide the ends in the terminal block.
The method has a big disadvantage.
The resistance will heat up, and if the power is selected incorrectly, it can even lead to a fire.
In addition, modern electronic meters in the apartment will take into account the energy consumption for heating the resistance, and you will end up paying not only for lighting, but also for this “modernization”.
Creating a circuit with lower resistance in parallel with the lamp
If you connect a resistor parallel to the lamp, then current will be spent to heat it up. At the same time, there is no longer enough current to charge the capacitor. In this case, the lamp will stop blinking after turning off.
To connect a resistor in parallel, you can use heat shrink tubing or electrical tape
The resistor power should be 2 W, and the nominal value should be 50 kOhm. Wires must be connected to it, and the connection point must be carefully and securely insulated. To do this, use electrical tape or heat shrink tubing. With relatively little heating, such insulation will be quite sufficient.
Eliminate blinking LED lamp using a capacitor
If you don’t have a resistor, then instead you can use a capacitor with a capacity of 0.01 to 1 µF and a voltage with a double surge noise margin of 2*220=440V. But it is most reliable to take at least 630V.
When there is no capacitor for 630V, but there is one for 400V, then using a soldering iron you can assemble a circuit like this.
Here, one resistor serves to protect the capacitor from impulse noise, and the second to discharge the capacitor.
In an alternating current circuit, a capacitor is essentially a reactance, which is not taken into account by the electric meter and, unlike a resistor, the capacitor does not heat up.
Therefore, installing a capacitor is more preferable and safer. Install it in the same places as described above using resistance (distribution box, chandelier terminal block).
Where can I find such a capacitor? In order not to run around radio stores, you can simply disassemble the already burnt-out energy-saving lamp and pull it out or take it from a regular starter for fluorescent lamps.
True, there is one BUT. It is better to use paper or ceramic, because... Electrolytic may explode unsafely during power surges. So if you take it as a shunt, be sure to take it with a large voltage margin.
The lamp blinks when turned on
If, after turning on the lamps, they light up for a few seconds and go out, then the reason is most likely in the trigger mechanism. It cannot cope with the conversion and supply of current and is not able to overclock the entire system. To solve this problem, you should simply replace the starter.
If the operation of the lamps is not interrupted when they are on, but the LED lamp flashes periodically, then the reason may be the following:
- The incoming network voltage is too low.
- The starting system is not working properly.
- Excessive fluctuations and sudden surges in voltage.
Now let's explain how these backlight problems affect performance and why the LED light blinks when it starts working.
The voltage is too low and does not provide the necessary resources for the regulatory mechanisms that are responsible for the stable operation of the light bulb. It is permissible to reduce the incoming current by no more than five percent. You should measure the current strength in your network; if it goes beyond the permissible limits, then you should contact the appropriate authority.
Only they can solve this problem. Such a decrease in voltage will affect not only the fact that the LED light blinks, but also negatively affect the operation and life of all equipment.
When a deviation above five percent occurs, the service life of an incandescent lamp can be reduced to twenty percent, and for such a complex mechanism as LED paws and more than this figure.
Malfunction of the system for starting and maintaining lamp operation. Such a system is usually firmly installed in the light bulb body and replacing it is quite difficult, and sometimes even impossible. Such a product will no longer be suitable for use. This often happens when the product reaches the end of its useful life, so it is quite normal.
Strong power surges or sudden changes have a negative impact on work, as in the first case. Because of them, the light blinks when it is on. The lifespan of lamps can decrease very sharply due to strong changes.
In addition to poor-quality supply of voltage to the network, the use of powerful equipment can cause surges and drops. The most common type of welding machine used in everyday life is the welding machine. It is highly not recommended to use too powerful welding in an apartment building.
Advice from experts
When buying LED light bulbs, pay attention to the manufacturers. Usually, the cause of all malfunctions after installation is poor-quality design. It is better to choose a more popular brand, thereby focusing on quality. But in this case you will need to overpay a little.
It is best to use LED devices with special devices that are designed specifically for diode technologies. When used with standard fixtures suitable for any light bulbs, energy efficiency and cost savings will be slightly lower.
Pass-through switch
You can also use a pass-through switch instead of a regular one. In this case, the light will be on in one position, and the backlight in the second. The light will also not blink.
This is achieved by direct supply of only neutral conductors to the lamp in the off position.
And no amount of interference will make it light up.
True, here you also need to connect the neutral conductor to the switch. But this method allows you to get rid of blinking, even when the backlight is not the cause! (discussed below). If you are not too bothered by the additional costs associated with purchasing a pass-through switch, and you do not want to go into the weeds of choosing suitable resistors and capacitors, then this method is the most optimal.
Solution to Problem #1
Now that the cause of the problem has become clear, we can propose a fairly simple way to solve it, the use of which will allow you to effectively and quickly get rid of the unpleasant blinking of the lamp.
The procedure to eliminate the cause is as follows:
- The circuit through which microcurrents pass opens. In this case, the board on the shutdown element is removed.
- The parameters in the circuit itself that provides the backlight are replaced. This is done in such a way that there is not enough current to charge the capacitor.
- Currents are directed through a circuit of lower resistance.
- Replacing switches with another model where there is no backlight or the lamps themselves need to be replaced.
Chandeliers with several lamps do not lose their popularity when installed in living rooms and other rooms
Tip #1: There is another very simple way. In a chandelier designed for several lamps, one of the LED lamps is replaced by an incandescent lamp.
Connecting a simple light bulb
And when the chandelier has several horns, instead of one energy-saving light bulb, you can place an incandescent lamp in parallel. The flashing should also stop. The method only works if there are several cartridges in one lamp and is probably the least expensive.
There are pros and cons here. The downside is that you lose the benefits of energy savings, for which you most likely switched to energy-saving devices. Plus, the lighting becomes more pleasing to the eye. Some jewelry workshops use just this kind of light.
A little about the design and principle of operation of LED lamps
At the beginning of its appearance, the “LED” was called a “smart lamp”. The product is economical, durable and environmentally friendly. The light bulb is an autonomous mechanism that regulates the lighting process itself.
The LED lamp consists of:
- base;
- polymer base of the base part;
- drivers;
- radiator;
- aluminum printed circuit board;
- chips;
- diffuser.
The base part of the light bulb is screwed into the lamp socket. The base is made of brass with a nickel coating, which ensures contact and protection against corrosion. In the base part there is a polymer base that protects the case from electrical penetration.