The design of modern household electrical appliances requires that they be grounded. To do this, you need a third wire in your home network. In rural areas, the electrical network is predominantly two-wire, consisting of a working zero and a phase. With this and any other power supply system, you can make grounding at your dacha with your own hands.
How it works and why a grounding loop is needed
A person is protected from electric shock by the insulation of electrical appliances and protective devices. But they can become unusable. The 220V voltage reaches the body of the device. Touching it, a person receives an electric shock. Death can occur if the body short-circuits an electrical circuit. This happens when there is simultaneous contact with a faulty device and a natural ground electrode. The latter can be steel pipes, structural elements of the house, or damp earth.
Current always chooses the path of least resistance. In this case, it turns out to be the human body. To protect people, they create a grounding loop through which the current will flow. Its resistance is tens of times less than that of a person - 30 Ohms. The average for people is 1 kOhm.
Circuit device
The design consists of metal electrodes driven into the ground. They are connected into a common circuit by strips of similar material. A metal bus is connected from the circuit to the incoming electrical panel of the house.
The system works reliably if good contact of the electrodes with the ground and minimal resistance are ensured.
The properties of soils, depending on the type, differ in the amount of resistivity:
- The smallest is in underground aquifers: 5–50 Ohm.
- For plastic clays or loams, peat, graphite shales, chalks - from 20 to 60 Ohms.
- Semi-solid, loess loams, moist sandy loam soils, and chernozems have a resistivity of 100–200 Ohms.
- For sand, the indicator depends on the proximity of groundwater. If they are above 5 m - 500 Ohm, below - 1 kOhm.
The least resistance is found in layers located at depth. To achieve effective grounding, several methods are used simultaneously or separately: immerse the electrodes to a greater depth, increase their number, the distance between the elements, and the area of contact with the soil.
Types of systems
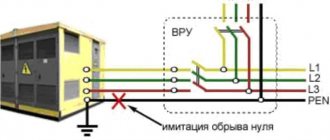
In private homes, grounding is arranged depending on the circuit used to supply electricity: TN or TT. The first has a solidly grounded neutral at the substation. These are neutral wires connected together: protective (PE) and working (N). The TN system includes varieties TN-C, TN-S, TN-CS.
The TN-C subsystem uses a grounding wire, which is designated PEN in the diagrams. There are 2 wires entering the house - phase and common neutral.
Only the input shield is grounded. Reliable protection against electric shock when using the devices is not provided.
In the TN-CS system, like TN-C, a common PEN wire comes from the transformer. In the home switchboard it is divided into zero N and grounding PE, connected to a common bus. The circuit is used with a three-phase power supply. In single-phase, an additional third wire is laid from the sockets to the input distribution panel.
Principle of operation and purpose of grounding
Most of the suburban sector receives power from a 220 volt AC network. The electrical circuit exists due to two conductors - phase and neutral. Electrical appliances are equipped with protective devices and insulation that help prevent voltage from reaching the metal parts of their housings. However, the possibility of voltage appearing there cannot be ruled out, since the insulating layer is sometimes penetrated by current, and the elements of the devices fail.
Once on the housing, electricity poses a threat to the life and health of a person who touches the surface of the device. It is especially dangerous if objects that act as natural grounding conductors (metal pipes, structural elements of a building, etc.) are located near the current source. When the ground electrodes touch, the circuit opens and the current is directed towards the lowest potential, that is, into the person.
To understand the principle of grounding and its importance, knowledge within a school physics course is sufficient. One of the physical properties of current is that it always finds the conductor with the least resistance. Thus, to ensure human safety, it is necessary to create a highway in which the resistance will be significantly less than in the human body.
The average resistance of the human body is 1000 ohms (although this value varies significantly depending on the circumstances). There are complex calculations of the resistance value required for grounding, according to which the optimal value is 30 Ohms (for household electrical appliances). If we are talking about lightning protection of a private home, the preferred value is 10 Ohms.
Note! There is an opinion that to ensure safety it is enough to have an RCD. However, correct operation of the residual current device is only possible if there is grounding.
Grounding tasks:
- Guaranteed drainage of voltage from conductive objects to the ground.
- Equalizing the potentials of all objects located in the country house.
- Creating conditions for the proper operation of all electrical safety systems, including circuit breakers, residual current devices and fuses.
- Avoiding situations where static charges accumulate on the housings of electrical appliances.
- Maintaining electrical equipment in good condition. For example, the operation of switching power supplies on computer equipment often involves applying voltage to system units. As a result of the discharge, electronic components break down and information is lost.
Large household appliances must be protected by a grounding system:
- The boiler is made of stainless steel, which reacts negatively to stray currents removed by grounding. When a stray current appears, a person is in serious danger: a shock is possible while taking a shower or simply touching the boiler.
- Washing machine. The device is characterized by high electrical capacity, which occurs due to high humidity in the room.
- Computer. The power supply is designed in such a way that the operating leakage in this element is even higher than that of the washing machine.
- Electric stove. This type of household appliance is characterized by high power, which results in an increased risk of breakdown.
What is used to create a ground loop
The structure is made of rolled metal.
The following are used as electrodes:
- steel corners with shelves 50 mm, thickness 4–5 mm;
- pipes with walls of at least 3.5 mm;
- smooth non-corrugated reinforcement from 10 mm.
To connect the circuit and introduce it into the building, strips of 40×4 mm and rods with a diameter of 10 mm or more are used. The grounding connection to the shield is carried out with a copper wire with a cross-section of 6 square meters. mm, but not less than that of the phase conductor. One end of it is attached to an M10 bolt, which is welded to the busbar, and the other to the shield body. You will need copper wire terminals, washers, and nuts.
If the input panel is located in the house, a plastic sleeve is needed. It is placed in a hole made in the base. A grounding wire is pulled through it.
How to do it right
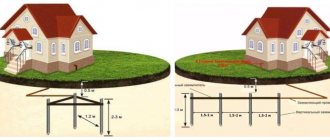
First, let's look at the shape of the ground electrode. The most popular is in the form of an equilateral triangle with pins hammered into the vertices. There is also a linear arrangement (the same three pieces, only in a line) and in the form of a contour - the pins are driven around the house in increments of about 1 meter (for houses with an area of more than 100 sq. m). The pins are connected to each other by metal strips - metal bonding.
The most popular ground electrode model
Procedure
From the edge of the blind area of the house to the installation site of the pin there must be at least 1.5 meters. In the selected area, they dig a trench in the form of an equilateral triangle with a side of 3 m. The depth of the trench is 70 cm, the width is 50-60 cm - so that it is convenient to cook. One of the peaks, usually located closer to the house, is connected to the house by a trench with a depth of at least 50 cm.
At the vertices of the triangle, pins are hammered (a round rod or corner 3 m long). About 10 cm is left above the bottom of the pit. Please note that the ground electrode is not brought to the surface of the earth. It is located 50-60 cm below ground level.
A metal bond—a strip of 40*4 mm—is welded to the protruding parts of the rods/angles. The created ground electrode is connected to the house with a metal strip (40 * 4 mm) or a round conductor (cross section 10-16 mm 2). The strip with the created metal triangle is also welded. When everything is ready, the welding areas are cleaned of slag and coated with an anti-corrosion compound (not paint).
After checking the grounding resistance (in general, it should not exceed 4 Ohms), the trenches are covered with earth. There should be no large stones or construction debris in the ground; the earth is compacted layer by layer.
At the entrance to the house, a bolt is welded to the metal strip from the ground electrode, to which a copper conductor in insulation is attached (traditionally the color of the ground wires is yellow with a green stripe) with a core cross-section of at least 4 mm 2.
Grounding outlet near the wall of the house with a bolt welded at the end
In the electrical panel, the grounding is connected to a special bus. Moreover, only on a special platform, polished to a shine and lubricated with grease. From this bus, the “ground” is connected to each line that is distributed throughout the house. Moreover, wiring the “ground” with a separate conductor according to the PUE is unacceptable - only as part of a common cable. This means that if you have two-wire wiring, you will have to completely change it.
Why you can’t make separate groundings
Rewiring the entire house is, of course, time-consuming and expensive, but if you want to operate modern electrical appliances and household appliances without problems, it is necessary. Separately grounding certain outlets is ineffective and even dangerous. And that's why. The presence of two or more such devices sooner or later leads to the output of the equipment plugged into these sockets. The thing is that the resistance of the circuits depends on the condition of the soil in each specific place. In some situation, a potential difference occurs between two grounding devices, which leads to equipment failure or electrical injury.
What materials cannot be used for grounding
It is not advisable to make electrodes from corrugated reinforcement. It has poor contact with the ground: when driven into the ground, voids are formed. It is forbidden to paint the electrodes: such a surface has poor conductivity.
Do not connect the ground to a steel pipe of an existing central or home water supply or heating system. Underground, they are often heavily covered with rust, and emergency current flows poorly through them. It accumulates on pipes, touching which is fraught with unpleasant consequences.
Types of ground loops
To quickly “drain” the current into the ground, the external subsystem redistributes it to several electrodes located in a certain order to increase the dissipation area. There are 2 main types of circuit connections.
Triangle - closed loop
This case involves the use of 3 pins connected by stripes into an isosceles triangle. The distance between the electrodes is selected according to the following principle: the minimum distance is the length of the underground part of the electrode (depth), the maximum is 2 depths. For example, for a standard depth of 2.5 m, the side of the triangle is selected within 2.5-5 m.
Linear
This option is made up of several electrodes arranged in a line or in a semicircle. An open contour is used in cases where the area of the site does not allow the formation of a closed geometric figure. The distance between the pins is selected within 1-1.5 depth. The disadvantage of this method is the increase in the number of electrodes.
These types are most often used when arranging the grounding of a private house. In principle, a closed loop can be formed in the shape of a rectangle, polygon or circle, but a larger number of pins will be required. The main advantage of closed systems is that they continue to function fully when the connection between the electrodes is broken.
Important! The linear circuit operates on the principle of a garland and damage to the jumper puts a certain section of it out of service.
Preparing for grounding at a summer cottage
Grounding at the dacha is carried out in several stages.
Development of a grounding scheme
In practice, several schemes are used:
- Linear. The rods immersed in the ground to a depth of 1.2–3 m are placed and connected in series. If connections are broken, only the electrodes closest to the electrical panel work.
- Closed. 3 electrodes are driven into the ground and connected to each other. The depth is similar to that of a linear contour. The outline of the diagram resembles a geometric figure, which is why it received the more common name – triangle. If any jumper other than the bus leading to the switchboard is damaged, the system operates as a linear one.
- Pin. The rod is driven to a great depth - up to 20 m. Sections are used that are increased as they go deeper.
- In the latter case, during the construction of a house, the reinforcement frame of the building is grounded.
The optimal choice of circuit for an independent grounding device is a triangle (closed) or linear. The first one is more effective and reliable. The installation process itself is almost no different. Similar rods and jumpers are used.
To calculate the dimensions of the circuit, it is advisable to contact the specialists of the local energy supply service.
They have developments taking into account the conditions of the region. They will give design advice based on network load.
Preparation of materials
The electrodes on one side are cut diagonally with a grinder. The sharp end penetrates the ground better when driving. The recommended length of the rods is from 1.2 to 3 m. For a closed system you will need at least 3 electrodes, for a linear system – 4–6 pieces.
The tire size depends on the distance between the bars. At one end of the one that will go to the distribution cabinet, an M10 bolt is welded. It serves to attach the copper terminal of the grounding wire, which will go to the shield.
Site marking
The distance between the input distribution board and the electrode closest to it must be at least 10 m. Arrange the circuit away from places where people walk or cars pass.
Mark the location points of the electrodes on the site in accordance with the selected scheme. The minimum distance between grounding electrodes is equal to their shortest permissible length - 1.2 m. It is better to use three-meter electrodes, maintaining a distance of 3 m between them.
If the rods are closer, the current flow areas intersect. This reduces the efficiency of the system, although it will work.
What does it give
Protective grounding is necessary to ensure electrical safety in the home. If done correctly, when a leakage current appears, it leads to immediate tripping of the RCD (damage to electrical insulation or when live parts are touched). This is the main and main task of this system.
The second function of grounding is to ensure the normal operation of electrical equipment. For some electrical appliances, having a protective wire in the socket (if any) is not enough. A direct connection to the ground bus is required. For this purpose there are usually special clamps on the case. If we talk about household appliances, these are a microwave oven, an oven and a washing machine.
The main task of grounding is to ensure the electrical safety of a private home.
Few people know, but a microwave without a direct connection to the “ground” can emit significant radiation during operation; the reception level of radiation can be life-threatening. In some models, you can see a special terminal on the back wall, although the instructions usually contain only one phrase: “grounding is required” without specifying exactly how it should be done.
When you touch the body of the washing machine with wet hands, you often feel a tingling sensation. It is not dangerous, but unpleasant. You can get rid of it by connecting the ground directly to the case. In the case of an oven, the situation is similar. Even if it does not “pinch”, a direct connection is safer, since the wiring inside the installation operates under very harsh conditions.
With computers the situation is even more interesting. By directly connecting the ground wire to the case, you can significantly increase the speed of the Internet and minimize the number of freezes. It’s that simple because of the direct connection to the ground bus.
Do you need grounding in a country house or in a wooden house?
In holiday villages, grounding is mandatory. Especially if the house is built of flammable material - wood or frame. It's about thunderstorms. At dachas there are a lot of elements that attract lightning. These are wells, boreholes, pipelines lying on the surface or buried to a minimum depth. All of these objects attract lightning.
At dachas there is a high probability of being struck by lightning
If there is no lightning rod and grounding, a lightning strike is almost equivalent to a fire. There is no fire station nearby, so the fire will spread very quickly. Therefore, in combination with grounding, also make a lightning rod - at least a couple of meter-long rods attached to the ridge and connected to the ground using steel wire.
Instructions for installing grounding
Having completed the preparatory work, they begin installation.
Excavation of trenches
Dig trenches to a depth of 0.5–1 m along the perimeter of the created contour. In the direction of the input shield, from the rod closest to it, they also dig a pit for the grounding bus. The width of the trenches is about 50 cm, so that a person can fit in it to work.
Circuit installation
Pointed rods are driven into the ground. They should protrude 20 cm above the bottom of the trench. Jumpers are placed between the electrodes and adjusted to length. A busbar is laid from the same material in the direction of the input panel. Its end is bent into the letter “G” and secured to the base of the house. Bending is needed to compensate for the expansion of steel during temperature fluctuations.
What is grounding in a private house?
Grounding is the connection of metal network elements, equipment or mechanisms with a grounding device (ground loop), due to which, when leakage currents occur (insulation breakdown), the entire potential is completely transferred to the ground.
If we consider this issue at the “user” level, then grounding protects you from electric shock if the insulation in the electrical wiring is damaged.
Purchasing a grounding loop
Ready-made grounding kits are sold.
The deep grounding kit includes:
- rods 1.2–1.5 m long, 14–20 mm in diameter;
- threaded or press-fit couplings for building up elements;
- pointed tip;
- a head that does not deform when driving pins;
- contact clamp;
- anti-corrosion lubricant;
- water-repellent tape.
Some sets, instead of a head, are equipped with a special adapter to drive the rods with a powerful hammer drill.
Modular pin system
All the previously described devices - made from hammered corners, pipes and rods - are called traditional. Their disadvantage is the large volume of excavation work and the large area that is required when installing a ground electrode. This is because a certain area of contact between the pins and the ground is required, sufficient to ensure normal “spreading” of the current. The need for welding can also cause difficulty - there is no other way to connect the grounding elements. But the advantage of this system is relatively low costs. If you do traditional grounding in a private house with your own hands, it will cost a maximum of $100. This is if you buy all the metal and pay for welding, and do the rest of the work yourself
Modular grounding system kit
Modular pin (pin) systems emerged a few years ago. This is a set of pins that are driven to a depth of up to 40 m. That is, you get a very long grounding rod that goes to a depth. The pin fragments are connected to each other using special clamps, which not only fix them, but also provide a high-quality electrical connection.
The advantage of modular grounding is the small area and less work required. A small pit with sides 60*60 cm and a depth of 70 cm, a trench connecting the ground electrode to the house is required. The pins are long and thin; driving them into suitable soil is easy. This is where we come to the main disadvantage: the depth is great, and if you encounter, for example, a stone on the way, you will have to start over. But removing the rods is a problem. They are not welded, but whether the clamp will hold up or not is a question.
The second disadvantage is the high price. Together with installation, such grounding will cost you $300-500. Self-installation is problematic, since driving these rods with a sledgehammer will not work. We need a special pneumatic tool, which we have learned to replace with a hammer drill with impact mode. It is also necessary to check the resistance after each driven rod. But if you don't want to deal with welding and excavation, modular grounding pins are a good option.
How to connect a protective wire to sockets in a country house
We should not forget that all electrical wiring in the country house is made with a two-core cable. If grounding is installed, a third conductor must be connected to the grounding terminals of all sockets and devices. According to the rules, it must be part of a common three-core cable that is used for wiring in premises.
Everything is simple if the country house has open wiring, which is easy to replace. Otherwise, the old electrical wiring should be disconnected and a new (open type) three-core cable installed. Aesthetics can be achieved by using cable channels. As an option, it is possible to use a plastic corrugated pipe.
It is clear that you want to save money and lay a separate grounding wire to the sockets. It's up to you to decide whether to break the wiring rules or not. However, the cable channel will still have to be installed.
The inventive mind of a Russian summer resident is not limited by anything, and there may be a temptation to somehow ground each outlet separately. This definitely should not be done, since the resistance and quality of each grounding cannot be the same, which can easily lead to the appearance of dangerous voltage on one of the devices.
Operating procedure
- The location and grounding design are selected: line or triangle.
- The required number of horizontal and vertical elements is calculated and delivered to the site.
- Tools are prepared: shovel, sledgehammer, welding machine with electrodes, grinder.
- A trench 60–70 cm deep is dug along the grounding profile. Places for vertical elements are marked. It is recommended to dig holes here. The deeper they are, the faster and easier the vertical electrodes will clog.
- The angles and round steel are sharpened and sharpened, and the pipe at the end is flattened.
- After driving, the horizontal electrodes and the busbar are welded to the input panel.
- The welding areas are cleaned of scale and treated with an anti-corrosion compound, such as bitumen. Other parts of the structure cannot be covered with anything in order to maintain a good electrical connection with the soil.
- The trench is filled with homogeneous soil and compacted. Protective grounding is ready.
Connecting a grounded outlet
Connecting an outlet with grounding
To ground an outlet with your own hands, you need to follow the algorithm:
- phase and zero disconnection;
- turning off the power supply;
- fastening the socket contacts to phase and neutral;
- connecting the ground wire to the outlet;
- installation of a protective housing for an electrical outlet.
Before grounding the socket, you can determine the phase and zero using an indicator screwdriver or a tester. The phase and neutral from the electrical wiring must be connected to the corresponding terminals of the socket. The grounding conductor is connected to the terminal, which is located between the phase and neutral contacts.
If there is no grounding conductor, grounding cannot be performed. This will lead to the fact that when zero is lost, a short circuit will occur, which can cause a fire or knock out the plugs on the machine.
Common mistakes when performing installation work
Experts note that the following mistakes are most often made during self-installation:
- An attempt to protect the electrodes from corrosion by painting. This method is unacceptable, because prevents flow into the ground.
- Connection of steel metal connection with pins with bolts. Corrosion quickly breaks contact between elements.
- Excessive distance of the circuit from the house, which significantly increases the resistance of the system.
- Using too thin a profile for the electrodes. After a short period of time, corrosion causes a sharp increase in the resistance of the metal.
- Contact of copper and aluminum conductors. In this case, the connection deteriorates due to contact corrosion.
If design flaws are discovered, they should be corrected immediately. Excessive increase in electrical resistance or disruption of circuit integrity disrupts the operation of grounding. The circuit will not be able to guarantee safety.
A grounding loop is necessary for a private home. This design will ensure electrical safety for residents and eliminate tragic accidents. However, it should be remembered that the effectiveness of grounding depends on the correctness of calculations, choice of circuit and installation. If you doubt your own abilities, then it is better to use a ready-made kit.
Tags: machine, ampere, beat, sconce, view, internal, harm, choice, house, , clamp, grounding, protective, sign, isolate, cable, like, oscillation, design, circuit, crown, , installation, power, neutral , connection, strip, wire, project, start, , work, size, calculation, edge, row, network, system, connection, resistance, circuit, ten, type, current, triangle, , phase, photo, stepper, panel, electrical panel , Effect