If you find yourself in a situation where the issue of electrifying your suburban area is being decided, then you are probably faced with the question of how tall the electric pole should be. Many people don’t know whether they have to install it themselves, or whether it’s the work of electrical networks, and what material is best to install the pole from.
The topic is quite rare and practically not covered on the Internet. Apart from specialized sites and SNiP, which not everyone can navigate.
Regulatory requirements for the installation of electricity poles
Standards for additional electric power transmission poles are regulated at the legislative level. The requirements are as follows:
- the distance between unprotected wires to balconies or windows is at least 1.5 m;
- the gaps between line conductors are at least 10 cm for spans less than 6 m, 15 cm for spans greater than 6 m;
- height of the connection point of power lines to a residential building - from 2.75 m;
- the height of the wires is 3.5 m above the ground and 6 m above the roadway, respectively;
- the electricity pole must be made of fire-retardant materials;
- materials used to make insulators are porcelain or glass.
Before installing the pole, you should understand the classification. There are four types:
- Anchor. Used in places with the highest load point, as it is intended for fastening lines.
- Intermediate. Such pillars are located between anchor ones. Wires are hung on them in the spaces between the fasteners.
- Angular. Used where lines turn. Depending on the size of the turn, either an intermediate or an anchor structure can be used.
- Terminal. Located at the end points of the line.
In addition to standard types of poles, there are specialized ones. This is a generalized name for pillars of non-standard configuration. They are used at intersections of power lines with railways, highways, buildings and structures. Such structures are not used in summer cottages.
Wooden electric pole installation technology
- The location of the support is determined in strict accordance with the technical conditions.
- The area is thoroughly cleaned of debris, tree roots, and leveled.
- A hole is drilled or dug for the post. In this case, the depth should be at least one and a half meters. But if the depth of soil freezing in winter is greater, then the pit is prepared to a greater depth. The hole can be dug by hand or using an electric drill.
- A wooden electric pole can be installed not only directly into the ground, but also with a concrete stepson. If the pole is installed without a concrete stepson, then the lower part that will be in the ground is treated with bitumen or creosote. In the case of installation with a stepson, it is firmly attached to a wooden support before installation begins.
- The post is installed in the hole, leveled to the hydraulic level and covered with crushed stone with careful compaction. To better fix the support, it can be filled with concrete.
Is approval required for installing poles?
To place a power line support and connect a private home to electricity, the owner must obtain permission. To coordinate the installation of electricity poles at the dacha, related equipment and further network connection, you need to contact the energy sales company at the site address.
The application is drawn up in free form. It submits a request for the employee to leave. This is required to verify compliance with regulations.
A sample application is available here.
Installation procedure
Installation of a power line support is a complex and responsible procedure consisting of several stages. In order to properly install an electricity pole on a site, you must:
- draw up a plan for landscaping the area adjacent to the dacha, and mark on it the place where the supporting structure will be located;
- coordinate the resulting scheme with neighbors in the area and supervisory authorities;
- remove turf and tree roots at the point where the supporting structure is installed;
- drill a well in the soil, the depth of which should be 50 cm greater than the freezing level of the soil (for this you can use either special equipment or an ordinary garden drill);
- pour a 10-liter bucket of crushed stone into the hole;
- install a pole in the well and secure it in the desired position using supports;
- fix the support in the ground by tying it with a metal mesh or reinforcing bars;
- pour concrete solution into the hole and leave it to harden.
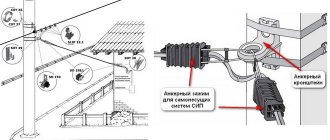
This is interesting: installation of a vulture from a pole to a house.
On days 5-7 after the end of the procedure, it is necessary to remove the supports supporting the pole and make sure that the supporting structure is fixed strictly perpendicular to the surface of the earth. Immediately after this, you can submit an application for installation of power lines to the local energy supply organization.
General requirements for power lines with voltage up to 1 kV
When installing power transmission line supports on private land, technical requirements must be observed. To check compliance, you must be guided by Article 2.4 of the Electrical Installation Rules, with operating voltages up to 1 kV. The list of standards is as follows:
- mounted poles should not obstruct access to buildings and courtyards;
- supports must be equipped with protective mechanisms against possible collisions with vehicles;
- when power lines are located in a forest area, there is no need to cut down a clearing, but you must maintain a minimum distance to trees - 1 meter;
- You can use only those structural elements and supports that have anti-corrosion and fire-resistant properties.
IMPORTANT! Before sending an application for approval and connection of power lines, you need to make sure that the requirements are met. Otherwise, the application will be rejected and the process will be delayed.
Why do you need a pillar?
An electric pole is a product made of concrete and reinforcement, from 9.5 to 13.5 meters . The latter is sufficient to organize reliable anchorage in the soil. Its installation is regulated by a number of regulatory documents. This stage in the electrification of the private sector plays an important role, especially if the connection point is located at a distance of 45 meters or more from the common line - the maximum distance between poles.
On a private site, organizing a high-altitude connection point is a prerequisite. As a last resort, one pole can be used to electrify several areas, subject to acceptable design placement.
In addition to wires, it is allowed to install external lighting with a connection to the meter, as well as video surveillance devices, but not lower than 1.2 meters from the passing 220 V wire.
Package of documents
To install and connect power line supports, the owner needs to collect the following documents:
- passport;
- document of ownership of the site;
- TIN;
- a list of electrical devices that will be constantly used by the owners (indicating the power);
- calculation of the network load;
- technical plan of the site indicating the nearest power transmission line supports and the proposed locations of new poles.
IMPORTANT! If there are communications (gas or pipelines, sewerage) on the ground near the future location of the supports, they must be displayed on the technical plan.
How to install a pole for electricity?
Where can I install an electricity pole in my dacha?
What distances should you keep from surrounding objects? What should the wires and insulators be like? How much will it cost to connect the cottage to the power supply? Let's try to find the answers.
Our task is to find out how difficult it is to electrify a country house
Is it difficult to install an electricity pole on the site with your own hands?
Here are the simplest instructions for making it from timber with a cross-section of 150 mm.
- We treat the timber with an antiseptic in two or three layers.
- We assemble a cross measuring approximately 2x2 meters at one of the ends of the future pillar. The crosspiece itself is connected halfway across the tree; Galvanized corners are used for fastening to the pole.
- Four jibs are attached between the post and the crosspiece, after which the entire underground part (about one and a half meters) is painted with bitumen mastic.
- A cross-shaped hole is torn off under the support, into which the post can easily be installed by two people using a rope tied to its top. All that remains is to level it plumb, bury the base and compact the soil.
The pillar stands firmly on the crosspiece
Without electricity, it is currently difficult to establish normal life in a house or country house, therefore, before selling or after purchasing a plot for individual housing construction, electric wires are immediately installed on it. A cable is hooked up to a common power line and brought out to a support on the site. But before you start pulling, you need to install this very pillar.
Cables with a maximum voltage of no more than 1 kV are installed in a private house or country house. When designing and constructing a line with a voltage of less than 1 kV, it is necessary to observe the standard distances from supports to utility facilities.
- The distance between the line poles should not exceed 50 meters; the minimum distance between the main supports is determined based on the calculation of the wind load, the degree of tension of the cable line and the cross-section of the working wire. At the same time, the distance from the main support to the wall of the house should not be more than 25 meters. If the span is large, installation of additional supports is required.
- The distance from an electric pole to a distribution pole is not strictly standardized; it is determined by the terrain plan and the location of consumer points and other supports. It is important that the sag of the wire to the roadway is less than 6 meters, which will ensure the safety of the entire line when passing heavy trucks and special equipment. The cable sag above the walkway should not be less than 3.5 meters.
- A common question that developers face is what should be the distance from the electric pole to the fence. According to the regulations, the distance between the support and the fence of the site must be at least 1 meter. This value is sufficient for convenient installation of the structure and access for network maintenance by specialists. Moreover, it does not matter which side of the fence the pole is installed on - from the street or on the site, power engineers must always be able to independently reach the pole and cable; the support on private property does not belong to the owner of the land and he has no right to move it without the knowledge of the supervisory authorities.
- According to the standard, the distance from the house to the electric pole for a line less than 1 kV should not be less than 2 meters. You should also observe the height of the cable entry into the house for the power line - not lower than 2.75 meters.
To install poles for electrical wires yourself, you must follow the action plan:
- Drawing up a plan in accordance with the standards. On it it is necessary to indicate the distances between supports, landscaping elements, and calculate the amount of sag. This plan must be agreed upon with the supervisory authorities and neighbors of the site.
- Site preparation and drilling of wells. At the point where the pillar is located, turf and tree roots are removed. For drilling, you can invite special equipment or use a garden drill (depending on the type of soil and the diameter of the support). The drilling depth should be 0.3-0.5 meters below the soil freezing level in the region.
- Crushed stone is poured into the bottom in layers with sand to a height of 20-30 cm. This cushion will prevent the structure from being pushed out when the soil expands.
- A post is installed in the pit manually (wooden) or using lifting equipment (reinforced concrete, concrete). It is important to level the vertical position before fixing the support in the ground.
- To prevent the support from collapsing, it is tied with reinforcing bars or a finished mesh, fixing it to the ground.
- Pour the concrete solution into the hole and leave to harden. You can remove the supports as early as 5-7 days.
The installation of metal supports for power lines and wooden poles with a concrete base is carried out in a similar way.
After completing the work, you can begin installing the electrical line.
Our task is to find out how difficult it is to electrify a country house.
Is it difficult to install a pole on the site with your own hands?
The pillar stands firmly on the cross.
When electrifying a land plot, the owner needs to install power line supports. When carrying out this procedure, a number of rules and regulations must be observed, and all work must be coordinated with authorized government agencies.
Standards for additional electric power transmission poles are regulated at the legislative level. The requirements are as follows:
- the distance between unprotected wires to balconies or windows is at least 1.5 m;
- the gaps between line conductors are at least 10 cm for spans less than 6 m, 15 cm for spans greater than 6 m;
- height of the connection point of power lines to a residential building - from 2.75 m;
- the height of the wires is 3.5 m above the ground and 6 m above the roadway, respectively;
- the electricity pole must be made of fire-retardant materials;
- materials used to make insulators are porcelain or glass.
Before installing the pole, you should understand the classification. There are four types:
- Anchor. Used in places with the highest load point, as it is intended for fastening lines.
- Intermediate. Such pillars are located between anchor ones. Wires are hung on them in the spaces between the fasteners.
- Angular. Used where lines turn. Depending on the size of the turn, either an intermediate or an anchor structure can be used.
- Terminal. Located at the end points of the line.
In addition to standard types of poles, there are specialized ones. This is a generalized name for pillars of non-standard configuration. They are used at intersections of power lines with railways, highways, buildings and structures. Such structures are not used in summer cottages.
To place a power line support and connect a private home to electricity, the owner must obtain permission. To coordinate the installation of electricity poles at the dacha, related equipment and further network connection, you need to contact the energy sales company at the site address.
The application is drawn up in free form. It submits a request for the employee to leave. This is required to verify compliance with regulations.
The procedure for installing electricity poles and connecting them is as follows:
- choice of material for supports;
- drawing up a plan for the location of pillars;
- preparing the land for installation;
- installation.
After installation and quality control of the line, the house and other buildings on the site are electrified.
Material
The choice should be made between wooden and reinforced concrete pillars. Metal structures are designed for heavy loads. They are used at substations with capacities up to 110 kV. The use of such power lines in a summer cottage is inappropriate.
- low price;
- possibility of maintenance and repair without a lift;
- relative ease of installation;
- service life after treatment with heat-resistant impregnation is 40 years.
Concrete structures are stronger than wood, but they are more expensive. It is possible to use a combined option: a main wooden pole is attached to a reinforced concrete support. This method allows us to achieve an optimal balance of strength and durability with manufacturing cost.
Planning
After choosing the type of supports to use, you can begin to draw up a plan for the location of power lines. To do this, you need to contact an electrician. Such services are provided by energy sales organizations.
At the stage of drawing up a location plan, approval of the installation is carried out immediately. To clarify the cost of the service, the owner should contact the organization that provides access to electricity in the area where the site is located.
Land preparation
Preparatory procedures include clearing the area of the site from debris, plants and roots. A hole for supports is being drilled.
Installation of supports
Once the installation site is ready, the poles are installed. The structure is fixed with concrete. During the pouring process, it is necessary to ensure compliance with the dimensions, in particular, the vertical position of the support.
General costs include:
- making a pillar;
- preparation of project documentation;
- transportation of the support to the site;
- hole drilling;
- pole installation;
- electrification.
The total cost, depending on the subject of the Russian Federation and the pricing policy of the contractor, is 20–30 thousand rubles.
Builder 4th category
Comfortable life in a country house is impossible without electricity. However, in order to gain access to the general power grid, a number of conditions stipulated by law must be met. First of all, it is necessary to install an electric pole at the summer cottage, which allows you to securely fasten the wires supplying electricity from the power lines to the residential building and outbuildings.
Power lines are created using electric poles to provide homes with electricity.
Installation of a power line support is a complex and responsible procedure consisting of several stages. In order to properly install an electricity pole on a site, you must:
- draw up a plan for landscaping the area adjacent to the dacha, and mark on it the place where the supporting structure will be located;
- coordinate the resulting scheme with neighbors in the area and supervisory authorities;
- remove turf and tree roots at the point where the supporting structure is installed;
- drill a well in the soil, the depth of which should be 50 cm greater than the freezing level of the soil (for this you can use either special equipment or an ordinary garden drill);
- pour a 10-liter bucket of crushed stone into the hole;
- install a pole in the well and secure it in the desired position using supports;
- fix the support in the ground by tying it with a metal mesh or reinforcing bars;
- pour concrete solution into the hole and leave it to harden.
Stages of work on installing supports
The procedure for installing electricity poles and connecting them is as follows:
- choice of material for supports;
- drawing up a plan for the location of pillars;
- preparing the land for installation;
- installation.
After installation and quality control of the line, the house and other buildings on the site are electrified.
Material
All types of supports can be made from the following materials:
- wood;
- metal;
- concrete.
The choice should be made between wooden and reinforced concrete pillars. Metal structures are designed for heavy loads. They are used at substations with capacities up to 110 kV. The use of such power lines in a summer cottage is inappropriate.
Benefits of wood:
- low price;
- possibility of maintenance and repair without a lift;
- relative ease of installation;
- service life after treatment with heat-resistant impregnation is 40 years.
Concrete structures are stronger than wood, but they are more expensive. It is possible to use a combined option: a main wooden pole is attached to a reinforced concrete support. This method allows us to achieve an optimal balance of strength and durability with manufacturing cost.
Planning
After choosing the type of supports to use, you can begin to draw up a plan for the location of power lines. To do this, you need to contact an electrician. Such services are provided by energy sales organizations.
At the stage of drawing up a location plan, approval of the installation is carried out immediately. To clarify the cost of the service, the owner should contact the organization that provides access to electricity in the area where the site is located.
Land preparation
Preparatory procedures include clearing the area of the site from debris, plants and roots. A hole for supports is being drilled.
IMPORTANT! The depth of the supports should be greater than the freezing depth of the ground. An expansion must be made at the bottom of the pit. This is required to avoid the support being pushed out during the winter months.
Installation of supports
Once the installation site is ready, the poles are installed. The structure is fixed with concrete. During the pouring process, it is necessary to ensure compliance with the dimensions, in particular, the vertical position of the support.
ADVICE! Before pouring the concrete solution, it is recommended to cover the pit walls with waterproofing material. This will increase the service life of the pillars, due to the isolation of the structure from the influence of groundwater.
Types of supports
There are many types of wire supports. the following types of electricity poles are most often
- metal;
- wooden;
- reinforced concrete.
The most durable electric poles are made of metal.
Metal poles are convenient and durable. However, they are much more expensive than poles made from other materials. In order to protect the metal support from corrosion, it is coated with a thin layer of zinc. After installation on the site, such an electric pole is grounded : this allows you to avoid electric shock when operating power lines.
Wooden supports for wires are made of pine. The logs, cleared of branches and bark, are dried, treated with fire-fighting compounds and impregnated with antiseptics to prevent wood rotting. Electric poles made of wood have two important advantages : they are relatively cheap and easy to install (you can install a pole in your summer cottage with your own hands, without resorting to the use of complex equipment). However, designs of this type also have a number of disadvantages. Thus, wooden supports are short-lived. In addition, they can only be installed in non-wetland areas with dry soil.
This video shows how to install an electric pole:
Reinforced concrete electric poles remain the most popular in the domestic market - monolithic structures made of concrete reinforced with wire or metal rods. Such supports have an affordable price and a long service life, and are suitable for use in any environment.
The only drawback of reinforced concrete pillars is the difficulty of installation. In order to install such a structure on a summer cottage, special equipment is needed.
Installation
The rules for installing reinforced concrete supports are determined by GOSTs and SNiPs and are the same for both Moscow and other regions of Russia.
The support is assembled on a flat area cleared of foreign objects. For heavy structures, 35 kV and more attract riggers.
Most often, installation is carried out using technological maps, which contain the sequence of operations, the necessary devices, and the layout of parts (crossbars, traverses, racks).
The procedure for assembling single-post supports made from vibrating racks for power lines up to 10 kV:
- In order to secure the traverse and the grounding descent, the top of the product is raised. The braces and traverses are put on the bolts, the nuts are installed and tightened.
- Before installing the insulators, polyethylene caps are filled. The insulators are mounted and the nuts are cored.
- At the end, a stencil poster is installed, where the year of installation and serial number are indicated.
The supports are lifted using a crane, helicopter or by building up. Before installation, the correct preparation of the foundation and pits is checked.
For different lines, supports of different types and sizes are used.
Overhead lines up to 1 kV
- single-column free-standing unified intermediate;
- A-shaped end, anchor, corner;
- single-post with struts;
- prefabricated from vertical posts installed side by side.
It is possible to assemble and install reinforced concrete supports from vibrating racks, which are made to hang 2-4 radio wires and 2 to 9 overhead line wires.
Such structures have steel traverses. They are also used as lighting supports, placing lamps, brackets for branches, and cable sleeves on them.
Overhead lines up to 10 kV
For overhead lines from 6 to 10 kV, installation of single-column products with struts and intermediate, anchor, end and corner - A-shaped products is carried out.
Structures made from vibrating START poles have a traverse, which is made for hanging 3 wires up to 120 mm² made of aluminum.
On anchor and corner single-post supports with struts, steel traverses are placed for the wires of each phase.
On intermediate single-post supports made of centrifuged posts, apical pins and traverses made of wood 80*100 mm are placed.
Overhead line 35-500 kV
On lines of 35 kV and above, portal and single-column free-standing supports unified with guy wires are used.
Their structural parts are cable supports, traverses and pillars, which have asphalt-bitumen waterproofing.
To prevent moisture from entering the rack, plug covers are installed, the bottom of which is an additional way to increase the support area and the strength of the structure in the ground.
Expert opinion
It-Technology, Electrical power and electronics specialist
Ask questions to the “Specialist for modernization of energy generation systems”
Step-by-step installation of concrete poles for electricity They are used in the construction of high-voltage power lines when the required overall dimensions do not allow the use of concrete. Ask, I'm in touch!
How to install an electric pole on a site
We will analyze the procedure if there is a need to install an electric pole on the site to connect the house (cottage, hereinafter we will call the object) to the power supply. Firstly, you need to contact the organization that supplies electricity to the given locality. Before this, you need to find out the list of documents that need to be submitted (depending on the region and conditions, this list may differ).
If the appeal is completed correctly and a positive decision is made, then the owner of the object receives technical conditions. They indicate all the technical work that is required for connection. In particular, the technical specifications specify all the necessary parameters for installing an intermediate support, if there is a need for one. This is the exact location, height and other details that are strictly required.
Only after receiving the Technical Specifications can you begin work directly. As a rule, the power supply organization can recommend a specialized organization that provides such services. But not everyone is satisfied with the prices for such work. If you decide to install an electric pole yourself, then you should do this in compliance with all applicable rules and regulations.
What should the actual pillar be like?
For low-voltage lines, reinforced concrete, metal, solid wood and wooden poles with a concrete base can be used. All types of wood, except larch, must be impregnated with an antiseptic; Larch wood itself is extremely resistant to rotting.
Wood is the most affordable material for a pole.
When using a wooden support, its minimum diameter (at the top end) should be:
- For the main power supply line - 14 cm;
- For a branch to a house (in particular, for a pole installed on a site) - 12 cm.
Regarding the deepening of supports, the document is somewhat vague - “depending on local conditions.”
What should be the minimum distance from the pole to surrounding objects and communications?
| An object | Distance, meters |
| Water pipelines, heating mains, sewerage | 1 |
| Fire hydrants, water pumps, water wells | 2 |
| Power cables (for example, a wire from a well pump) without additional protection (insulating pipe) | 1 |
| Power cables in conduit | 0,5 |