For many men, the garage is not only a room for covered parking, but also a full-fledged workplace.
Car enthusiasts spend many hours of their lives in it every day, and not only for repair work. There are no windows in such places, so full lighting comes to the fore here.
However, this is where the main problem lies. Connecting your garage to power grids seems like an insoluble problem for most.
Either there are a lot of obstacles with documents, or there are simply no electrical networks nearby. But don’t be upset, because there are several simple ways to illuminate your garage building, even without power lines nearby.
How is lighting done?
When constructing any premises, lighting systems should always be included at the planning stage.
This is especially important for buildings such as a garage, which you can build with your own hands without any problems. Before installing autonomous lighting in this room, you need to consider the following points:
- what level of lighting needs to be organized;
- what lighting fixtures will be used;
- what type of light source will be screwed into the lamps.
Garage lighting option
It must be remembered that the lighting of a garage, even a stand-alone one, must necessarily comply with the following rules:
be safe. Autonomous lighting in this case will be the most relevant, since in this case there is no wiring, and therefore there is a risk of electrical injury;
- The lighting level should be comfortable for the eyes. In order to correctly calculate the level of illumination for a given room, it is necessary to rely on the standards given in SNiP for garages;
- the light that the lamps will create should illuminate the entire space, including the corners. At the same time, it should be uniform. To achieve this level of illumination, you can use general and local types of illumination;
- The placement of lighting fixtures should be carried out according to a scheme convenient for you. This will make working in the garage more convenient and comfortable.
Another important factor that must be taken into account when creating autonomous lighting in garage-type buildings is economical energy consumption. In this situation, LED lamps of any model (especially low-power 12 volt ones) have proven themselves to be most effective.
12 volt LED lamp
The fact is that such devices, with a power of only 12 volts, are capable of producing a bright luminous flux and at the same time consuming a minimal amount of energy.
To create autonomous lighting with your own hands, such a lamp is perfect.
Battery-powered LED light
The most practical lighting device for an emergency meeting is a rechargeable LED device.
. First of all, such lighting does not depend on a centralized supply of electricity, and, therefore, in the event of an accident, when the main light sources do not work, the autonomous lamp continues to burn.
But even such a seemingly perfect device has a significant drawback - for normal operation of the device in emergency mode, it must be charged. And as you know, charging the battery is only possible from the mains. From this we can conclude that in the case of a discharged battery, the LED emergency lighting lamp is absolutely useless. Therefore, to maintain such a device in working condition, a person must be appointed who is responsible for timely charging of the battery.
Rechargeable emergency light source based on LEDs – the optimal choice
providing lighting in emergency situations. This is primarily due to the minimal energy consumption of LEDs. This is especially true when they are combined with a battery whose charge is not endless.
In addition, the LED is designed for a fairly long number of hours of continuous operation.
And if we take into account that emergency light sources are not used so often, then a battery-powered LED lamp will last quite a long time, the main thing is not to forget to recharge the battery on time
Garage lighting
In addition to connecting to the electrical cable, the owner also needs to think about how to arrange the lighting.
Which lamps to choose for the garage?
When choosing lamps, pay attention to 3 points:
The luminous flux should be distributed evenly, which will avoid problems when parking a car and when repairing damaged vehicles. Consider the layout of the lamps in advance. Pay attention to energy-efficient light bulbs.
The most popular lamps today:
- energy saving;
- LED;
- halogen;
- luminescent.
The shape of the light bulbs can be different, depending on the wishes of the users.
Lighting installation
When creating a lighting scheme, consider the following details:
- In a garage, hidden installation is recommended. If this is not possible, then you can hide the wires in plastic boxes.
- Ceiling lamps require two-core cables with a cross-section of about 2 m².
- Make a lighting system with several switches. For example, one on the desktop, the other in the recreation area.
But in the gate area it is better to make the lighting brighter to make entering the garage more comfortable and easier.
How many lamps do you need?
Almost no sunlight penetrates into the garage, since, as a rule, windows are not installed here.
The main reason for the lack of windows is the desire to protect vehicles from prying eyes
That’s why it’s so important to create good artificial lighting here.
One lamp on the ceiling will not be enough. Dividing the room into zones will help achieve uniform lighting. Each of them contains 1-2 lamps.
For a small garage, the following lighting scheme is suitable:
- Installation of 2 lamps at the gate.
- One lamp is installed above the table with a workbench.
- Another (or several) lamp is located above the shelves with tools and spare parts.
It is recommended to mount the lamps not on the ceiling, but on the walls, so that parts of the shelf do not block the light.
Most often, owners prefer to install long lamps in the garage, which are covered with a transparent cover.
Lighting with solar panels
Today, many people install solar panels in their private homes and even apartments. With their help, you can not only save on electricity, but also illuminate a garage that does not have electricity.
Garage lighting with solar panels
Despite the popularity of this lighting method, it is unlikely to be suitable for a garage for the following reasons:
- the cost of one solar battery and its connection will cost a significant amount;
- It is unlikely that you will be able to install such a system yourself without the help of specialists;
- complexity of the system for connecting lighting devices and batteries to storage equipment (batteries).
But by spending once on the purchase and installation of solar panels, you will not only receive high-quality autonomous lighting for any room, including the garage, but you will also be able to sell the excess electricity that has accumulated to the state. A 12-volt lamp can be powered from such a system. Moreover, their number can reach several pieces, which is just suitable for a given room. If there is a need for a voltage of 220 volts, then this system needs a 12 volt converter or inverter.
Rechargeable batteries and their applications
Another way to create autonomous lighting in a garage building is to connect the lamps to a battery. The battery can power a 12 volt lamp.
When the lights are turned off, such a lighting device (rated at 12 volts) can work for 10 hours. Of course, if the battery was fully charged before. You can use a spare car battery to illuminate your garage. With its help, it is best to power an LED strip that can be run around the entire perimeter of the premises.
Which meter should I choose for my garage?
The question of which electricity meter is best to install in the garage is quite pressing. At the time of connection, the owner must have an energy consumption meter on hand, so it must be selected in advance.
When choosing an electric meter, consider which devices will be used with what power. For example, if a workshop is set up in a garage, the power consumption will be higher.
Experts advise in this case to focus on a total power of at least 15 kW. If the garage is powered from the same network as a residential building, and a workshop is located in it, an electric current of 100 Amps should be distributed at the input.
In addition, the meter must withstand temperature changes and cold, since the garage is usually not heated.
When purchasing, make sure that the metering device complies with modern standards. The electricity meter must have a stamp in the passport, seals indicating the year of testing. The manufacturer's stamp and the date of inspection must also be included in the passport. The energy supplier will then put another seal on the meter.
It is also worth paying attention to the operating principle of the meter. Induction models, which are distinguished by their low price, reliability and durability, are considered classics of the genre.
But their disadvantage is low accuracy, which can result in overpayment for electricity. Electronic products are more expensive, but they are quite compact and can be configured to several tariffs.
Garage wiring diagram
The general wiring is divided into groups of lighting and sockets. If it is necessary to arrange a power outlet, the cable is supplied to it separately, from a separate machine.
Below are several diagrams for laying wires along the wall(s).
Basic rules for installing electrical appliances:
- The distribution board is placed as close to the exit as possible. The best option is on the wall immediately next to the gate or, if there is space, on the same wall into which the gate is mounted. In the absence of people, the shield must be de-energized;
- It is advisable to separate groups of lighting and sockets, turning them on or off with a multi-key switch or using several single-key switches (one for each group). A separate switch should be installed on the power outlet;
- since the garage is an area with an increased risk of fire, it is better to install the wires in special fire-resistant boxes;
- installation of grounding is required;
- the sufficiency of lighting in each work area is checked by calculation.
The standard of illumination for a garage (nominal illumination intensity) is selected depending on the nature of the work being carried out.
Illumination with a Philippine lantern
In addition to the above methods of autonomous lighting of garage buildings, some car enthusiasts use the so-called “Filipino lantern”.
Philippine lantern
This method makes it possible to organize free lighting in the garage. Moreover, it is quite possible to do it yourself. The Philippine lantern operates on the principle of light refraction. You can make such a lantern from an ordinary plastic bottle. At the same time, it can be used either entirely or cut out of a part. The algorithm for making a Filipino lantern with your own hands is as follows:
- take a transparent plastic bottle;
- The container is easy to wash and remove the colored label;
- We put a rectangular or round screen made of stainless steel or galvanized on it;
- Clean water is poured into the bottle. It needs to be diluted with bleach. This will prevent the liquid from blooming and, as a result, a drop in lighting intensity;
- the liquid is poured so that its level is three centimeters higher than the installed screen;
- Then such a bottle is mounted in the roof of the garage structure. The bottle itself must be mounted on a rigid base.
Installation of a Philippine lantern
If the roof was made of corrugated sheets, then simply cut a hole of the required diameter in a sheet of material. To minimize the risk of the roof leaking through the holes, all joints between the bottle and the roof must be well treated with silicone or sealant. You can use a Philippine lantern as additional autonomous lighting for the garage in those regions where the sun shines most of the year. To increase the level of illumination, you can install several of these homemade flashlights. In cloudy weather, such a design will produce such dim light that working with it will be life-threatening. In addition, it is worth noting that if the sequence of manufacturing the Philippine lantern is violated, the lighting inside the garage will also be poor.
Alternative options
A variety of light sources are good when you have the time and opportunity to organize them. This also applies to ice lighting in the garage, and a variety of generators, batteries, windmills and other things. But sometimes simpler and more cost-effective solutions are required.
One of the cheapest ways to create daylighting in the garage with your own hands is the so-called “Filipino lamp” or “Filipino lantern”. This method is suitable for areas with long daylight hours; in northern latitudes it produces too weak a luminous flux.
To make a simple light guide, you will need a transparent plastic bottle with water, a piece of fiberglass or tin for fixing to the garage roof, and sealant.
View from above
Indoor light level
The process of creating such a “lamp”, or more precisely, a light guide, is discussed in the video.
Of course, a “Filipino lantern” is not enough for full-fledged work in the garage, but it is quite enough for free movement without the risk of injury.
Useful tips from an electrician
Electrical experts suggest installing garage lighting using the following guidelines:
- For power cables, use three-wire ground wire. When the equipment shorts to the housing, the RCD will operate, preventing electric shock to a person.
- Connect the lantern for street entrance lighting via a motion sensor or photo relay. This will save energy consumption.
- Do not install fluorescent lighting in unheated garages. In cold weather, mercury lamps do not work properly.
- Provide emergency lighting in case of power outage. Keep a charged battery and some LED bulb sockets in your garage. This will allow urgent work to be completed regardless of the power grid.
- Use proven devices and materials for installation.
Equipping lighting in a garage is not difficult if you choose the right lamps, calculate their number and distribute them evenly around the perimeter.
How to install electricity in an individual garage?
In order to connect an individual garage to the electrical network, you need to contact a resource supply organization. It does not matter who applies: an individual or an organization. The connection is made on a general basis, as stated in PP No. 861 dated December 27, 2004. The entire procedure consists of 2 stages.
Stage 1 - Obtaining permission
Conducting electricity anywhere (to a site, to a house, to a garage) is possible only after obtaining permission from the company supplying electricity. What documents are needed?
In addition to the application for connection, power engineers must provide:
- a copy of the owner's passport;
- a copy of the title deed;
- copy of TIN;
- a list of all devices available in the garage, indicating their power;
- technical documents for the garage;
- a garage plan, which shows the location of electricity poles, gas, water and sewerage pipelines and the places where the wiring is installed;
- consumption calculation.
The application and documents can be submitted in 3 ways:
- send by Russian post;
- bring it personally to the company;
- remotely.
The application is considered within a month (if submitted in person) or within 45 days (if sent by mail). After reviewing the application, the supplier company will send the owner 2 copies of the contract for the provision of electricity connection services and technical conditions (TU). If everything is satisfactory, then the contracts must be signed, and one copy must be sent back to the company.
Stage 2 - Connection
On the appointed date, energy company specialists will come to the specified address and make a connection from the pole to the input switchboard, seal the meter and draw up a subscriber connection certificate.
The layout and installation of electrical wiring will be carried out in accordance with current standards and in compliance with safety regulations.
How to apply for connection via the Internet?
This service is provided on the website “https://portal-tp.rf”. Here you need to register, submit an application, send scans of documents (the list is indicated above).
Many owners have a question: “To install light into the garage from a pole, who should I contact?” We answer: you need to contact the company that supplies energy resources in your area. The procedure in this case will consist of the same steps as described just above.
The electrical company will run their cable from the line on the pole to the entrance panel on the wall of the garage. True, this method is not entirely acceptable, since meters on the outer wall of the garage are often simply broken by vandals. Therefore, there is a second option, which involves underground laying of the power cable in a metal pipe from a pole with a power line.
How to make light in a garage with or without electricity
If the garage is connected to electrical networks, general and local lighting is provided. They stretch electrical wiring lines along the walls, ceiling, and also lead them into the inspection ditch. Installation of electrical wiring requires compliance with safety regulations.
Light in a garage without electricity comes from alternative sources. Autonomous lighting will help out the owner in the absence of a connection to the city power supply, as well as during temporary power outages.
A temporary lack of light can be compensated for with LED lamps or 12 V strips that are connected to a battery. LEDs, at minimum power, produce a luminous flux that is many times higher than that of other types of lamps. This allows you to illuminate the room for a long time and brightly from the capacity of one battery.
They make stationary or portable lighting. The battery is charged with a charger from the network, an electric generator, or from solar panels. Gasoline electric generators produce more power, but consume fuel.
Lighting selection factors
People enter the garage for many reasons and for different periods of time. But in any case, every time you visit a room you need to be well oriented in space and see all the elements.
To create high-quality lighting, the following factors must be taken into account:
- Room parameters (height, area, width);
- Finishing material;
- Work area location;
- Required lighting power per 1 sq. m;
- Lamp type
There are also many technical characteristics that an electrician takes into account when laying wiring. A competent lighting design must meet the following indicators:
- Safety;
- Low power consumption;
- Long service life;
- Even light distribution.
The most difficult and important factor is ensuring the proper level of security. All wires must be grounded, properly insulated and protected from contact with owners. Violation of any one of the rules may result in electrical injury or death.
Different lamps create light of different shades Source les66.ru
Useful tips and tricks
The street lamp should be equipped with a motion sensor. Then it won’t spend the whole night on battery power or screw up the meter dial. Do not use even the slightest part of the wiring without grounding. It is extremely dangerous to save on lamps, RCDs and cables. If you do not plan to repair your car in the garage, or this will happen only occasionally, then you can save money by abandoning emergency lighting. People who rarely visit the garage should mount only one lamp and use it as needed.
For some advice on wiring lighting in the garage, see the video below.
Lighting in the country: tips
- The paths can be illuminated with solar lamps; they are inexpensive.
- Incandescent lamps should not be used, they consume too much electricity and also have a short service life.
- The protection of all devices must be at least IP 43, but it is not entirely advisable to use anything higher.
- Remember to connect wires and insulate them.
- You can make emergency lighting using an old car battery.
- Make the correct calculation of the cable cross-section; if done incorrectly, you risk a short circuit. In this case, even a small error can lead to this.
Using these tips, you can create really high-quality and complete lighting. Our resource has sufficient information; understand, after reading one article, you won’t be able to do it well. Lighting in a summer cottage is a complex and multifaceted process; everything needs to be taken into account.
Methods for connecting a garage to electricity
There are several ways to run electricity into your garage. This can be done legally or illegally. But we will tell you how to legally install electricity into the garage.
Today, even experienced car enthusiasts have abandoned dangerous experiments with illegal taps and connections. In addition, power engineers have learned to easily identify unauthorized burglars. Therefore, we act according to the law.
If you connect to electricity bypassing the cooperative, for example, by running a cable from a neighbor in the garage, then sooner or later this fact will come to light and the offender will not have any trouble.
Owners of individual garages need to privately conclude an agreement to connect to electrical networks, issue a personal account, a book and pay for the electricity consumed.
Organization of internal electrical wiring in the garage
We will not dwell on the external stage, since it is too complex for the unprepared garage owner. In almost all cases, it is carried out by professionals under the supervision of the relevant government services. But instructions on how to conduct electrical wiring should be before your eyes. Without it, it’s difficult to cope even with this not particularly difficult job.
You can lay open or closed wiring:
The open version is suitable for rooms created with metal or wood, since it is impossible to run cables inside them. For this purpose, special plastic boxes or similar devices are used. Sometimes the space under the baseboard is used for this purpose. We recommend using flat-type cables similar to PPV, but any options without armor will do.
To successfully secure the wires, tin versions of staples or dowels and nails are used. Fasteners must be installed at a distance of about 40 cm.
Do-it-yourself electrical wiring in a garage based on a hidden type is used in the case of a concrete or brick type of building. It is usually created before applying the plaster, since it involves destructive actions for its integrity. You just have to make sure that the distribution boxes will not be too noticeable after the plaster application process.
But it happens that the wiring is created after applying the plaster. In this case, it is necessary to create grooves with a depth of about 0.5 cm. The cables are laid in them using nails. After this, the recesses can be sealed.
But it is necessary to take into account that the wires are connected using soldering. After this, you can install all outputs to the consumer based on the diagram.
Internal installation of electrical wiring in a garage can be done by virtually any owner of this premises with his own hands.
But it is necessary to remember about safety, since a careless attitude towards electricity can lead to undesirable consequences. Lay the wiring without applying voltage, wear comfortable clothing, make sure that all devices and tools are in working order, and that the cables are secure.
Options for autonomous garage lighting
As already mentioned, the best choice for any garage structures will be LEDs. They have a lot of advantages, among which the following points should be highlighted:
- creating uniform and bright lighting;
- in terms of glow intensity, such a lamp creates a luminous flux that is equal to daylight;
- economical consumption of electricity;
- such lighting devices can be powered from various devices (for example, from a battery) in a situation where there is no source of electricity.
LED Garage Lighting
Most often, 12-volt LED strips are used to illuminate garage spaces. With its help, you can create general lighting by running a ribbon around the perimeter of the structure. In such a situation, the light emanating from the tape will fall evenly. Using an LED strip, you can also create local illumination of shelves and racks, as well as an inspection pit.
The same conditions and requirements are typical for the basement. In this regard, the lighting installation that will be used here should not have a power higher than 12 volts. You need to remember that in certain places in the garage you need to install a waterproof lamp, both when creating autonomous lighting and when electricity is available.
Variations of garage lighting
Now you have decided on the type of lamps used, it’s time to decide what kind of lighting will be in the future garage. It can be complete or spotty. The second option is more acceptable if you do not have a lot of money or your premises are very large. But there is a third option - combined. It is about illuminating the garage and its most difficult to reach and dark corners that you will need.
Do-it-yourself garage lighting is a responsible, but uncomplicated process. We have decided on the type of placement, now we need to accurately determine the location of each source and calculate the future number of light bulbs. Always comply with two basic conditions:
- The entire room must be fully illuminated.
- The light should not be produced with differences, each corner is accordingly illuminated evenly.
Now we need to figure out the light supply systems. This will help you comply with all conditions and achieve success. If your garage is small, we recommend installing one large lamp in the center and several small ones around the edges. If it’s the other way around, then install the largest light source directly above the machine or work area, and mount the rest along the walls.
It is worth remembering that it is not necessary to install each lamp at the same level from the floor, this is a purely individual factor. The multi-level lighting option is recommended by most experts as the most effective and ergonomic. The best method is as follows - you need to install lamps on the ceiling and three levels. The first is 40 centimeters from the floor, the next is 75, the last is right under the ceiling, that is, about two meters.
The central lamp must be installed in such a way that there is no shadow from the car. A lamp on a bracket is the best option in this case. You should also always have a portable lamp with you that can be installed on the mezzanine or hood of a car to illuminate the desired area. This way, you can improve your productivity and the overall efficiency of the room.
Garage Lighting Options
Knowing the classification will help determine which lighting arrangement is best in the garage. Lighting devices differ in design and type of lamp installed.
Types of light sources:
- Incandescent lamps have a low price, a short resource, and low light output efficiency - up to 15 lm/W. They scatter light unevenly and are sensitive to voltage changes.
- Halogen lamps heat up during operation, have a luminous efficacy of up to 22 lm/W and an average service life. They fail when there are power surges or when liquid or fat gets on the glass flask, so they require installation in sealed caps.
- Fluorescent tubes are more economical - light output from 45 lm/W. They operate unstable at voltage drops and temperatures below +5℃. They contain mercury, which, when the flask loses its seal, enters the environment, which is harmful to human health.
- LED panels, strips and lamps produce a luminous flux of 120 lm per 1 W of consumed electricity, which characterizes them as the most economical. The service life reaches 30 thousand hours.
In garages, surface-mounted, pendant, recessed lamps, as well as devices on an adjustable bracket are used. The housing design can be waterproof, dustproof, shockproof or with a protective grille.
Illumination of inspection ditch
Durable, moisture-resistant lamps must be installed in the inspection pit.
A person works in close proximity to lighting fixtures installed in the inspection pit. The accumulation of dampness leads to electric current leakage, which is dangerous for people. This increases the safety requirements for the arrangement of lighting in the inspection ditch.
Stationary and portable lighting of the garage pit is carried out by supplying a line with a voltage of 36 V and below. This voltage value is obtained on a step-down transformer.
Sealed, moisture-resistant, dust-proof lamps covered with impact-resistant shades are installed in the pit. Additionally covered with protective grilles.
To protect lamps from damage from falling objects, niches are made in the walls of the inspection ditch and devices are mounted in them on retractable brackets.
How to make light in the garage: lighting options
The power (energy consumption) of lamps and their quantity directly depend on the method of obtaining energy. When an external electrical network with unlimited consumption is connected to the building, there is no need to save on the power of lamps and their number. If you plan to have autonomous lighting in the garage, you must count on the permissible power consumption from a battery or an alternative source (wind generator, solar panels, etc.).
Working in a closed, unheated (lowly heated) and often damp room requires light sources to:
- high luminosity with minimal energy consumption;
- strength, resistance to accidental impacts and shocks;
- resistance to moisture, dust, temperature changes;
- Possibility of stable operation at unstable voltage;
- compliance of the input voltage with standards for centralized and autonomous power grids (220/380 V).
When choosing a lamp, the intensity of the luminous flux per 1 W of power is taken into account. The leaders in this parameter are LED models.
Other parameters of light sources are also taken into account (the table shows a comparison for lamps with a luminous flux of 800...900 Lm)
Important: at low temperatures (less than -5o Celsius), fluorescent lamps operate unstable, and insufficient voltage in the network also creates a problem. For halogen lamps, protection from dust, touches and voltage surges is required.
They are connected via a power supply (12 V).
Thus, lighting a garage with LEDs is the safest and most practical, but not the cheapest, option.
Do it yourself: instructions
Installation of lighting in the garage and installation of electrical wiring requires the use of:
- tester;
- a set of insulated screwdrivers;
- insulating tape;
- dielectric gloves;
- safety glasses;
- insulated pliers;
- construction knife or wire cutters (they are used to cut off the wire and strip it).
Laying wiring, installing distribution cabinets and other components is impossible without hammer drills, drills and wall chasers.
It is also worth preparing:
- construction spatulas;
- jigsaws;
- saws for metal and wood;
- hammers, wrenches;
- drills for certain materials;
- circular saws;
- building levels and measuring tape.
The exact list of tools is determined by what kind of work needs to be done and what its volume is. One socket should be per 6 sq. m. garage, and the switches of the general and local levels must be separated. When a room has separate zones, the number of light sources at the general level can be reduced. But this means that you will still have to connect private power supplies to the main power lines efficiently.
Brick walls with gypsum and lime plaster allow for hidden wiring. The center of cable routing is the indoor distribution block. Grooves for power cables are drawn in the direction of the sockets. The grooves from switches to ceiling lamps must be made vertically. When a suspended or fire-hazardous ceiling is used, the lighting lines must be hidden in a special corrugation hidden by a false ceiling.
You cannot expect that the installation of lighting in the garage will be cheap and high quality at the same time. It is even more difficult to do this work in a metal building. A frame garage, insulated on the outside and finished inside with several types of materials, is equipped with lighting systems with a combined route.
The main nuances are:
- shields are placed on non-combustible bases to the right of the door or gate;
- it is advisable to place electrical routes hidden;
- if hidden installation is not possible, boxes made of plastic or metal are used;
- these boxes are mounted on the walls as securely as possible;
- open boxes are used to install sockets and switches;
- lighting fixtures are placed on special brackets, which are selected in accordance with the mounting method.
When in the garage, in addition to the car, household supplies, spare parts, tools, things accumulate, or there are a number of work segments, you need to provide several light switching points, one of which will be the main one. All devices in inspection pits must be connected only through a step-down transformer. If the calculations are carried out correctly and there are no errors during the installation of wires and equipment, the safe operation of the electrical network is guaranteed for approximately 30 years.
It is imperative to provide emergency lighting for the garage. The simplest option is a pair of LED strips that are connected directly to the batteries. It is not necessary to take a car battery; a computer uninterruptible power supply unit is also suitable for solving this problem. As an autonomous source of power supply, a wind generator can only be used in mountainous areas or on sea coasts, where wind speeds very often exceed 6 m/s. At this flow rate, a standard device generates 1 kW of electricity per hour - quite enough for lighting fixtures.
If the solar panel and battery are not suitable, you need to choose a “Filipino lantern”. This is a bottle made of transparent plastic, on which a screen made of galvanized or stainless steel is put on. The screen shape can be either round or rectangular. Pour clean water into the container and dilute it with bleach. The device is placed in the roof, and the joints are filled with sealant or silicone. To ensure there is enough light in the room, you need to use several lamps.
Local lighting device ↑
Any garage that seriously engages in car repairs should have an inspection hole. To illuminate it, the ideal option would be to install local lamps. It should be noted that this place is characterized by high humidity and the formation of condensation. That is why the optimal solution for lighting the inspection pit is low-voltage light sources with a 12V power supply. They are powered through a step-down transformer from the general electrical network of the garage. Lighting the inspection pit requires special care and precision, since this place is especially dangerous in terms of electrical safety.
Lighting of the inspection pit
In addition to the inspection pit, you can organize local lighting of the entrance and garage doors. This measure will make parking a car much easier in the evening. In conclusion, it can be noted that organizing competent, economical, effective lighting in the garage is a solvable task. The only thing is that this issue should be approached at the design stage, everything should be carefully thought through and the most optimal choice should be made. The main thing is to strictly comply with all electrical safety requirements when installing lighting in the garage.
Diesel or gasoline generator
You can also make light in the garage without electricity if you use a gas generator. In this case, as in the version with solar panels, it is possible to completely provide the site with electricity by connecting the generator to the power grid. It is rational to use this idea only if the lights are turned off for a short period of time, and if you use power tools in the garage.
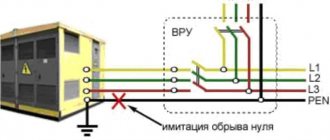
Otherwise, 1 kW of electricity from a gas generator will cost you quite a lot, so using it constantly is unlikely to be profitable. We talked about how to connect a generator to the network in the corresponding article.
Homemade wind generator
An alternative option for autonomous power supply to a garage and a dacha in general is to install a windmill, which can also generate free electricity. You can buy a ready-made device, but it will be quite expensive. For a 2-kilowatt model you will have to pay about 100 thousand rubles. That is why we suggest you make a wind generator with your own hands, thanks to which you can use light in the garage without electricity.
The only thing to consider is wind speed. If there are no strong gusts of wind in your region or site location, it is unlikely that you will be able to get free electricity.