Scheme for connecting an LED to a switch in an apartment
Diagram and appearance of the switch
As you can see, the device consists of only two elements - a current-limiting resistor and a light source.
Many people who are not related to radio electronics may be confused by this scheme. After all, we put the LED in a 220V AC switch, although the LED itself is designed for a voltage of 2-12V DC. And the main lamp, in theory, should also glow with this connection.
How and why does it work?
Let's remember the school physics course:
- Voltage is the potential difference at the two ends of a conductor . The higher the voltage, the faster electrons travel through the wires.
- Current strength is the density of electrons in a conductor . When an electrical circuit encounters a section with high resistance along the path of electrons, some of them give up their energy to this section.
When the current (electron flux density) is significantly greater than the area can handle, the excess energy is converted into heat. If there were no resistor in front of the diode, the current passing through it would be many times greater than its rated parameters, turning the diode crystal into a cloud. In this circuit, the resistor acts as a valve, cutting off most of the current. Current will also flow through the incandescent lamp itself, but its strength is so small that the coil will not heat up.
LED lamp device
Despite the variety of models and the difference in technical solutions depending on the manufacturer, each LED lamp has the following main components:
- base;
- frame;
- LEDs;
- driver.
As in conventional lighting fixtures, the base is used for fastening, and the body is used to accommodate the main elements. Some of the lamps are equipped with radiators for cooling. Lighting sources are LEDs - semiconductor elements that convert electrical energy into light radiation. The voltage they consume is significantly lower than the usual 220 V, and therefore the power is much less than that consumed by ordinary light bulbs. This is the basis for savings in the operation of LED lamps. But to create the required voltage, it is necessary to use special converters (drivers) that lower it to the required value. This is where the main differences appear. The converter is a complex device consisting of electronic components: a diode bridge, resistors, transistors, capacitors, chokes, and sometimes transformers.
Calculation of circuit parameters
| Formulas for calculating electrical circuit parameters | ||||
| Voltage | Current strength | Resistance | Power | Capacitor reactance |
| U=I*R | I=U/R | R=U/I | P=Ur*I | Rc=2*π*£*C(f); Rc=314*C(f) |
Selecting a resistor for the LED. In this formula, the network voltage is taken as 320V, since it is necessary to take into account not the nominal parameter, but the effective peak voltage.
Selecting a resistor
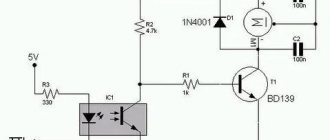
How to make a backlight for a switch
The main purpose of an LED backlit switch circuit is to limit the amount of current flowing through the LED. For a diode, it doesn’t matter at what speed electrons pass through it, it will take its “portion” and convert it into a glow. If the electron flux density is higher than its throughput, the excess will be released in the form of heat, melting the crystal.
Installing an LED in a 220V switch, diagram:
Options for how to connect an LED
Option 1
This connection method will work, but for a very short time, a few milliseconds, until the filament of the incandescent lamp lights up. With this connection, the circuit current will be calculated based on the needs of the lamp, exceeding the needs of the LED by hundreds of times. This is the wrong option.
Option 2
This is already a viable option. Current-limiting resistor R1 will reduce the current to the required value. For a regular 20 mA LED, the resistor value should be:
(320V-3V)/0.02A≈16 kOhm and power 0.25-0.5W.
To increase the service life of the backlight and reduce the heating of the resistor, it is better to increase the resistance parameters by 3-4 times. Such a circuit can be seen if you disassemble a cheap Chinese switch with an LED. There is no reverse current protection, which does not contribute to the long life of such a device.
Option 3
Turning on the diode with reverse polarity protects the LED from reverse half-wave. This is important if there are powerful devices on the network line: washing machine, boiler, electric kettle. You can use any small-sized diode with a voltage of up to 500-1000 volts.
Video description
How to fix a light bulb that blinks when the light is off:
Insufficient mains voltage
If there are constant interruptions in the supply of a stable load in the house, the solution is to purchase a voltage stabilizer. It will eliminate flickering of LED lamps and protect them from rapid failure.
Poor LED quality
Sometimes you can think for a long time and check for what technical reasons and why the LED lamp blinks when it is turned on, but the reason turns out to be simple - low quality of the product.
If the light bulb blinks at certain intervals, the flickering may not even be noticeable to humans. The cause of the problem is the poor quality of the LED power module, which cannot correctly handle the rectified load.
Such blinking is harmful to the eyes and for this reason it is necessary to buy lighting devices from trusted manufacturers. All reliable manufacturers manufacture their products in accordance with the rules of SanPiN 2.2.1/2.1.1.1278–03, which indicate the pulsation coefficient. If the product is of high quality, this parameter will be written on the packaging. For cheap models it is not always indicated.
You can improve the quality of the LED of cheap products with your own hands, but this is a rather labor-intensive task: usually it is necessary to disassemble the base and install a new one with a larger capacity instead of the old capacitor. Naturally, the new element must fit the dimensions of the LED light bulb so that the base can be properly installed in place.
Expert opinion
It-Technology, Electrical power and electronics specialist
Ask questions to the “Specialist for modernization of energy generation systems”
Why does the LED lamp blink when the switch is off and when the switch is on? If there is no protection for the resistor soldered into the board, the LED lamp blinks both on and off until it completely stops functioning. Ask, I'm in touch!
Examples of calculations
Since our task is only to illuminate the switch and achieve maximum viability, we take the LED current 30% of the nominal - 6mA
Resistor current limiter
Usd=3.5V, Isd=20mA (0.02A) - We do the calculation at 6mA (0.006A);
R1= (330-3.5) /0.006=55000 Ohm (55 kOhm). In order to reduce heating, the resistor value can be doubled to 100 kOhm.
Resistor power P=Ur1I=3270.006=2W.
It is better to mirror a 1000V diode in parallel with the LED.
Capacitive current limiter
Instead of a resistor, you can use a high-voltage capacitor; R1 is necessary for the self-discharge of capacitor C1. The capacitive circuit does not heat up.
C1=Rc/(2π£)=50kOhm/(23.1450Hz)=150μF; C1=150uF*500V;
R1=0.5-1 MOhm;
The diode is the same as in the previous design.
If the switch is intended for an energy-saving lamp, it is better to replace the LED with a neon lamp, the donor of which will be the starter of the fluorescent lamp. Classical circuits, due to half-wave damping, can cause flickering of “energy-saving” devices. The connection principle remains the same, but due to the higher rated current, about 100 mA, the resistor or capacitance (on a neon light bulb) should be increased to 500-600 kOhm.
Using a pass-through switch
The science of blinking of switched-off lamps does not stand still). This is an update to the article dated July 26, thanks to reader Sergei for the tip. See his comment to this article dated July 25, 2014.
When the lamp is turned off, the potential, due to which it tries to turn on, appears for two reasons (often these reasons are present simultaneously): 1) The potential appears due to the flow of backlight supply current, 2) The potential appears due to interference from nearby current-carrying conductors.
By the way, it is almost impossible to measure this parasitic voltage with a conventional voltmeter, or the readings will be greatly underestimated - because the voltmeter itself will act as a shunt.
The idea is that the parasitic potential is shunted by the contacts of the pass-through switch. Here is a diagram from which everything will be clear:
Pass-through switch to eliminate flickering of a switched-off lamp
The top position of the switch according to the diagram - the lamp is on, everything is clear here.
Turn off the lamp, switch position is down. The backlight is powered by neutral through the switch contacts (and not through the lamp, as usual), and the lamp is connected to the neutral wire on both sides. Everything is iron-clad, no interference or stray potentials.
Also read comments on this topic for July 25, 2014 and later.
In order not to miss new articles on the SamElectric.ru blog, subscribe, and new articles will be sent to your mailbox immediately (within a second) after publication!
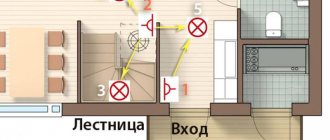
Connection diagram
How to connect using a live example
Below is a diagram of how to connect a switch with an LED. Connection instructions
- Before installing the LED circuit in the switch, make sure that the switch is disconnected from the “phase”. This can be done using a simple tester screwdriver.
- Check the quality of insulation of all connecting contacts. Bridging exposed wires will, at best, damage the lighting circuit, and, at worst, damage the wiring in the apartment.
- If necessary, you can make a mounting hole for the LED in a plastic part so that it evenly illuminates the switch button.
- We assemble the resulting structure and enjoy the result.
How bad is it that the LED lamp continues to burn after being turned off?
Unauthorized lighting of a lighting fixture creates a number of problems:
Flashing or dim lights can be annoying. Especially if the LED lamp is used to illuminate bedrooms, hotel rooms, etc. This mode significantly reduces the resource of an expensive device. A constant glow, albeit in a weakened form, reduces the service life by two or more times. Dim light caused by leaks indicates problems with wiring insulation
And you need to pay attention to this and take measures to prevent the development of a malfunction.
Therefore, if a problem occurs, you should find out the cause of the glow as quickly as possible and eliminate it as quickly as possible.
Recommendations
If we use the resistor option, it is worth experimenting with the resistance parameters. The diode can “start” with 2V or 3V; accordingly, in the second, the resistor value can be reduced.
Do not forget that in such devices only the electron density is limited; the voltage remains the same and is still dangerous for living organisms.
Please rate the article. We tried our best:)
Did you like the article? Tell us about her! You will help us a lot :)