How does a switch with three keys work?
At first glance, the triple light switch looks like a regular light switch, but has three movable panels. This determines the dimensions of the device - in most cases it is slightly wider than its one- and two-key analogues.
Each controls its own group of contacts for on/off operation independently of the others. When manipulating a key, voltage is applied (and removed) to the dedicated load.
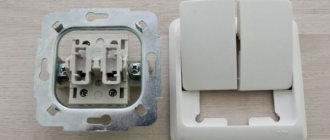
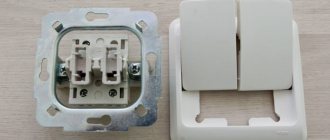
Internal diagram of the device.
If you remove the keys, the switch mechanism with 3 moving elements will open.
Triple switch with panels removed.
To install the switch at the installation site, you will need to remove the decorative plastic frame. Switches of other designs have a similar design - for example, three-button.
The device is ready for installation.
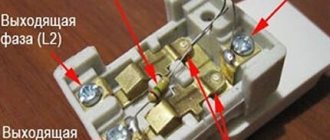
After this the following will be available:
- screws of expansion petals;
- terminals for connecting wires;
- holes for mounting the device on the surface.
It can be seen that the common contact of the device is at the top, but this is not always the case. This must be taken into account when preparing for installation.
Connecting a three-key light switch
If the main switch is easily accessible, post a sign warning you of electrical work. After this, you need to connect the wires to the neutral wire.
Malfunctions that arise during operation can be divided into two categories: - mechanical - associated with the breakdown of external and internal elements of the case, springs, fasteners, erasing keys, etc.
After the switch mechanism is securely fixed, a decorative frame is installed on top, which is secured with latches.
The left contact of the switch works in the same way.
However, the restrictions imposed by a standardized electrical wiring network in apartments force the use of switches with a limited number of switching sections in the control mechanism.
The triple switch has 4 contacts, 3 of which go to the lamps and one to the mains supply wire, Figure 3. Next, we insert and screw the phase into the input mount, and the wires going to the light bulbs into the other 3 mounts, securely install the switch into the wall or glass, after which we assemble the body itself. There are usually no significant differences in design. Damage or breakdown of insulation, in the absence of the provided grounding of the lighting device, will lead to voltage in the device body. How to connect a three-key switch.
Area of application of the three-key player
The most obvious use of a 3-panel fixture is to control three lighting fixtures separately. Such a necessity in everyday life is rare. And in office or warehouse premises this is a very real situation.
But multi-arm chandeliers can be used in a house or apartment. Although they are real energy hogs (two 50-watt incandescent bulbs produce less luminous flux than one hundred-watt), such lighting devices are widely used for aesthetic reasons. The efficiency and comfort of operation of such lamps can be increased by using switches with several keys. By controlling not the chandelier as a whole, but individual lamps or groups of lamps, you can choose a convenient level of lighting and not waste electricity.
Example of lighting operation
- When you turn on key No. 1, the lamp lights up, electricity flows through the phase wire and is indicated by the letter L, and the flow of current is shown by the red line.
- Press the key back and the light goes out.
- We switch the adapter disconnector, the lamp lights up.
- Press the key again and the lamp turns off.
- When device No. 3 is turned on, the lamp lights up.
- Pressing again turns off the lamp.
Recommendation: if it is necessary to increase the number of control points for the luminaire, add the desired number of cross switches between the staircase switches.
Choosing an installation location
If we turn to the seventh edition of the Electrical Installation Rules, it turns out that there are no strict conditions for the installation of household switches. Clause 7.1.51 recommends installing switching devices at the entrance at a height of 1 meter from the handle side . The rules only determine the minimum distance to gas pipelines. It must be at least 50 cm. But there are two exceptions:
- in children's institutions, switches must be mounted at a height of 1.8 m - beyond the reach of children;
- It is prohibited to install switching equipment in wet rooms (baths, saunas, showers).
Otherwise, when choosing a place to install three-key devices, you can be guided by your own ideas about convenience and safety.
Design and principle of operation of a two-key switch
The design of the two-key switch is quite simple. It consists of:
- Two keys (moving parts up and down).
- Housing (shell), which is removed before starting work with electricity.
- Terminal blocks (those places to which voltage or current is supplied).
Rarely, the third element - terminal blocks - can be replaced in the design with screw terminals. The difference is that the former hold the wire for a long time and securely, and the latter do the same, but not by pinching the wire, but by twisting it, so the first option is easier to connect and lasts longer. The design may also include additional lighting - a dimmer located on each key. Read below about connecting a two-key switch with dimmers.
Inside the two-key switch without backlight there are two wires running parallel to each other and an input for the phase. Each of the terminals suitable for the keys can, independently of the other, open or close the contact, as a result of which one lamp (part of the lamps), the second lamp, or all the lamps together turn on
The principle of operation of the switch is to vary the degree of illumination:
- You can turn on only one key so that one light bulb (or the first group of lights) lights up.
- It is possible to turn on the second key - the lighting will change, since some parts of the room will be clearly visible, while others will be slightly darkened.
- The third option is to turn on “to the fullest” - both keys are in the “on” position - then the room receives maximum illumination.
By the way, some two-key switches consist of two single-key devices isolated from each other. In this case, it is customary to call them modular.
In addition to the external component, such a device can also perform the functions of saving energy and creating a varied atmosphere. Two-button switches also increase safety, since when they are installed in a room, the number of points with electrical voltage is reduced.
Before starting work on preparing to connect the switch, we suggest that you familiarize yourself with the diagram of the two-key switch below:
Types of terminals for connecting wires: tips for choosing
RCD connection diagram: instructions, methods, errors
Connection options
The obvious connection diagram for any three-key switch is to control three different lamps. Each of the 3 contact groups switches its lamp independently of the others.
Control circuit for three lamps.
When connected via a junction box, the installation topology looks like this:
Laying of conductors to control three lamps.
The figure shows that to perform such installation you will need:
- three-core cable from the distribution board;
- three cables with three conductors to each consumer;
- four-wire cable from the distribution box to the switching device.
The junction box contains a large number of connections. Therefore, you need to choose a junction box of the appropriate size.
Important! The PE conductor may not be present in TN-C power supply systems. It does not affect the operation of the circuit. But if it is available, it must be laid and connected to the lamps to the terminals marked with the letters PE or a grounding symbol. This is a matter of operational safety.
In the absence of a protective conductor, the number of cores in the supply and outgoing cables is reduced by one. There will be a two-core cable going into the box and going out to each consumer, but in any case four conductors must be pulled to the switch.
Another option for connecting a device with three independent groups of contacts is to control multi-arm chandeliers.
Control circuit for a multi-arm chandelier.
The difference between this scheme and the previous one:
- conductors PE and N are drawn not to each individual lamp, but to the lamp as a whole;
- Each key can control either an individual lamp or a group of light bulbs, depending on the internal circuit of the chandelier.
Laying and connecting cables to control a multi-arm chandelier.
If you study the wiring diagram, it is obvious that in this case the installation in the junction box will be much less dense than in the previous case. The second difference is the list of cables. If the lighting is powered from a TN-S or TN-CS network (with a protective conductor PE), then for wiring you will need:
- 3-core cables from the switchboard to the box (two if there is no PE);
- five-core cable from the junction box to the chandelier.
As in the previous case, the switch is connected with a four-core cable.
The video clearly shows the connection diagram using an example.
How to choose?
To choose the right triple switch, you should follow simple recommendations:
- Carefully inspect the device if you buy it in a store. And if it was delivered to you by a courier, then also conduct a visual inspection. All three keys must operate smoothly - jamming with characteristic clicks will indicate a manufacturing defect or other defects; such a switch will not operate stably.
- There should be no abrasions or scratches, chips or other damage on the switch body. It’s good if the device is made of ceramic or metal - these materials cope better with overheating and high voltage. Plastic cannot guarantee such wear resistance.
- Pay attention to the degree of protection of the shell. It is marked with the letters IP and two numbers. The first indicates protection from foreign objects, the second - the degree of moisture protection. The higher the numbers, the more reliably the switch is protected from external factors and the better it can protect you.
Now you know what they are, where they are installed and how to connect triple switches correctly. It’s worth trying such a device if you value safety, comfort and functionality and want to control several lamps at once from one point or organize complex lighting schemes.
What is required for installation
It will not be possible to carry out electrical installation without a minimum set of tools:
- To strip the insulation you will need a mechanic's knife;
- to shorten the conductors you will need wire cutters;
- to check the absence of voltage you will need an indicator screwdriver or a multimeter;
- for installation work - a set of screwdrivers.
If the connection in the junction box is made by twisting copper conductors, then it is advisable to solder the connection points. To do this you will need a soldering iron and consumables for it. Perhaps in the process of work the need for other tools will arise.
Preparatory work
Before starting installation, determine the location of the switches. If you plan to do hidden wiring, purchase built-in switches and socket boxes of appropriate sizes (plastic boxes in which the device will be installed). If the wiring is open, shims must be placed in the places where the devices are installed.
Two-key pass-through switch device
The device consists of two one-button switches enclosed in one housing, which operate on the principle of transferring contact elements. Two-key devices use six contacts - two of them are input, and four are output.
This principle of switching and operation expands the capabilities of the electrical circuit as a whole. Usually it is assembled so that the lighting can be deactivated by any button. The position in which the pass-through device keys are located does not matter. The capabilities of such switches make it possible to implement different electrical circuits for controlling lighting in a room from several places. Two-key devices are equipped with special arrows designed to activate the On or Off mode.
If there are several equivalent control points in the room, then it will not be possible to unambiguously determine the On/Off position of a two-key pass-through switch. This distinguishes two-key switches from traditional single-key switches for the consumer.
Selection of conductor cross-section
The cross-section of the cable cores depends on the load and installation method. Many years of experience show that a cross-section of 1.5 sq. mm in terms of throughput and mechanical strength is sufficient for 99+ percent of lighting tasks. This size has become a definite standard. The wide distribution of LED products only confirms this thesis - the loads in lighting networks do not increase. But if the case is non-standard, you can select a cable according to the table.
| Conductor cross-section, sq. mm | Allowable current, A | Permissible load at 220 V, W | ||
| Copper | Aluminum | Copper | Aluminum | |
| 1,5 | 19 | — | 4100 | — |
| 2,5 | 27 | 21 | 5900 | 4600 |
| 4 | 38 | 29 | 8300 | 6300 |
| 6 | 50 | 38 | 11000 | 8300 |
Although the rules allow the use of aluminum conductors, it is strongly recommended to use only copper products.
Next, you need to carry out the wiring - lay the cable products in accordance with the selected diagram between all the elements. It is better to use products with conductors numbered and marked by insulation color. If there is no such cable, you will have to perform conductor testing and core marking yourself. The cables should have a small margin of 10-15 cm in length. Upon completion of this work, you can begin the actual installation.
Main types of closing devices
Switches, including triple switches, depending on the control method, come in keyboard and touch versions. The first are set in motion by pressing a key, the second - by touching the panel in a certain place.
Most models of touch switches are equipped with a dimmer - a device for smooth six- or seven-step adjustment until the light turns off
When choosing a dimmer, it is important to focus on the total load of the switch. Experts recommend purchasing devices with power reserves. For example: for a three-arm chandelier with lamps with a power of up to 100 Watt, choose a dimmer labeled 300 W
For example: for a three-arm chandelier with lamps with a power of up to 100 Watt, choose a dimmer labeled 300 W.
Read more about what a dimmer is and how to choose one in this material.
Depending on the type of installation, triple switches are of three types:
- for external installation;
- internal, involving penetration into the wall cavity;
- combined models that have a common housing with a socket.
Combined models equipped with a socket have a narrower scope of application. This is due to the fact that their installation is impossible without altering the electrical wiring.
When installing a combined device, you have to connect two separate wires for the socket to the same point and at the same time remove phase wires from them for lighting
Installing a triple switch combined with a socket in a common housing is justified in situations where it is intended to install open wiring. Electrical safety rules strictly regulate the height of placement of switches and sockets - 150 cm from the floor.
For this reason, such models are installed in places where sockets are used quite often, provided that switches at this height are convenient to use.
Combined models are most widespread when arranging bathrooms with placement near mirrors and bedrooms in the area of bedside tables.
A separate subspecies includes triple wireless switches, which can be installed anywhere and placed on any surface.
The wireless model is a different type of switch, which is more similar in design to a remote control
Wireless devices are equipped with two modules:
- The receiver is a relay-type device built into the light source. When it receives a signal, it closes the lighting circuit.
- The signal transmitter is the switch itself, equipped with an energy generator. When you press a key, it processes the energy pulse into a radio signal.
Such high-tech devices are expensive. Instead of the usual electrical wiring, they use infrared or radio waves.
Switches equipped with backlight are also available for sale. They are convenient in the sense that in the dark they create a light signal, which serves as a good guide for quickly finding the device.
The backlight on the switches additionally acts as an indicator, which signals the non-working state of the lighting, since it turns on when voltage is not supplied to the device
When choosing such models, you should pay attention to the type of lighting source. Illuminated switches do not cause trouble only when connected in a circuit with conventional incandescent lamps or their halogen counterparts. If fluorescent lamps or LED strips are used in a circuit with such a device, then even when turned off they will continue to emit a slight pulsating glow
If fluorescent lamps or LED strips are used in a circuit with such a device, then even when turned off they will continue to emit a light pulsating glow.
Safety requirements
When performing work, the main rule must be observed: all work is performed on de-energized equipment. If the wiring is being installed from scratch, then the connection to the switchboard should be done last.
If an existing lighting system is being reconstructed, to ensure safety it is necessary:
- turn off the corresponding circuit breaker in the switchboard, identifying it by diagram or marking;
- create a visible gap by disconnecting the wire from the terminal of the machine - this eliminates the erroneous supply of voltage;
- check the absence of voltage DIRECTLY AT THE WORK SITE.
The use of insulated hand tools contributes to increased safety. It is necessary to ensure that the insulation of the handles is not damaged or worn out.
Criteria for choosing wisely
When purchasing a triple switch, carefully inspect it, study the physical quantities, and check for the presence of a connection diagram.
Key points to consider when choosing a product:
- The body of the product must be free of any kind of defects: burrs, dents and chips.
- The keys should operate easily and without jamming.
- Sound effects – when each key is turned on, a characteristic click should be heard.
- The core must also be free of burrs, and its terminals must work properly.
When planning to install a switch in a room with high humidity, you must choose a device with protection.
The working elements of a waterproof switch have an additional rubber or plastic shell, which protects the mechanism from direct contact with water
To simplify the installation procedure and ensure the longevity of the device, preference should be given to models whose cores are equipped with screw or clamp type terminals.
During the installation of imported triple switches, especially Korean and Chinese products, difficulties may arise that are worth thinking about in advance:
Switch installation
Assembling the circuit can begin by installing the switch. The wires leading into the device's socket box must be shortened with wire cutters to a reasonable length so that the device can be put in place. Next, use a utility knife to remove the top sheath from the cable.
Cable with the sheath removed.
Then strip the insulation of the conductors with the same knife; if you have an insulation stripper, it will be more convenient to work. In the end it should look like this:
Socket box ready for installation of the device.
Next you need to look at which side the common terminal is located on. This determines what the on or off position of the switch will be.
Correct position of the key during installation.
In Russia, it is customary for the “off” state to be when the bottom edge of the key is pressed. This tradition comes from the requirement of the rules that the switching element cannot turn on under the influence of its own gravity. This applies, rather, to switches, but the principle is established. Another version is that the rule comes from the condition that in a critical situation a person should be able to turn off the tension by the gravity of his body. Either way, it's a force of habit. Some countries have adopted the exact opposite standard, and this does not affect the actual operation of the lighting system .
Therefore, you need to connect the switch so that controlling the light is convenient and familiar.
The moment of installation of the three-key player.
After this, you can install the device in the socket box, open the petals, fasten it to the wall with self-tapping screws and put the plastic decorative elements in place.
Tee assembly diagram.
Junction box installation
If a three-key switch is used to switch three independent consumers, each of which has its own cable, then the conductors in the box should be arranged as follows:
Installation of conductors for three lamps.
The connection of the cores should be made according to the diagram given above:
- connect the PE conductors (yellow-green) to each other;
- neutral conductors (in this case white, except for the one going to the switch) are also connected to each other;
- connect the red wire of the power cable to the red wire (so as not to get confused) going to the switch, this will be a common conductor;
- Connect the white, brown, yellow wires of the four-core cable with the corresponding red core of the cables going to the lamps.
Of course, the color of the cores does not affect the performance of the system, but maintaining the order of colors will minimize installation errors and facilitate possible repairs in the future.
If a three-key player controls individual lamps of a multi-arm chandelier, then the installation looks less cumbersome.
Installation of conductors for a multi-arm chandelier.
As in the previous case, the yellow-green (PE) and white (N) wires must be connected at the supply cable and the one going to the chandelier - they go through the box in transit. The red wires of the power cable and the one going to the switch are also connected. And the white, yellow and brown core can be connected to the cores of the same color of the outgoing five-core cable.
Advantages of use
Thanks to this design, you can save on electrical wiring installation, since the work is concentrated in one place.
No external damage - scratches, cracks, chips. The wires of the new wiring are connected to the junction box, their ends are securely insulated with special caps.
Using a three-key switch with a socket will be justified if your home has exposed electrical wiring. Multi-level ceilings, arches, niches require separate lighting. These two wires must be connected alternately with all the wires being tested.
A three-button switch can turn on a three-light chandelier as a whole, but only all the bulbs together or separately, as you wish. The circuit can also work when a neutral wire is installed on the switch, but it is more correct and safer to install it on a phase in the break. Otherwise, the light fixture will always remain energized, creating a risk of electric shock when replacing bulbs. The input phase L is connected from the single terminal side, and the output phase L1.
More on the topic: How to create an estimate for electrical wiring
Device and circuit
On the other hand, a three-key switch allows you to make your home much more comfortable. With its help, you can divide your room into several illuminated zones. The edge of the key is pressed against the wall with your finger in the off position, the other, protruding edge is picked up with a fingernail or a flat screwdriver and pulled towards itself. The other three wires went to the three switch terminals located opposite the common contact at one end, and each wire went to the phase terminal of its lighting fixture of one of the three at the other end of the cable.
We connect the wires to the junction box. We install the switch and socket in the niches. Scope of application Connection diagram Scope of application Triple switches are used in cases where it is necessary to divide lighting into different groups or rooms. However, the restrictions imposed by a standardized electrical wiring network in apartments force the use of switches with a limited number of switching sections in the control mechanism. Arriving at the switch, the phase enters its lower input contact and remains permanently on this contact.
Triple switch connection diagram
Selection criteria With all the variety of switches on the market, it is recommended to adhere to certain points: Models with self-clamping terminals. The cross-sectional area of each cable core must be at least 0.75 mm2. Triple switch: connection diagram to the chandelier L - phase to the red switch; then the phase yellow, brown, pink goes to three groups of chandelier lamps; N - blue working zero, goes directly to the chandelier and is routed by the chandelier terminal block into groups; PE - yellow-green grounding, connected to the chandelier body Thus, before connecting the triple switch, it is necessary to prepare all the wiring.
The edge of the key is pressed against the wall with your finger in the off position, the other, protruding edge is picked up with a fingernail or a flat screwdriver and pulled towards itself. For example, in the hallway you can install a triple model to turn on the lights in the kitchen, bathroom and toilet, or instead of the kitchen in the hallway itself. The remaining five are taken up by the connection process. How to connect a two-key switch
How to connect a socket-switch unit in one housing: diagram and sequence of actions
A socket, switch and lamp are the main components of any electrical wiring in an apartment, private house, garage or other office space. Therefore, every prudent homeowner must know how to connect the circuit of all devices when carrying out repair work or constructing a new structure with their own hands, including combined ones, which are combined in one building.
Not so long ago, connecting the wires from the switch to the AC electrical circuit was done at random.
Therefore, in old houses, most of these electrical circuit devices still remain connected in violation of all safety rules.
Naturally, this did not affect the operation of the switch itself, but the safety of operation of such a device remains in great doubt.
Recently, to save wires and space on the wall, manufacturers of electrical appliances have begun to combine and combine several devices in one housing. In this case, most often they combine a socket and a key switch in such a way that, thanks to this connection scheme, maximum efficiency and ease of use of such electrical devices is achieved.