The main devices with which you can control the lighting of an apartment are switches. Today, the market offers a huge selection of different designs and appearances. And if a few decades ago it was rare to find a light switch with three keys in ordinary residential premises, now they are found in almost every modern home. This device is convenient because it can be used to manage three groups of lighting fixtures from one access point. And since these electrical switching devices are so popular, let’s talk in more detail about how to connect a three-key switch.
Where are they used?
Modern renovations and design solutions increasingly suggest dividing lighting into different groups.
For example, a room has a complex configuration - niches, ledges, separation by partitions or curtains. Very often now large one-room apartments are divided into zones and made into so-called studios. In this case, a switch with three keys is ideal. By using specially thought-out and mounted zone lighting, you can highlight a work area where there will be a computer desk, a sofa, shelves with books, here the lighting is made brighter. The second zone is the sleeping area, where more subdued light is quite suitable. The third zone is the living room, where there is a coffee table, armchairs, and a TV; here the lighting can be combined.
When else is it advisable to use a three-key household switch?
- If from one point it is necessary to control the lighting of three rooms at once, for example, a corridor, a bathroom and a bathroom, when they are located close to each other.
- In the case of combined lighting in the room - central and spot.
- When in a large room, lighting is provided by a multi-arm chandelier.
- If the room has a multi-level ceiling made of plasterboard sheets.
- When the lighting of a long corridor is divided into three zones.
Home use model
In the vast majority of cases, a person uses an excessive number of lighting sources, which is two or more times greater than the real need.
If we stop lighting extra light bulbs, this will save from 10 to 30% of all electricity consumed.
On the other hand, living in conditions of insufficient lighting is uncomfortable, because... and bright and decorative lighting is still necessary.
For this purpose, a track switch is used, which is most often connected to control the main, additional and decorative lighting.
In fact, the key to turn on the main lighting is most often used, the rest are only “occasionally”.
This connection scheme provides, on the one hand, significant energy savings, and on the other hand, allows you to stay in the comfort zone, turning on additional and decorative lighting if necessary.
Advantages
From installing such a triple switch you will receive the following advantages:
- Externally, one switch with three keys looks more compact and more aesthetically pleasing than three single ones.
- Laying electrical wires to the connection point will be less expensive in terms of labor and money.
- You will need to make one technological niche in the wall for the mounting box instead of three.
- Economic effect. For example, if your chandelier has 3-4 light bulbs, then turning on a single-key switch ensures that all of them work at once, while consuming maximum electricity. But such illumination is not always necessary; dim light is sufficient. If you install a 3-key household switch for such a chandelier, then, if necessary, one or two lamps are turned on, thereby saving almost half of the electricity.
Decorative and functional facial details
The housing structure also contains fastening elements and a number of front parts. This is a plastic frame and three key inserts.
- The frame is necessary to cover the edges of the wall recess into which the switch is mounted.
- It also effectively protects the wallpaper from sweat and dirt, which are present to one degree or another on the hands.
- The wider the installed frame, the cleaner the wall around the switch will be after 1-2 years of operation.
- These parts are detached without much effort, after which they are just as quickly fixed on the spacer fasteners.
Original industrial design
A three-circuit light switch is better than analogues with fewer keys for a number of reasons. Firstly, such a device looks much more original, which is pleasing to the eye and brings zest to the interior, which is sorely lacking in the era of widespread minimalism and pragmatism.
You can be convinced of the unusual design of this device and its aesthetic superiority by studying a couple of dozen photos of three-key switches.
Kinds
Do not rush to connect a three-key switch until you decide exactly what kind of device you want to see in your apartment. After all, these switching devices come in several types:
- Regular.
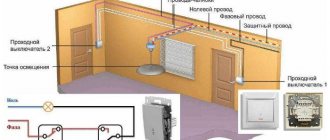
- Walkthroughs. They are used in long corridors or on different floors, when at the entrance (at the beginning of the corridor or on the first floor) the lighting is turned on by one switch, and when leaving (at the end of the corridor or on the second floor) another switch is turned off. That is, you don’t need to make your way in the dark and crawl along the wall with your hand to find the button of the switching device.
- With indication. Such light beacons have two options for indicating the status of the device. Or they glow when the lights are off and thereby indicate in a dark room where the switching device is located. Or, on the contrary, the beacons light up when the keys are turned on, thereby making it clear where exactly the light is currently turned on.
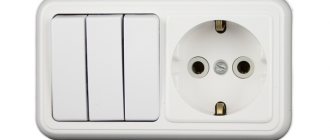
- Three-key switch with socket. They are most often used in rooms where a toilet, bathroom and corridor are located nearby.
What is required for installation
It will not be possible to carry out electrical installation without a minimum set of tools:
- To strip the insulation you will need a mechanic's knife;
- to shorten the conductors you will need wire cutters;
- to check the absence of voltage you will need an indicator screwdriver or a multimeter;
- for installation work - a set of screwdrivers.
If the connection in the junction box is made by twisting copper conductors, then it is advisable to solder the connection points. To do this you will need a soldering iron and consumables for it. Perhaps in the process of work the need for other tools will arise.
Preparatory work
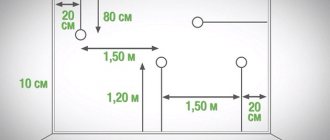
Before starting installation, determine the location of the switches. If you plan to do hidden wiring, purchase built-in switches and socket boxes of appropriate sizes (plastic boxes in which the device will be installed). If the wiring is open, shims must be placed in the places where the devices are installed.
How to choose?
Nowadays there is such a huge range of switches on the electrical goods market that you can find a suitable model and color for any design solution or interior. However, you understand perfectly well that shade and appearance are far from the main indicators that you should pay attention to when choosing a device. When purchasing a three-key switch, check the following:
- The presence of modern self-clamping terminals, they are more convenient to use. Simply insert the wire into the hole and it will immediately be fixed.
- The outer side of the product is without burrs, scratches or damage.
- Normal operation of all terminals; they must ensure reliable fixation of the wire cores.
- The keys do not stick when pressed (on or off) and work clearly, with a clearly audible characteristic click.
- On the reverse side there should be a connection diagram for the triple switch.
Try to avoid cheap Chinese electrical wiring products. Buy devices from trusted companies and manufacturers.
Serviceable switch
When choosing a three-circuit switch in a store, you should carefully inspect it. It would also be useful to read the electrical description and ask for a connection diagram.
It will not be difficult to distinguish a conscientiously manufactured three-button from a defective one based on a number of signs:
- The polishing of the decorative frame and keys must be without the slightest defect.
- The keys should switch without effort or jamming.
- Each key press should produce a soft click that is pleasant to the ear.
- All mechanisms and fastenings of the internal part must work flawlessly.
Design
There are no special differences in the design of these switches. The principle of operation is the same as for two- or one-key ones.
Let's consider the main elements of the switching device.
Keys and frame, so-called protective elements. For their manufacture, special heat-resistant plastic is used. The keys directly turn the switch on and off.
The operating mechanism, or actuator, that operates the keys. The frame is connected to the working mechanism with special latches or screws. This entire assembled structure is mounted in an installation box and fixed in it with special spacers.
The connected three-key device must have four contacts - one to connect the power supply wire, three more will connect the switch to the lighting elements. The material for contacts is usually copper; the size varies depending on the cross-section of the wire and the connected load.
The use of this type of switches is more intensive than others, so their average service life is from 8 to 10 years. There can be two main reasons why a device may fail:
- Mechanical - fastening elements are damaged, the housing is destroyed.
- Electrical - damage to contacts.
If there is a breakdown, do not try to replace any components in a three-key switch; the device should be replaced completely. It would be better if this is done by a professional electrician in compliance with all safety rules. Although, if you are well acquainted with electrical engineering, have skills in working with power tools, and understand what “phase” and “zero” are, it will not be difficult for you to do this yourself.
Connection errors
There are problems with connection. It is important to prevent them. Otherwise there is a risk of short circuit.
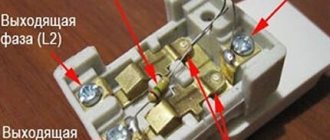
- A common mistake when connecting a three-key switch is when the switch does not work when the socket is working. The reason lies in the confusion of phase and zero on the socket. The jumper is connected not to the common terminal, but to the phase. The latter turns out to be zero. Use an indicator screwdriver to check the direction of the conductor.
- When replacing the switch block, it is worth checking the voltage on the wires. The rule is not suitable for installation on a new site. Specialists connect the phases to the socket and switch. In this case, there will be 2 power supplies in the block at once. This triple switch circuit will cause a short circuit.
- The light does not light on 2 keys until the third one is turned on. When activated, everything functions properly. The problem is the wire is connected incorrectly. It is directed to the output contact of the last key, but should be directed to the common input. To correct the error, a check with a screwdriver with indicators is required.
- When replacing used blocks with new ones, problems arise. Checking the voltage on the contacts shows all phases. The light comes on on all circuits at once. The switch breaks zero instead of phase. Either the electrician or someone else could have missed. He transferred the wires in the meter or panel to someone else's apartment.
- The contact indicators light up due to the bulbs being screwed into the sockets. The circuit is closed by a filament. After unscrewing the lamps, you need to check the conductors. The glow will disappear if you find a common zero and throw it on the central contact of the new device.
- Connection in the block cannot be made with one key. The method is convenient, but it is erroneous. The load is connected through the socket contacts. An example is a 1.5–2 kW hair dryer.
This is how a tee or extension cord is often connected. However, the switch contacts are not compatible with this magnitude and duration of current. After some time, the voltage in the unit will disappear and a fire may occur.
For more information about connection errors, watch the video: