Applications, Benefits and Methods of Use
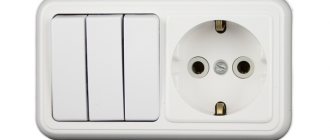
A three-key switch with a socket, despite its ease of operation, is rarely installed. The connection diagram for a three-key switch with a socket is more complicated than a regular one, because there are three contacts going to the lighting device at once. This unit has many functions and takes up minimal space, since three devices are located in one housing.
Three-key switch connection diagram
The socket is a separate device. Although it is located in one building, it works independently. “Zero” from the distribution box goes to it, and “phase” is connected from the switch jumper.
Among the advantages of such a three-key switch are:
- saving electricity;
- compactness;
- the ability to control lighting in various rooms;
- easy regulation and switching of the light source (if dimmers are not used);
- possibility of combining lighting.
The use of a three-key switch is necessary for:
- changes in lighting intensity;
- control several lamps simultaneously.
If the device is equipped with a block with a socket, then it is considered the most functional.
Installing a two-key block
When installing an electrical unit of this design, all work is carried out in the same way as installing a single-key device. Almost all two-key models do not require more space for installation and an additional socket box.
All preparatory work described for the example of installing a single-key device is used for installing two-key modules. The phase wire is taken away from the common phase wire, and at the output of each switch one core is attached, which are then led to the lighting fixtures.
Installing a three-key block
A three-key device is installed in a similar way, with the only difference being that the number of wires that will be directed from the switch to the lighting fixtures is 3.
Types of devices
The model range of blocks is varied, it is always possible to find a product that matches the interior of the room. Such devices may differ in functionality.
How to install a multi-key switch with a socket?
According to this criterion they are divided into:
- Regular. Some of them have an indication, it indicates the location or the switched on key, they work in the dark;
- Walkthroughs. They are installed in a long corridor, on a staircase, etc. They are used to control lamps located in various places.
Note! When choosing, you must visually inspect the product. It should not have burrs, abrasions or damage. You should hear a click when switching keys.
The device has self-clamping lemmas. They are necessary for fixing and connecting wires. When the cores are pulled out (which is strictly prohibited), the special latches-clamps fail.
Choice
The modern market of electrical equipment offers many different modifications of combined electrical fittings.
However, all of them can be classified according to the following criteria:
- The relationship
between the number of interlocked sockets and switches. - Installation method
: external or built-in. - Design.
Today, you can find on sale a unit consisting of one socket and a one- or three-key switch, or you can choose a product with two or three electrical sockets and a different number of switches.
Of course, the choice of one or another modification depends on the number of connected electricity consumers and the number of lighting sources. Multi-key switches are indispensable when connecting multi-arm chandeliers, when using different combinations of pressed keys you can step by step change the lighting intensity.
External electrical fittings are visually perceived as somewhat cumbersome and their installation is due to the impossibility of installing hidden wiring.
Connection features
How to disassemble a light switch
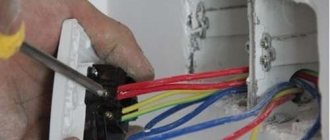
There are many models of a three-key switch with a socket, but its connection remains the same. The unit should be connected in the same way as a single or double model. The power cable is connected to the input of the device itself, and the wires run from the contact of the block with the switch to the light bulbs. Their number must match the device keys.
Basically, the socket is equipped with a separate neutral wire and, according to the diagram, is not connected to the switch, but they have a common “phase”. All “zeros” from the lamps and the socket itself are connected to the junction box. The “phase” is connected to a common contact included in the switch. The lighting wires are placed on separate blocks. It is from them that the voltage is transmitted to the light bulbs. At the ends of the cores, approximately 10 mm of insulation is removed. Since the contacts are tightened with clamps, and the wire can break, such devices will prevent this from happening.
NShVI - special lugs are used for connections
Basically, the switch block is mounted on the wall, in a special niche. For these purposes, calipers or spacer legs are used, and a decorated frame is put on top.
Usually a switch with keys and a socket is installed near the door of the room. The block helps to change the lighting and connect various household appliances used in the bathroom or toilet.
The distribution box has 5 connections. The ground wire should always go to the outlet. If the lamp has metal parts, then it is necessary to protect against electric shock. There is a special screw connection for this purpose.
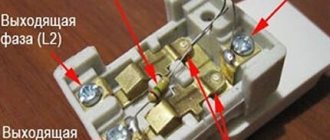
Operation of a circuit with a three-key switch
When you press, for example, the right key, the right contact closes and the phase with wire L1
enters the junction box, where through point
2
and the ceiling wire it reaches the brown terminal of the
HL1
and the lamp lights up.
Zero N
common
for all lamps .
Remember
.
The phase reaches the upper contacts of the switch only when the contact of the corresponding key is closed
.
Now, when you press the middle key, the middle contact closes, and the phase with wire L2
enters the junction box, where through point
3
and the ceiling wire it reaches the brown terminal of the
HL2
and the lamp lights up.
The left contact of the switch works in the same way. And when three keys are pressed simultaneously, all the chandelier lamps will light up.
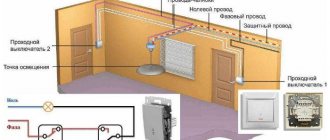
Connection methods
Pass-through switch
There are two main schemes for connecting a three-key switch, and in one, a distribution box is required (for twisting the wires), and in the other, the connection is located in the switch block. Let's consider each scheme separately.
With junction box
How to properly connect a three-key switch with a socket in this case? The basic rules that must be followed are as follows:
- they dismantle the old unit, after which 5 wires stick out from the wall;
- turn off the current;
- straighten all the wiring, supply power;
- using the indicator, find the “phase” (L), which is located on only one core;
- looking for “zero” (N);
- both wires are connected to the socket, with L going to the contact that goes to the switch jumper, and N to the free one;
- the other 3 wires are connected to the remaining contacts;
- When you switch keys, the lights should light up.
The connection diagram for a three-key switch using a junction box looks like this
On a note. Dismantling involves removing the old switch, cleaning the niche and wires, and checking the wiring. Only after this they begin to install the new device.
Before starting work, it is first determined whether N or L breaks in the room using a switch. Basically, this should be a “phase”. If this is not the case, then “L” goes from the junction box to the luminaire. That is why “zero” is supplied from the switches. In this incorrect version, N and L are swapped in the socket with the switch block.
Without junction box
Let's look at how to connect a block with an outlet directly. When dismantling the old unit, 8 wires will appear from the wall. If they are the same color, then proceed as follows:
- de-energize the line;
- carefully straighten the wires and make sure that the bare ends do not touch;
- they find a two-core wire (from it power is supplied to the unit and to the lighting), for this, voltage is applied and the “phase” is determined with an indicator;
- de-energize the line and mark the found wire (you can use electrical tape);
- looking for “zero”;
- 6 two-core wires stick out from the wall, which are necessary for three lamps (kitchen, bathroom, toilet);
- each has its own “phase” and “zero”;
- one core is taken from each of them and connected to N coming from the junction box;
- “zero” is applied to the socket contact from this connection (it does not have a jumper);
- N is connected to the socket and goes to all lamps;
- the found L coming from the shield is connected to the socket (second contact);
- other wires going to the lamps are connected to 3 contacts (switch block).
Important! This scheme has a drawback: twisted “neutral” conductors, which must be hidden in the switch block with the socket.
How to connect a three-key switch with your own hands
Connecting a three-circuit device is extremely simple. To do this correctly, you need to follow many step-by-step steps. The entire connection process is divided into stages:
- connecting the cable to the three-key player;
- connection of wires in the box;
- checking the correct connection and eliminating errors.
Before carrying out the process, it is advisable to study the connection diagram. This measure will help minimize possible mistakes.
Triple switch connection diagram
There are several conductors in the box. Each performs its own function:
- The cable with 3 cores is located in the circuit breaker present in the switchboard.
- A four-wire wire runs down to a three-key switch connected to the bottom.
- The connection diagram for a triple switch for 3 lamps involves connection with a 4- or 5-core VVGnG-Ls wire. Its cross section is 1.5–2 mm. A chandelier with 6 or 9 bulbs requires the same connection.
- With 3 different lamps, you need to pull 3 different three-core cables. This method is common.
Now the number of requests for “triple switch with socket diagram” on the network has increased. It is easy to find detailed connection algorithms with photographs or drawings there.
Useful video on the topic:
Connecting wires to the switch
Often the device is installed in a block with an outlet. People are wondering how to connect a three-key switch. You need to take several sequential steps:
- You will need a copper wire with a cross section of 2.5 mm². Direct the cable from the common shield. When it goes from the box to the switch, it is an error.
- Run copper wire 5*2.5 mm² down the groove. Then it will be near the switch and socket box. Connect the common wire to the contact. This is due to the more powerful load on the sockets. It is not so pronounced on lamps.
- Using a jumper, connect the phase to the upper terminal of the device. Direct the zero to contact 2. Place the remaining conductors under the lower contacts.
The cable in the box is connected using the method described above. The difference lies in the connection of the auxiliary neutral core to the central point.
Wire connections in the distribution box
There are 5 conductors in the box. We must not confuse them and connect the wires correctly. It is worth starting with 2 cores: neutral and ground. The number of light bulbs does not matter. All zeros will end up at one point.
The rule of reduction to a common point applies to grounding conductors. On lamps they should be connected to the housing. Sometimes the wires are missing.
You can quickly connect the cores using clamps for Vago terminals. They are suitable for lighting loads. It is better to choose core colors based on existing standards. Blue wires are neutral. The grounding conductors are colored yellow-green.
We must not forget that the zero is not directed towards the switch. It goes directly to the lamps. By contacting the device with three keys, 1 phase is broken.
Then you need to connect the phase conductors. Start with the conductor coming from the input machine. Combine a phase with a common phase conductor. It goes to the common terminal of the three-key player. If the core is no longer directed anywhere, the phase is switched on to the switch.
Connect the 3 conductors coming out of the keys with 3 phases. They extend from the circuits onto the lamps using Vago clamps. Correct marking of the cores will help to quickly recognize them. Each one controls a light bulb in the room. There will be 6 connection points in the box.
Before switching on, you should re-check the triple switch circuit. Then turn on the machine and use the keys to turn on the lighting fixtures.
We recommend watching a video on the topic:
Installation errors
Many people wonder how to connect a three-key switch with a socket so that the work is done efficiently and everything functions correctly. Often, when connecting the socket unit with the switch, something goes wrong, and as a result, the chandelier does not light up.
Let's look at the errors that may occur when connecting devices:
- The socket works, but the switch does not. If you confuse “phase” and “zero”, then this will happen. That is, L is connected to the common line of the switch with a jumper instead of N. To correct the situation, you need to check everything with an indicator and redo it;
- When installing unit connections or replacing an old one, check the voltage in the wires. Often, electricians install separate wiring for the device, and there are two power supplies at the same time. Therefore, by assembling a sample according to the circuit, a short circuit is often created;
- Two keys do not work until the third is pressed. This means that the “phase” was connected incorrectly. Instead of the general input, it is connected to the output of the third key. To correct the indicator, you need to check the voltage of the contacts. If it lights up in all cases, it means that the switch breaks the “zero”, that is, someone crossed the wires in the panel. To correct this, unscrew the light bulbs and check the “phase” conductors. They find “zero” (common) and transfer it to the central contact of the three-key switch;
- Electricians do not recommend leaving the socket device in the block connected through one key, although this is convenient, since when pressed the light disappears. This is explained by the fact that various household appliances are often connected to the outlet, for example, a hair dryer from 1.5 to 2 kW. Extensions or tees can also be connected here. The device contacts are not designed for this voltage. In the best case, the unit will turn off and stop working, in the worst case, a fire will occur.
Where is the best place to install?
It is very convenient to install such a unit in places where you do not need to constantly connect electrical appliances to an outlet.
Before you connect a double switch for the corridor and the adjacent combined bathroom (bathroom with toilet), think about installing a common unit with an outlet? One button turns on the light in the hallway, the second in the bathroom, and the socket can be used to connect a hair dryer, electric drill, vacuum cleaner, or charge a mobile phone.
The block, which has a socket with a one-key switch, is suitable for installation in garages, sheds, basements, gatehouses, change houses and other outbuildings. In this case, just one switch key is enough to light up the lamp in the room, and the socket is useful for connecting a power tool, kettle, fan or radio.
In other rooms (living room, kitchen, bedroom, children's room), connecting a combined socket-switch unit is unlikely to be advisable. It will not have the aesthetic appearance to fit into the overall interior. After all, the light switch is usually installed at the entrance to the room. Imagine how ugly it will be if the cord of a TV, computer, refrigerator or air conditioner runs here, to the outlet.
Therefore, before you connect a unit that combines an outlet with a switch, think carefully about where you want to put it, and whether it is needed there.
Manufacturers
Basically, the consumer makes a choice in favor of an aesthetic model; it all depends on the interior design of the apartment. If the design is “antique”, then the choice should be made on models from Fede.
The Gira triple switch with socket has an elegant design and is in great demand. Legrand models are perfect for any interior, as they have horizontal and vertical designs.
ABB supplies the market with a large range of switch units with LED socket outlets. They add functionality to aesthetics.
The Russian one produces combined models. You can find a single block made of plastic with vertical installation. Models with triple switches and a socket are available: without a grounding contact, with red backlight or with a Euro socket with protective curtains.
Important! All switches have a voltage of 220 V, and the rated load ranges from 10 to 16 A.
The buyer decides which manufacturer of switch to choose.
This is how you install a three-key switch with a socket yourself. If you have no experience in this matter, it is better to contact a specialist. He will not only do everything quickly, but will also help you choose the best devices, advise where to install them, and check all the electrical equipment in the apartment.
Installation and connection of sockets with switches in one housing
The advantage of interlocked fittings is not only aesthetics and ergonomics, but also ease of installation and connection. In this case, there is no need to drill several recesses in the wall panel and pull various wires to them.
Of course, the grooves will have to be sealed, however, the labor intensity of this operation is disproportionately lower than when replacing wiring and several sockets or switches.
The question of the convenience of placing the keys and the plug panel on the same level is quite complicated. From the point of view of classical ergonomics and electrical safety rules, the optimal height of the socket is 50.0, and the switch buttons are 130-150 centimeters from the floor.
The rules of European electrical installation standards and regulations, on the contrary, recommend placing all elements of electrical fittings, with the exception of connection points for light sources, on the same level.
Basic connection options
In old houses, all connections were made in a junction box under the ceiling. After it, the wires diverged each to its consumer. With the advent of blocks - various devices assembled in one housing - it became possible to save on cables and cut less wires. In addition, there is no need to carefully measure the height of the socket with the switch in order to place them exactly next to each other.
The disadvantage of such combined devices is that if one thing fails, everything will need to be replaced together. It cannot be replaced separately.
Single-key option
This is the simplest version of the block design. All you need is the unit itself and a connected 3-wire cable.
In the distribution box itself you need: phase, zero - to the socket, zero - to the lamp, another wire from the lamp - to the switch. Now you need to make the necessary connections inside the block itself.
As can be seen from the figure, connecting elements in one block is no different from separate ones. A phase and a neutral go to the socket. The same phase goes to the contact of the switch, then to the lamp. Now everything is inserted into the box, screwed on, and the key is put on. If you did it right, everything will work.
Two-key block
To save on electricity bills, our readers recommend the Electricity Saving Box. Monthly payments will be 30-50% less than they were before using the saver. It removes the reactive component from the network, resulting in a reduction in load and, as a consequence, current consumption. Electrical appliances consume less electricity and costs are reduced.
There are situations when you need to turn on the light in the bathroom or toilet, and then you need to connect the washing machine somewhere. An outlet can only be installed in the bathroom itself if it has the necessary waterproofing. If not, then it is best to mount everything in the hallway.
The first thing to do is to choose a suitable design. Remember that the washing machine uses a heating element - a tubular electric heater. When heating water like a household appliance, it can have a power of up to 2200 watts. The socket must have a rated current of 16 A (the power of the heating element itself, plus the machine motor, plus reserve). Grounding is required here.
Now let's move on to the connection itself. With this option, a cable with 5 cores will be lowered to the socket box from the distribution box. The phase end is red, or brown, or black. Zero – blue, light blue. Earth – yellow-blue
It is important not to confuse the markings so as not to get hurt later
Let's look at the diagram: the grounding (green in the figure) is connected to a special grounding contact of the socket. It is clearly visible: there are “antennae” on it, which get in the way when the outer cover is put on.
The phase end (red) goes to one of the terminals. From there, jumper to the switch. From its output contacts, two wires go (yellow and beige in the figure) to the junction box, and from there to the corresponding lamps. If you need to change the order in which the keys are turned on, swap the yellow and beige ends on the terminals.
Don't think that the three keys are not used anywhere. This can be convenient when, in addition to the bathroom and bathroom, there is a kitchen nearby, and the lighting is turned on from one wall. This is especially common for small apartments. But you can turn on decorative lighting, depending on your imagination.
So, we have a socket and a three-key switch in one housing. A cable with 5 or 6 cores comes from the distribution box (with or without grounding). For simplicity, let's consider an example without grounding. The circuit differs from the two-key design only in the presence of one more contact, and as a result, a connection.
The same picture is visible as in the two-key circuit. The phase wire goes to the socket, and a jumper comes from it. Zero - only to the socket. And three wires go out - for three lamps, or for three groups of lamps.
The more cores a cable and connections have, the easier it is to make a mistake. Therefore, you need to be careful during installation. If something doesn’t work out, it’s better to rest a little and then carefully check everything again.
If the switch is being added to an existing outlet
Minimizing the consequences - replacing the socket with a block. The procedure itself is simple; we drill a hole nearby for the box and carefully install the new module.
There is no need to install a power incoming cable; it is already in the socket. But the output wiring, to the lighting device, will have to be extended. This is an individual decision, there is no universal way. The connection diagram is very simple: both the neutral and phase wires are laid not from the box, but from the socket box.
Naturally, you will have to install contact blocks. Although many connect the output wire directly to the socket contacts: some models allow such a connection.
If there are several sockets in a group, you can replace any of them with a common block (socket - switch). You simply choose a convenient location (from which you can run the wire to the lamp) and connect the switch to the outlet.
If you need to organize an additional light point in the hallway, you can use wall sconces. They are placed in close proximity to the outlet-switch block, and you do not have to destroy a large piece of the wall for wiring.
General safety rules
Of course, before starting such work (especially on a completed power supply system), you should de-energize the line and check that there is no voltage. Selecting a power cable will not cause any difficulties: a cross-section of 1.5 mm² is sufficient for organizing lighting. Since we are connecting the switch to the socket, and not vice versa, the primary (socket) cable will be more powerful: 2.5 mm².
Strange box under the switch
A reader sent a photo (see comments dated January 11, 2020),
It's not clear what's going on there:
This is a 220/220 isolation transformer, for the safety of the bathroom outlet. Power 20 VA, only for electric shaver.
Then it became clear - This is a 220/220 isolation transformer, for the safety of the outlet in the bathroom. Power 20 VA, only for electric shaver.
Transformer marking
Proof:
Transformer cover 1:1
Apparently, once upon a time someone was electrocuted in the bathroom, and they started doing this. The disadvantage of this is that when the fuse burns out, a bug is installed, which will lead to a fire. And then the trance is simply thrown out. Now they install an RCD instead.
If you have any questions about how to connect a double switch block with a socket, please ask in the comments!
How to choose the right three-key switch?
The main advice in this matter is to beware of cheap Chinese crafts. And only when choosing a triple switch, and electrical goods in general. In all other respects, you should rely only on your taste and financial capabilities. On the modern market, the choice of three-key devices is so rich that choosing them to suit your interior will not be difficult.
Triple switches come in several types:
- checkpoints;
- with indicators.
Pass-through devices are extremely convenient for installation in long rooms (corridors, passages or on different floors). The operating principle of such devices is simple: at the entrance to the corridor, the lighting is turned on using one device, and at the exit the light is turned off by another device. There is no need to walk in the dark and look for how to turn on the light.
When choosing a triple switch, you should follow a few simple rules:
- Before purchasing, you should carefully inspect the device - there should be no burrs, damage, or discoloration on the surface;
- the keys should move easily and clearly, while making light clicks;
- there must be a connection diagram on the back of the device;
- the contact terminals should rotate easily and securely press the wires;