We already know how to control a weak LED and even a powerful motor using Arduino. But what if we decide to manage devices connected to a household network? Let me remind you that even a small table lamp is powered by an alternating current source with a voltage of 220 Volts. The usual field-effect transistor that we used in the circuit with the motor will no longer work.
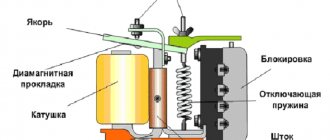
To control a powerful load, and even with alternating current, we use a relay. This is an electromechanical device that mechanically closes the load circuit using an electromagnet. Let's look at the insides:
The principle of operation of the relay is as follows. Apply voltage to the electromagnetic coil. A field appears in the coil, which attracts the metal tab. In turn, the foot mechanically closes the load contacts.
Relays have two main uses. Firstly, we can apply only 5 Volts to the coil, closing the circuit of a very powerful load. For example, a relay used in Arduino tutorials can turn on the lights in the house or turn off a forgotten iron. Secondly, some types of relays can simultaneously close and open several different circuits with different voltages.
Relay module HL-52S for Arduino
As an example for this Arduino relay tutorial, we will be using the HL-52S 2 Channel Relay Module, which has 2 relays rated at 10A at 250 and 125V AC and 10A at 30 and 28V DC. The high voltage output connector has 3 pins, the middle one is the common pin, and as you can see from the markings, one of the other two pins is for a normally open connection and the other is for a normally closed connection.
On one side of the module we have 2 sets of contacts.
The first one has 4 pins, ground and VCC pin for powering the module and 2 input pins In1 and In2. The second set of pins has 3 pins with a jumper between the JDVcc pin and the Vcc pin. Attention ! With this configuration, the relay solenoid receives power directly from the Arduino board, and if anything goes wrong with the relay, the microcontroller may be damaged.
Electromagnetic and solid state relays
Electromagnetic relay
An electromagnetic relay is an electrical device that mechanically closes or opens a load circuit using a magnet. consists of an electromagnet, a movable armature and a switch. An electromagnet is a wire that is wound on a ferromagnetic coil. A plate of magnetic material acts as an anchor. Some device models may have built-in additional electronic components: a resistor for more accurate relay operation, a capacitor to reduce interference, a diode to eliminate overvoltages.
The relay operates due to the electromagnetic force generated in the cores when current is supplied through the turns of the coil. In the initial state, the spring holds the anchor. When a control signal is applied, the magnet begins to attract the armature and close or open the circuit. When the voltage is turned off, the armature returns to its original position. Sources of control voltage can be sensors (pressure, temperature, etc.), electrical microcircuits and other devices that supply low current or low voltage.
Electromagnetic relays are used in automation circuits, when controlling various technological installations, electric drives and other devices. The relay is designed to regulate voltages and currents, can be used as a storage or converting device, and can also record deviations of parameters from normal values.
Classification of electromagnetic relays:
- The control current can be either constant or alternating. In the first case, the device can be neutral or polarized. For alternating current, the armature is made of electrical steel to reduce losses.
- Anchor or reed relay. For an anchor type, the process of closing and opening occurs by moving the armature; for a reed switch, the absence of a core is typical; the magnetic field acts on the electrode with contacts.
- Performance – up to 50 ms, up to 150 ms and from 1 s.
- Protective covering – sealed, covered and open.
Compared to semiconductor devices, an electromagnetic relay has advantages - it is inexpensive, switches a large load with a small device size, and produces little heat on the coil. Disadvantages include slow response, noise, and difficulty switching inductive loads.
Solid State Relays
Solid-state relays are considered a good alternative to electromagnetic ones; they are a modular semiconductor device that is produced using hybrid technology. Relays contain transistors, triacs or thyristors. Compared to electromagnetic devices, solid-state relays have a number of advantages:
- Long service life.
- Performance.
- Small sizes.
- There is no extraneous noise, acoustic interference, or contact chatter.
- Low energy consumption.
- High quality insulation.
- Resistant to vibration and shock.
- There is no arc discharge, which allows you to work in explosive areas.
They work according to the following principle: a control signal is supplied to the LED, galvanic isolation of the control and switched circuits occurs, then the signal goes to the photodiode matrix. The voltage is regulated by a power switch.
Solid state relays also have several disadvantages. Firstly, during switching the device heats up. An increase in the temperature of the device leads to a limitation of the regulated current - at temperatures exceeding 60 degrees, the current value decreases, the maximum operating temperature is 80 degrees.
Solid state relays are classified according to the following criteria:
- Load type – single-phase and three-phase.
- Control method - switching occurs due to direct voltage, alternating or manual control.
- Switching method: zero crossing control (used for weakly inductive, capacitive and resistive loads), random switching (inductive and resistive loads that require instantaneous actuation) and phase control (output voltage variation, power regulation, incandescent lamp control).
Schematic diagram
To better understand how to work with Arduino relays, let's look at the circuit diagram of the relay module in this configuration. So we can see below that the 5 volts from our microcontroller connected to the Vcc pin to activate the relay via an optocoupler is also connected to the JDVcc pin which powers the relay solenoid. So in this case we did not get any isolation between the relay and the microcontroller.
To isolate the microcontroller from the relay, we need to remove the jumper and connect a separate power supply for the solenoid to the JDVcc and ground pin. Now with this configuration the microcontroller has no physical connection to the relay, it simply uses the LED light of the optocoupler IC to activate the relay.
There is one more thing to note about this circuit diagram. The module input contacts operate in reverse order. As we can see the relay will be activated when the input pin is LOW because this way current can flow from VCC to the input pin which is low or grounded the LED will light up and activate the relay. When the input pin is HIGH, no current will flow, so the LED will not light and the relay will not be activated.
High voltage warning ! Before we continue with this tutorial, we warn you that high voltage will be used which, if used incorrectly, can cause serious injury or death. So be very careful what you do! The ArduinoPlus.ru project does not bear any responsibility for any of your actions.
Content
- 1 Guide to using a relay module with Arduino[1] 1.1 Description
- 1.2 Connection to mains power
- 1.3 Connecting contacts
- 1.4 Where to buy?
- 1.5 Sketch: Controlling a light bulb using a relay module and a PIR-type motion sensor 1.5.1 Safety precautions
- 1.5.2 Required components
- 1.5.3 Code
- 1.5.4 Scheme
- 1.5.5 Demonstration
This article explains how to use a relay module with an Arduino board. It starts with explaining how to connect the relay to mains voltage and the Arduino. Then a project will be presented with a lamp controlled by a relay module and a PIR-type motion sensor (instead of the lamp, you can use another device controlled by AC).
How to use the relay module with high voltage devices
First let's look at the circuit diagram. As described earlier, we will use the 5V adapter as a separate power supply for the electromagnet connected to the JDVcc and ground pin. The Arduino 5V pin will be connected to the Vcc pin of the module and pin 7 to the In1 input pin to control the relay. Now for the "high voltage" part we will need a plug, socket and a cable with two wires. One of the two wires will be cut and connected to the common and normally open pin of the module output connector. So in this configuration, when we activate the relay, we will have a closed and operational high voltage circuit.
Below we will touch on how to make a cable. We need a plug, socket and cable. Carefully cut the cable and cut one of the wires as shown in the picture below. We connect them to the normally open contacts of the relay module. We also connect the ends of the cable to the plug and socket.
Note ! Make sure you use wires other than the yellow and green ones as they are intended for ground.
The final cable, ready for use, is below. Before using the cable, make sure it is working properly. You can check this with a multimeter or test it on low voltage first.
What is a relay?
A relay is a switching device used to automate processes in electrical engineering; it connects or disconnects electrical circuits when the specified electric current values are reached. That is, when a small control voltage is applied, a more powerful circuit is closed.
Since the relay is a reliable switching device, it is not surprising that it is used both in industry to automate processes and in a wide variety of equipment, for example in cars or washing machines.
There are two main types of relays: electromagnetic and solid-state. Let's look at them in order.
Source
All that remains is to write simple code for our Arduino relay and test the module to see how it will work. The code itself is quite simple, we will simply use pin 7 to control the relay, so we will define it as an output and create a program that will simply activate and deactivate the relay every 3 seconds. Here I will mention again that the module input works in reverse, so a low logic level on the input will actually activate the relay, and vice versa.
int in1 = 7; void setup() { pinMode(in1, OUTPUT); digitalWrite(in1, HIGH); } void loop() { digitalWrite(in1, LOW); delay(3000); digitalWrite(in1, HIGH); delay(3000); }
3 devices were tested based on this example. First a 100W light bulb, then a table lamp and a fan heater. All these devices operate on 220V. This way it is possible to control any high voltage device using Arduino or any other microcontroller. And of course the possibilities are endless, for example we can control devices using the TV remote control, Bluetooth, SMS, Internet and so on.
Relay SRD-05VDC-SL-C description and diagram
A relay is an electromechanical device that serves to close and open an electrical circuit using an electromagnet. The operating principle of the power relay srd-05vdc is very simple. When control voltage is applied to the electromagnetic coil, an electromagnetic field appears in it, which attracts the metal tab and the contacts of the powerful load close.
If the relay contacts close when control voltage is applied, then such a relay is called a closing relay. If, when control voltage is applied, the relay contacts open, but in the normal state the contacts are closed, then the relay is called a breaking relay. Relays are also available in direct and alternating current, single-channel, multi-channel and switching. The principle of operation is the same for all.
According to the characteristics of the SRD-05VDC-SL-C relay, about 5 Volts 20 mA is enough to switch contacts; the Arduino pins are capable of delivering up to 40 mA. Thus, with the help of Arduino we can control not only an incandescent lamp, but also any household appliance - a heater, refrigerator, etc. Field-effect transistors on Arduino can control currents only up to 100 Volts.