Socket box dimensions: diameter, depth, center distance
An installation box for hidden installation, designed for mounting a socket in it, is called a socket box.
Most often, the socket box has a round shape (less often square) and a standard size. The main function of the socket box is to provide a rigid and reliable mounting location for the socket inside the wall, near the plane of its surface. If you need to install a socket box, then armed with quite ordinary tools (pencil, level, spatula, brush, hammer, chisel, drill with a crown, alabaster), you can do it yourself. Follow safety precautions, first turn off the electricity supply in the panel, use the tool carefully, remember the standards - and everything will work out.
Installation of a socket box
First, make markings regarding the wire going to the future outlet. Draw a horizontal line at a short distance from the wire - this is the level of the center of the future socket, then draw a vertical line - this will be the edge of the socket box (the wire will have to go from the top to the side), finally apply the socket box and outline it with a pencil - mark the place for drilling.
The standard diameter for drilling with a crown is 68 mm, and the depth will be approximately 45 mm; this should be taken into account when choosing a crown. In general, the attachment for a drill is called a “crown for a socket box (they are available for concrete, wood, etc.), so there will be no problem purchasing it. Drill according to the markings, if necessary, during the drilling process moisten the nozzle with water so that it does not overheat too much.
The socket box is fitted to the hole and the remaining drilled material is removed using a chisel and hammer.
If a single socket box is installed, then the transition lugs from its edges are cut off so that they do not interfere with installation in the mounting hole, but if there are several sockets nearby (a block of sockets), then the necessary lugs are left to fasten several socket boxes to each other.
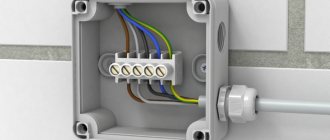
If the socket fits easily into the mounting hole, everything is fine. The wire should easily fit into the diagonal hole of the socket box, which is located on the side near its back wall.
When the socket fits normally and is suitable in diameter and depth, the hole is moistened with water so that the alabaster adheres better, then the solution is mixed. The solution is prepared at a ratio of 4 to 1 - 4 parts alabaster to 1 part water. Apply the solution to the socket box from all sides in contact with the wall.
Carry out the installation, position the socket box strictly in the plane of the wall so that it does not stick out or go too deep, the edges of the socket box should be at the same distance from the edges of the mounting hole. The remnants of the alabaster solution are used to mask the wire going to the socket box.
Drilling walls for socket boxes in the video:
Installing a new socket in an old socket box
Sometimes, when carrying out repairs in multi-year-old houses, it turns out that the old metal socket box is much wider than necessary, the new socket dangles in it like in a bucket, the legs do not catch. In this case, you can put a new socket box directly inside the old box.
A hard, wide old box without a bottom will require the use of alabaster mortar, as is the case when installing a socket box in a wall. If the box firmly holds the new socket box, then it is simply screwed onto the old one with self-tapping screws, remembering that the wire must be inserted from the back side and not damaged by the screws.
Block of several socket boxes
If several socket boxes are placed in a row, then this is done by mounting a block of socket boxes. The crown is taken with a slightly larger diameter - more than 68 mm, up to 80 mm - the mounting holes will be combined with each other, and the interaxial distance will be at least 71 mm.
They make a horizontal marking relative to the wire that will have to go from the right, then they mark the wall for drilling mounting holes, taking into account the required center distance or along the already connected socket boxes - simply circle the block.
They drill holes, remove the excess with a chisel and hammer, remove the partitions, and run the wire horizontally. The margin in diameter will help to orient the block evenly. The transition lugs perform their function here - they combine the socket boxes into a block.
Installing a socket box in drywall
Universal socket boxes for drywall have special spacer lugs that make fixing easier, and alabaster is not needed with them. A hole is drilled with a crown to suit the size of the socket box, installation is carried out, fixation is carried out with a screwdriver - that’s all. When tightened with a screwdriver, the fastening lugs expand and hold well inside thin-walled surfaces such as drywall.
The universal socket box has a distance between the fixing tabs of about 83 mm, so if a switch or socket has a larger distance between the fasteners than usual, such devices will fit well. Also, universal socket boxes can, in principle, be screwed to wood or placed in concrete by simply removing the fixing tabs.
Which is better: heated floors or radiators?
Warm floorBatteries
Installation under plaster or tiles
If the wall will be plastered or tiled in the future, this must be taken into account when installing the socket box. Make a margin of about 7 mm for the protrusion (or as much as the covering will be) so that the plane of the future wall covering coincides with the edge of the installed socket box. Thus, the socket box must be left protruding.
In general, when installing a socket box in the wall in advance, it is important to take into account the fact that it is possible that the depth of the future socket (switch) and its diameter will differ from the geometric parameters of the socket box.
The wire in the socket box must have a reserve
Despite the seeming insignificance of this aspect, a prudent installer always takes into account the fact that it is likely that in the future, when replacing an outlet or switch, it will be necessary to strip the wire or shorten it slightly. If the wire turns out to be short, then it will have to be extended, and this will be associated with increased vulnerability of the connection; it will oxidize and break faster, and will spark.
The wire is taken with a margin of about 20 centimeters, carefully twisted into a spiral or smoothly (not steeply) bent, and thus compactly fits inside the socket box. This is done, of course, so that if in the future the owners decide to update the interior, they can easily update the sockets without unnecessary hassles and problems with extensions. How to extend a short wire if the wall, say, is covered with tiles or plaster? It's easier to leave a reserve in advance.
Share this article with your friends:
Join our groups on social networks:
Installation of a socket box in a concrete base
If you have already decided where your sockets will be located, you can begin installation work, which consists of several stages.
Before installing the socket box in concrete, markings are made, then a hole is made in the wall and a gypsum solution is prepared.
Step 1 - marking the wall
The sequence of marking work is as follows:
- Using a tape measure, measure the distance from the floor to the intended installation location of the socket box;
- if the floor covering has not yet been laid, then you need to add another 5 cm;
- using a building level, draw two lines: horizontal and vertical with an intersection point at the place where the box will be installed;
- Place the glass against the wall and trace it with a pencil.
If two or more socket boxes are to be installed, then first draw a horizontal line using a building level. It should be located at the distance from the floor where the sockets will be placed.
Find the center of the first box and draw a vertical line through it. Then set aside exactly 71 mm and draw the second vertical. The center of the second glass will be located in this place. The marking of the following socket boxes is done in the same way.
Step 2 – punching a hole in the concrete
There are several ways to make holes in a brick or concrete wall. The simplest of them is using a concrete crown with pobedit teeth, which, when cutting into the wall, makes a circle of the required size.
In the center of the crown there is a drill bit made of pobedit for making a central hole.
Since standard socket boxes have an outer diameter of 67-68 mm, a crown with a diameter of 70 mm is suitable for the job. The nozzle is put on a hammer drill or drill, placed on the marked line and a hole is made.
Then the nozzle is pulled out, and the entire remaining layer of concrete is knocked out of the hole with a chisel and hammer.
If you don’t have a concrete crown, you can make a hole with a drill with a Pobedit drill bit. First, a central hole is drilled to the entire depth of the nozzle, and then holes are made along the circumference line with the same drill.
The more of them, the easier it will be to hollow out a hole of the required diameter and depth with a chisel and hammer or hammer drill.
Another way is to make a square hole using a grinder with a diamond blade attachment. First, the central lines are cut, and then along the entire perimeter of the socket box. The process, as always, is completed with a chisel and hammer.
Step 3 - installing the box into the wall
After the hole is made, you need to clean it well and insert a socket into it for fitting. It should fit freely in width, and in depth there should be a margin of approximately 5 mm for the solution.
If everything worked out as it should, then now you need to make a passage from the top or bottom of the hole (depending on the location of the electrical wiring in the room) for laying the wire.
The socket box also needs to be prepared. We turn it over with the bottom side where the slots for the wires are and cut one of them with a knife. We run the wire there and insert the box into the wall to check.
To secure the glass, prepare a solution from plaster or alabaster, which should have the consistency of sour cream. It is worth considering that the solution made from these materials hardens very quickly, and you have no more than three to four minutes to complete the process of installing the socket box. After five minutes the mixture will no longer be suitable.
Two minutes before placing the box in the wall, the hole is moistened with water. After the liquid is absorbed, a layer of gypsum is applied to its walls with a spatula. A wire is threaded into the glass, its back part is also smeared with the solution, and the socket box is inserted into the hole.
Adjust the position of the box so that its edge is flush with the wall and the screws are horizontal.
Step 4 - combining several socket boxes
How the marking of two or more electrical outlets is carried out was described above. Holes are made using the same methods as for a single box. The only difference is the need to connect the holes together. This can be done with a chisel or grinder.
Before installation work, the socket boxes must be joined to each other using a side fastening element. Installation into the wall is carried out similarly to the installation of a single glass.
An important point that you must pay attention to when attaching a block of boxes is the strict alignment of the socket boxes horizontally while fixing them in the wall with gypsum mortar. It is necessary to carry out this part of the installation only using a building level
How is the crown constructed?
This type of drilling tool is an attachment for a hammer drill or impact drill. The appearance of such an assembled and ready-for-drilling structure is presented below.
A crown for reinforced concrete installed on a hammer drill powered by 220 Volts
Now let's look at how the drill bit is structured; its main elements are shown in Figure 2.
Designations:
- A – cartridge, this is the nozzle on which the remaining structural elements are attached.
- B – centering drill for concrete, ensures the correct shape of the hole. This element, like conventional drills, becomes dull over time and therefore needs regular replacement.
- C – the crown itself, as can be seen in the photo, is a piece of pipe on the edge of which cutting segments are installed (marked with red circles). They are made from special carbide materials capable of cutting stone, brick and concrete. Crowns can be of different sizes; they are selected depending on the required width of the hole. Dry drilling attachments are sold in sets or individually. Assembling the tool is quite simple and does not cause any difficulties.
Both electric and pneumatic tools of appropriate power can be used as a drive; in some cases, special drilling rigs are used.
Application of drilling tools
The last two types are, as a rule, not used when installing hidden household wiring at the amateur level.
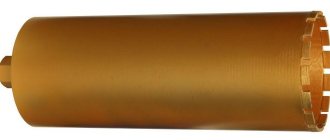
Diamond crowns
To perform a large amount of work, it makes sense to choose a high-quality tool that will last a long time and meet all safety requirements. We are talking about diamond crowns. Of course, their price is much higher than carbide, but this is justified by the service life and quality of work, plus time savings.
The cutting surface of such a crown is coated with industrial diamonds and can even cope with reinforced concrete, but is still not suitable for working with reinforced materials - its service life is rapidly reduced.
A diamond crown can be with or without a drill - this determines the accuracy of the cut and, of course, the price. Cups with a drill are more expensive and usually have a higher quality coating.
The key advantages of working with a diamond drill bit are low noise levels and high speed. They especially note the low dust formation, but experienced craftsmen are ready for such difficulties and use a vacuum cleaner to collect dust.
The cost of a diamond crown starts from 600 rubles without a centering drill, 1400-1500 rubles with a centering drill. The most expensive are segmented consumables used in percussion instruments. Such copies can cost at least 3,000 rubles, but this is clearly justified by the service life and quality of work.
Review and description of the main types of crowns
To effectively cut holes in, it is important to choose the right bit based on the material in which the drilling will be carried out. Depending on this, the type of crown is selected, which is determined by the type of cutting attachment. The following edges are used for concrete, stone and brick partitions:
- Diamond.
- Tungsten carbide.
- Pobeditovye.
Let's talk in detail about each type.
Diamond
The peculiarity of this tool lies in the technology of non-impact drilling. With this method, a more correct hole geometry is obtained than when cutting with a carbide-tipped tool.
Holes drilled with a diamond bit (A) and a carbide bit (B)
There are two concrete drilling technologies: “wet” and “dry”. Accordingly, different types of crowns are used for each of them.
Wet cutting tool.
In such crowns, the cutting part consists of diamond tips soldered to the base with refractory solder. If cooling water is not supplied to the edge during the cutting process, the nozzle will quickly heat up to a threshold temperature (about 600°C), after which the tool will fail.
A crown of this type that has become unusable can be restored, despite the fact that this is an expensive process, its cost will be lower than the price of a new instrument.
Dry cutting tool.
When making crowns that do not require forced cooling, the cutting attachments are welded to the base using a laser. Such a tool may be subject to a higher thermal load, but, unfortunately, if it fails, it cannot be repaired.
Rubi Foragres bits for dry cutting of concrete
Advantages and disadvantages of diamond-coated hole cutters.
Let's start with the undoubted advantages:
The main disadvantage of diamond bits is their high cost, which can be offset by the possibility of restoring the tool. But this is only available for wet hole saws. To work with such crowns, a special drilling tool is required, which does not make sense to buy for the sake of drilling a dozen or two holes. This is a professional level technique.
“Dry crowns can be used with a conventional hammer drill in non-impact operating mode. But this requires a certain skill, the tool is quite fragile, if vibration occurs (for example, when the support drill is rotated), the cutting attachments may break off. Such a crown cannot be restored.
Tungsten carbide
This type of cutting coating allows you to work with brick, concrete and ceramic materials (for example, tiles). If such a cutter encounters metal fragments, it almost always fails, that is, such a tool is not suitable for cutting reinforced concrete.
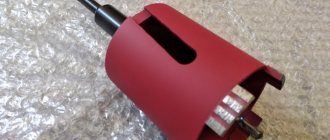
Pobeditovye
This is the most common type of hole saw. Its main feature is that teeth made of pobedite or other hard alloy are used as the cutting material.
Core cutter with carbide inserts and SDS shank
For this type of tool, a percussion drilling method is provided, that is, it is intended for use in conjunction with rotary hammers. Accordingly, the shank of such bits is made for an SDS chuck (SDS+ and SDSMAX options are possible).
The main advantage of such a drill is its low cost. As for the disadvantages, these include:
- Rapid tool wear.
- Impossibility of restoring cutting attachments.
- Failure upon contact with metal fragments (reinforcement).
Despite a large number of disadvantages, tools with carbide tips remain in demand due to their low cost.
Features of using crowns
Tool assembly diagram
Carbide bits are usually used in conjunction with a hammer drill, with a standard SDS mount, which uses locking and rotating grooves in the shank of the bit. In this case, you can quickly replace the nozzle without clamping keys, and provide it with free movement along the drilling axis, which is necessary for the full impact force on the concrete when making a hole.
Features of the process are as follows:
- Before drilling holes in concrete with a crown, you need to make sure that there is no reinforcement in the wall at the drilling site that could harm the tool;
- The centering drill, if available, is placed in the center of the future hole and drilling can begin;
- In the absence of a centering drill, the cutting edge of the crown is applied to the wall surface simultaneously with all teeth;
- Effective dust removal should be carried out using a construction vacuum cleaner with a special hose attachment;
- A feature of the process of drilling holes in concrete with a crown: the tool does not require periodic cooling, which makes the process continuous immediately to the desired depth;
- When drilling a through hole, the drilled concrete remains inside the cup and is removed along with the crown;
- In case of a blind hole, the concrete remaining in the center of the drilled circle is removed by chipping with a chisel or chisel;
- To speed up drilling with a crown on concrete, you can deepen the tool a small amount, then remove it and drill several holes along the contour of the circle with a Pobedit drill to the desired depth. The diameter of the drill is chosen equal to the width of the teeth of the crown;
- Drilling continues with the same crown.
To obtain high accuracy and quality of holes with diamond core bits, the use of complex technical devices is required that will allow drilling to be carried out without shock and vibration. To facilitate the operator's work, the drilling device should be fixed in a certain way. In this case, you do not need to hold the tool, but only move it in the desired direction.
The video in this article shows you how to properly drill with a crown in concrete, with all the nuances and details.
Socket sizes
The standard for a “glass for an internal socket or switch” is a diameter of 68 mm. Naturally, for cutting it is better to select a larger hole saw, for example Ø 70 mm, 72 mm and even 75 mm. Accordingly, a crown with a diameter of 65 mm is not suitable for this purpose (if you use standard sockets).
Standard diameters.
Conventionally, core cutters are usually divided into four size groups:
- Small diameter tool. This includes cutters Ø4.0 – 12.0 mm. In everyday life, such attachments are practically not used. Their scope of application is electrical switching work of increased complexity.
Please note that to use cutters of the third and fourth groups you will need special drilling rigs.
Recommendations for selection
Let's start with the fact that the only thing better than a diamond crown is a high-quality diamond crown. But given the cost of such a tool, the question arises about its profitability, especially if it is necessary to drill 10=20 holes. In such a situation, it is economically justified to purchase 3-4 Chinese drills. On the other hand, purchasing a set of diamond cutters of various diameters can be considered as an investment in private ownership of the means of production.
Once you have chosen quality, stick to the principle until the end. Well, good diamond crowns for concrete sockets cannot be cheaper than Polish Pobedit cutters of average quality.
When working with concrete surfaces, there is often a need to create large-diameter holes, in particular for installing socket boxes or laying communications.
- How is it structured?
- Overview of species
- Which one is better to buy?
- Prices
The nozzle is a piece of pipe equipped with cutting edges on one edge and a flange for fastening; the kit sometimes includes a centering drill, which is necessary for more reliable fixation. Standard crown dimensions for a socket box: diameter 68 mm (in rare cases less, maximum - 74), the length of the working part depends on the required drilling depth (minimum - 50). This type of cutting device can be used as an attachment for a drill only if it has high power (from 800 W) and a suitable head diameter. But in general, it is better to choose a special drilling tool: pneumatic or electric.
A special feature of concrete crowns is the presence of sharp cutting edges: from 6 to 16 pieces, which ensure accurate and fast work. For comparison, when using a conventional drill with a standard drill with a diameter of up to 12 mm, you will need to drill at least 12 holes and gouge out crumbs from the future socket box. When choosing a crown, the desired recess is drilled in a maximum of 5 minutes, the edges remain intact and perfectly smooth. This is achieved due to high tool speeds.
Characteristics of crowns
When choosing a crown, it is not enough to be guided by such a parameter as the material with which you will have to work. Here you need to take into account what specific design parameters form the range of these tools:
- Shape and type of shank. This parameter affects the type of equipment with which the crown can be combined. For example, three-jaw chucks, typical for drills, can work with bits with a hexagonal shank. The same applies to cartridges for 1/4 bits. At the same time, hammer drills work with crowns that have a specific SDS-type seating surface (those who have used a hammer drill know that such drills have two characteristic mounting grooves on the shank). At the same time, for shanks with a diameter of 10 mm, the SDS-plus form is used (compatible with lightweight hammer drills), and over 20 mm, the SDS-max form is used (for working with large and powerful professional equipment).
- The diameter of the working surface (actually, the crown itself). In practice, working tools with a circumference from 33 to 150 mm are used. Large values are used to form holes for pipes, and for socket boxes, crowns with standard sizes of 68 and 70 mm are most often used.
- Drilling depth. This parameter determines the length of the working tool, which ranges from 60 to 550 mm. When drilling holes for socket boxes, their depth can vary from 40 to 80 mm, although usually this figure is at the level of 60-65 mm.
Socket box for drywall
Before installation, it is necessary to remove the plugs in the cable entry area. In this case, a wire with optimal parameters is selected in advance. The optimal dimensions of the element are also important, and therefore the diameter of the product is taken into account when choosing. The most common standard parts are with a diameter of 70 mm. They are suitable for simple sockets, but for a stove you should choose a special device.
In the field and other Sciences are constantly being developed. Every year scientists from around the world make a little opening, slowly moving humanity forward and improving our lives. Explores untouched by man places, first and foremost, of course, on our home planet. However, in the space constantly undergoing work. The distance from the slope to the first outlet in the group should be 150-200mm, and be the same in all rooms.
It is almost impossible to accurately measure these distances before leveling the walls with plaster, therefore the ideal option is to postpone the marking and installation of socket boxes to the moment when all the walls have already been formed. When placing only the socket mechanism in the socket box, you should choose elements with a depth of 45 mm for standard devices. If you plan to install electrical wiring in the socket box, then more spacious options are needed.
In this case, shape plays an important role. Round options are often used, which are easy to install. There are also square models that are optimal for installing non-standard mechanisms or for obtaining more space.
Installing socket boxes in drywall: tips for a novice master
The socket box for gypsum boards is an important element when installing electrical equipment into hollow walls, which is securely attached to the sheet and allows you to mount any electrical structures - switches, sockets, sensors or switchers. Important! When installing several socket boxes in one line, it is necessary to maintain a distance between their centers of 71 mm. When planning to mount a socket box in plasterboard, it is important to be able to choose it correctly. Of course, in any hardware store, consultants can help with the choice, but it is better if you yourself know what the differences are between socket boxes and how not to make a mistake with the purchase.” A glass for drywall differs from the rest in the presence of special fasteners installed on screws. These fasteners secure the socket box to the inside of the wall.
This is the only way “the glass can be securely fixed – neither with putty solution nor with cement. There are times when it is necessary to install 2 or 3 socket boxes in a row. In this case, you need to select “glasses with connecting tunnels through which the wire will be laid. If you only need to install one socket box, these connections can be cut, as they may interfere with installation in the recess in the drywall. There is a second option - you can purchase special connecting elements.
These partitions are installed in the glasses immediately before they are installed in the wall.
How to choose crowns for socket boxes on concrete, plasterboard, wood
To drill a hole for the socket box, you will need a crown and a tool with an electric or pneumatic drive. If you plan to drill drywall or wood, it will be enough to use an electric drill. It is better to use a hammer drill on a brick, stone or concrete wall. The impact force when drilling should be approximately 14 J.
In other words, if you take a 1.5 kW hammer drill, the tool will cope with the task without any problems. When working with drywall, you can use another type of cutter - bimetallic. In addition to gypsum boards, they can be drilled into wood, plastic, and sheet metal. In general, a bimetallic cutter is used to cut a socket for a socket box in any fragile finishing material.
The center drill and shank are often sold as one set with an attachment. There are also extension cords designed for rotary hammers with different cartridges: SDS Plus or SDS Max. The extensions have standard threads similar to those on the crown body, so they are easy to change. The center drill can be cylindrical or conical. The standard bit is usually supplied with a cylindrical drill bit, while the extended shank may be sold with a tapered drill bit.
Regardless of the type of socket box, their standard diameter is 68 mm. It is to this size that most manufacturers make sockets, switches and regulators. Naturally, in order to drill a socket of the appropriate size, you need to take a similar diameter of the crown - 68 mm. Sometimes circumstances require making a larger hole, for example, in a concrete wall, where the socket box will be secured with concrete mortar. Here it is possible to use crowns whose diameter is increased to 70 or 75 mm.
It is rare to find glasses from Chinese manufacturers of non-standard sizes on the market. The diameter of the crown for them will have to be selected experimentally.
Crown shanks
The three main types are SDS+, SDS Max and hex (or cylindrical shank). The first two are used in hammer drills, and the hexagonal one is used in drills or screwdrivers.
If you choose a bit for a drill or screwdriver, then please note that the power of your tool should be at least 800 W, but if possible, give preference to a special tool.
Types of crowns for drilling holes in drywall
During renovations, you often have to face the need to make a hole in the drywall to install socket boxes, spotlights or switches. The simplest option may be a drill bit with a drill bit. Such equipment allows you to make the necessary holes of the required diameter with a perfectly even cut.
What crowns are most often used and how to choose a high-quality attachment?
- The attachments allow you to drill into material up to 22 millimeters thick. Considering the parameters of the plasterboard sheet (thickness 14.5mm), this set is perfect.
- The holder is also different; it has protrusions for securely fixing the cylinders and a centering drill.
- Fix the nozzles using a hexagon.
- Professional sets are sold in hard plastic cases and have several holders, spare drills and sets of crowns with sizes from 38 mm. Wood crowns
The second name is a wood saw. The nozzle is designed for cutting large diameter holes. Kits are available for sale, consisting of an adapter for cylindrical nozzles with various diameters and a centering drill. Drilling holes in drywall One of the features of drywall sheets is that they are easy to machine. To drill it, you can use various types of crowns designed to work with harder materials. Set of bits for plasterboard and wood To obtain holes of the required diameter in plasterboard surfaces, you can purchase the following types of attachments. It is worth knowing that sets of inlaid drills mainly come in two varieties: the first from 23 to 63 mm, and the second from 63 to 100 mm. Drills for wood at work You need to select them in accordance with their intended purpose; if it is an opening for a socket box (68 mm), then it is worth buying the second option. The price for a good set ranges from 200 to 400 rubles. On average, a set costs 200 rubles.
It is better to immediately ignore the offered attachments at a more favorable (read cheaper) price.
Features of crowns for socket boxes on plasterboard
- Material of manufacture: must be self-extinguishing plastic. If the outlet gets hot, the heat won't be able to transfer to the drywall. This will help prevent short circuits.
- Individual sizes, when the distance between the wall and the covering is small. If the width is standard, you can purchase models of standard sizes with a depth of 50 cm.
In order for the installation of socket boxes in plasterboard to be successful, preliminary preparation of the walls should be carried out. At the preparatory stage you need: Crown - a special drill in the form of a cylinder with an edge that has small but sharp teeth. With its help, you can effectively drill material, obtaining perfectly straight holes. Standard product sizes are 68-70 mm, but there are nozzles with other parameters. After the tool and the hole itself are ready, installation work begins.
It is recommended to familiarize yourself with the electrical wiring plan, taking into account the arrangement and overall dimensions of the furniture. It is better to spend a little time and get the necessary information than to redo everything later. Modern devices have additional fasteners with which they can “clip to the installation cover, ensuring optimal fixation of the connector.
Drywall crown 68 mm: types, characteristics, nuances of application
Bimetallic cutters are also produced, which, in addition to processing fragile materials, are suitable for drilling metal and steel with sheet thicknesses of 1 mm or more. Popular manufacturers that produce 68 mm crowns include the brands Bocsh, HSS, Sigma, MTX, etc. The Karat (Bosch) series cutter is used complete with an adapter and a centering drill, which allows you to process plasterboard walls, marble and wood. The HSS bit (Makitta) chambered for 13 mm is suitable for processing surfaces made of gypsum plasterboard, plastic, plywood and chipboard.
Allows you to make holes in the wall with a depth of 3.2 cm. It is equipped with a countersink. Before choosing the installation method, prepare a tool, in addition to crowns and sockets, use a drill, a screwdriver and the outer part of the socket. This type of installation is the simplest.
It is used if there is a metal frame, and on sheets of plasterboard you can confidently determine where the profiles are located based on the marks left by the screw heads. There is no risk of snagging wiring or getting into the middle of the profile when making holes, which guarantees safe installation. For sockets, a special cylindrical drill (mill) is used with a cutting edge in the form of pointed teeth placed at a certain angle at the end.
In the center of the device there is a drill around which the crown is placed. First, a drill penetrates the material being processed, fixes the nozzle in a given position and performs alignment for the cutting edge. This shape is optimal for efficient drilling and durability of the crown. I will tell you about all the options that can be used for drywall, I have tested each of the types described below in practice, so you can safely take this information into service.
And don’t worry - the work process is not complicated and can be done with your own hands even by someone who is holding a drill or screwdriver in their hands for the second time in their life. First, mark a horizontal line at the required height from the floor level. To do this, we use a tape measure and a simple pencil. Then we determine the location of the socket boxes , taking into account the symmetrical location of the structure relative to all sections of the wall.
After these manipulations, four points appeared on our wall, which define the central part of the socket boxes. Now you can start drilling holes.
- choose socket boxes for plasterboard made of self-extinguishing plastic. When the outlet heats up, the heat from it will not transfer to the surrounding drywall. This is additional safety in case of a short circuit;
- focus on individual dimensions if the distance between the main wall and the plasterboard covering is small. If the width of the cavity is sufficient, you can buy a model of a standard size - 50 mm deep.
Installation methods and types of tools for its implementation
There are three ways to install socket boxes:
- linked to a profile;
- without connection to the frame;
- installation of a socket block.
Before choosing the installation method, prepare the tools, in addition to the crowns and socket boxes, use a drill, a screwdriver and the outer part of the socket.
Additionally you will need:
- building level;
- ruler or tape measure (to control the distance between block socket boxes);
- pencil for marking;
- a construction vacuum cleaner, which is used when making holes with a drill in drywall, so that less dust collects and does not clog the lungs.
For precise marking, a laser level is used, which will allow you to carry out work with minimal deviations in calculations.
Type of marking made using a level
Diameter of crown for socket box in plasterboard
A socket box for plasterboard is a plastic or metal mounting box necessary for securely fixing electrical installation equipment and isolating it from flammable materials in a hollow wall. If you only need a crown for sockets, then there is no point in purchasing a whole set; you can buy a special crown, which most often has diameter 68 or 70 mm for standard socket boxes. The cost of a separate device will be from 300 to 600 rubles. A socket box for gypsum boards is an important element when installing electrical equipment into hollow walls, which is securely attached to a sheet and allows you to mount any electrical structures - switches, sockets, sensors or switchers.
Sometimes it happens that the calculations are made incorrectly and after drilling in the hole for future sockets, a profile is visible, due to which it is impossible to push the block through and securely fix it in the recess. In this case, the crown is replaced with an ordinary metal knife or chisel and the holes are made manually, removing 5-10 cm of the visible profile. The frame of the structure will not suffer from this, but the sheet of drywall itself may be deformed, and due to the inconvenient viewing angle there is a risk of injury.
When cutting the profile, it is recommended to wear special installation gloves - they will protect your hands from unwanted cuts.
Additional information on the topic:
- What profiles are needed for a plasterboard box in a bathroom under tiles?
- Plasterboard ceiling in the hall photo with cornice
- Which profile to use for a plasterboard niche
- How deep should a plasterboard niche be?
- Is it necessary to putty drywall before wallpapering reviews?
How to treat the surface → Room decoration → How to choose the right paint → Surface treatment technologies → Leveling and finishing the walls → Selecting and applying a primer → Removal from the surface → Stretch ceilings and technologies → Reviews and testimonials
What is a socket box: types and features
The socket consists of two parts: a visible decorative part and a socket box - a terminal block hidden from view, which serves as a connection point for various wires to ensure safe electrification. It is round and is produced in certain standard sizes in diameter and height, the compliance of which is verified by GOST standards and norms.
There are three types of socket boxes:
- for concrete, they are a plastic cup without fixing elements, installation is carried out in cement mortar;
- for wood - made of metal;
- for plasterboard, the body material is plastic, special vertical pressure plates, plastic or metal, are placed on the side walls; by means of these fixing elements, the socket box is attached to the back side of the gypsum board sheet.
The usual diameter of manufactured socket boxes is 68-70 mm, which requires the use of special drills for installation. As for the decorative part of the rosettes, it is also divided into subtypes:
- with a closing curtain to protect children from electric shock;
- with protection from moisture and other aggressive environments - suitable for installation in extreme rooms (kitchen, bathroom);
- equipped with a grounding contact.
Installation of a mounting box for a socket