- home
- Construction and renovation
- Electrics
>
>
⬎
Socket boxes are required in almost all places where electrical appliances are installed. The final appearance of the installed sockets, switches and other installation products depends on how smoothly one or more socket boxes are installed. Of course, the evenness of the installation of the socket box does not 100% decide the final result - a socket or switch can be perfectly screwed even into a crookedly “grown” socket box. However, this does not mean that you can be irresponsible about “smearing” round installation boxes
(this is the official name for socket boxes).
A crookedly installed socket box can cause a lot of suffering during the final installation of installation products. Therefore, smooth installation of installation boxes is strongly recommended.
By the way, socket boxes do not always have a round shape - there are square installation boxes designed for four modules, two in a row. And in general, there are rectangular models that, according to their purpose, replace several single socket boxes in a row. However, the most common are the round ones, so we will focus on them.
At first glance, installing a socket box in a concrete wall seems simple. In principle, this is true; anyone can “smear” the installation box. The only point that many people have difficulty with is the evenness of installation, especially of several combined socket boxes.
The method that I want to describe is far from new. These few additional operations will allow you to efficiently install several socket boxes in a row in any walls - concrete, brick, aerated concrete.
The first stage is marking
, you need to mark the horizontal and vertical axes of each socket. When installing several boxes in a row, you need to maintain the correct distance between them so that future outlet or other modules are installed correctly. The optimal distance between axes (centers) is considered to be 71 mm, however, there are products whose connecting elements contain a distance of 70-72 mm. When installing 2-3 socket boxes, this does not matter much, but for 5 boxes in a row, every millimeter is important.
Before installing 5 points in a row (vertical or horizontal), you should clarify the specific size of the installed electric points of a particular series. The best way is to assemble the socket boxes on the table in a row using connectors (usually included with the boxes) and screw all 5 sockets (or switches). Then you will know whether the axle size is correct or not. Often, 5 socket boxes in a row may not correspond to the size of five sockets. If there is no opportunity to try on the sockets, a distance of 71 mm is maintained between the axes.
If the outer width of the box is 70 mm. (with a front border) - such socket boxes can be installed without problems with a distance between the axes of 71 mm. If the width is 72 mm, then it will be difficult to “narrow” the axes of the boxes. For 2-3 modules in a row, you can maintain a distance of 72 mm, but for 5 in a row it is better to choose other products.
So, the axes are marked - socket boxes can be mounted in both vertical and horizontal rows. But some series of rosettes are not designed to form vertical rows (rare, but it happens), so you need to clarify this point.
The second stage is the selection of holes
for installation. In concrete, this can be done with a diamond bit for a high-speed drill or grinder. An easier way is to drill holes in a circle with a small drill and knock out the middle with a hammer drill. The optimal hole diameter is 75 mm. - then any socket box will fit in freely and there will be a gap for putty. The depth of the hole is about 50-60 mm, the box must fit completely into the wall. A cleanly installed socket box should be flush with the final putty of the walls or slightly recessed relative to the plane of the wall.
For brick, plaster and other softer walls (relative to concrete), a hammer drill bit is suitable. This crown can also drill concrete walls, but then its service life is greatly shortened. In brick walls it is drilled with impact, in foam concrete and plaster - in drilling mode without impact.
When the hole is made, a socket box (or a group of socket boxes) is fitted into it; if everything fits in without problems, it is swept and primed.
The next stage is creating a pattern
. Many installation boxes are equipped with connecting elements for combining into groups. Connectors can be structurally part of the socket box or equipped with a separate part. In our installation method, connectors are completely unimportant, they may not exist at all. The role of a reference template that maintains the required distances between the mounting screws is played by a homemade pattern.
Any piece of profile, for example PN27X28, is suitable for making patterns. Holes for the fastening screws of each socket box are marked and drilled in the profile, so that there is a distance of 71 mm between the left screws of the first and second boxes (and all subsequent ones). Well, the distance between the screws in one box is 60 mm.
The pattern profile must be longer than the entire group of socket boxes so that there is room to attach to the wall. For this, holes are also drilled in the profile. Next, all the boxes are screwed into the pattern from the flat side; for this, screws are used that come with the socket boxes.
The assembled structure is tried on in a pre-prepared recess. Nothing should prevent the profile from fitting tightly to the plane of the wall.
Well, the final operation is smearing
. A wide range of materials is suitable for fixing socket boxes in concrete, aerated concrete and brick. This can be a gypsum mixture: alabaster, thick fugen, rotband or goldband and others. Cement mixtures, including tile adhesive, are also quite suitable. The most important thing is that thanks to the template, the putty does not need to set quickly.
Even when the template is not secured to the base, it is still very useful: several boxes will not form a crooked line when pressed into the solution.
The putty is filled into the prepared hole and the socket boxes are pressed in from above. It is necessary to press until the plane of the template profile fits snugly against the plane of the wall. The pattern is aligned to the horizontal axis of the group of socket boxes (or to the vertical axis when forming a vertical row) and, after drilling holes, it is fixed to the wall. All excess putty that has come out from under the boxes is removed with a small spatula. Putty will also definitely get inside the socket boxes - it can be removed without problems after removing the template.
When applying it, it is important to ensure that not a single socket sticks out from the plane of the wall. If some boxes fell a little deeper than the plane of the wall (which is unlikely), it’s okay.
After the putty mixture has set, the template-pattern is unscrewed, and the remaining sagging is cleaned off with a spatula. Installation completed!
For those who love “reliable reliability”, we can recommend additional reinforcement of the fastening using self-tapping screws. A hole is drilled in the wall right through the bottom of the socket box and a self-tapping screw with a plastic dowel is screwed in. In walls made of foam concrete and aerated concrete, there is no need for preliminary drilling - the self-tapping screw is screwed in just as it is. It is convenient to use self-tapping screws with a press washer.
Whatever one may say, the putty mixture usually gives some shrinkage, so the place where it is put in requires finishing putty. Therefore, the best solution for electrical installation would be to install it before finishing the walls with putty.
Tip: Mounting screws get lost all the time when it comes to final installation of outlets and switches. Therefore, it is recommended to tighten the screws in place immediately after removing the template. And so that they do not interfere with the finishing puttying, the screws are tightened deeper than the plane of the wall.
How to remove the socket from the frame?
In order to remove the frame from the socket, you need to carefully pry it off with a screwdriver, after which it will easily move away from the socket body. To dismantle the socket built into the wall, simply remove the decorative frame. The socket located on the wall surface can be dismantled after its casing has been unscrewed.
Interesting materials:
How to set up the G Shock 110 watch? How to set up Fork Player on LG? How to set up hotkeys in Photoshop? How to set up Google Assistant? How to set up Yandex on a smartphone? How to set up drawers in a chest of drawers? How to set up Internet on Nokia Lumia? How to set up the camera in Samsung s10? How to set channels on a Sony TV? How to customize brushes for Adobe Illustrator?
How to install socket boxes in a concrete wall?
How to install socket boxes in a concrete wall? In this article I will outline the entire sequence of actions in order to correctly install socket boxes.
We mean that the holes for the socket boxes and the grooves for them are already ready and we are moving to the next stage - installing plastic socket boxes in the concrete wall. Here we describe in detail which crown is best to use for this. And here in detail about at what height to install the socket boxes.
What we need for this:
- Level;
- Gypsum plaster is the best known Rotband;
- The socket boxes themselves (my choice is Schneider Elektrik, they are comfortable and they fit on a cone, this is important if the crown is 68 mm, they fit without problems);
- Narrow and medium spatula;
- A vacuum cleaner is desirable;
It is necessary to clean all the holes and preferably prime them from dust. To do this, it is convenient to use a vacuum cleaner or take a small brush.
We prepare the socket boxes - we connect them into groups according to the number of holes, and break off unnecessary elements. We definitely try to insert the assembled socket boxes into the holes to make sure that everything fits in and nothing gets in the way.
It is necessary to prepare all the sockets at once because... doing it at the same time is more difficult. The solution “freezes” quite quickly.
By the way, if you don’t have experience, I don’t recommend using alabaster (it hardens very quickly), ordinary gypsum plaster is much better suited for this. Alabaster should be used when installing one or two socket boxes and then install finishing fittings.
It is also most convenient to first install the socket boxes on the plaster mortar in the concrete wall, and only then insert the cable into them. This method is the most effective and you will spend much less time. A rigid cable will constantly try to unscrew the socket until it freezes.
We throw a little solution into the hole, try to distribute it along the walls, insert the socket box and press it into the solution with a level or a small rail. so that it is flush with the wall. Using a medium spatula, smooth out the squeezed out solution. We wait a couple of hours until the solution hardens.
It is better to clean the socket box after the solution has hardened.
The solution does not need to be removed from the socket box before hardening. It cleans up easily afterwards.
Everything is good and simple when all the holes are made with a good tool, and not with improvised tools (grinder and hammer drill). What to do in this case? How to install socket boxes in our concrete wall in such a way that when installing the finishing fittings, everything is on the same level and even?
This is a very important point. If a single socket can be placed in the crookedest socket box, then with a group of 5 sockets such a number will not work. And then it will look very crooked if the sockets fall into place at all.
You are unlikely to install mechanisms exactly in such a socket box.
In any case, you need to be fully aware that if you save time on one operation at the beginning, you will subsequently lose three times as much. Because of this, the installation of finishing electrical installations can turn into a real struggle for millimeters.
If you feel that the socket is difficult to enter into the hole, something is preventing it, the group is stretched or, on the contrary, compressed. Don’t be lazy, take a hammer drill and finish the hole. The group of electrical outlets must enter freely.
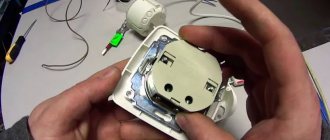
However, if the group comes in very freely, and you need to set them on a level with the rest? And until the solution freezes, they need to be held in place with something. To do this, I used a 30/30 mm aluminum corner when working. I drilled holes on one side that coincided with the fasteners for the socket boxes. Connecting them into a group and screwing them to the corner. This entire structure is installed in a large “hole” in the wall, leveled and fixed at the edges with self-tapping screws until it freezes.
Installation of socket boxes using aluminum corner
In this case, the solution should be poured into the large “hole” in two stages. First, a little to fix it, and then we will level it.
I hope the article was useful to you. Question: Installation of socket boxes in a concrete wall - resolved, if not, ask questions in the comments.
Add the article to your bookmarks and share with friends. Ready to answer everything.
Installing a socket without a socket box: pros and cons
After completing the renovation, most people are faced with the problem of installing sockets. Due to ignorance of the basics, electricians call in specialists, although this is not as difficult to do on your own as it might seem at first glance. After tediously studying the information on installing sockets in concrete or drywall, some find an option without using socket boxes, but as a result they are faced with a number of problems that arise.
The nuances of installing a multibox on a plinth
What should you do if your house has already undergone high-quality repairs, but you need another point to connect electrical household appliances?
In this case, it is not at all necessary to rip off the new wallpaper and ditch the wall; you can make a socket directly on the baseboard.
Multiboxes fit all types of standard single sockets. They can accommodate not only electrical, but also telephone sockets, as well as Internet cable connectors.
However, it should be noted that this method can only be used on collapsible plastic skirting boards with a cable channel. Before installing the socket box, it is necessary to lay the wire inside the baseboard.
To do this, remove the cover from the part where the socket will be located. This operation is performed from a corner or from a nearby plug; simply pry the cover with a screwdriver and carefully remove it.
Cut the baseboard so that there is a gap the width of which matches the size of the plastic trim. Insert the multibox into it, thread the wire through the hole in its body, and secure the socket box with dowels.
Rules for preparing the solution
Alabaster, despite its high adhesion to most substrates, has little contact with rubber. Therefore, to prepare the solution, it is better to use a special bowl or a cut ball or chamber. You can take a plastic container. The metal will have to be constantly cleaned mechanically. As a last resort, use disposable plastic bags for each batch.
To carry out repair work, the following proportions are observed for diluting alabaster (mixture/water):
- 1/0.5 – fixation of wires, boxes, pipes, beacons;
- 1/0.65 – filling minor voids;
- 1/1 – surface leveling.
The mixture must be mixed in a short time (no more than 2 minutes). To prevent the formation of lumps, the powder is added to the water gradually. The volume is selected in accordance with the optimal production during working hours. In case of exceeding 1 liter, it is recommended to use a power tool with a whisk for fine-grained mixtures.
The mixture is added to the kneading water
It is important to remember a common mistake made by beginners. In addition to the exaggerated volume, water is often added to the hardening solution in order to extend working time.
As a result of this action, the resulting mixture will be lumpy, crack when drying, and deteriorate in strength characteristics as a whole.
To extend the working time of the solution, carpentry or wallpaper glue can be used. The permissible rate of 2% will not have a noticeable effect on the quality of the mixture. Lime milk is often used instead of water at construction sites.
Alabaster is made from gypsum with the addition of special additives. As a result, the mixture hardens faster, after drying it is stronger and absorbs less moisture.
Light powder is used more often on construction sites in order to quickly and reliably fix materials in recesses and gypsum cladding.
The recipe for preparing the solution is determined by the specific brand of the mixture and its purpose: filling voids, securing products, leveling the base.
Dissolve the dry mixture in water or milk of lime.
So what is alabaster?
This is really a “subspecies” of gypsum. Like building gypsum, it is obtained from a natural mineral - gypsum stone, both of them are calcium sulfate, only the first is dihydrate (CaSO4•2H2O), and alabaster is semi-hydrous (CaSO4•0.5H2O) .
The mineral is crushed and then fired at a temperature of about 180C.
The grind of alabaster is finer than that of building gypsum, and therefore this material has less ductility, but greater hardness.
Also, its unique feature is the drying time - alabaster mortar sets on average in 5 minutes, that is, much faster than other building mixtures.
These properties narrow the range of applications of alabaster to construction and finishing works, while gypsum can be used in many industries, including medicine, jewelry, casting, art, etc.
Mounting on various surfaces
In drywall the task is simplified because there is no need for alabaster. You need to do the same operations, marking, cutting a certain size hole that matches the socket box, fixing.
The box is fixed in the drywall using special fastening tabs, which are pressed against the drywall when screwed. It is called universal, it can be attached to various thin-walled surfaces that include drywall.
If the box, despite being tightly fixed, sticks out strongly, it is necessary to remove the thickness and make the edges of the hole in the drywall at an angle.
The universal socket box is large in size because the distance between the legs is 83 mm, which is convenient if we have a socket or a non-standard switch, in which the distance between the mounts may be slightly larger.
Similarly for wood, if it is a thin wooden partition, but if the house is from a log house, then the option of screwing the wall of the box to the log frame using self-tapping screws is possible.
If you purchased a universal socket box for a brick wall or log house, then the tabs must be unscrewed.
It is better to make holes in a single socket box with a heated knife to avoid breaking the housing. In this case, you need to have a safe distance from drywall and wood.
When installing on a surface that will be plastered or tiles will be laid on it, there is no need to drill holes to the full depth. The socket box should be made slightly protruding, 5-7 mm, or less, depending on the thickness of the plaster/tile.
When choosing, it is important to consider that the depth of the socket may differ from the depth of the socket, as well as the diameter.