Sooner or later, home renovations come to the stage when it is necessary to install lamps in drywall. The installation process does not require any special skills. Moreover, with rare exceptions, most models of lamps for plasterboard ceilings are equipped with special fasteners and mounting devices. The worker will only need to carefully prepare the holes and fasteners, connect the wiring and install the product into the hole in the drywall.
Features of recessed luminaires for plasterboard ceilings
The main distinguishing feature of the ceiling lantern is the simplicity of its design. The number of operations required to install luminaires in a plasterboard ceiling is reduced to a minimum. But you shouldn’t expect an easy solution to the problem; often, flashlights and lighting elements purchased at a showroom can be fraught with unpleasant surprises.
Electricians installing built-in lamps in drywall recommend paying attention to the following nuances:
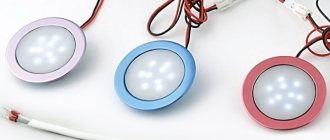
- A huge number of different models of LED and halogen light sources are produced around the world, designed for installation specifically on drywall. Moreover, most of the models are manufactured using an open design. This means that the lamp has a front panel, a reflector and a housing frame on which the remaining parts are held. Almost always, the manufacturer saves on clamps, so you need to be prepared for the fact that the plastic spring or clamp securing the lamp to the drywall will break during the first installation attempt;
- Most lighting devices are produced according to standard mounting dimensions of the housing and terminal connectors for connecting wiring. If you buy a flashlight from a well-known brand or manufacturer, then, as a rule, there are no problems. On the other hand, cheaper models of lamps, especially those made in China, can “please” during installation with non-standard shapes and sizes, a falling off reflector or the absence of a fastening spring.
Advice! It is better to buy beautiful spotlights for plasterboard ceilings together with a specialist who can select the highest quality products, and at the same time recommend one or another model for installation, depending on the interior and the conditions for organizing the lighting of the room.
The advantage and at the same time disadvantage of modern built-in lamps is the reduced supply voltage. On the one hand, this is safe, on the other hand, it means that, in addition to the lantern body itself, it will be necessary to place an additional power supply or step-down transformer in the space between the rough ceiling and the drywall. This is a small unit, slightly larger than a phone charger, but it will also need to be secured, and sometimes additionally covered from condensation or accidental damage during installation.
When choosing a lamp model, you need to take into account the maintainability of the design. Installation conditions must ensure trouble-free removal of the entire lamp or luminaire with drywall without damage.
How to choose the right one
When planning a lighting scheme, the question arises: what are the best fixtures for drywall? When choosing a point device, you need to evaluate not only its appearance, but also imagine how it will look during operation.
Worth paying attention:
- where the light will be directed;
- degree of light scattering;
- lighting brightness.
Some devices create light patterns on the ceiling. Spotlights are selected to suit the style of the room:
- Classical. The lamps chosen are strict and calm, they can be bronze or with patterns. Crystal products are very suitable.
Classic style
- Provence, country, romantic. Oval lamps in gold color are better suited. They can be built in and use overhead.
Provence
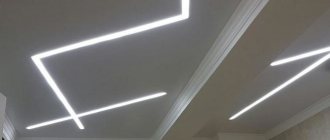
- Minimalist. It is recommended to choose round or square shapes for products. It is possible to use LED strips to create all-round illumination. Such an interior will certainly be appreciated.
Minimalist style
In specialized stores there is a huge selection of spotlights for plasterboard ceilings. This provides an opportunity to use imagination and create attractive interiors.
Types of spotlights for drywall
Typically, four types of light sources are used to organize lighting:
- Halogen lamps;
- LED assemblies;
- Classic incandescent light bulb;
- Fluorescent lamps.
A conventional incandescent lamp is rarely used in plasterboard ceilings due to its low light output and short lifespan. Demand for fluorescent or energy-saving light bulbs is also declining due to high sensitivity to voltage changes. In addition, older lamp models widely use mercury compounds, so it is better not to use this type on drywall in residential areas.
Installing spotlights in drywall turns out to be simpler and more affordable than choosing a built-in model that matches the interior and furnishings. Typically, more modern LED and halogen devices are used for plasterboard ceilings; they are more durable, although they are more expensive.
If the customer prefers halogen lamps, then the installation will need to additionally check the cross-section and quality of the wiring, as well as the absence of fusible materials in the finishing of the ceiling surface.
With high light output, halogen ceiling lamps built into a plasterboard structure can overheat in the absence of free air space and cause the reflector to melt.
Based on the body design, spotlights are divided into three categories:
- Ordinary, with an open back and a stationary reflector. Installation of such a lamp is carried out by fixing it into a hole in the drywall, after which the lamp can only shine in one direction;
- Rotating or adjustable model. In fact, this is a variation of the previous version, in which the reflector is made on a rotating hinge. It can deviate together with the light source at a small angle, up to 45o;
- The protected version of the lamp is a sealed housing, inside of which a light source, a reflector and a contact group for connecting electrical wiring are mounted.
Waterproof models are usually installed in bathrooms and rooms with high humidity. Installing this type of lamp on drywall in a living room or even in a kitchen does not make sense; they cost more, and there are no special advantages in terms of resource or decorative design.
The protected design is convenient in that the lamp will not fail even if water leaks through the ceiling onto the drywall. It is clear that if there is a risk of flooding, then the location and location for installation must be chosen taking into account the possible consequences. But repairing a waterproof spotlight is quite difficult; it is not enough to remove the housing from the drywall; this is the simplest stage of repair. You also need to properly disassemble the device in order to get to the light bulb and, preferably, without damaging the seal.
Unfortunately, most manufacturers make protected models that can only be disassembled a couple of times, after which you have to look for ways to replace the seals, including using sealant and fum tape.
Lamps with a movable reflector are convenient because you can always adjust the direction of the light flow relative to the vertical axis; the maximum reflector can deviate by an angle of up to 45°. But there is one obstacle: installing an LED lamp on a plasterboard ceiling makes it not very convenient to control the adjustable reflector, it is too high.
In addition, 3-5 months after installing the lighting on the ceiling, the body and fittings of the lamp become clogged with dust, so it becomes difficult to turn the reflector. Therefore, after installation, such models are immediately set in the required direction and fixed so that there is no need to return to adjustments.
Repairing such devices is quite simple, but there is one limitation. In addition to the electrical part, the housing must contain polypropylene inserts, therefore, if you install a halogen lamp instead of an LED one, then after 5-6 months the inserts are tightly welded to the base, and accordingly, it will be almost impossible to disassemble the flashlight. All that remains is to replace the halogen lamp with a more gentle LED bulb and repeat the installation on the ceiling, turning the reflector in the desired direction.
Stationary built-in lamps are convenient in everything. They are lightweight and most of the structure is open for cleaning and maintenance. In addition, the absence of an external housing facilitates and improves the cooling of the reflector, so in this design it is quite possible to install both conventional incandescent lamps and halogen light sources.
Wiring
Laying the electrical cable is a key step when installing fixtures in a plasterboard system. Lay the wires correctly not after, but before installing the drywall - this is the only way to perform the wiring efficiently.
The wire cross-section should not be less than 1.5 square millimeters. It is recommended to opt for a parallel connection diagram, which will ensure autonomous operation of all light sources.
When laying wires, loops (20–30 centimeters each) are left in the areas connected to the chain of lighting fixtures, which will ensure future maneuverability when creating connections.
It is recommended to hide the wires in special corrugated channels with a high level of fire safety. If the ceiling is already installed, then holes are drilled in the drywall and wires are pulled through them to the lighting fixtures.
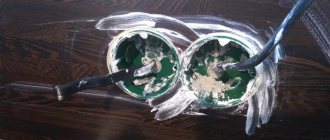
The wires are connected in accordance with the colors of the cores. For example, blue color is phase, brown is zero. When the colors have been sorted out, the supply wire going to another lighting fixture is clamped in the terminal box. In this case, only wires of the same color can be combined with each other.
The switch can only open a phase. If the circuit has a transformer, it is placed between the floor slab and the plasterboard ceiling. Twists of wires are pressed using a sleeve and insulated.
Open twists are not allowed. Wires cannot be placed diagonally relative to each other, no matter what installation diagram of electrical appliances is used. If the circuit is complex - with an abundance of wires, you will need distribution boxes in which there is a main supply wire, and all other wires are its branches.
Which lamps are best for drywall?
Despite all the advantages of the LED circuit, it is impossible to say unequivocally that this particular option is best suited for installation on the ceiling. The optimal choice of a particular model and light source depends on the shape and size of the plasterboard ceiling structure, as well as the overall interior of the room.
LEDs on the ceiling
Today, LED ceiling lights for plasterboard are considered the best in efficiency and reliability. The very bright and at the same time cold bluish-gray glow from a spotlight LED lamp is not entirely suitable for lighting a room in dark blue, black and red tones, or any darkened rooms.
Spotlights with LEDs are ideal for light multi-tiered plasterboard ceilings.
Halogen
If built-in ceiling lights are the main source of light in the room, and in addition, you need not a monochrome, but a full-fledged flux, not inferior to that of the sun, then the best option would be halogen LED lamps for drywall.
Ideal for colored and monotonous ceiling cladding. The only limitation is the high power of the lamps, therefore, if you are installing drywall with a tension sheet, you will need to increase the distance between the plastic and the lamp, otherwise the plastic will gradually melt.
Incandescent lamps
It may be perceived as an anachronism, but it is lanterns with incandescent bulbs that create a stream of light that does not irritate the human eye. Such lighting is inferior in brightness to LED, but the filament, like halogen, provides a wide spectrum. Therefore, the installation of such spotlights in plasterboard is carried out in places where lighting is needed, for example, above a chair near the TV or above a computer screen, on the ceiling in the corridor.
Lighting installations and their dimensions for suspended ceilings
Stretch ceilings are very popular today.
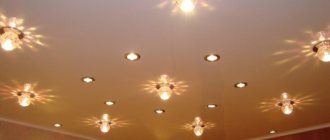
Note! Tensile ceilings look great in combination with spotlights.
Stretch ceiling with spotlights
When choosing such lighting installations, you need to know that stretch fabrics have specific requirements for such concepts as depth and dimensions. They are due to the fact that high temperatures and heating of the surface from a working light bulb pose a particular danger to stretched fabrics. Moreover, the same requirements are relevant for plastic floors. Here you need to take into account the following requirements:
- the planting depth should provide heating from a working light bulb no higher than 80 degrees;
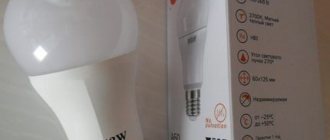
- the light source must be low-power (no more than 60 W for fabric, and no more than 40 W for film). Therefore, here preference should be given to models that have small dimensions of both the body and the socket with the light bulb. The light bulbs themselves must have a mirror or black coating;
Note! For stretched fabrics, small LED spotlights are the ideal solution.
- the light from the light source must come exclusively into them. Therefore, only non-rotating models can be used here.
Preparing the ceiling for installing lamps
It is important to create the correct holes in the tension fabric. To create holes here, at the stage of preparing the canvas, fasteners should be placed in the right places, into which the lamp housings will then be placed. At the same time, it is important to decide what depth of their embedding is required in a given situation. After this, the canvas is stretched. Decorative rings are installed on it, at the fastening points, and holes are cut. When forming holes, the ring will prevent the fabric from tearing more than is necessary to accommodate the recessed type of lamp.
Arrangement options for LED spotlights for plasterboard ceilings
The installation scheme and placement of lighting points on plasterboard depends only on the design of the ceiling. This could be installing lamps in a chain around the perimeter of the room. For such a scheme, stationary unregulated lamps are used.
A fairly popular scheme is in which the ceiling lights are distributed in several groups. In this case, the main part of the light flux is directed not vertically, but at an angle towards the wall.
This is called reflected flux lighting. Very convenient if you need to create an atmosphere of comfort in the room.
Adjustable lamps with LED reflectors are installed in the kitchen and auxiliary rooms. They are most convenient for conditions where they work and require high brightness lighting.
Influence of lamp type on height indicators
Built-in lamps consist of a housing in which the base and lighting lamp are located, fastening elements, and decorative formwork. They have minimal heat transfer, so the tension fabric does not heat up. According to operating standards, the lamp power should not exceed 35 W, which can be maintained in a given mode or protected from power surges in the network by being equipped with separate power supplies or a battery. They are connected to each lamp separately or only to the junction box.
The height of the lamp body directly depends on the type of lamp:
- 12 cm – for incandescent lamps;
- 6-7 cm for halogen;
- 4-5 for LED.
Subject to these parameters, optimal comfort is ensured when installing the panel and easy access to the wiring when replacing the lamp. Spotlights have a number of other advantages:
- they are modified by equipping them with motion sensors, a cooler, a light reflector, etc.;
- allow you to divide the room into zones, direct rays to illuminate individual objects and visually enlarge the space;
- have a wide range of products;
- are characterized by simple installation.
Housing height of various types of spotlights
Dimensions of spotlights for plasterboard ceilings
For home lighting, devices with a reflector rim diameter of 85 mm and 106 mm are used. The first type is used for LEDs, halogens and incandescent lamps designed for open-frame installation. The height of the housing can vary from 35-45 cm for LED models, up to 60 mm for halogen and 90 mm for incandescent bulbs.
A larger diameter of spotlights for drywall is used in situations where a fluorescent lamp is used as a light source. They have lower luminous flux density and intensity, so you have to use a larger reflector size so as not to increase the number of lighting points on the drywall. The case height is one of the largest, up to 95 mm.
How to choose for suspended ceilings
In order for the lamp to be ideal for a suspended ceiling, everything needs to be measured down to the centimeter. Otherwise, the structure may be damaged, including dismantling. The most rational option is round spotlights of small diameter.
A typical round spot for a gypsum plasterboard ceiling.
They don't even need large holes in the ceiling. The round shape minimizes the risk of damage to the ceiling. To prevent the temperature from rising above the specified limit of +80°C, it is worth using light bulbs with a power of up to 60 W for a fabric tension surface and up to 40 W for a film surface. For halogen lamps, the power is divided in two - 30 and 20 W, respectively.
One of the main parameters of a lighting device for suspended or tensioned ceilings is the design of the socket . This determines which lamp can be used in the lamp. And this, in turn, dictates the depth of installation of the lantern (when a built-in model is used). There are the following types of cartridges:
- E27 - a regular incandescent light bulb has this socket;
- E14 – known as a “minion”, smaller than E27;
- G4, G5, G9 - these lamps have pins, due to which the overall dimensions are reduced.
Diameter of the hole for a spotlight in plasterboard
For the vast majority of models, the case size is either 60 mm or 75 mm. But this is precisely the mounting dimension, which is measured not by the rim of the reflector cover, but by the distance between the clamps when folded.
In addition, the round shape of the reflector does not mean that it is necessary to drill a round hole to mount the device on drywall. There are many models, as a rule, these are lamps with built-in motion sensors, in which a hole for installation must be cut in a square or rectangular shape.
How does the frame affect the height of the ceiling structure?
A reliable frame made of metal profiles is the basis of the suspended ceiling. It performs three functions:
- with its help they create multi-tiered structures;
- it serves as the basis to which the fastening elements of the tension fabric (mounting strips) are fixed;
- performs a camouflage role and additionally holds pipes, hoods, electrical wiring, etc.
The frame is made of various materials, the type of which also affects the ceiling level. The use of a metal-plastic profile will take 13-15 cm from the height of the room, so it is used only in large-sized office or industrial premises where it is necessary to strengthen the load-bearing capacity of the stretch ceiling.
Preparing a metal frame for a suspended ceiling
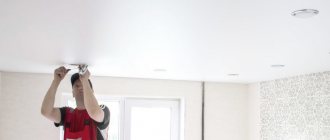
How to install spotlights in drywall with your own hands
To install a spot lighting device you will need:
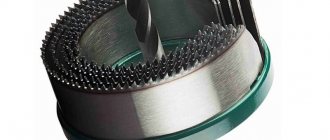
- Core drill with centering tool;
- Drill or screwdriver;
- Wiring with a cross section of 1.5 mm2.
You will definitely need to stock up on a construction knife, a screwdriver and pliers. Despite the fact that most models of recessed flashlights are designed to be installed into a hole without any tools, in about half of the cases, installing a spotlight in a plasterboard ceiling is done using a screwdriver and pliers.
How to wire spotlights under drywall
First of all, you need to select a connection diagram and mark the installation points. If it is planned to divide all the lights into two groups, then you will need to purchase two mounting junction boxes and a wire, preferably brand VVG-3x1.5 or ShVVP.
We measure the amount of wire so that each lamp is connected to its own box with a separate wire. Plus another 20 cm at each point to simplify installation and wiring.
For your information! All wiring from the junction box to the connection point must be in bundles.
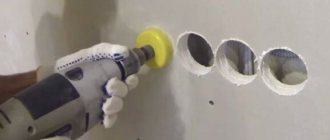
How to make a hole in drywall for a light fixture
To pierce a plasterboard sheet, we use a tubular core drill bit. In order for the light to hold securely, the hole in the plasterboard for the light must be exactly 60mm, so the drill should be 59.5mm or 59mm, depending on the thickness of the material.
Before starting drilling, it is advisable to make a centering hole at the point with a small diameter drill, 2-3 mm. This will help you cut the hole in the ceiling sheet more accurately.
If while working with a drill and screwdriver your hand trembles and the tool moves slightly to the side, you can correct the situation with a knife. You need to carefully align the edges without expanding the diameter of the hole; this will help you install it exactly into the seat.
How to fix a lamp on drywall
Before installation, we clean the ends of the wiring and insert them into the contact clamps. Typically, the length of the wiring is selected so that the connected flashlight hangs on the wire at a distance of 15-20 cm from the drywall.
It is clear that after connecting, you need to check the functionality of the device by plugging it into the network for a few seconds.
Next, you need to compress the spring antennae on the body and insert the flashlight into the prepared hole. The springs straighten and securely press the device to the drywall. In order not to cut the ceiling material, it is recommended to align the lantern in the desired direction until the spring clamp is completely released.
Selecting the mounting size for a suspended ceiling
In order not to damage the tension fabric, suitable models must be selected according to the fastening. For lighting installations installed in a suspended ceiling, there are several standard internal diameters: 60, 65, 70, 75, 80, 85 mm. The selection of fasteners here is carried out in such a way that they correspond to the size of the internal diameter of the ceiling part of the device. This must also be taken into account when creating holes in the ceiling. In addition, you need to pay attention to the depth of placement of the light bulb. The built-in type of device can have two options for placing the light source:
- outer. Here the light bulb is placed below the level of the tension fabric. It is separated from it by a lampshade. Such models have smaller dimensions. Also, the depth of their placement will be less;
External light bulb placement option
- interior. The light source is recessed inside the housing. Because of this, the depth and the area occupied by lighting products increase.
Internal light bulb placement option
When choosing lighting fixtures for suspended ceilings, just like for suspended and plasterboard structures, you need to correlate the dimensions of the lighting fixtures (width, length, depth and diameter) with the dimensions of the room itself. This will allow you to maintain the ratios and give the room greater harmony.
How to remove a spotlight from drywall
The outer cover in the form of a ring is attached to the body using protrusions on the inside. Therefore, if necessary, you can separate the part from the reflector and insert it into the hole without a housing. To install the lamp, the reflector with the light bulb is inserted inside the cover and rotated in a horizontal plane at a small angle.
To dismantle the lamp, the procedure is performed in the reverse order - rotate the housing with the reflector, take them out, after which you can replace the lamp, remove the device or perform reverse installation.
Preparatory work
If there are several spotlights and they are located at a small distance from each other (up to 500 mm), then it will be enough to stretch the wire to the nearest one. This process is carried out before the installation of the ceiling structure begins. Then, after the ceiling is completely installed, the cable is routed from device to device. Which wire should I use? Of course, from the point of view of ease of connection to the marks, it is flexible multi-core, but from the point of view of quality and reliability of installation, it is necessary to choose the same one as for all wiring. More often it is a hard copper wire, for example VVG-2x1.5.
We fix the wires in the terminal block
If a step-down transformer is used, then there is one important nuance. When using low supply voltage for halogen lamps (12 Volts), the voltage drop in the wires will be of great importance. In short, the wire must have a cross-section of more than 1.5 sq. mm, preferably 2.5. And the length of the cable to each lamp must be the same, so that the voltage drop is the same.
Tips for installing ceiling lights built into a plasterboard structure
When installing point devices in a plasterboard ceiling, you should understand that:
- the process of organizing lighting and technological innovations are not complicated, so any craftsman with at least some knowledge in electrical engineering and construction can handle installation in a suspended structure;
- a bold design solution in interior design and the use of modern lighting schemes will effectively affect the result of creating comfort;
- the result of the work done is the safety of the premises and the elimination of the threat of danger to the people living in it.
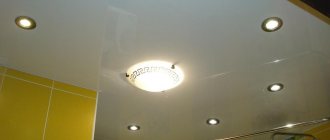
Beautifully designed ceiling made of built-in spotlights
Appearance and lighting effects
Lighting is not only functional. Often this is also a decorative component. To make choosing spotlights based on this principle a little easier, let’s divide them into categories:
- In some rooms - the bathroom, for example, special design refinements are not required. Here are the most popular models in which only the ring remains on the outside. The same models are installed if the interior is designed in a style that does not tolerate “embellishment” - minimalism, hi-tech, loft. The models chosen are the same, only the approach to choosing a color scheme may be different.
- If you want to “revive” the interior, spotlights with decorative shades are suitable. They are very different - with balls, cylinders, carved shades. The styles are very different.
In one interior you can use spots with different designs - it is important that they are in the same style
- If you need “lighting effects” on the ceiling - a play of light and shadows, look towards models with crystal shades and/or pendants. They are, again, in different styles - geometric cut, in the form of flowers, etc.
In fact, choosing a design is almost the most difficult thing, because there are also rotating models, and two, three, or four light bulbs in one housing, and with various inserts of a different color, and with painting, embossing, etc. . and so on.
Wiring diagram for connecting to a 220 V network
This is the simplest method that does not require the installation of converters. Most modern lamps are designed for 220 V, so there will be no connection problems. You need to choose a suitable scheme, since there are two main options and each has its own pros and cons.
Sequential option
Connecting spotlights using this method is simple and has the lowest cable consumption. But at the same time, it is worth connecting no more than 6 lamps in a series circuit, otherwise the wiring will be subject to high loads and the risk of overheating will increase significantly. You should connect like this:
- Connect the phase to the switch and extend it from it to the first lamp. Connect it with the next one and so on until the last element.
- The zero must be led directly to the last lamp and connected only there. As a result, when the light is turned on, the circuit will close and all the bulbs will light up at the same time.
- If there is grounding, then it is supplied to the corresponding contact of each lamp. You can connect the ground from a nearby switch or outlet.
- It is best to use single-core wires rather than a cable, since one goes straight to the last lamp, and the second constantly breaks. This way you can save money.
Serial connection diagram.
Since a series connection distributes energy to all bulbs, the light may be dim. But if you install LED options, then the voltage will be enough and there will be practically no difference in brightness.
Parallel connection
This connection diagram assumes a separate connection for each lamp, which allows all lamps to operate with the maximum possible power. This option is the most popular and is almost always used. Suitable for any number of recessed luminaires. The first type is a daisy chain connection, the features are as follows:
- The method is quite simple and involves connecting a wire to the first switch, from it to the second, and so on until the very end. The phase goes through the switch, and the zero from the distribution box. It also connects to all lamps in series.
- If a two-key switch is used, the circuit becomes more complicated due to a larger number of wires and the connection of two independent circuits. However, the operating principle remains the same.
Daisy chain connection with two-key switch.
If one light bulb burns out, then all those located behind it stop working. Therefore, it is very easy to determine the burnt element.
Beam connection is the most complex, but also the most reliable and practical. In this case, the most cable is consumed, since it is routed to each lamp separately. Before starting work, you need to place the power core in the middle of the room so that there is approximately the same distance to all lamps. Remember the following:
- Lead a separate phase and neutral wire to each lamp separately. The wiring is similar to the rays of the sun, hence the name.
- The main thing is to make a reliable connection, since a large number of wires can be connected to the power core. To do this, you can use soldering, buy a special block, or adapt a standard screw block as shown in the photo below.
- Due to the complexity and large amount of cable, this method is used less frequently than a daisy chain connection. The main problem is the reliable connection of several wires.
A simple connection option with a standard block.