Replacing a light bulb is the simplest job at first glance, which is not difficult for anyone to do. But according to statistics, a very large proportion of electric shocks in everyday life occur precisely when unscrewing or screwing in a lamp. Therefore, it is worth considering the process in detail to figure out how to ensure safety and quickly replace the burnt element.
The work is simple, but requires compliance with safety precautions.
Substitution rules
First you need to study the general rules for working with electrical equipment, which are mandatory when replacing light bulbs of any type. There is nothing complicated here, but nevertheless, most people neglect simple recommendations:
- It is advisable to buy dielectric gloves. They last for many years and can be purchased and stored in the pantry to be used when needed. You can work in them even if it is not possible to turn off the power supply when replacing a failed element.
- Use cloth gloves if the light bulb cannot be moved. When you cannot budge the threads and you need to apply a lot of force, it is better to wear durable gloves made of fabric or leather to protect your hand if the bulb breaks.
The tool must be dielectric. - Carry out work in good visibility. Since electricity most often turns off, and lamps burn out mainly at night, when they are turned on, it is necessary to provide lighting. If you have a headlamp, this is the best option, but you can ask someone to light it with their phone.
- Take a reliable stool or other device to reach the lampshade. Very often, when replacing a light bulb, people are injured not due to electric shock, but due to falling from an unreliable structure. The height should be such that you can work comfortably without having to stretch your arms.
- Always check for voltage with a multimeter or indicator screwdriver. After removing the light bulb, do not put your fingers into the socket without making sure that there is no current there. The check will take a few seconds, but will eliminate any problems.
For your information! Do not carry out work with wet hands, especially if the voltage is not turned off.
How to connect old-style carbolite cartridges
This is the most common option. The cartridge resembles plastic and consists of a bottom with a hole for the cable, a threaded body and a ceramic insert for connection. To do the job correctly, you need to remember these simple tips:
- It turns out which phase is being experienced and which is zero. This is important for the safe use of lamps, you can check with an indicator screwdriver. The phase is always connected to the central support for safety reasons. Zero goes into lateral contact. The main thing is to secure the ends of the cable tightly and prevent contact of exposed parts.
When connecting, it is important not to confuse the phase and neutral wires.
- If a three-wire cable is used for connection, it is important to place the ground correctly. Most often, on the body of the chandelier there is a place for its attachment, indicated by the corresponding icon. Since it is located on the side, the length of the grounding conductor must be much longer. If there is no clasp, the end is attached to any part of the body. Some ceramic lamp sockets have space for a third wire, making the job easier.
The green-yellow (PE) wire is ground.
- To securely fasten the braided wire, you need to prepare it. To do this, the insulation is removed from the ends and rings of a suitable size are formed. In order for them to remain intact and not deformed, they should be treated with a soldering iron and the veins should be sealed. This will ensure good contact and maintain the connection even if the cartridge is removed several times.
All folding options are connected according to this scheme; the design is usually no different.
The video clearly shows how to connect a lamp socket to a PVA cable.
Replacement process
With proper preparation, you can quickly and safely change any type of lamp. At the same time, the set of tools and devices may differ, it all depends on the specifics of the work. General recommendations are:
- If possible, wear dielectric gloves. If they are not available, use any rubber option that is at hand, or at least a fabric one.
- When purchasing a screwdriver, pliers or pliers, it is advisable to choose varieties with dielectric handles rated for 220 V. They are always marked, and this is also indicated on the packaging. But even such a tool should be used with caution.
- It is worth wearing safety glasses. They are inexpensive, but useful for a variety of purposes. For example, when working with your head raised, you can prevent glass shards and small debris and dust from getting into your eyes, which often fall when disassembling a lampshade or replacing a light bulb.
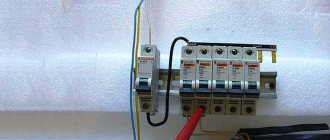
- Turn off the power supply to the entire apartment or to the part where repairs need to be carried out. It is best to clarify in advance what each of the machines in the panel is responsible for, so as not to confuse anything and turn off the power to the lighting. Usually there is a separate unit connected to it, so other consumers of electricity will not be left without voltage
- If the house has an old-style panel, then it is enough to unscrew one of the plugs to de-energize the room. But even after turning off, you need to be careful and remember about the residual current that may remain in the network. Even this is enough to seriously defeat a person.
- Set up a chair, table, stepladder or any other device to ensure comfortable work. It is important not only to choose a reliable design, but also to ensure a stable position to prevent tipping over. You need to check this in advance, and not after climbing up.
How you can do it and how you can’t.
Important! If the light bulb is located at a high height, you can only work on a reliable stepladder to ensure safety. There must be a second person below and support the ladder.
In which direction and how to twist it correctly?
This simplest action at first glance causes many difficulties for those who carry out the work for the first time. Therefore, you need to follow a few simple recommendations to change the light bulb correctly and minimize the risk of damage to it:
- If the surface is hot, it is better to wait until it cools down. Do not rush, as the risk of damage is much higher.
- Grasp the flask with all your fingers and distribute the load evenly over the surface. If you press on only one or two sides, then the likelihood that the flask will burst increases significantly. Grasp it in such a way as to hold it from all sides.
- If the lampshade interferes with work, it is better to remove it first. It all depends on the design of the chandelier; you need to act according to the situation. The main thing is not to damage the fastenings and the lamp itself and not to drop it.
- Use gloves, preferably fabric ones with polymer coating. Firstly, they allow you to securely grip a slippery glass surface. Secondly, even if the flask bursts when unscrewing, the glass fragments will not damage your hand and you will be protected from severe cuts.
- Always unscrew counterclockwise or from right to left. All bulbs have the same thread direction, so you need to immediately turn them in the right direction so as not to tighten them even more and complicate your work.
Unscrew counterclockwise. - If the base is burnt from overheating or does not give in, you need to work with extreme caution. First, firmly grasp the flask and gently swing it from side to side, pushing a little inward. Often after such manipulations the lamp breaks. It should be torn off with a sharp, precise movement, without pressing hard on the glass so that it does not break.
- If the socket is dismountable, the easiest way is to unscrew the bottom part along with the light bulb. In this case, the top one can also rotate; in this case, it should be held with your hand or any suitable device.
- To remove the removed lamp from the socket, it is better to pre-treat the thread with a liquid key and leave it for a while. And then try to unscrew the base. If the flask bursts, follow the instructions in the section below.
Advice! To prevent the bulbs from sticking, apply a little lubricant to the base before installation. Lithol or solid oil will do. Then, even after a few years, no problems will arise.
Possible problems
When replacing lamps you may encounter the following problems:
- The tendrils beat on the fingers. If they are too strong, removing the lamp may damage the ceiling. To solve this problem, just hold the springs firmly to prevent damage to your fingers and the ceiling. The light source must not be allowed to hang on the film; it is necessary to ensure that the springs get into the mounting ring behind the film.
- At one time, workers who installed the ceiling could leave exposed parts of the wire behind it. To eliminate this problem, even after a complete blackout of the house (apartment), it is better to wait a few minutes before starting work. Otherwise, there is a risk of getting an electric shock.
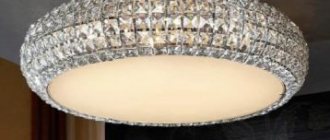
The following types of lamps are used to illuminate the ceiling:
Various types of lamps and socket fasteners. They differ in power output, heat, economical energy consumption, cost and service life. Regardless of the type of light bulb used in the design of the lamp based on the established GOST standards, the package includes similar parts, knowledge of the structure of which facilitates the dismantling process:
- The housing, which is located in the inter-ceiling space and is hidden from view, contains wiring and a cartridge;
- Spring-type “tendril” clamps that securely hold the light bulb in one position and fix it flush with the surface of the ceiling;
- A glass or plastic cover, which performs a protective and light-diffusing function, protects the lamp from the penetration of dust and moisture;
- Fixing ring that holds the protective cover on the decorative outer formwork.
When a light bulb burns out, not the entire lamp needs to be replaced, but a part. To do this, you only need to dismantle the fixing ring and the plastic cover. However, during operation, difficulties are caused by the type of lamp to be replaced and the method of attachment to the housing. There are different types of fastenings for lamps to the socket:
- Threads are a standard type of fixation, most often installed on conventional incandescent lamps;
- Pins (2 metal guides) that pass through a special groove in the cartridge and with light pressure, if connected correctly, a characteristic click is heard;
- 90 degree rotating lock.
Subtleties of replacing damaged lamps
If the bulb bursts during operation or when unscrewing, then changing the light bulb is much more difficult. The remaining part in the cartridge must be removed. There are several methods, you need to choose the appropriate one based on the situation:
- If the bulb has completely fallen out, you can try to unscrew the metal element using small pliers or long-nose pliers. You need to carefully grasp the edge of the base; you can bend it a little with a screwdriver to make it easier to work with. While rocking, twist counterclockwise, the main thing is to get it out of place, then the work will go much easier. During operation, you should be careful not to damage the threads in the chuck.
- You can use a small plastic bottle. To use it to unscrew the base from the cartridge, you need to heat the neck with a regular lighter so that the plastic becomes soft. Then insert it into the cartridge, pressing it inward so that it hardens in the base and, after cooling, sticks securely. Next, unscrew counterclockwise, holding the bottle.
Using a bottle you can quickly remove the base remaining in the cartridge. - If you have a champagne cork with a thick top on hand, you can use it. If necessary, the thin side must be trimmed a little with a knife so that it fits into the base. If there is a rod left inside (the leg on which the tungsten filament stands), it must first be removed with pliers. Insert the plug all the way so that it is firmly fixed and unscrew the remaining part.
- When there are small pieces of glass and a leg left in the base, you can try to unscrew the light bulb with a potato. To do this, you can cut the potatoes in half, there should be a piece left that will be comfortable to hold in your hand. Press the half into the light bulb so that it is well fixed on the fragments, then carefully turn out the base.
An example of unscrewing a light bulb with a potato. - If you can unscrew the lower part of the cartridge, it is better to do this; it is more convenient to work on the removed element. Again, you can treat the threads with liquid wrench to make unscrewing easier.
In the most difficult cases, you need to replace part of the cartridge with a new one, and if it is non-separable, cut off the wires and attach a new one. Do not forget that glass must be cleaned thoroughly; it is best to use a vacuum cleaner.
Video: Replacement hazards, common breakdowns
Types of socles
A socket is a thread or other type of connector with which a light bulb is attached to a socket or lamp. The base contains contacts that, when interacting with the contacts of the lamp, conduct current.
The device of a classic light bulb
The following types of bases are found in everyday life:
- E27 is the most common type; it is screwed into almost all chandeliers and floor lamps. It has the form of a thread with a diameter of 27 mm.
- E14 is the second most common base, thread with a diameter of 14 mm. It is available in low-power models that are installed in floor lamps, bedside lamps, and wall decorative lamps.
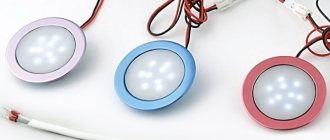
- The picture below in the second row shows the bases of tubular fluorescent lamps found in long ceiling and wall lamps.
- In the third row you can see the bases of the light bulbs that are built into the ceiling lamp.
Common types of bases
Installing a new light bulb
After the burnt element is unscrewed, you need to insert the light bulb correctly to ensure its secure fastening and long-term operation. There are no particular difficulties here, just follow a few tips:
- Check the condition of the thread and the absence of carbon deposits on it if the base had to be torn off. If there is damage or dents, it is better to replace the outer part of the cartridge; it can be purchased assembled.
- Be sure to bend the contact on the inside so that it presses well against the base. You just need to pull it a little towards yourself, since over time the spring steel loses its elasticity and the contact deteriorates, which often leads to the bulb burning out.
- First, screw the outer part of the cartridge until it stops; it should not dangle. Then carefully screw in the light bulb clockwise. If it does not fit in easily, gently wiggle it or unscrew it a little and screw it in again, do not apply force.
After screwing in, be sure to check the operation of the light bulb.
After finishing work, turn on the power supply and check the operation of the light bulb. If everything is in order, you can remove the tools and accessories.
Methods of fastening electric sockets in chandeliers and lamps
Most often you need to connect the nodes that are in the lighting equipment. This imposes certain requirements depending on the installation option and design of the lighting device. Most commonly used methods:
- It is not allowed to secure the cartridge in the device for the conductive wire, since the load cannot be dropped on this element. The exception is the use of reinforced insulated cables designed for certain loads. However, you should not hang huge chandeliers in this way. The lamp socket is connected in the standard way. The wire is pulled through the hole at the back and fixed in a fixed position with a special screw located on the side. It must be twisted to secure the wire without deforming it.
- Installing a socket in chandeliers with a supporting element in the form of a pipe is much simpler. Here the load falls on a tubular element, inside of which the thread is tensioned, which significantly streamlines the structure. The cable is pulled out with a small margin and fixed in the socket as usual. In the upper part it is connected to the power supply through a block; the connection point is closed with a decorative plug.
- Installation of the cartridge through the sleeve is used both in chandeliers and sconces, and in table lamps. To do this, there is a threaded element in the upper part, which is inserted into the hole and secured on top with a nut of the appropriate size. The most important thing is that if the fastener is metal, the plastic ones will become loose over time and cannot be repaired. Only a complete replacement will help, since such parts are not sold separately.
- Fastening versions with screwless clamps is even easier. This is a modern solution that has appeared recently and is increasingly found in chandeliers. In this case, the bottom part of the element through which the wire, usually two-wire, is passed, must first be screwed onto the wire. It is then connected to the contacts and the top is carefully aligned with the latches and snaps into place until it stops. This system securely holds the element without additional fastenings.
This is what a screwless ceiling support looks like.
If you need to remove a screwless socket, you will need a thin flathead screwdriver. Using it, we first remove one latch, then the second, then carefully remove the top from the seat.
Lamp disposal
It all depends on the type of light bulb, so you need to look at the main options in order to understand how to properly dispose of them:
- Incandescent lamps can be disposed of with normal household waste. But at the same time, they are dangerous because they can break and cause injury or damage the package. It is best to take them out immediately to eliminate problems.
- Halogen lamps also do not need to be disposed of separately. They are an order of magnitude stronger, so they do not pose any danger.
- LED options are made of plastic, do not contain hazardous substances, and can be disposed of with household waste.
- Energy-saving fluorescent lamps contain mercury vapor, so they should not be thrown away as usual. You need to hand it over to specialized collection points or put it in special containers; they are available in many cities.
Fluorescent lamps must be disposed of in special containers.
Despite its simplicity, replacing a light bulb requires certain knowledge and compliance with basic safety standards. It is important to turn off the electricity before starting work and protect your eyes and hands in case the bulb is damaged. And if the lamp bursts, use one of the described methods for removing it.
How to connect a socket to the socket
If for some reason you need to power the lamp and plug it into an outlet (for example, during repairs), it is important to do it correctly. To do this, the cartridge is disassembled and additional cables are connected to the contacts. The phase in the lamp socket should not touch zero, so for reliability it is better to wrap the connection point with electrical tape.
This solution can only be used as a workaround. Do not connect equipment that consumes a lot of power to this outlet, as this will cause overheating and deformation of the cartridge.
From the video you will learn how to connect the cartridge to the wires and socket.
Is it possible to change the chandelier on a suspended ceiling?
A distinctive feature of suspended structures is the fact that, if necessary, you can install the lamp anywhere. To do this, it will be enough to secure a special ring, then make a hole of the appropriate size and hang the chandelier. During operation, electrical appliances tend to break down, resulting in the need to replace the lamp or the entire appliance. Removing a chandelier is not difficult if you have an idea of exactly how to do it.
How to remove a chandelier from a suspended ceiling
Before removing the chandelier from the PVC sheet, it is worth considering that it can be installed on a hook or on a special strip. If the chandelier is fixed on a hook, the work algorithm will look like this:
- First of all, it is recommended to turn off the power to the lamp, then take a tester or a screwdriver with a special indicator and check that there is no voltage.
- If there is a decorative cap, it should be lowered, which will provide unobstructed access to the hook.
- Through the hole that appears, it is recommended to remove the chandelier from the hook and remove it along with the terminals.
After the chandelier is removed, you will need to disconnect the terminals.
Advice! All work should be performed strictly according to the attached step-by-step algorithm and only with the voltage turned off.
How to change a chandelier on a suspended ceiling
Replacing a chandelier on a suspended ceiling is not as difficult as it might seem at first glance. As a result, you can perform such work yourself, without resorting to the help of specialists. As practice shows, when replacing an old chandelier, choose a device of a similar design. All that is required is to assemble the chandelier according to the attached instructions, and then hang it on a special hook left in the surface from the old lighting fixture.
Pliers or needle nose pliers
The first method you should resort to is using pliers or needle-nose pliers. The latter are more convenient due to the fact that they have thin, elongated “sponges” that can reach many hard-to-reach places. They are very convenient for capturing small parts. It will also be easy to separate the base from the socket.
Specialist in repair and maintenance of electrical equipment and industrial electronics.
Important! The handles of thin-nose pliers should be rubber or plastic. If such a tool is not at hand, the last resort is to wrap the handles with several balls of electrical tape.
- Remove any remaining glass, if any.
- Next, grab the base with a tool, twisting it outward. The lamp shade must be held so that it does not come off. It is important not to damage the circumference of the cartridge.
- If the base does not give in, you can carefully bend its sides inward and then unscrew it.
During the process, the base may begin to tear or become deformed, this is not a big deal, it will even be easier to remove it, the main thing is that it does not damage the cartridge.
If you can’t grab the edges, you can try another option - place the needle-nose pliers inside the base and push the ends apart so that they rest against the side walls. You need to twist counterclockwise.
If there are no tools at hand, then you can resort to using improvised means. The procedure is as follows:
- Pull out the remaining glass, they will interfere.
- Take a plastic bottle. The volume does not matter - the necks are all the same.
- Remove the lid and heat the neck until the plastic begins to melt. This can be done with a lighter or candle.
- Insert the neck into the base and wait until the plastic cools down.
- Get the base.
The method is simple, although it does not always help. To do this, you need to have pieces of glass sticking out of the base; in this case, there is no need to remove them. To implement this method you need:
- Cut a fairly large potato (raw) in half and separate its parts. They must be clean and dry.
- Place a potato over the fragments so that they cut firmly into the flesh.
- All that remains is to unscrew the base from the socket.
After use, potatoes should be thrown away. Other fruits and vegetables will not help because their flesh is not as dense.
Expert opinion
Viktor Pavlovich Strebizh, lighting and electrical expert
Any questions ask me, I will help!
Of course, the lamp must be screwed tightly into the socket, but still, during installation, you need to find such a tightening point so that you can then unscrew it. If there is something you don’t understand, write to me!
Types of luminaires for safe connection
There are a wide variety of types of lighting devices. They can be briefly described as follows:
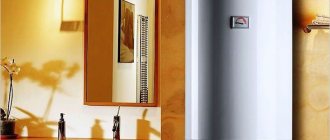
- ceiling They can be built into the ceiling, or they can serve as a regular hanging lamp;
- wall (sconces). They attach to the wall and come with all the necessary parts. They are distinguished by convenience, practicality and mobility. Mobility lies in the fact that the sconce can simply be unplugged from the outlet and moved to another room;
- floor Similar to ceiling ones, but they are much more difficult to install. It is more often used in shopping centers, luxury offices and houses, where a similar system was provided at the stage of major renovations.
Floor lighting is different in that, unlike most other types, these lamps cannot be used as the main source of light, but only as an auxiliary one.
Connecting lamps depends on the following parameters of the chandelier:
- number of light bulbs (with 4 light bulbs, they are usually divided into groups and each group is equipped with a separate switch);
- type of cartridges;
- type of base;
- The power of the lamp is important for its connection.
Conclusions and useful video on the topic
Video of the disassembly process, where everything is clear without unnecessary explanation:
The process of disassembling and repairing an LED lamp:
Disassembling the incandescent light bulb is easy. You can make a lot of interesting things out of it, but you can’t reuse it for its intended purpose. Fluorescent and LED light bulbs can be disassembled to a certain point and repaired.
Do you have experience disassembling lamps? Or maybe you have made interesting objects from old lamps? Please share your skills with readers - leave comments and attach photos of your homemade products. The feedback form is located below.
Used light bulbs are trash. But if you are a super creative person with a wild imagination, then for you this light bulb will be a decorative element in your home. A glass lamp can be used to place an eternal terrarium, glitter, water, colored cotton wool, threads, photos and much more. You can also make a garland, panel or lampshade from this glass material. But to make decorations, you must first know how to disassemble a light bulb yourself.