So, it would seem, what can you come up with easier and simpler than unscrewing a light bulb and replacing it with another? After all, it’s elementary! Or is it not elementary?! If everything is so simple, then why, during such an operation, no, no, and some kind of incident will happen: a person will get an electric shock, or he will take it and fall off the stool. No, it's not that simple!
Our fellow citizens are still a long way from experts in replacing light bulbs! And sometimes they have never done this even once in their own lives. And we haven’t even heard about safety precautions.
So that the wife’s banal request to replace a burnt-out light bulb does not become the reason for resting on a hospital bed, we will try to study all the hidden nuances associated with its replacement.
General rules for replacing any light bulb
The technology for replacing different types of light bulbs has significant differences. But in any case, there are points that must be observed, regardless of the type of light source:
- Before you begin replacing, you must turn off the power to the work area. Do not think that for this it will be enough to flip the switch, because it does not give absolutely any guarantees that nothing terrible will happen to you during work.
- When turning off the power supply, do not forget about your own safety measures. Wear safety glasses and gloves. In addition, you need to work in a comfortable position, which means using a stepladder if necessary.
- Often, when the electrical switch is turned off, the phase wire does not open, which can lead to a very unpleasant surprise. Double-check that the room is completely de-energized. A guaranteed result will be achieved only if the machines are turned off, and if they are not, then there will be traffic jams. But even after completing this procedure, it would be useful to take a tester and check again that there is no voltage. Repeated testing with a tester will help if there are “bugs” in the network; they are sometimes installed in order to “bypass” the electric meter and not pay for electricity. If there are bugs, then turning off the machine will have no effect, since the wiring will bypass them.
- If the device is connected to an electrical outlet, remove the plug from it. Remember that there may also be residual voltage, which is no less dangerous. Such situations are not uncommon, so even when replacing a lamp in a table lamp, you should not forget about safety measures.
- Only after all procedures have been completed can you begin to change the light bulb. But in any case, do not touch metal surfaces while working, and it is better to refrain from replacing if the humidity in the room is too high. Only use tools that are insulated.
- Do not hold onto the metal parts of the lighting device while working.
- When working at height, be sure to use a ladder or stepladder. With their help you can work at heights of up to five meters.
- Replacing lighting devices located at a height of more than five meters is permitted only by specialists who have special permission to work at heights.
Useful tips
We told you how to change an LED lamp in a suspended ceiling, now let's learn about some of the subtleties. Our tips will help you do this without damaging the wiring and ceiling covering, as well as quickly burning out the lamp.
- If a lamp burns out in the same place more often than others, the problem is in the socket. Pin sockets are not designed for high power, so it is better to use energy-saving lamps, then the socket will last longer, but if it is already damaged, replace the lamp or socket.
- Do not paw the flask - use napkins and gloves. In addition to visual defects, this can lead to burnout of halogen light sources, as we have already mentioned. Such lamps need to be handled with a napkin or with gloves; simple HB from a hardware store will do. If you don’t have them at hand, you can even use medical ones. A napkin will also help avoid problems. The last option is paper tape.
- If the lamp does not work, do not use force. It can stick to the cartridge, this happens due to power surges and overheating. Duct tape or paper tape will help. You can cover the protruding edge of the flask and pull the edge of the tape. This way you can apply more force without damaging the ceiling.
Errors
The main mistake is the use of powerful halogen lamps. For example, the GU5.3 base does not tolerate working with lamps over 40 W. To make the lighting brighter, add more lamps, or use LED or fluorescent fixtures. With the same power consumption, LEDs shine five or more times brighter. The price of LEDs has dropped significantly over the past five years, and the quality of the products has improved. They are suitable for both backlight and main lighting
If you already have high-power LED devices installed, try white lamps. Warm light visually seems dimmer and softer, although they provide the same luminous flux.
How to replace a lamp
Any quality work must be preceded by a preparatory stage. This also applies to the correct replacement of the lighting device. You should take care of personal protective equipment, the availability of tools and equipment.
Try not to ignore any of the listed points, as this will only cause harm. The duration of work will increase, the risk of injury will increase, and the quality of installation may suffer.
The first stage - preparatory work
When changing a light bulb (no matter what type it is), you must remember that it is an electrical device, and therefore there is always a danger of electric shock. It is for this reason that you should prepare a tool that has insulation, as well as instruments for testing.
Important! Inspect your screwdrivers and pliers. All of them must have plastic handles, which will protect against electric shock. Just remember that such protection only helps when the voltage does not exceed twenty-four volts. At a higher value there is no guarantee.
Get to work wearing rubber gloves. In this case, it is advisable to use electrical gloves rather than household gloves. Eyes should be protected with goggles.
You need to have instruments with you that will allow you to check the voltage in the network. This is an indicator screwdriver or any other measuring equipment.
When planning to change a lighting fixture, be prepared that you will have to turn off the power supply to the room yourself and do it correctly. Otherwise, you will still be convinced that current is flowing through the wires and you will understand why the light bulb lights up.
The second stage is to disconnect the room from electricity
When changing a light bulb, you will have to act at your own peril and risk. Well, really, you wouldn’t call an electrician for such nonsense and ask them to send a specialist. But he also needs to be paid for his work. Sadness. You have to do everything yourself. But here you need to be responsible for all your actions. Therefore, remember once again that safety comes first.
In any organization, the manuals indicate that such work can only be carried out by specialists who have the appropriate clearance, skill and qualifications. However, every person at home regularly faces such a need.
The third stage is dismantling or installing the lighting device
To complete the task of replacing a lighting device, you must follow several important, but not at all difficult, steps. To do this you don't need to have any tool at all.
You need to do the following:
- First of all, remove lampshades, chandeliers, and any elements that make it difficult to work with the lamp. Do not forget that all actions should be performed in personal protective equipment.
- Unscrew the lamp counterclockwise. Remember that the light bulb, if it is an incandescent lamp, heats up from operation, so do not handle it with your hands. Put a regular glove on top of the rubber glove and carry out the dismantling in this form.
- Installation of a new lamp is carried out by screwing it in clockwise.
- After the lamp is replaced, you can return all decorative elements and other parts to their place (you can also clean them of dust and other contaminants).
Stage 3. Installation of the fastener
Mounting plate for installing a chandelier
Professionals advise buying a new lighting structure only after dismantling the old one. This is necessary to find out how it was attached to the main ceiling. You need to choose a new lamp with the same mount. Then all that remains is to connect the wires coming from the chandelier and the ceiling, hang the product on a hook or attach the strip to the embedded platform on the rough ceiling. This option is considered the easiest.
If the old chandelier clung to a hook, and you purchased a model that is fixed to the bar, then the task becomes more complicated. In this case, you need to dismantle the decorative ceiling covering, pull out the hook and install a new platform from a wooden block or piece of plastic. It is attached to the old ceiling using metal hangers.
You can remove the tension fabric covering with your own hands. If the canvas is made of PVC film, it will be more difficult to reorganize the lighting, since it is mounted under heat. Then you need to call the experts. If the PVC ceiling is installed using the harpoon method, then you can partially or completely remove it yourself.
After dismantling the decorative fabric, you can change the arrangement of the fastening fittings or prepare a platform for the lamp in a new place.
The chandelier is attached to an anchor hook according to the following plan:
- A hole with a diameter of 6 to 14 mm is drilled in the rough ceiling, a hook is inserted, and a nut is tightened.
- Then the decorative coating is installed.
- When the ceiling canvas is dry, you need to feel under it for the place where the hook is located.
- Then you need to cut a hole in the canvas with a knife. Plastic rings are used for this. It is smeared with glue, applied to the place where the hook is located (the rim should completely cover the hook), then you need to wait until the glue dries.
- Then a hole is cut in the ceiling inside the rim, through which the wires are pulled out, and the chandelier is connected.
The length of the hook should correspond to the gap between the rough and suspended ceiling.
Hanging the lamp on the bar is carried out as follows:
- A circle is cut out of wood, the thickness of which is 3 mm less than the gap between the old and suspended ceiling. This will be a platform for the plank, which is attached to the sub-ceiling using dowels. If the gap is large, then metal hangers can be used to install the coating.
- A hole is drilled in the wooden platform through which the wiring is pulled out. It is advisable to fix the location of the chandelier.
- Then the PVC covering is stretched.
- The thermal ring is glued to the canvas, and after drying, a hole is made for the wires.
- The plate is sanded before installation so as not to damage the ceiling.
- Then the strip is attached with self-tapping screws.
After all the work is completed, the lighting fixture is attached, and the hole is covered with a decorative cover.
If, before installing the stretch ceiling, you or the craftsmen installed additional suspended structures, then you just need to feel them, glue a thermal ring, cut a hole, and install the chandelier using any of the methods described above.
To cover the hole left in the ceiling by an old chandelier, use decorative stickers.
Installing a new light bulb
At its core, installing a new lighting fixture is no different from dismantling it. All the steps just go in reverse order:
- If the lamp has a threaded connection, then you need to tighten it clockwise until you feel that it cannot be screwed in any further. You should not make titanic efforts to do this, otherwise you may damage the cartridge or break the glass flask. Halogen models are screwed in the same way.
- The contacts of the long light source must be placed in the guide slots where the old light bulb stood. Once it is installed, you need to turn it ninety degrees until you hear a click.
- In ceiling and other recessed lighting fixtures, lamps are inserted until the spring clicks. There is no need to press anything.
- When the lamp is installed, you should check that it is securely seated. This plays a special role if it changes in the ceiling lamp.
- After completing the work, check the quality of installation. Apply voltage to the lamp, while it is better to turn away. You need to be careful when turning on a new light source. There are often cases when they are caught with a manufacturing defect and explode immediately.
Dismantling options
Depending on the purpose, the chandelier can be removed for:
In this case, the dismantling option will be completely different for each case. So, to replace a light bulb, it is not at all necessary to remove the entire structure; it is enough to remove the lampshade, which can be dismantled by unscrewing the bolts, unscrewing the threads, removing the spacers or pressing the clamps.
If you need to wash a chandelier or perform finishing work, and the device is removed temporarily, and a socket with a light bulb is installed for the period of cosmetic repairs. In this option, dismantling is also partial, since it is advisable to leave some elements in place. You only need to release the power wires to which you connect a temporary lighting fixture.
What kind of lighting do you prefer?
Built-in Chandelier
In the case of a complete replacement, all elements are dismantled. And if the fastening structures interfere with the newly installed equipment, they are also removed.
Features of replacing damaged lamps
It often happens that when unscrewing or, conversely, installing a new lamp, its bulb is damaged. The base remains in the socket and can only be unscrewed with pliers. However, before doing this, you need to collect all the glass shards.
If you happen to break a mercury lamp, you need to act carefully, but quickly. Having broken, it is capable of filling a room with a volume of fifty cubic meters with its poisonous vapors in just a few seconds.
In this case, the permissible content of mercury in the air will be one hundred and sixty times higher than the norm. This means that if such an unpleasant situation occurs, then all people who are in the room must leave it immediately.
The next step is to open all the windows in the room for ventilation. The minimum ventilation time is twenty minutes. All this must be done, even if you do not feel any unpleasant signs of exposure to mercury, because this does not mean that everything is in order. Mercury vapor is colorless and odorless, settles very quickly in the body, and is practically not excreted.
It is possible to continue work on replacing the lighting fixture only after ventilation is completed and all shards of broken glass have been removed.
When working, you should have personal protective equipment, which includes:
- rubber gloves;
- protective glasses;
- damp cloth or bandage made of cotton wool and gauze.
As soon as all the consequences of the broken lamp have been corrected, you need to contact the Ministry of Emergency Situations. Employees of this structure must check that the premises are safe for people to stay there, and also pick up the damaged lighting fixture.
Replacing a lamp in a suspended ceiling
If you are planning to change LED lamps, then you should take into account that some lamps and the lamps inside them are a single whole.
In this case, you will have to change the lamp itself. The procedure is as follows.
First, remember that it is not held in the ceiling film itself, but in a special mounting platform.
Using your hands, carefully bend the lamp to see two expanding springs, due to which the fastening occurs.
These springs will need to be held during dismantling so as not to catch and tear the ceiling itself.
- press the springs inward and pull down to pull out the lamp
- disconnect the power connector and connect a new spot in its place
- now bend the springs inward with your fingers and insert them into the ring of the mounting platform
Sometimes it’s not very convenient to do this at the same time, so you start the right side first, and then, pressing the left spring, insert the entire lamp.
Please note - the lamp should not hang on the film. The springs must fit exactly into the ring, which is located behind the film.
Using your thumbs, you press the body up, finally sinking it inside the ceiling. The lamp is installed in its place. Turn on the switch and check the lighting.
Rules for recycling light sources
After unscrewing a used lamp, do not throw it away. Try to handle it as carefully as possible. Do not place on a hard surface or where people could easily sit on it.
Never throw the lamp into a bin with other household waste. After dismantling the product, try to get rid of it immediately after finishing the work. This will be more reliable and no unpleasant situations will happen.
Important! Only incandescent or LED light bulbs may be disposed of in the household waste bin. The only harm they can cause is a cut if handled carelessly.
All light sources containing mercury inside must be handed over to the people who are responsible for their disposal - this could be an electrician at your housing office. You can also take them to a special collection point or throw them away in a specialized container. You can congratulate yourself on a successful replacement only after you have disposed of the damaged lamp.
Only after you have managed to change a light bulb yourself can you call yourself a real master, expect praise from your household and continue to live peacefully, enjoying comfort and safety.
Subscribe to our Social networks
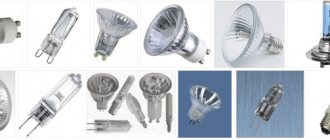
Lamps with base: GU10 and GX53
These primarily include lamps with a base: GU10 and GX53 (GX70 is a larger diameter model). The contacts of which have thickenings at the ends, which hold them in the connectors of the lamps.
To replace such bulbs, just turn them slightly counterclockwise. Then the lamps come out of the socket freely and a new one can be installed there, following the reverse sequence of actions.
I have already described in some detail the installation of such a spotlight with a GU53 connector in the article “Installing spotlights in drywall | Using the Ecola GX53 as an example.” I advise you to read it, all stages of installation are described in detail and it is shown how to change the lamp.
Non-standard situations
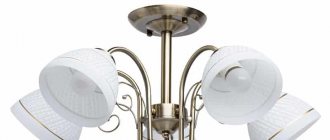
Plate chandelier
- In lamps of this type, such as “dish”, you need to find the bolts. In this case, the hook is not a fastener.
- The lamp is attached to the ceiling using bolts. For the beauty of this type of lamp, the bolts are hidden in the lampshade, and it is sometimes difficult to find them.
- In this case, the bolts are unscrewed with a Phillips screwdriver.
Stretch ceiling
Stretch ceilings are becoming increasingly popular. It is this type of ceiling that has become in demand and fashionable. If you need to remove a lamp from a suspended ceiling, then the first thing you need to do is protect yourself.
- That is, we go to the electrical panel and turn off the voltage.
- Next, you need to analyze how this or that fastener was installed. As you know, there are only two ways - the hook and the bar.
- If the fastener held the hook, then you need to remove the hook for the chandelier and disconnect the wires.
- If you encounter a case where the fastener is installed through a strip, then you need to unscrew the strip itself, disconnect the wires and remove the strip.
- In these two cases, after the work has been done, all that remains is to remove the lamp from the ceiling. The job will be done. Also, do not forget that starting work with the electricity turned on is strictly prohibited.
Also briefly about how to hang a chandelier
There are two ways to install the lamp to the ceiling. This is done with a strap or with a hook. It is necessary to set up a mortgage in advance. This stage is mandatory, regardless of how the chandelier will be installed.
- In the first case, we need to secure the lamp with a strip using bolts or screws. Carefully, you need to make two holes in the tension fabric. The edges should be secured with tape. Then, the canvas that we glued is fixed with screws around the chandelier.
- In the second case, the chandelier will be mounted on a hanging hook. Having made the holes where the hook will be located, you should process the edges of the hole. Then, hide the holes in a cap, which will also decorate the ceiling. Hanging a lamp is not as difficult as installing it. However, working with a stretch ceiling is painstaking.
Step-by-step instruction
Before you undertake to change the chandelier, you should decide on the features of its attachment to the corresponding elements. The most common options are: mounting on a hanging hook, mounting strips or dowels. And due to the widespread use of suspended ceilings and the danger of damage to the film coating, the dismantling of a chandelier near a suspended structure should also be classified as a separate category.
How to remove a chandelier from a hanging hook?
Structurally, the chandelier is suspended from the ceiling hook using a cord or chain. In most cases, in order not to spoil the appearance of the room, the hanging location is hidden under a decorative cap. In order to remove the lighting device, perform the following sequence of actions:
- Remove all moving parts from hanging parts that could fall and break during dismantling. This includes lampshades that do not have a rigid fixation and spotlights.
- Inspect the decorative cap carefully; it is fastened with a bolt, which can be located either on the surface or hidden in a recess.
- Rice. 1: bolt for fixing the cap
- Using a screwdriver, release the cap, the chandelier will remain in place, and the cap will be able to move freely in a vertical plane.
- Rice. 2: Unscrew the cap fixing bolt
- Pull the hood down to reveal the hanging area. The power wires are also located here, which should already be de-energized.
- Rice. 3: lower the hood down
- Remove the insulation from the wires and disconnect them from the general internal wiring network. If necessary, insulate the supply wires.
- Remove the chandelier from the mounting hook. If you don’t need this method of hanging in the future, the hook can be removed - unscrewed, bent or cut off.
Rice. 4: Remove the chandelier from the hook
The chandelier has been removed; in its place you can hang another lighting fixture or putty the surface.
How to remove a chandelier from the strip?
The plank is a load-bearing ceiling structure that takes the main load from the weight of the product. Linear and cross-shaped planks are fixed to the ceiling with dowels. To remove such a chandelier you need:
- Remove breakable parts that may be damaged during dismantling. This also includes incandescent, fluorescent or LED light bulbs that may disturb you.
- Unscrew the decorative nuts; under them there are pins that hold the entire structure on themselves.
Rice. 5: Unscrew the decorative nuts - But, be sure to keep in mind that without the nuts, the entire chandelier can spontaneously move down.
- Lower the chandelier down in a controlled manner; under the decorative disk there is a place for connecting the wires. The power must already be turned off. Disconnect the chandelier from the wires and remove it - the process is over.
Rice. 6: Disconnect the power wires
If you want to remove the mounting strips, you need to unscrew the screws that secure them to the ceiling.
How to remove a chandelier from a dowel?
Today, this fastening method is most common in suspended plasterboard ceilings, when there is free space behind the suspended structure. Older models include plate chandeliers, which were also attached with dowels to a concrete or wooden base. The difference between these fastening options is only in the type of dowel - for a suspended structure it is butterfly, and for a concrete slab it is a classic model.
To remove such a lighting device, you will need to get to the mounting point, which can be covered with the same plate or a classic lampshade. First remove the lampshade; if the light bulb sockets are in the way, they should also be removed. There should be enough space to remove the screws, then remove them and disconnect the wires. The chandelier can be removed.
How to remove a chandelier from a stretch ceiling?
The design of suspended ceilings is quite strong, but it is catastrophically susceptible to punctures from any sharp objects, so removing and hanging the chandelier must be done extremely carefully. Work with a screwdriver should only be carried out for unscrewing and tightening fasteners; creating forces that could cause the tip to slip off and damage the film is unacceptable. In total, there are two methods of fastening - on a hook and on a bar, similar to the two methods described above. To do this, you need to determine which method is used in your case.
If the chandelier is hung on a hook, to remove it, perform the following manipulations:
- Remove from the chandelier all unnecessary parts that may fall off.
- Carefully release the decorative cap fixation unit.
- Move it down the wire; if movement is difficult, loosen the bolt on the cap.
- A hole will appear in front of you in the tension fabric; carefully place your fingers inside along the supporting rod and feel for the place where it is suspended.
- Remove the chandelier from the hook and disconnect the power wires.
If the chandelier is suspended on a bar, perform the following sequence of actions:
- Unscrew the decorative nuts and let the chandelier smoothly fall down.
Rice. 7: Unscrew the nuts - Hold the chandelier at a convenient distance for you so that the place where the wires are connected is in the direct access area.
Rice. 8: Hold the chandelier at a comfortable distance - Disconnect the chandelier from the power wires.
If for any reason you need to remove a hook or bar from an old lighting fixture, be sure to keep in mind that we remove the mount with the utmost care. You should not knock it out or pull it out of the hole; all operations are carried out under control. Hold the bar and hook so that they do not catch on the edges of the film when they fall out.
Tools and equipment you will need
In most cases, it is enough to replace the burnt out light bulb. But there are times when it becomes necessary to disassemble the lighting device. For the second step you need to have the following tools:
- a screwdriver - a pointer with a light-emitting diode;
- tester;
- a large table, a strong chair, a stepladder;
- two flat screwdrivers;
- pliers or crimping pliers;
- Phillips screwdriver;
- special pliers to remove retaining rings;
- construction knife;
- wire cutters for stripping insulation;
- terminal block;
- drill with a long drill bit for concrete;
- electrical tape (optional).
Pliers for retaining ringsTips from professional craftsmen! Many homeowners use electrical tape to insulate wire connections. But this is not a good option. Poor contact can lead to heating of the wiring and further fire. You can connect the wires using a regular terminal. Moreover, the level of expenses is very low. It should be noted that the majority choose to install their own built-in lamps on seamless ceilings. They are economical, small, and shine brightly.