Due to the design features of a stretch ceiling, the installation of a chandelier is carried out differently than with traditional types of finishing. In addition, you will need thermal rings to protect the PVC film, and if the lighting fixture is attached through a bar, then also mortgages. Let's look at how to choose the right chandelier so as not to damage the material and look at several ways to install it on a suspended ceiling. Additionally, we will tell you what to do if the canvas is already stretched, but fastening was not provided.
Limitations when choosing a chandelier
Most often, the canvas for a stretch ceiling is made from PVC film, which does not withstand high temperatures. When heated, the material becomes stained and gradually deteriorates. Therefore, chandeliers with a heated metal base are not suitable.
When installing incandescent lamps, the lampshades must be directed downward, and the distance to the canvas must be at least 20 cm.
Unlike PVC film, fabric stretch ceilings tolerate temperatures up to +80°C. But in any case, it is better to choose energy-saving or LED lamps; they emit much less heat and last much longer.
The film can be easily damaged by sharp objects. Before purchasing, you need to make sure that there are no protruding edges, casting marks, etc. on the base of the lamp.
If the canvas is glossy, it is recommended to choose closed shades. Otherwise, a lot of glare will be reflected on the surface of the ceiling, unpleasant for the eyes.
There are no restrictions on weight or type of fastening. Any lamps are mounted not on the canvas, but on the base.
Read more: Requirements for chandeliers for suspended ceilings
Electrical safety rules
Working with electrical wiring can be dangerous if certain rules are not followed. There is nothing complicated about them, they are very easy to remember.
- Before starting work, turn the machines on the dashboard to the “Off” position. or Off. If you have an old electric meter and no panel, then you need to unscrew the plugs.
- Using an indicator screwdriver, make sure there is no voltage on the wires.
- When connecting the chandelier to the electrical wiring, use terminals or connecting blocks. Connecting wires using twists is extremely unreliable and can only be used as a temporary measure.
- When purchasing consumables and fasteners, choose the highest quality products, as the durability of the result and, ultimately, your safety depend on this.
- Do not give up grounding, although it will complicate the process of connecting wires a little.
Do not touch wires without first unplugging them - this is the most important safety rule.
Hanging chandelier SVETPROM Len 5×60W E14 textile, metal
Methods of attaching a chandelier to a suspended ceiling
Lighting fixtures are available with fixation on a hook or mounting plate. How exactly the work goes depends on this.
On the hook
When installing a chandelier on a suspended ceiling in this way, the fastening is reliable, but there is a risk that the base of the lamp will not be positioned completely evenly. The hook is attached directly to the rough ceiling, and a hole is made in the canvas through which the lighting device is suspended.
The following types of hooks are available:
- anchor - installed in a drilled hole and fixed by surprise;
- through - fastened through the ceiling, convenient for installation during the construction of a house;
- embedded - suitable if there are hollow channels in the slab.
The size of the mount is selected depending on the weight of the lighting fixture.
Through the mounting plate
Chandeliers with a strip are installed without a hook; for this purpose, a mortgage is attached to the base ceiling. It is made from wooden beams or plywood, or you can buy a ready-made plastic platform. The platform is attached to the floor slab using flexible steel hangers so that the base is located at the same level as the future ceiling. Then the fabric is stretched, holes are made and the mounting strip is screwed to the mortgage, and the lighting fixture is attached to it. Thus, the load falls on the floor slab.
Several types of strips are used for chandeliers:
- small longitudinal ones - for small devices;
- cross-shaped (composed of 2 long ones) - for heavier ones;
- I-beams - for the largest ones.
Installing a chandelier with a strip on a suspended ceiling is more difficult. But it is easier to ensure that the lighting fixture hangs evenly.
Connecting the lamp to the electrical wiring
To properly connect the chandelier to the electrical network, you need to find out what kind of wires are connected to the ceiling and how to connect them with the chandelier wires. The simplest option is when the two wires coming out of the lamp need to be connected to a two-core network cable. To do this, you just need to insert the stripped ends of the wires into the block and secure it so that each power wire is connected to the chandelier wire. As a rule, this is how simple lamps are connected to a single-key switch.
Connection options with grounding and neutral wire are much more complex to implement. First, you need to determine the purpose of each wire, then connect them in compliance with electrical safety rules.
How to find “phase” and “zero”
If you have new electrical wiring installed in your house, it will not be difficult to determine the purpose of the wires: the neutral conductor is always highlighted with blue insulation, grounding is indicated with yellow-green insulation. Phase wires can be sheathed in any other colors; in a three-core cable, this is usually a brown wire.
The matter becomes somewhat more complicated if you need to connect to old wiring with wires in black or any other insulation. This is where an indicator screwdriver comes in handy. Touch its tip to the stripped ends of the wires one by one. If the indicator lights up upon contact, it means it is a phase conductor. If it does not light up, then you have found a zero core. There is usually no grounding in old wiring.
Ceiling chandelier LAMPLANDIA Jasmine 6×60W E27 glass, metal
Connection to a two-gang switch
Three wires in the ceiling are typical for two-gang switches. Phase wires are routed from each of the keys, the zero wire is common.
Chandelier with two wires
If only two wires come out of the chandelier, regardless of the number of lamps, then when connecting, the phase wires are often connected with a jumper. After this, the light comes on when you press either key or both.
If, in addition to two ordinary wires, the chandelier is equipped with grounding, this will not complicate your task particularly. The yellow-green ground wire is either connected to the same color located on the ceiling, or is insulated.
Connecting a multi-arm chandelier
Connecting a multi-arm chandelier to a double switch is usually done so that the brightness can be adjusted: one key turns on only part of the bulbs, the second - the other part, and both together - the entire chandelier at full brightness.
Consider the wires that come out of the chandelier. As a rule, there are two wires coming from each light bulb, usually brown and blue, but they can also have other colors. To connect them with a two-key switch, you need to form three bundles of conductors: two bundles of phase conductors and one of neutral conductors.
- Connect all the blue wires into one bundle and insert into the terminal clamp. This will be the neutral wire of the chandelier, which you connect to the neutral wire of the switch. Make sure that wires of a different color do not fall into the bundle - this is very important!
- Divide the brown wires into two groups, depending on the number of horns in the chandelier and the gradations of brightness. So, for a five-arm chandelier you can form groups 2+3 or 4+1, for a four-arm chandelier - 2+2 or 2+1, for a three-arm chandelier only one option is possible - 2+1.
- Collect the wires of each group into a bundle and insert into the terminal clamp, connect each group with its own phase wire of the switch.
When you press one of the keys, the corresponding group of chandelier horns will be connected. All horns will be turned on simultaneously when both keys are pressed.
Ceiling chandelier DEMARKT Conrad 5×60W E27 textile, metal
Multi-arm chandelier and single switch
With any number of wires in the chandelier, connection to a single switch can occur according to a single scheme: either the entire chandelier is on, or all the bulbs are off. Disassemble the chandelier wires into two bundles according to the color of the insulation and twist each bundle separately. Then connect one bundle (no matter which one) to the phase wire, the second to the neutral wire.
How to connect bundles of wires
According to electrical safety rules, twisting of wires is unacceptable, since over time:
- bare veins oxidize;
- contact between them worsens;
- resistance increases at the twisting point;
- the twisting area begins to heat up;
- heating enhances the oxidation process;
- the wires are heating up more and more;
- Due to strong heat, the insulation melts and catches fire.
To prevent this from happening, the twists must be soldered. But the twisted end of the harness is too thick and does not fit into the terminal box. To connect a bundle of wires through the terminals, solder one short wire, no more than 5-10 cm long, to its end, and clamp its end into the connecting block. Insulate the soldering area thoroughly with electrical tape. Solder each bundle in this way, connect it to the terminal block, and only then begin installing the chandelier on the ceiling.
Hanging chandelier CAIMAN Leo 5×60W E14 glass, metal
Connecting an LED or halogen chandelier
Halogen light bulbs operate not from mains voltage 220 V, but from direct current 24 V or 12 V. LED lamps are also connected from direct current. Therefore, as a rule, a chandelier contains a small transformer to which the light bulbs are connected. All you have to do is connect the transformer outputs to the mains cable. These are two wires that are connected to the phase and neutral wires in any order.
A chandelier with a remote control is connected in the same way. The only difference is that the connected wires do not come from the transformer, but from the control unit hidden in the chandelier body.
How to hang a chandelier on a hook
The preliminary stage begins before the canvas is stretched. The method of attachment depends on the type of hook. Let's consider the installation principle of the four most common types of fasteners:
- The anchor one is the easiest to hang. A hole of a suitable diameter is drilled in the concrete floor using a hammer drill. Drive in the anchor and tighten the fastening nut so that the base is fixed in the ceiling.
- The through hook must be installed across the entire ceiling. A hole is made in the slab, then two metal plates are taken and placed on the rod. One of them is placed on the ceiling, and the other on the floor of the upper floor. The hook is inserted into the holes, and then the plates are pressed tightly with nuts to the ceiling.
- The spring version is available with a built-in holder. It consists of two parts, between which there is a spring. The rod has a screw thread. The moving parts are pressed and inserted into the hole. They pass through the ceiling and straighten out. Then tighten the nut to firmly fix the rod in the ceiling.
- hook is placed on a metal rod with a bend in the middle. Turn it so that it is adjacent to one of the ends. The structure is inserted into a hole in the ceiling and rotated. In this case, the hook falls into the central bend. It is pulled out and threaded into the hole of the decorative plug.
After installing the chandelier mount, power is supplied to this place. To prevent the cable from interfering with the installation of the stretch ceiling, the ends are secured to a hook.
Then the film is stretched. When the canvas is installed, a thermal ring is glued in the place where the chandelier will be attached. It will prevent the material from dispersing and will further protect against overheating. The size is selected so that the diameter is smaller than the decorative lampshade.
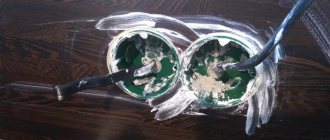
Take Cosmofen CA-12 glue and carefully coat the tread ring, leaving no empty spaces. The thermal ring is applied to the ceiling and pressed lightly.
When the glue sets, use a stationery knife to cut out the film inside the ring. They pull out the wire and connect the device, and then hang it on a hook; it will be hidden by a decorative lampshade.
Installation with ceiling hook
Typically, a hook for securing lighting fixtures is installed during construction work. In this case, before hanging the chandelier on the ceiling, you need to check its strength.
Mounting hook
To check, for some time a load corresponding to the weight of or slightly heavier than the chandelier is suspended from the installed hook. If the attached load has not shifted, you can safely hang the chandelier in place. If the fastening hook has moved, or even fallen out, you can carry out the installation work yourself.
Testing the hook with the weight of a chandelier
To do this you need:
- use a puncher to make the required hole (if it does not already exist);
- a properly selected metal anchor or a folding spring dowel with a ring is inserted into it. It should fit snugly against the inner surface of the drilled hole;
- It is enough to screw a strong self-tapping hook into a wooden ceiling.
This is the simplest method that describes how to attach a chandelier to the ceiling.
Schematic mounting of the holding element
If the ceiling is finished with plasterboard or a tension fabric is installed, the work of attaching the chandelier to the hook may become more complicated.
Plasterboard sheets are quite durable, so a small lamp can be mounted directly onto the material itself, but it is worth considering small nuances:
the weight of the attached lighting device should not exceed 6 kg; It is worth paying attention to the fact that when replacing lamps, you can damage the sheets or accidentally touch a low-hanging lamp with your hand.
If this has not been done, then you can hang the chandelier on a spring dowel or a special butterfly installed in a drilled hole. The dowel will need to be tightened with a special nut, and the butterfly spacer will need to be tightened with a self-tapping screw until it clicks. All fasteners must be equipped with a pin or hook to which the chandelier is attached.
One of the options for mounting a chandelier if the ceiling is made of plasterboard
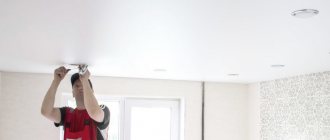
When installing a stretch ceiling, you must take care in advance of how to secure the lamp. It must be remembered that a stretched canvas cannot serve as a fastening base for a chandelier. When installing a suspended ceiling, workers, before cutting a hole for attaching a lamp, glue a thermal ring in advance. If this is not done, then it will be impossible to hang the chandelier from the ceiling, since the stretched fabric will tear. Connecting wires are routed through the cut hole.
With this option, you first need to hang the chandelier on a hook, and then connect the electrical wires, after which the attachment point is covered with a decorative cap of the lamp.
Mounting diagram for suspended ceiling
Attaching the chandelier to the mounting plate
Before stretching the canvas onto the ceiling, a mortgage is installed, to which the plank is subsequently attached. Ready-made platforms of several types are produced: round, oval, square, cross-shaped. The product is selected depending on the size of the base of the lighting fixture. The platforms are made of high-strength plastic and have holes for self-tapping screws for convenient fastening of the plank and hangers.
You can also make a mortgage with your own hands. To do this, use timber or plywood according to the size of the base of the chandelier. The edges are carefully polished so that there are no burrs that could damage the blade.
Let's consider the option of mounting a chandelier with a small longitudinal strip using a universal round platform. Such platforms are suitable for devices of relatively light weight, up to 10-12 kg.
Before installation, determine the mounting location of the chandelier and apply markings to the ceiling. Next, you need to screw flexible steel hangers or punched tape to the platform. Small “bug” self-tapping screws (3.5x9.5 mm) are used as fasteners. For a small chandelier, four pendants are enough. The legs are then slightly bent into an accordion shape so that the height of the support can be adjusted.
Holes are drilled in the ceiling, plastic dowels are hammered in and the mortgage is secured with long self-tapping screws (5x50 mm). The platform should be on the same level as the suspended ceiling frame. This can be checked by pulling a thread attached to baguettes on opposite walls. Then the electrical cable is connected. The ends are inserted into the terminal block and fixed on the site so that they do not interfere with further installation.
When the canvas is stretched, find the location of the mortgage. A tread ring is glued in the center and the internal space is cut out.
In places where the chandelier strip will be attached to the mortgage, you need to strengthen the film so that it does not come apart. To do this, reinforced tape or small tread rings for self-tapping screws are glued to it.
Then screw the bar to the platform. After which the chandelier is connected to the wiring. It is more convenient when a second person holds it. If there is no assistant, the device is suspended on a rope. The final stage is to attach the chandelier to a metal strip, install shades and screw in the light bulbs.
Note! Large lighting devices with a cross-shaped strip and a base of about 40-50 cm are mounted on a cross-shaped mortgage. The principle remains the same, but 8 hangers are required to attach the platform.
Features of installing lamps on different types of ceilings
To install a chandelier on a regular concrete ceiling, it is recommended to first insert self-expanding anchors into the drilled holes for the hook fastening or strip - they securely hold the screws in the ceiling sheet, preventing the metal from slipping out of the concrete base.
Wooden ceilings, as a rule, do not require reinforcement of fasteners; ordinary threaded screws hold in place without any problems. Holes of the required diameter can be cut in the wood, which means that surface-mounted lamps can be placed on such ceilings (subject to all necessary safety precautions).
Installation of lamps on suspended and suspended ceiling structures requires a careful approach to the selection of the lighting fixtures themselves. Even under the influence of light weight, such ceilings are easily deformed and lose their attractive appearance.
To avoid damage to the ceiling fabric, it makes sense to mount the lamps on wooden blocks that are attached directly to the concrete base of the ceilings.
Before installing any type of lighting equipment, you need to carefully study the instructions for its assembly and installation. This is important to do because each manufacturer has its own set of requirements for mounting options for the lighting equipment it produces. In addition, manufacturers often provide additional recommendations regarding the safe installation and further operation of their chandeliers and lamps.
Go to all chandeliers
How to “drown” a chandelier in a suspended ceiling
Some lamp models have a large base diameter (40-60 cm) and a high side that covers the transformer. Such a chandelier looks more aesthetically pleasing if you “recess” it a little into the ceiling.
For installation you will need a large diameter tread ring to match the size of the base. But such thermal rings are not sold in stores, so you will have to make them yourself. You will need a PVC sheet about 2 cm thick. This is an inexpensive material that is sold in many construction stores. A ring with a diameter slightly larger than the base of the chandelier is cut out of the panel. Then they place the lamp on the ceiling and trace it around with a marker. A homemade ring is glued to this outline. To make it smoother, you can apply the composition not immediately to the entire surface. First, opposite points are glued, then between them, etc.
Note! In this case, you can attach the embedding platform after stretching the canvas, since the hole will be quite large. The installation procedure is the same as in the previous method. But the platform must be located above the ceiling level so that the side of the chandelier is completely hidden behind the canvas.
When the ring is fixed, the film inside is cut out and removed. But not flush with the tread, but leave about 2 cm. Then the inner edge of the canvas is cut, folded inward and glued to the ring. Next, a plank is screwed to the mortgage and a chandelier is attached to it, but the base will be recessed into the plane of the ceiling. Thus, thanks to homemade protection, the PVC film will not be damaged.
Chandelier assembly
This issue is resolved quite simply. The lamp must be accompanied by instructions, which clearly and clearly indicate what is connected to what, and in what sequence. At first glance, an assembly drawing may seem completely incomprehensible, but this is a common reaction of an unprepared person. In a few minutes everything will fall into place and the assembly process will go like clockwork. This has happened thousands of times already, and in your case everything will turn out no worse. For assembly you will need some tools:
- Pliers.
- Screwdriver (Phillips or flat, there may be options).
- In some cases, a 12-size wrench may be useful. Even a “family wrench” will do; it is needed to tighten the nuts on decorative outlets for lampshades (if they are provided for in the design).
A word of warning: there may be times when you discover that some parts should have been installed in a certain sequence. Usually this becomes clear when it is already too late and you need to disassemble a little something that is already tightly screwed on. This is normal, it happens to everyone. Disassembly will take a couple of minutes, but now you can no longer make mistakes and finish the assembly with the most optimal result.
How to hang a chandelier if the ceiling is already stretched
There will be no problems with the hook; it can be installed through a hole in the canvas; the decorative lampshade will still cover the hole. But in order to hang the chandelier on the bar, you will need to attach a mortgage, and for this you need to remove and re-tension the ceiling. Dismantling and subsequent installation is expensive and inconvenient, so let’s consider another method.
Place the plank against the ceiling and mark where the attachment points are. Thermal rings are glued around them and in the center. The film inside is cut out and holes are drilled through the rings in the ceiling. To secure a chandelier to a suspended ceiling without a mortgage, select self-tapping screws or dowels of sufficient length.
To prevent the bar from wobbling after installation, take a plastic pipe (smaller in diameter than the rings). It is inserted into the hole, resting against the ceiling, the required length is measured and cut off. The distance to the ceiling will differ at different points, so it is better to sign the pieces. The bar is fixed through tubes inserted into the holes. The base will rest against the ceiling through the pipes, so it will become more stable. Then the lighting fixture is screwed to the bar. A connection to the network is first made.
In this way, it is possible to attach the chandelier to the suspended ceiling after its installation. In this case, the device is installed without a mortgage. But this method has its own nuances and difficulties. It is better to think about lighting before installing a stretch ceiling.
Safety precautions during chandelier installation
All work near the ceiling must be done on a stepladder or well-secured ladder. Frequent questions arise when hanging a chandelier on a plasterboard ceiling. But the material is strong enough to hold a standard-sized structure. In addition, it is convenient to screw fasteners into it even without a drill. A suitable hole can be made manually using a regular drill. The subsequent installation technique is the same as with a concrete ceiling.
Before installing the chandelier, turn off the voltage at the distribution panel. It is advisable to have a portable indicator device. Before connecting the wire, check if there is voltage in it. It has a phase and a zero. The first of them will be shown by the measuring device.
It is important to check the connection carefully. Incorrect switching is possible: the switch on the wall opens zero, and the phase is supplied to the chandelier in constant mode. Such a lamp is dangerous because it can cause electric shock. The new wiring has 3-4 multi-colored wires inside. Zero flows along blue, phase flows through brown and white.
Advice. If possible, also connect to ground. The corresponding core in the wire is yellow or green.
You can hang the chandelier securely with or without a hook. To do this, you must strictly follow the operating technology.