What do you need for work?
In order to quickly and accurately carry out all installation processes, it is necessary to prepare the tools in advance:
- Drill. If the device has the ability to adjust the speed, then it can be used not only to create holes, but also to screw in screws. As an alternative, use a screwdriver.
- Drywall drill bits with centering drill. These attachments are the optimal solution for quickly obtaining seats in which mounting boxes for sockets and switches are placed.
- Set of screwdrivers and bits. Used to screw in screws of different sizes. It is taken into account that hand tools are more convenient when connecting wires to terminals.
- Pliers or wire cutters. Used to quickly remove excess cable sections.
- Electric jigsaw or hacksaw for gypsum board. For creating complex holes.
- Construction knife. Used for cutting out plugs in the body of the socket box, since cheap products are often heavily sealed.
- Screwdriver indicator. A simple device for determining voltage. The principle of operation is that when there is power in the handle, a light comes on.
- Level, ruler and tape measure. For marking and alignment.
Although any actions with electrical wiring involve disconnecting the voltage, according to safety standards, all tools must have insulated handles and tips
Standard installation technology requires the following materials:
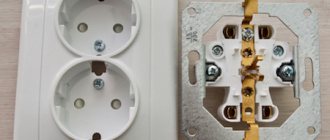
- Landing boxes for sockets and switches. For gypsum boards, special plastic varieties are used that have passed fire certification. Their main difference is in the fixing tabs. Diameter and depth are selected individually. The following options are available: Single modules. This is the cheapest variation, it is easy to install, but there is no possibility of docking with similar devices.
- Boxes with additional connector. A modern type with an extension connector on the body. The socket boxes are assembled using a special part, which is not always included in the kit.
- Blocks. Most often there are double and triple structures that do not require additional joining.
As practice shows, the most convenient models are those with the ability to be connected in a chain. It is recommended to select all elements from the same manufacturer. This will avoid adjustments, which often happens when joining fragments from different manufacturers.
On a note! For some rooms there are certain types of sockets. For example, rooms with high humidity need special products that prevent water from getting inside.
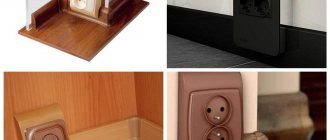
Types and characteristics of socket boxes
Modern sockets, both in appearance and in the installation method, differ significantly from those installed in Soviet-era houses.
If previously they were simply embedded in the wall without the possibility of replacement, today installing them and, if necessary, changing the socket is not particularly difficult.
And all this thanks to the socket box, which, in fact, is a box that securely holds the socket in its depths and at the same time ensures its fire safety.
Socket boxes come in different shapes and sizes, differ in materials of manufacture and installation method, so before you buy, you need to understand their types.
Selecting a socket box based on wall material
The main selection criterion is the material of the walls into which the socket boxes will be installed.
On this basis, there is the following classification of boxes:
- structures intended for installation in walls made of solid materials: concrete, reinforced concrete, aerated concrete, brick;
- glasses for walls made of composite materials: plasterboard, plastic boards, chipboard, plywood and others.
In the first case, the socket box is a round glass without any additional elements. It is fixed to the wall using mortar.
There are mounting holes in its walls or bottom for electrical wiring. When installing a socket box, it is enough to remove the jumpers and push out the plug.
To install several sockets located nearby, you can use glasses, on the side of which there is a fastening mechanism. The socket boxes are connected to each other using special grooves and combined into blocks.
Drywall boxes contain special plastic or metal clamping tabs designed to secure elements into hollow walls. The clamps are attached to screws, which rotate to adjust their position.
What shapes are the products produced in?
Round socket boxes have become most widespread. It is very easy for them to make a hole in the wall using a variety of tools.
Round glasses can be used both for mounting a single socket or switch, and they can be combined into groups, connecting to each other using docking units.
Square boxes, although not used as often, have certain advantages. Their volume is much larger, so you can hide a lot of wires in them.
They are often used to install elements of the “smart home” system. There are single and group square-shaped socket boxes designed to install up to five sockets.
There are also oval boxes on sale, which, like square ones, have a large internal space. They are convenient because you can immediately connect a double socket to them. All the products described above are mounted in walls and used for hidden wiring.
There is another type of mounting boxes that stand somewhat apart - plastic linings or, in other words, multiboxes, designed for open installation on the baseboard. They are designed for one or more outlets and are usually square in shape.
External socket boxes have two modifications - designs with installation to the middle of the baseboard or to the floor. Since multiboxes are mounted on top of the baseboard, their distinctive feature is their aesthetic appeal and original design.
Installation box size
An important parameter of socket boxes is their dimensions, which are selected based on specific installation conditions. The fork dimensions are 60-70 mm in diameter and 25-80 mm in depth.
Standard designs have external dimensions of 45 x 68 mm, but it must be taken into account that the internal depth in this case will be 40 and the diameter 65 mm.
Glasses of increased sizes, the depth of which is about 80 mm, are advisable to use when there is no distribution box in the electrical wiring, and its functions are performed by the electrical outlet itself. As for square products, as a rule, they have a size of 70x70 or 60x60 mm.
Material for making mounting boxes
The most popular are socket boxes made of non-flammable plastic. They can be installed in concrete walls and structures made of composite materials.
There are also metal boxes, which were used everywhere in the past, but today they have almost been replaced by plastic products.
Metal socket boxes are usually installed when installing electrical wiring in wooden houses. They are made of galvanized or non-ferrous metal and cannot be welded, so the connection to a metal pipe is made by soldering.
Safety precautions when working with electric current
The first thing you should know when starting any electrical installation work, even something as simple as installing an outlet in a plasterboard wall, is safety precautions.
The electric current supplied to our electrical networks is quite dangerous for humans. For domestic needs, a current of 0.2 A and a voltage of about 220 V is supplied. Safety rules will help you not to feel the effects of electric current.
In fact there are few of them:
- Never begin electrical installation work until you are sure that the network is de-energized.
- Use tools with insulated handles (plastic, rubber, wood). If this is not the case, wrap the handle of the existing one with several layers of electrical tape.
- Have an indicator screwdriver with you. Before reaching into the outlet, check it for voltage with an indicator.
- Do not use broken, repaired, or soldered sockets or their parts. Materials must be new and of proper quality.
- Select the correct wire cross-section.
If you follow these basic rules, your work will be safe.
Option No. 1. Connection to a two-wire cable
In the first case, it is difficult to make a mistake: having checked the presence of voltage with the tester probes, we turn off the circuit breaker responsible for the zone to which our future outlet belongs.
Important! In no case do not forget about de-energizing the wiring! Electric shock can cause death.
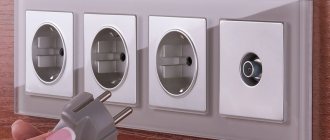
We strip about 8–10 mm of insulation for each core and lead them into equidistant terminals of the socket. The design of sockets can be very different, but there is one thing in common - the power terminals are always equidistant from each other, so locating them will not be difficult.
Remember that next to one terminal there may be a hole immediately leading from it, used for further parallel connection of electrical installation products. Do not connect there, it will cause a short circuit. The holes for different terminals should be at a respectful distance: 1.5 cm from each other.
Polarity will not play a role in this case, since the current is alternating.
USEFUL INFORMATION: How to prepare drywall for wallpapering: what should you use before gluing?
Place for socket
There are certain standards that specialists prefer to work by when installing sockets. They concern the gap from devices to the surfaces of the room:
- The distance between the floor and the socket is 30 cm.
- The distance between the floor switch and the switch is 90 cm.
- The distance between the socket and the wall is 18 cm.
If possible, such standards should be applied. They can be changed individually. The socket must be placed so that it is convenient to use the product. For example, kitchen devices are made on an “apron”, approximately at a height of 1.2 meters - household appliances will be connected there. In the bathroom, devices are usually installed at a height of a meter in order to comfortably turn on the washing machine.
In other rooms it is also worth focusing on the available equipment. It may be better to mount the socket in the drywall at a higher height than the recommended 30 cm. It is necessary to take into account the flow of wiring in the room, so it is better to identify the areas where the sockets are located at the renovation stage.
If a place for the product is found, you need to mark it with a construction marker using a level. The first hole will then be made in the center of the mark - the beginning of the future hole for the socket box.
Adviсe
In order for the installation of sockets in drywall to be carried out as correctly as possible, it is advisable to adhere to the following recommendations:
- Take into account the presence of empty space between the drywall and the main surface of the wall (it must be at least 4.5 cm and the glass must be placed freely at the base). You can deepen the base using a hammer drill or chisel.
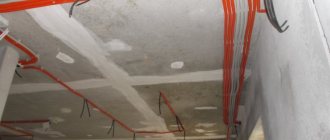
- Even at the stage of assembling the gypsum plasterboard structure, in the place where the socket is planned to be installed, it does not hurt to bring the wiring out with a margin of 20-30 cm.
- When installing several devices, use a building level to correctly mark and install sockets.
- Electrical wiring inside the structure should only be carried out while protecting the electrical wires from possible mechanical influences (in a corrugated sleeve) in order to minimize their damage during installation or operation.
- It should be taken into account that when creating holes you may come across the metal profile on which the gypsum board is based. To prevent this from happening, use a powerful magnet. Place it against the wall and move along the surface to find out whether there is a metal profile behind the ceiling.
- If you still come into contact with a metal structure, then you should not despair. Since there is no need to move the holes for the sockets to another location. The fragment of the profile that interfered with the work is cut off using iron scissors or knocked out (bent) with a simple chisel.
When making repairs, you most likely have thoroughly calculated everything. But after a certain period of time, you may need to install an additional switch, you will need to hang a picture or change the location of wall lights. And then chaotically laid wiring can turn out to be a serious problem. Because using a hammer drill or electric drill can easily cause damage to hidden electrical wiring and cause a short circuit. To avoid such surprises, place the electrical wiring parallel to the floors, adding a few 90-degree turns. It is advisable to record the laying diagram: sketch out a plan, a sketch, or simply take a photo, at least on your phone. Then, in a few years, you will be able to drill into walls at any point without any obstacles or doubts without any undesirable consequences for electrical wires.
Mounting a socket into a plasterboard wall is quite simple and can be done with your own hands. Following all the above recommendations, such a procedure as installing electrical sockets in a wall made of gypsum plasterboard will be implemented most correctly and in the shortest possible time.
To learn how to select and install a socket box in drywall, see the following video.
Making a hole
Having completed all the necessary marking work, you can begin cutting out the holes.
There is nothing complicated in this operation:
- We install the prepared attachment on the drill or hammer drill;
- Before starting drilling, you need to correctly position the “crown” relative to the place where the hole will be (to make it easier, you can drill the center of the future hole with a regular drill);
- Using a crown, we cut a through hole in a sheet of drywall. When working with a drill and hammer drill, you should not create strong pressure, otherwise this may lead to the formation of torn edges of the hole, which will subsequently affect the installation work;
Note that you can make a hole without a crown, although it will be more difficult. To do this, you can use two methods - cut it with a knife or use a drill with a regular drill. But no matter which method is chosen, you first need to make additional markings to determine the dimensions.
Tools and materials
For installation work, you will need, in addition to the socket itself and the socket box, a number of tools:
- Phillips screwdriver;
- regular screwdriver;
- indicator screwdriver;
- construction marker (regular pencil);
- level;
- knife;
- hand drill.
You can make a hole in a sheet of drywall for a socket using a drill or knife, but it is better to do the work with a drill and a cutter. It is selected according to the diameter of the glass in order to easily drill the desired hole.
Difficulties that may arise and their solutions
One of the most common problems that arise when making a seat for a socket box is getting into the profile to which the plasterboard sheet is attached. In this case, it will not be possible to install the mounting box, since its height is much greater than the thickness of the drywall. That is, for installation you need additional space under the sheet so that the socket box goes all the way.
This problem can be solved very simply - using a chisel (chisel, screwdriver) and a hammer, we cut out the interfering section of the profile. This will not affect the bearing capacity of the profile in any way. The situation is worse if the drywall is glued to the wall without using a frame made of a metal profile (such installation also occurs, although it is rare).
In this case, you will have to make a recess in the wall using a hammer drill with a chisel or a hammer with a chisel. Another situation concerns the installation of a block of sockets (several of them are located in a row, one next to the other). For reliable fastening of each socket box, it is necessary that there are jumpers between the holes for them.
And this is where correctly executed markings will help. It's done like this:
- We select the location for installing the outermost socket and mark the center of the hole.
- Then draw a straight horizontal line through the marked point.
- Next, measure 72 mm from the center of the first hole and make a mark (this will be the center of the second hole).
- We make a few more marks on the line (according to the number of sockets in the block), observing the specified length between the points.
It's simple - the diameter of the hole is 68 mm, and between the centers we have 72 mm, and after cutting the holes we will get jumpers 4 mm thick in the thinnest place.
Features of installation of a socket box
Making dimmers, switches or sockets in drywall with your own hands is not a difficult task for someone who has done similar work in brick or concrete walls. The main new stage will be the installation of the installation box in the gypsum plasterboard structure. Complete it, guided by the description, and then your previous experience will help.
Preparing for work
Installing sockets in drywall requires special training. Purchase all the necessary materials and prepare special tools. You will need:
- A connection device consisting of a mechanism and a front part.
- Suitable size installation box for gypsum boards.
- Electric drill.
- The drill attachment is a drywall bit. It will help you cut a round hole of the desired size. The attachment consists of a cylindrical cutter with a serrated edge. There is a drill in the center of the product. During operation, it is installed on the center marked on the wall, fixes the crown in the correct position when the cutter cuts out a circle of a certain diameter. In this case 68 mm.
- Building level.
- Marker or pencil for marking.
- An indicator screwdriver is needed to check the voltage.
A shaped screwdriver to secure the mounting box and secure the socket.
Step-by-step description of the process
- Do-it-yourself installation of a socket box in drywall, like any other work related to the electrical network, should begin with de-energizing the room. After this, check the presence of voltage in the network using an indicator screwdriver.
- Decide where you need to install the outlet in the drywall. Mark the wall. If multiple connection points are required, mark all centers at 71mm intervals. Check with a building level that the points lie on the same horizontal or vertical line.
- Start drilling a hole for the socket in the drywall. Place the end of the drill at the point marking the center and drill carefully. Remove cut material.
When installing the block, cut out all the fragments where the intermediate fasteners for the socket box will fit.
- Lightly press the plastic plug where the wire runs and remove it. Thread the wires inside. Before placing the plastic bowl, double-check that the distance to the main wall allows it to fit completely. If there is not enough space, use a hammer drill to make a small hole in the concrete or masonry.
- We fasten the mounting box into the finished hole. There are 4 screws on the fixture. Two of them are intended for fixing the box with clamping feet to the wall, the other two ensure installation of the socket (mechanism) inside the cavity. Use a regular screwdriver to twist the screws, controlling how the tabs secure the position of the device. Do not pinch to avoid damaging the drywall.
- Before installing the outlet, connect the device wires to the appropriate wiring cores. To avoid electric shock, check the voltage again using an indicator screwdriver. Connect the blue wire (N - zero), yellow-green (PE - ground), brown (L - phase) in series. Make sure that the contacts are well secured. Unreliable fastening can lead to heating of the operating device, melting of the plastic, and even fire.
- Insert the socket mechanism into the socket box. Secure the correct position with screws. Install a plastic frame and decorative cover.
- Make sure the outlet is installed correctly. Turn on the power. Test the operation of the new outlet by connecting the appliance.
- Rules for installing an air conditioner outlet
- Explanation of AAShv cable markings and its technical characteristics
- How to install and connect a TV socket
- How to replace electrical wiring in premises
Choosing the right place
Often the choice of location depends on how the wiring is done. By the way, all power cables must be routed throughout the apartment before installing the drywall. Therefore, you first need to route the wires to certain places, and then think about how to install the socket in the drywall.
There is a European standard regarding the installation of sockets:
- the distance from the floor should be at least 30 cm (regular rooms);
- for a washing machine, the socket should be at a level of 1 meter from the floor;
- in the bathroom, installation should be carried out at a distance of at least 60 cm from the floor;
- the distance from the laid cables to window and door openings should not be less than 10 cm.
This standard is advisory in nature and is not mandatory. It is also worth considering existing profiles so that they do not interfere with installation work. If this is not provided for, then during installation you will have to cut off a piece of the profile so that a glass can be installed in its place.
Typical recommendations for socket installation and wiring.
Description of the installation process
Before making a socket in drywall, you need to mark its future location.
Further, depending on the type of device, the installation process will vary slightly.
Installing a surface socket
For overlapping installation, fastening to drywall is done using special dowels called “butterflies”. Due to their design, they are installed in a pre-prepared hole with a diameter of 10 mm and at the moment of tightening the self-tapping screw, the plastic body of the dowel is compressed and forms a large-area stop on the inside of the gypsum board, which reliably presses the dowel and what is attached to it to the wall.
The main thing when installing with an overlap is to install the dowels exactly in the place where the fastening screws coming out of the body will be located. To do this, we disassemble the element, press its body and, where it needs to be secured, make marks with a pencil. Later, dowels will be placed in this place.
After marking, use a screwdriver or drill to drill two holes with a diameter of 10 mm and insert dowels into them. At the next stage, the electrical wiring must be cleaned and connected to the socket, after which the housing must be secured to the wall using self-tapping screws and dowels. The overlap installation is complete.
Installing a single, recessed outlet
A single recessed socket in drywall looks much nicer than a bulky and prominent cover plate, which is why most residential buildings install recessed elements.
As in the previous version, you need to start with markings. We mentioned earlier that this type of product is mounted in special boxes with a diameter of 68 mm. Thus, when marking, it is necessary to mark only the central point, into which the centering drill bit of the crown for drilling drywall is subsequently installed.
The next stage is installing the box - socket box in the prepared place
After tightening the screws, you must check how the socket box is seated and whether it is securely fastened.
Next, the electrical wiring is connected to the contacts, after which the product is installed in the socket box and securely fixed with fastening screws.
Installing an outlet block
Now let's look at how to install a socket in plasterboard, or rather sockets in plasterboard, if several of them are needed. Everything is clear with the installation of overhead elements, they are placed next to each other and connected in parallel, but what about the recessed options.
To install several recessed sockets, an installation technique is used using a block of socket boxes, which is assembled using several socket boxes and special jumpers through which the electrical wire passes for connection.
An important step is marking. To do this, using a pencil and a building level, in the place where the block is planned to be installed, draw a horizontal line on which a mark is made every 71 mm. These marks indicate the distance between the centers of the socket boxes in the block.
Next, using a screwdriver or drill with a 68 mm plasterboard bit, we drill the required number of holes for installing socket boxes. We need two, we drill two, we need more, we do more, it’s up to your discretion.
At the next stage, using a utility knife or a drywall saw, we remove the jumpers between the holes.
Now you need to remove the technological plugs in the plastic socket boxes so that they do not interfere with connecting the structure together and passing the wiring through it. After assembling a single unit, the electrical wire is run inside, and the unit itself is installed in place and secured by tightening the screws.
How and when to make holes in gypsum boards
It is necessary to know in advance exactly where the power cables are connected. You can make marks on a sheet of drywall in advance so that you later know where to make the hole. It is best to put a cross, which will mark the center of the future hole.
Before installing a block of sockets in drywall, you need to learn an important rule - between the centers of the holes for them you need to make a distance of 72 mm. The sockets will be installed in a row so that they fit snugly against each other.
A drill with a special bit will quickly and accurately drill the required hole. You need to keep the tool level and perpendicular to the plasterboard wall. However, there are some nuances. This scheme is good when it comes to interior partitions, because due to the frame, they have enough space to fit a socket box.
There should not be a profile at the socket level. Typically, the installation depth for a socket box is considered to be 45 mm. If the frame made for drywall is very small, then installation will be impossible without drilling the wall. I’m glad that most often people already make the right frames from metal profiles so that they don’t have to hammer into the wall.
If profiles were not used (glue or foam was used to install gypsum boards), then you will have to cut drywall to install the wires. In this case, the process will be no different from installing an outlet in a regular wall.
Here's how to make a hole in drywall for an outlet.
A hole can be made not only with a crown. Using a compass, a circle is drawn on the sheet to indicate the location for the hole. Then, using a drill with a regular drill bit, holes are made along the inner border of the circle. Next, the core is carefully cut out with a knife, and the protrusions are trimmed with the same knife. The hole will come out a little clumsy. However, you do not need to buy a crown, and all the irregularities will be hidden by the rosette.
Option No. 2. Three-core cable
The second option is used when the apartment has protective grounding - a very useful thing that will remove static voltage from devices.
The conductor responsible for grounding, according to the standard, must have a bright yellow-green color.
If our outlet is provided with a grounding connection, there should be copper “antennae” in its sockets at the top and bottom, and there should be a separate terminal on the inside for connecting this wire. If the outlet is not grounded, we insulate this wire well and hide it behind drywall. Otherwise, the connection picture does not differ from the option discussed above.
Which socket outlet is best to choose?
For gypsum boards, socket boxes are produced by manufacturers: Schneider Electric, Tuso and others. Boxes are classified by size:
- outer diameter (d2);
- box depth.
Standard sizes d2 (mm): 60, 64, 68, 70.75. There is also a non-standard diameter.
Box depth (mm): 40, 42, 45, 60, 62.
How deep to mount the box depends on its location. If this is a partition, then a box with a depth of 60, 62 mm cannot be installed. Install 40, 42 mm. For plasterboard walls, Hegel KU 1201, 1202 socket boxes are used. Dimensions: d2-68 mm, depth H-45 mm. Made of non-flammable plastic that can withstand 850ºС. For a plasterboard surface, install a box with a diameter of 68 mm.
Differences in shape:
- round – standard;
- oval - mounted for several switches or sockets.
The socket boxes for plasterboard are fixed in the wall using metal spacer tabs.
Under a wooden profile
The metal body of the socket box protects the wooden frame from fire. It will prevent contact of the spark from a short circuit with the wooden base. The plastic case will not withstand 1500 0C - it will melt.
Advantages of a metal case:
- Some boxes are made of 1mm steel, which can withstand high temperature during short circuit.
- When conducting electrical wiring in a wooden case, the cables are hidden in a metal corrugation. The metal body is able to withstand the load of corrugation.
- Installation. The box has a size of D2-68 mm, which is convenient for installation.
- Housing tightness. The seams on the box are welded.
- No extra holes. To feed the wires you need to drill holes.
- Threaded holes are provided for installation of the socket.
- Box depth 65 mm. This makes it possible to leave 10 cm of excess cable for subsequent repair work (replacing the socket, the switch broke, shorted the cord and melted the socket and wires).
For safety from fire, metal socket boxes are installed in wooden houses and places where wooden guides for drywall are installed. Before purchasing, you need to look at the thickness of the metal and the quality of the product.
Under metal profile
Under the metal frame, only plastic boxes are used to install switches. Let's say schneider electric IMT35150. The body of the product is made of plastic, which does not burn. The model is distinguished by its durability and wide front edge. There are plugs with different diameters. They are designed for wires with different cross-sections.
There are 2 metal “claws” in the box for fastening to the plasterboard surface. They provide strong adhesion, in which the back side of the gypsum board remains intact. The “legs” hold the screws; when tightened, their fasteners are pressed against the surface.
The socket box should not coincide with the location of the metal frame elements.
Preparing walls for installation
Installation of socket boxes in plasterboard involves the following preparatory work:
- Using a tape measure and a pencil, you need to mark out all the future locations of sockets and switches. Installation of sockets in drywall is carried out according to these marks;
- Marks are best placed in the form of crosses. This will make it much easier to cut holes in the future;
- carrying out putty. This will help strengthen the wall so that the socket in the drywall sits firmly;
- Prime the work surface well. In this case, the installation of the socket in the drywall will be successful, without the formation of cracks and delaminations;
- After the treated surface has dried, you can start making holes. It must have the required diameter. To do this, you can use a drill with special attachments, a mounting knife or a regular drill;
Drilling a hole
Note! When using a mounting knife, you need to work very carefully, since plasterboard sheets can be significantly damaged as a result of rough cutting. Such defects will be very difficult to hide during final finishing work.
Therefore, it is best to use special nozzles for making holes. With their help you can make the most neat and even holes.
- The diameter of the hole must match the diameter of the socket box. The box itself is inserted end-to-end. The diameter can be increased slightly, but not more than 2 mm, otherwise installation will be inconvenient. If the diameter is too large, the box will simply fall out of the prepared hole;
- when installing a socket under drywall in the form of a block, the distance between the holes must be 72 mm (standard center-to-center distance for blocks);
- the finished hole, namely its edges, must be treated with a mixture of primer and putty. This way the socket in the drywall will sit more stable and securely.
Stages of preparatory work
Now the structure is ready for installation work.
Installing a socket box in drywall
To install a socket on a plasterboard wall, you need to choose the right socket and install it. First, find out how a special installation box for drywall differs from a standard installation box for concrete. After this, you should install it correctly.
Installing a socket in a plasterboard wall involves a number of standard steps:
- Having selected a crown that matches the type of material and the diameter of the future hole, we drill it in the plasterboard partition;
- Through the drilled hole we pull out the cable to which we will connect the plug socket;
- We try on the socket at the installation site, making sure that 10-15 cm of all conductors fit freely in the socket box;
- We place a socket box in the drilled hole. After checking the horizontal position with a building level, we fix it with mounting screws or spacer tabs;
- Using a multimeter, we determine the phase and zero of the conductors inserted into the socket box, so as not to confuse them when connecting;
- We connect the wiring mechanism located in the caliper to the wiring. We fix it in the way provided by the device manufacturer;
- We fix the support with the device mechanism in the socket. We tighten it with screws, trying not to overtighten, so as not to damage the thread;
- We close the electrical installation device with the front panel.
Installation box design
Drywall is a universal building material for finishing walls and building partitions. It can be moisture resistant (for the kitchen and bathroom) and ordinary wall - for other rooms. Sheets of plasterboard are thin and cannot be compared with concrete or brick walls. Because of this, a reasonable question arises: how is the socket installed in such a thin material?
The location of fasteners may vary. Some models of socket boxes have bolts on all four sides, in other variations the bolts are located in pairs on both sides.
This is done using an installation box. For drywall, special socket boxes are produced with a special method of fixation. They look like a plastic glass. There are 4 screws on the front side. Two of them are located above the others. They are needed to directly fix the metal frame of the socket itself.
The feet can be metal or plastic. The first ones are a little more expensive, but accidentally tearing such an outlet out of the wall through negligence will be much more difficult. Those that are slightly lower are responsible for installing the socket boxes in the drywall. At the bottom of the installation box there are special fixing mounting tabs. Their position is adjusted by these two screws.
When you turn the screw, the foot is pressed more and more against the sheet of drywall. This mechanism ensures that the socket box is firmly installed and ensures that the socket will not fall out of the wall at the first opportunity.
The bottom of the installation box is equipped with blanks for holes for wires of different diameters and configurations. Depending on the method of connecting the cable to the glass and its thickness, cut a suitable hole using a knife. At this stage, the socket box is completely ready for installation.
Installation of electrical fittings
The process of installing sockets and switches consists of several stages: making a hole for the fittings, installing a socket box, connecting the socket. and then the switch.
Socket hole
After the wires have been routed and the places for the fittings have been marked, you need to start creating a hole for the socket. First of all, you need to make a hole in the drywall. We will use the hole to install a plastic socket box, which will be the basis for installing the socket itself.
We make a hole in the GVL like this:
- First, using a tape measure, measure the required distance from the floor to the place where we will install the socket.
- We mark the place where the socket under the drywall will be installed.
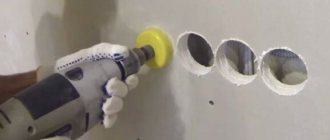
- We make holes with a drill. We use a milling cutter as an attachment. We set the tip of the cutter in the center of the previously made mark. Let's drill.
Cutting a hole in drywall with a milling cutter
If you need to install several sockets nearby, it is recommended to mark all the fittings before drilling the first hole. This organization of work will ensure the creation of more neat nests.
Installation of a socket box
The next stage of work is installation of a plastic base, the so-called socket box, into the hole. These elements are secured with four screws. One pair of them is responsible for the locking mechanism, and the other is responsible for holding the outer metal lining.
Socket boxes for drywall
The socket box is installed like this:
- First, we make a hole in the socket box for the wires. We pull the previously laid wiring through the hole. We leave a little wire outside for reserve.
- We place the socket box in the prepared hole, so that there are no pinches in the electrical wiring.
Important! Typically, the depth of a plastic box for mounting an outlet in drywall is approximately 45 millimeters. If the distance between the gypsum plasterboard and the wall is smaller, additional recesses in the wall will be needed
You can carry out the operation even before covering it with GVL, but then you will need to very accurately calculate the location for installing the fittings.
Using a building level, we check that the installed socket box is horizontal. If everything is done correctly, tighten the mounting screws with a screwdriver.
Connecting the socket
The final stage is connecting to the wiring. However, before installing the fittings, you need to perform one more action - check that there is no voltage in the electrical network. To do this you will need a special indicator screwdriver.
Using an indicator screwdriver to determine phase
If the check shows no voltage, proceed to connecting the outlet:
- We remove all plastic decorative elements from the device.
- We unscrew the screws on the terminals, pull the wires through them and secure them. If the wiring uses a three-core cable, the ground is connected to the middle pin.
- We place the socket with the attached contacts in the socket box. You can fix it with spacers or screws in the socket box.
- Before permanently fixing the socket into drywall, we test the reliability of contact between the wiring and the terminals.
- Attaching a frame. After this we put on the protective cap. Tighten the fixing screw using a screwdriver. We do this carefully, so as not to mechanically damage the plastic housing of the fittings.
Switch connection
The process of installing the switch is also not difficult. The sequence of actions is as follows:
As can be seen from the article, installing electrical fittings on gypsum fiber boards is not too difficult a task even for a novice electrician. Of course, due to inexperience, the first socket can cause a lot of trouble. But in the future, installing sockets in drywall will happen quickly and without problems.
Installation and connection of sockets and switches
The devices must be fastened carefully so that all connections are correct and extremely reliable. House wiring is most often divided into two or three main wires:
- working zero – N (mostly blue);
- phase – L (brown);
- grounding (protective zero) – PE (yellow-green).
But you can rely on color only if the distribution was initially carried out according to this rule. To do everything without errors, each device has its own connection sequence.
If the switch is built in series with the light bulb, then the sockets are usually connected in parallel. It is also necessary to first determine the type of wiring. The fact is that in old apartment buildings there is no separate outlet for grounding, but there is a ground connection. In such a situation, the PE connection terminal remains free, and the green-yellow core (if any) is bent and insulated.
The easiest way to install sockets. Standard technology:
- The wires removed from the box are cut to the required size, and the ends are stripped. It is taken into account that everything must fit freely inside the module.
- The outer plastic cover is removed; to do this, the central screw is unscrewed.
- The internal base most often combines a metal plate and an element with contacts. To connect the cores, screws are unscrewed, which release the connectors.
- Phase and zero are connected in any order and attract well.
- Next, you need to attach and align the frame and fix the overlay with openings for the fork on top.
Before connecting the outlet, all 3 wires should be checked for voltage with an indicator. Switches on plasterboard walls should be installed slightly differently. The main difference is that it is the phase that is supplied to the break (to the contacts). The device will also work when the zero is connected, but in this case the lamp will always be energized.
When installing the switch, a phase wire is placed on the break; it can be detected using an indicator; under voltage, the indicator light should light up
Important! All processes are carried out with the power off. If a large number of electrical devices are expected in the room, then a separate machine is provided.
Connecting wires
Before you start connecting the wires, you must turn off the power at the distribution panel. You can check that there is no voltage using an indicator screwdriver.
If there is no voltage, you can start connecting the wires:
- All decorative elements are removed from the socket;
- The bolts on the socket terminals are loosened, the wires are inserted and the bolts are tightened until they stop. When using a three-wire wire, the ground wire is connected to the middle terminal;
- The socket with the connected wires is inserted into the socket box and secured in it using spacers or fastening bolts on the socket box;
- Before finally fixing the socket, you should once again check the tightness of the wires on the terminals;
- All that remains is to put on the frame and install the cover. When tightening the screw, you do not need to make any great efforts so as not to crush the plastic parts.
- When installing several adjacent sockets, you can purchase a common frame for them, from 2 or more.
Open option
The open version assumes that the sockets are installed on an external wall without drilling grooves and holes for socket boxes. The wire will also run outside along the wall. Installation of socket boxes is not required in this case.
Holes are drilled in the wall for mounting it. To do this correctly, you need to disassemble it and attach the back cover to the wall, after which, having previously leveled it, mark the points for fastening with a pencil. The back wall can be immediately fixed to the wall using quick installation or screws, the main thing is that they have dowels. Wires are mounted onto the block by inserting the edge of the wire and tightening the screw on the block. Accordingly, you need to connect the wires so that each wire is connected to its own block. Phase to phase, etc. After everything is ready, you can assemble the structure by covering the base with a lid, then fasten it with screws and the installation of the socket is completed.
- Unaesthetic appearance for residential premises;
- At the places of the sockets there will be cable channels, which will be mounted on the walls and will take up space;
- Protrude 5–8 cm from the wall.
How to install?
The procedure is as follows:
Making holes for sockets
Before you build a socket into the drywall, you need to drill a hole for the glass:
- using a pencil, mark the place where the socket will be fixed;
- take an electric drill or a screwdriver with a crown for drywall;
- a sharp segment of the crown is placed in the center of the applied mark;
- a hole is carefully drilled (if you don’t have a drill, you can use jigsaw files);
- Holes for switches are made in the same way.
Once the hole is made, the materials and all the tooling are prepared, installation work can begin. Depending on the installation technique, the sequence of work differs. If the electrical cable is fixed in the wall, all that remains is to install the socket and connect it.
And if electrical wires are supposed to be passed along the outside of the wall, a groove (notch) is cut in the drywall, an electrical wire is laid and fixed with a quick-hardening compound (for example, alabaster). The ends of the wiring are brought out at the specified level in the required places.
The following stages of installing a socket with your own hands are as follows:
We install the socket box. Before installing the glass, you need to cut a hole for the wires on its back surface with a knife. If you look at the body of the glass, you can see 4 screws, 2 of them are needed to secure the socket itself, and 2 are for adjusting the spacer legs. First, we take the electrical wires out of the hole and pull them through the glass. Then we mount the glass in the drywall, securing it with bolts on the opposite side with clamping tabs.
- Let's putty. Usually, after installing the socket box and testing the system for operational suitability, it is time for the initial finishing. Only after the starting and final layers of putty have dried, the subsequent installation of the socket is carried out.
- We connect electrical power to the outlet. Before making the connection, make sure that there is no voltage in the line (you can check using a regular indicator). We connect the “ground” and “zero” phases to the appropriate contacts on the socket body and tighten the wires tightly so that over time the electrical contacts do not loosen and the plastic case does not begin to melt.
We install the socket in the glass. The socket is mounted in the glass and fixed in it with the appropriate screws. After this, we install the plastic frame and front cover. Check the fit to the wall; if necessary, loosen the screws on the pad feet and make adjustments.
Installation of overhead electrical socket
In some cases, instead of the well-known socket with hidden electrical wiring, surface-type electrical sockets are used. They do not require drilling holes in the walls and installing installation boxes (cups). And the electrical wiring itself is not carried out under the plasterboard structure, but along its top.
This method is not very attractive from an aesthetic point of view. The overhead socket is massive. Wires running along the walls do not add consistency to the interior of the room. But in some cases this is justified, in particular when the distance between the gypsum plasterboard structure and the concrete wall is too small - less than 45 mm, and there is no hammer drill at hand.
Electrical wiring laid outside and overhead socket models are often used in design ideas when decorating rooms in loft, retro or steam-punk style. In such cases, specialized fire-resistant electrical wires in stable, non-flammable insulation are used. They may also be in a corrugated sleeve.
The electrical wiring is fixed to the wall using clips, and the socket is simply screwed to the drywall using screws, like an overlay. The advantage of this arrangement is that at any time you can change the location of electrical household appliances and the socket along with it.
PUE and wiring in the frame of a plasterboard partition
According to the PUE (Chapter 2.1., clause 2.1.4, clause 2), wiring installed in premises structures is called hidden.
For hidden wiring, only the following installation methods are used:
- Wiring in electrical pipes;
- Protection of wiring with metal sleeves;
- Wiring in boxes;
- In technological voids and special channels of structures;
- In the furrows
- Under the plaster layer.
For wiring in plasterboard frames, we can only use
- Wiring in boxes;
- Wiring in pipes (including electrical corrugation);
- Wiring in metal sleeves (only in fire hazardous rooms with partitions of type C111/112/115/116 GSP-DF).
It is important to note that in the same PUE, in clause 2.1.19. and 2.1.23., it is said that there must be access to the places of connections and branches of electrical wiring for repairs
This means that in the place of the plasterboard structure where you do the wiring you need to install a service hatch. Unfortunately, this is done very rarely, especially in home electrical wiring, which is greatly regretted in cases of malfunctions and accidents.
and 2.1.23., it is said that there must be access to the places of connections and branches of electrical wiring for repairs. This means that in the place of the plasterboard structure where you do the wiring you need to install a service hatch. Unfortunately, this is done very rarely, especially in home electrical wiring, which is greatly regretted in cases of malfunctions and accidents.