How garlands are arranged
The arrangement of the garlands is quite simple. Ordinary, old garlands have one or two wires in their design that connect incandescent light bulbs to each other. Modern garlands have 5 wires, one of which is empty, and four of which are connected to a special controller box.
It is this box that is the most complex element of the garland and is responsible for:
- Different flashing modes for lights
- Duration of garland operation
- Time to turn off the garland
- Reliability of the entire structure
Although the box with the relay or controller is usually reliably protected from moisture and dust, breakdowns often occur here.
Safety precautions
You can inspect, repair and touch a faulty garland only when it is turned off. Otherwise, due to your carelessness and carelessness, you risk getting an electric shock. Even if the garland is 12V or 24V.
If you receive an electric shock and feel unwell, be sure to consult a doctor, especially if you have heart problems.
Also, do not solder live wires. The same applies to testing LEDs and other radio components with a multimeter.
Reasons for the breakdown of garlands
There may be several reasons why the garland does not light up or does not blink as desired. Main reasons:
- Burnt out light bulb
- Damage in the wire
- Damage to the power supply
- Damage to the control unit chip
Identifying a burnt out light bulb or damaged wire is easy. Moreover, modern garlands have a parallel connection and therefore it is much easier to find a problem in these cases. Since when there is a problem, not all the lights go out, but only some. And by the nature of the problem it is easy to determine its cause.
Types of LED garlands
LED garland “Fringe”
LED garland is characterized by such parameters as power, number of LEDs, structure diagram, length.
According to the design of the product there are:
- Traditional. They are a thread on which diodes are attached. They have a length of 5-12 meters.
- Light curtains - “rain” or “waterfall”. Several luminous threads are attached at a certain interval to one.
- Fringe. An LED window curtain garland is a type of rain shower, characterized by a shorter length and different levels of threads.
- Light grids. The threads are connected into a network.
- Garlands for trees, called clip-light.
- In the form of balls and icicles.
Each of these types finds its application in different areas.
Garlands can also be classified according to the type of food they supply. There are devices that are powered from the network - you just need to plug them into an outlet. Products of the second type require connection through a step-down transformer, since they operate on 12 V or 24 V. They are safer - even if the insulation is damaged, a person is not in danger.
Preparation for repair: materials and tools
For high-quality, quick and competent repair of New Year's garlands with your own hands, you will need the following materials and tools:
- Screwdriver with different sections
- Insulation tape
- Additional copper wires
- Voltage meter
- Multimeter
- Soldering iron
- Additional light bulbs as needed
Advice! When disassembling the garland, it is better to lay out all the small details on a large white sheet of paper. This way they won’t get lost and you can immediately find the part you need.
Repair of a Chinese product
Chinese garlands with permanent lamps can also be repaired. Pre-prepared:
- several identical garlands, they will serve as a donor of parts for a damaged product;
- tester;
- insulating tape;
- new lamps;
- wire cutters and a utility knife for working with wires.
The garland is disconnected from the network and the controller is disassembled, the soldering of the wires in the board is checked. Two pads for connecting the power cord are attached to one side, and five for color channels to the second. Moreover, one is located separately from the four; the common wire of all channels is connected to it. After checking the solders, the controller is closed.
Sometimes Chinese products contain lamps that short out when they burn out. This diode has less resistance than other lamps. The faulty part is replaced after de-energizing the garland. All connections must be soldered and insulated with tape. Due to the lack of shorted parts, the entire section of the same color goes out. In this case, check sections of the garland by cutting it in half. The lamp is then replaced, all cuts are connected and insulated.
Don't throw away a damaged Christmas tree garland. All damage can be repaired independently. Also, a broken or burnt-out lamp cannot be short-circuited, since the remaining diodes will begin to receive a higher voltage. This will lead to their burnout. After repairing the product, the entire cord and connections are inspected, and open areas are isolated.
How to fix a garland of ordinary light bulbs
A garland of ordinary light bulbs has the simplest device - a wire and incandescent light bulbs connected to each other in parallel or in series. This is the simplest garland device.
Usually the cause of the breakdown is either a damaged wire or a burned out light bulb. In a series connection, you will have to check each light bulb individually. But such garlands are practically no longer found.
With a parallel connection, a burnt-out light bulb is immediately visible and can be easily replaced. Damage in the wire is also easy to detect visually. In this case, it is enough to replace part of the wire using a soldering iron or simply connecting the wires by twisting.
Important! All replaced components must be securely insulated with special tape, as can be seen in the video of DIY garland repair. Otherwise, children, animals, or other household members may receive electric shock.
Problems and their solutions
Below are the most common breakdowns. You can actually repair the garland with your own hands: this will require attentiveness and accuracy.
Poor soldering quality
Poor soldering of supply and output conductors is the most common cause of backlight failure. In some cases, the contact is held solely by hot-melt adhesive, so its functionality is out of the question. It is enough to lightly touch the conductor, and the contact is completely broken.
Low-quality connections are especially common in Chinese-made garlands. Also, manufacturers from China, in order to save money, often use wires that are too thin, which easily break at the junction with the board.
Advice! To avoid tearing off the contacts, the soldering areas must be filled with a layer of hot-melt adhesive of sufficient thickness.
Another way to avoid wire problems is to avoid stripping wires with a knife. It is easy to excessively thin the wire during this operation. It is better to clean the conductor by heat treatment with a lighter.
LED damage
To find the faulty diode, disconnect the garland from the power supply. We start the test with the last LED in the circuit (the conductor from the power supply goes directly to it). An outgoing wire is connected to the same leg, which goes further to the next branch of the light channel.
You will need to test the LED between a pair of power wires (input and output). As a test device we use a multimeter with slightly modified probes. To upgrade the probes, we attach thin needles to their ends using thread. The point of the needles should protrude just a little - 5-7 millimeters. Apply a layer of insulating tape on top.
Since all the diodes are connected to the circuit by soldering, simply removing them from the lamp (as is the case with a regular garland) will not work. We pierce the insulating layer of the cores to find the copper wires.
Switch the device to LED ringing mode. We begin to pierce the supply conductors near each diode over and over again.
If the garland being tested is not 220 V, but 12 or 24 V, the working LED will light up. If we check a 220 V system, we pay attention to the multimeter readings. On serviceable parts of the circuit, the indicators will be approximately equal, but the defect will reveal itself as a break.
Chaotic flickering
Another common problem is light bulbs flickering randomly. The diodes blink for no apparent reason, their brightness changes chaotically.
The cause of this malfunction is the incorrect operation of the electrolytic capacitor. This element is usually subject to deformation - it looks somewhat bloated.
The way out of this situation is to replace the capacitor. Its nominal value is always written on the body.
If after replacing the capacitor the situation does not improve, the problem may be a burnt-out resistor. Such a defect cannot be detected visually, so in this case you cannot do without a tester. We measure the resistance, not forgetting to find out the rating for the component in advance. If the result obtained does not correspond to the nominal value, change the resistor.
No light in one of the areas
If there is no light at all on any of the channels, this could be due to one of two factors:
- Breakdown on the thyristor or diode of this channel. To make sure that the cause of the malfunction is correctly determined, we unsolder the channel wire on the board and connect a new channel instead of the old one (which definitely works).
- If the above method does not bring a positive result, the problem lies not in the garland, but in one of the board elements - a diode or thyristor. Using a multimeter, we check these components and, if necessary, replace them with working ones.
Dim lighting
There are situations when there is lighting, but one of the channels provides too dim light. In this case, the controller circuit functions without problems, and when pressing the buttons, normal mode switching occurs.
Testing the diodes using a multitester also does not give any results. There is only one possible reason left - poor quality wires. If any part of the stranded conductor is torn, the total cross-section decreases, which is reflected in the dimness of the light. This happens due to the fact that the required amount of voltage is not supplied to the LEDs.
To find a break, you will need to manually check the entire wire line. You will have to be patient, since the defect on the line is quite possibly located on the last thread being tested.
When the problem area is found, we disassemble the conductors on the LED, clean them (preferably with a lighter) and solder them again. Next, we apply an insulating layer using heat shrink.
Broken lamps
If one or more lamps are broken and you decide to repair the garland, it is recommended to simply replace one LED with another. It is technically impractical to repair such light bulbs.
Note! Replacement of diodes is carried out only when the power supply is turned off.
If there is no spare light bulb, remove the broken light source and connect the wires without its participation.
What is different about a garland of LED light bulbs?
A garland of LED light bulbs differs primarily in that it consists of a large number of wires and has its own control unit. A simple microcircuit is built into the control unit, but it is this that usually fails.
The microcircuit consists of the following parts:
- Dioid bridge
- Resistors
- Thyristors
- Capacitor
Thyristors are special controllers that control the operation of each branch of wires. If the device has four branches, then there are also four thyristors, if there are three, then there are three. Therefore, calculating thyristors and their breakdowns is quite simple.
Scheme and arrangement of the garland
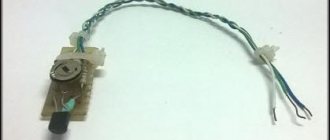
Externally, this is a set of light bulbs of different or the same color, attached to a long wire, which is connected to the power supply. It is the main control element for the decoration (turns it on and off, changes the glow modes).
On the outside of the box, all possible backlight modes are indicated in English. They can be changed by pressing one button.
If you open the power supply with a thin screwdriver, the tip of a knife, or simply by pressing your hand, you will see wires inside, soldered to the board. The largest cross-section is the supply wire. It supplies voltage to the entire garland from the network. Additionally connected to the board:
- resistors;
- controller that creates lighting effects;
- diode bridges;
- capacitor;
- thyristors for each channel of the Christmas tree decoration.
Circuit
Most often, the elements are soldered to the board. But it also happens that they sit on glue. Especially if the product is cheaply made in China.
How to fix a garland of LED light bulbs
If it was not possible to visually calculate the damage on the microcircuit, then to repair the Christmas tree garland with your own hands you will need a voltage indicator. With its help, by alternately switching on different modes with an open microcircuit, you can calculate the place where the current does not flow.
Important! All work must be carried out with rubber gloves, otherwise electric shock may occur. Once the problem has been identified, all that remains is to fix it.
Bottom line
As a result of the repair, 3 burnt out LEDs had to be removed. We check the work - the garland is working again. Naturally, you cannot leave the garland on unattended.
Another unusual search for faulty LEDs
You can also try to look for a faulty LED or light bulb using Brovin's camera. Working LEDs will light up if you lean them against a working kacher. Of course, this is not a very safe method from the point of view of the influence of interference on parts, but it can significantly speed up the search for a faulty part.
There is also the option of searching for a faulty section of the garland using a wiring detector. But this will not work if you have a garland with stranded wires.
Post Views: 332
One of the branches is broken or the thyristor is burned out
In this case, it is necessary to either replace the branch wire or replace the thyristor itself. The thyristor can be soldered with any metal material - copper, brass or other solder.
Replacing the branch wire is even easier - even a child can do it. However, it is important to reliably insulate the replacement area.
Visual inspection
It doesn’t matter what kind of garland you are repairing, be it LED or light bulbs. First you need to look at the integrity of its wire.
Start with a fork. There may be damage in this place, since it is not uncommon for the plug to be pressed when plugged into the network. The wires must be straight, without cuts or breaks. If there is at least one break, it needs to be corrected.
LED burned out
In an LED garland, usually all diodes on one branch are connected in series. In expensive garland versions they are connected in parallel. The most difficult thing is to calculate a burnt-out LED in a series connection.
In any case, you will need to replace the faulty light bulb, as well as the incandescent lamp in the old garland. It is also necessary to do the same with LEDs when repairing street garlands with your own hands.
Advantages of LED products
A Chinese garland, the circuit of which is built on LEDs, has a number of advantages.
- Economical. This is due to the low electricity consumption of LEDs. The following two advantages immediately follow from this.
- Durability. The service life of LED products is two or more times longer than the service life of incandescent lamps.
- Safety. LEDs, unlike incandescent lamps, can heat up to a maximum of 60 degrees. Therefore, they are less fire hazardous than their counterparts.
- Brightness. LED garlands are brighter and more pleasing to the eye.
- Frost resistance. LED products can withstand temperatures down to 40 degrees below zero without changes in performance.
- Moisture resistance. These garlands can be used to decorate bathrooms and wet greenhouses.
LED Chinese garlands are very convenient to use to decorate the outdoor part of the house. Due to their high moisture and frost resistance, such products will please the eye for a long time without repair.
If one of the colors glows dimly
This symptom indicates a break in the branch wire. That is, the wire is not completely broken, but at times it does not work properly and the signal does not pass through it well. It is necessary to carefully examine the entire branch, preferably in a lit state.
In this case, you need to carefully move the wire. If, when examining a specific place, a branch begins to go out or blink, it means the tear is right here. Next, you just need to replace the wire in this location.
Restoring broken contacts
Found a cliff? You can do without soldering.
It is enough to strip the wires and twist them.
Of course, it would be ideal if you have a stripper, but you can get by with a utility knife.
Carefully run the blade along the wire insulation in one direction, slightly pressing it along the surface and twist it. Do this carefully so as not to cut off any excess wires. You can also use side cutters or wire cutters. However, as a rule, garlands have rather weak wires and can be easily damaged by sudden movements. Therefore, it is better to use more gentle methods of removing insulation from wires. You can also remove the insulation with a soldering iron or matches. But this method is not very good either. Firstly, it produces a lot of toxic smoke. And secondly, it will not be possible to accurately measure the required length of insulation to be removed. And it may melt unevenly. We remove the insulation with a utility knife if there is no stripper. Next, bend the two wires parallel to each other and tightly twist their exposed parts together in one direction.
Now carefully move the twisted part of the wires back to the insulated side, and twist everything with electrical tape.
This type of twisting and insulation will be much better than if the wires were in one cavity, rather than parallel to each other.
An alternative to duct tape
You can also use heat shrink. But they have two main disadvantages compared to regular electrical tape. The first thing is that you need to accurately select the heat shrink in diameter so that it fits tightly around the wire after heating.
And the second is that it is much inferior to electrical tape in terms of insulation quality. Still, it is better to use electrical tape than simple heat shrink. Moreover, over time, heat shrinkage can completely move away from the insulated contact of the electrical circuit.
Capacitor failure
It is quite simple to identify a broken capacitor by its swelling - it will be immediately noticeable on the microcircuit. A broken capacitor also makes itself felt by the random blinking of all diodes.
The capacitor simply needs to be replaced with a new one by resoldering it on the board. You can get a new one either from the store or from another garland. These simple tips will help keep the garland in good condition, and it, in turn, will delight everyone in the New Year's mood.
Remaking a Chinese garland
Most consumers do not have a very good opinion about Chinese products. The garlands also do not stand out against the general background of goods from China: poor-quality connections, too thin conductors, cheap construction materials. As a result, such garlands (including their control units) often fail.
A breakdown of any of the circuit elements can affect the functioning of the garland. For example, a non-working capacitor causes light bulbs to flicker. A thyristor failure entails the shutdown of one of the channels. A burnt-out diode or a failed diode bridge lead to complete system inoperability.
Advice! If you need to change the flicker frequency, it is recommended to add a 0.5–2 µF capacitor to the circuit.
Damaged parts must be replaced with new ones. If you do not have sufficient knowledge in the field of electrical engineering or do not want to bother with repairs, an extremely simple but effective scheme is recommended. We connect the garland directly with a plug, and build a starter from a fluorescent lamp into one of the cable conductors. However, this scheme is only effective for ordinary light bulbs. As for the LED garland, its functionality will be restored in this case, but the light will become dimmer.
Photo of the garland after repair
Garlands with mixed (series-parallel) lamps
3.1. Multi-circuit ring type garland
The mixed (series-parallel) connection of lamps to mains voltage allows you to increase the number of lamps in one garland without using a powerful power source and without increasing the thickness of the wires.
Such garlands contain several serial circuits connected in parallel (Fig. 4): As you can see, additional circuits allow you to almost unlimitedly increase the number of lamps in one garland. In addition, if you install a lamp with a breaker (“blinking”) in each of the circuits, you can get a very beautiful decorative effect of their chaotic winking. It was on this principle that the Soviet double-circuit New Year’s electric garland “Salyut” was built (Fig. 9):
Foreign models using a similar principle can contain up to 5 circuits and up to 200 or more lamps in one garland. It would not be an exaggeration to say that the vast majority of modern garlands with direct power supply from mains voltage and a lighting effects controller are built according to this scheme (in this case, each of the circuits is powered by its own controller channel). Such garlands can have several typical configurations, which we will consider in more detail.
3.2. Multi-circuit thread garland
The series-parallel circuit for switching on lamps is the basis for constructing almost all multi-circuit garlands with a lighting effects controller. However, the easiest way to understand the principle of its operation is with garlands of the “multi-circuit thread” type, where the number of extraneous branches and other confusing “distracting maneuvers” is minimal (Fig. 10):
The most common options are with 4 and 2 circuits (in the first case, each of the colors in the garland is controlled separately, and in the second, the colors are grouped in pairs, most often “red-yellow” and “blue-green”). To control them, 4- and 2-channel controllers are used, respectively (they are NOT interchangeable!)
3.3. "Grid" type garland
With the advent of the mixed scheme, the number of garlands built on its basis began to grow by leaps and bounds. The second very popular option is commonly known as a “mesh”, as it has the appropriate configuration (Fig. 12):
In fact, this is still the same “multi-channel thread” laid in a certain way (Fig. 13):
Please note that the “grid” necessarily contains “extra” wires that perform exclusively a load-bearing function (they are shown in the figure as a gray dotted line).
3.4. Garland type "curtain"
This is another popular form factor of New Year's garlands, primarily intended for decorating large vertical surfaces - windows, showcases, walls, etc. In fact, it is the same “multi-channel thread”, but divided into parts connected by a common horizontal wire (Fig. 14):
In Figure 14, the gray dotted line shows the boundaries between the “threads” of the curtain (all wires within one thread are tied into one bundle).
3.5. Icicle type garland
In fact, this is a slightly modified (and slightly simplified) version of the previous “curtain” type garland. It differs in that different threads contain different numbers of lamps, as well as the lack of order in the controlled colors. Most often, garlands of this type are generally one-color, and may not contain a controller at all (Fig. 15):
What do you need to know about the garland?
Factory models are presented in a wide range, but the quality of many garlands leaves much to be desired. By making it yourself, you can choose all the component materials, in addition to saving on manufacturing and delivery costs.
Before making a Christmas tree garland or other lighting decoration, you need to decide on the following parameters:
- Type of light bulbs - there are LED, incandescent, fluorescent, and halogen bulbs.
- The method of connecting light bulbs is through parallel or serial connection in a circuit.
- Supply voltage - depending on the type of lighting fixture, a voltage of 220V, 24V, 12V, 3V or other ratings can be used for the garland.
- Current collection method - depending on the design of the light bulb, it can be done through a base, plug, soldering or connector.
In view of the fact that all points determine the operating parameters of the finished garland, they need to be thought through at the stage of purchasing or procuring materials. Let's look at these points in more detail.
Bulb type
Incandescent light bulbs are a fairly common type for creating lighting effects, but this characteristic is due to their relative cheapness and unpretentiousness. Incandescent light bulbs have a relatively low ratio of the luminous flux produced to the power consumed from the network. The design itself is quite fragile and is susceptible to mechanical stress; due to depressurization of the bulb, the light bulb immediately fails.
LED light bulbs - such lighting elements are the most modern and are increasingly crowding out all other types of equipment from the market. Such popularity of LED lamps is due to their significantly greater reliability and benefits for the garland. The glow of the LEDs in the light bulb produces the most favorable luminous flux in relation to the power consumed in comparison with other types of lamps, but they significantly react to the mains voltage parameters. Along with light bulbs for LED garlands, separately installed LEDs or strips with already assembled elements are used.
Fluorescent light bulbs are much more efficient in terms of the ratio of the generated luminous flux to the power consumption; they are superior to the glow of incandescent lamps, but are significantly inferior to LED lamps. But their operation is ensured by vapors of mercury and other gases, which, when depressurized, evaporate from the flask and can be harmful to health. In addition, such light bulbs require a certain time to warm up and fail at low temperatures, so they are not used for outdoor garlands operating in winter.
Halogen light bulbs are a convenient low-power option for making garlands. But, they have a relatively low ratio of lamp glow to power consumed from the network. But, unlike all the above-mentioned light bulbs, they are afraid of touching with hands; this model of garland can only be taken through a special glove or must be placed in a tube.
The most popular options for garlands are incandescent and LED bulbs. The element parameters are selected in accordance with the connection method.
Connection method
According to the method of connecting light bulbs, there are serial and parallel connections. Each of the schemes has its own characteristics in the power supply, which must be taken into account at the stage of designing the garland.
The serial connection of light bulbs in an electric garland is a connection in which the end of one element is connected to the beginning of the next. In this case, the current flowing through the garland will be the same for all light bulbs.
An example of a diagram of such a garland is shown in the figure below:
Rice. 1. Series connection of light bulbs
Here, mains voltage is applied to the garland, but each individual bulb experiences a voltage drop proportional to its resistance. Accordingly, it is necessary to calculate the voltage value for each element. If the applied voltage exceeds the rated voltage, a resistor is soldered into the circuit. If the voltage is less than the rated voltage, less current will flow through the network, resulting in a decrease in the glow intensity.
A parallel connection is the connection of the same terminals of LEDs or light bulbs to one point.
Rice. 2. parallel connection of light bulbs
Look at Figure 2 for an example of a parallel circuit. A feature of this connection option is the application of input voltage to each element, but the current flowing through the light bulb will depend on its resistance.
For both connection schemes, the power of the power source plays a role. For example, a garland for a New Year tree, powered from an electrical network, is limited only by the rating of the machine at the input. And the power supply that receives from the power supply will be limited by its factory capacity.
It should be noted that when connecting the legs of diodes or light bulbs in series, the burnout of one of the elements will lead to failure of the entire garland. But in a parallel circuit there is no such problem; if one light bulb burns out, the rest in the garland will continue to light.
The principle of operation of the driver in an LED lamp
The driver is considered a key part of the LED lamp; it essentially acts as a general power supply, carries out the process of neutralizing voltage drops, and this element redirects the direct current directly to the diodes, which then form the light emission.
Drivers can be capacitor or electronic. Each option has its own specific advantages and disadvantages. Electronic drivers are used on modern and high-quality dumps of branded products in the luxury segment; such elements rarely break. But condenser lamps, which are used in budget lamps, often require replacement or soldering of connections.
Driver circuits for LEDs from a 220V network
Specialized driver circuits clearly define the connection and operation structure. The basic version assumes that the alternating voltage that comes from the network must be pre-rectified, for which an LED bridge is used (available in all circuits). In the diagram, the values C1 and C2 indicate smoothing capacitors. In this case, the first option is an electrolyte, the capacitance of which is 22 μF, and the voltage is 400V, the second capacitor is made of ceramic and has the following parameters: 0.1 μF, 25V. The microcircuit provokes the generation of pulses that carry out the process of closing and opening the power format transistor Q1. The technical documentation for the LED lamp must certainly contain such a diagram (drawn, describing all the key components).
Why doesn't the lamp light up?
90% of the problems of all failed LED lamps are one burnt out LED.
Often you can determine it even by appearance. A black dot will be clearly visible on the yellow surface.
Sometimes there may be an obvious bulge or swelling instead.
Since all the diodes in the lamp are connected in series, the failure of one automatically interrupts the entire chain.
After you have found such an LED with a dot, pry it from below with a knife and simply cut it out of its place.
You should only have two contacts left on the site, scrape off everything else.
A small contact is a “plus”, a large one is a “minus”.
As a matter of fact, to restore the lamp’s functionality, these two contacts will need to be connected to each other with something.
Working with non-removable light bulbs
Some LED garlands have permanent lamps. Contrary to what you might think, this may be more of a benefit than an inconvenience.
In fact, they are the standard for commercial lighting due to their higher reliability and longer lifespan.
Even in this case, non-removable bulbs can burn out or become damaged over time and destroy the entire garland. In such cases, the repair may be difficult and it is better to entrust it to a specialist.