What power will it have?
Once you can answer each of the questions listed, purchase the required materials. You can easily buy the necessary materials in specialized stores. You will need wires, premium quality tape insulation, and a core.
The transformer itself requires winding. For these purposes, a machine should be created, the manufacture of which is carried out from a board forty centimeters long and ten centimeters wide. Several bars need to be attached to the board using screws.
The distance between the bars should not be less than thirty centimeters. Then you should drill holes eight millimeters in diameter. In the created holes you need to insert special rods for the device’s coil.
A thread should be created on one side. By tightening the equipped washer, you will get its handle. The dimensions of the winding machine can be chosen at your own discretion. First of all, the right choice directly depends on the size of the core. With its ring-shaped form, the winding is created manually.
According to the diagram of the transformer device, the device can be equipped with a varied number of turns. The required quantity is calculated based on power. For example, if it is necessary to create a device up to 220 volts, the power should reach at least 150 watts.
The shape of the magnetic wire should be O-shaped. You can make it out of a used TV. In this case, the cross section is determined using a certain formula.
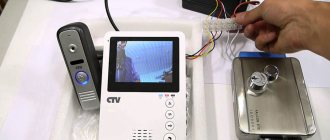
Electronic device for voltage conversion
People increasingly prefer LED light sources to gas-discharge light sources. Electronic transformers remained in outdated devices. They were intended for ignition.
From such converters you can make high-power power supplies (hereinafter referred to as PSUs), which are useful for powering LED assemblies, drills, hammer drills, screwdrivers, and jigsaws.
Electronic converter device
For quite some time now, the usual massive devices for transforming electricity began to change to electronic ones. The devices have the following advantages:
- reliability;
- compactness;
- simplicity;
- low cost.
In addition, they are easy to modify and improve. These characteristics significantly expand the scope of their application. All such converters have a single basic circuit; the differences are insignificant. The basis is a symmetrical self-oscillator. The main components of the circuit: rectifier, power and matching transistor, resistance, capacitors.
Considering the converter circuit, it should be noted that the unidirectional current from the rectifier enters the transistors of the autogenerator. These elements synthesize energy into a power converter. All radio components are selected in such a way as to obtain the required output parameter. If you start such a device without load, the autogenerator will not work, the output voltage will be zero.
Device assembly
An electronic converter can be purchased or removed from existing halogen or fluorescent lamps. But you can easily make the device yourself. Let's consider the manufacturing process of electronic transformers.
Required components
You will need the following items:
- Model plate.
- A rectifier with a reverse voltage of at least 400 V and a current of at least 3 A.
- Fuse link rated for current up to 5 A.
- Symmetrical trigger diode DB3.
- Resistance element 500 kOhm.
- Resistances 2.4 Ohm, 0.5 W – 2 pcs.
- Bipolar transistors MJE13009 – 2 pcs.
- Film capacitors 600 V, 100 nF – 3 pcs.
- Toroidal elements made of ferrometal – 2 pcs.
- Wire with dielectric coating with a cross section of 0.5 mm².
- Cable in PVC tube 2.5 mm².
- Transistor cooling element.
Most of the listed components can be easily removed by every novice electronics engineer from broken power supplies and from energy-saving lamps. Assembling an electronic transformer is quite simple.
Sequencing
First, you should purchase a circuit board on which all the components will be located. It is better to buy green, with double-sided metallization. Parts should be selected with long leads to avoid problems during assembly. If you use used elements, you need to do a visual inspection to identify external damage and check their functionality.
The matching and power transformers must be made independently. The first type of converter should be wound with a thin wire. To prevent the windings from disconnecting, they must be fixed with tape. The number of turns in the windings is:
- I – 7;
- II – 7;
- III – 3.
The power transformer has 2 windings. For the primary one you will need to make 90 turns of 0.5 mm² wire. For the secondary - 12 turns with 2.5 mm² wire.
Use new generation soldering irons with adjustable power for soldering. This will minimize the chance of burning heat-sensitive elements.
The circuit must be assembled from small components to larger ones. If you install large elements first, they will become an obstacle when soldering small ones.
All component connections must comply with the electrical diagram. Direct the legs of the semiconductor devices into the holes on the model plate and shape them in the required direction. When the contact length is not enough, the missing piece of wire is soldered.
At the end of the work, fix the transformers on the board with special glue or epoxy resin, or using a clamp. After completing the assembly, connect a device with active resistance to the output terminals and make sure that the product is functioning.
Arrangement of the reel housing
The body is made of high-quality cardboard paper. Its inner side is slightly larger compared to the core part of the core. When using an O-shaped core, several coils will be required. With a w-shaped core, it is enough to use only one coil.
When using a round core, it should be wrapped using insulation. Then you can carry out wire winding. Once you are done with the primary winding, it should be covered with several insulating layers. After this you need to wind the next layer. The ends of the existing windings are brought out to the outside.
When using magnetic wire, the transformer body is assembled step by step:
- A certain size of sleeve with the required cuffs is cut out.
- Cardboard cheeks are created.
- The main part of the coil is rolled up into a special box.
- Cheeks are placed on the sleeves.
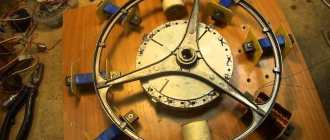
Creating windings for a magnifying transformer
You should put the reel on a block of natural wood. It is necessary to drill a special hole in it for the winding rod.
One of the serious stages involves connecting the current. The part is inserted inside the machine and winding can be done:
- Varnished cloth is wound on top of the coil in several layers.
- The end of the existing wire is fixed to the equipped cheek, after which you can begin to rotate the handle.
- The coils are laid as tightly as possible.
- After winding, you should cut the wire for subsequent fastening on top of the cheek near the first one.
- It is necessary to attach an insulating tube to the existing terminals.
Making the adapter
Quite often, the power supply of a power tool breaks down. You can purchase a new battery, which is not cheap. An adapter in the form of a power supply made on the basis of a transformer will help save money.
Required Components
To convert an electronic converter into a power supply, you need to buy the following parts:
- Circuit board.
- Overheat protection element NTC 4 Ohm.
- Resistance 6.8 Ohm, 5 W – 2 pcs.
- Resistance 500 Ohm, 2 W.
- Capacitance with parameters 100 µF, 400 V.
- Capacitance with parameters 100 µF, 63V.
- Film capacitor 100 nF.
- Rectifier device KD213B – 4 pcs.
- Metal plate for cooling diodes.
- Toroidal element made of ferrometal.
- Copper wire 1.2 mm².
Having prepared all the necessary components, you can begin to convert the electronic transformer into a power supply.
Algorithm of actions
The following steps must be followed sequentially:
- Shunt the rectifier output with a capacity of 400 V, 100 μF. To reduce the charging current of the container, add an NTC 4 Ohm overheat protection element to the open circuit. If this is neglected, the rectifier will fail when connected to the network.
- Replace the secondary winding of the matching transformer with a shunt. Wind 2 turns onto the power transformer, and 1 turn onto the matching transformer. To connect the turns, solder two parallel-connected 6.8 Ohm resistors.
- Wind 24 turns of copper wire onto the ferromagnetic rod and secure it with heat shrink tubing or tape. The result was a choke.
- On the mounting plate, assemble the remaining elements according to the diagram, and connect the assembly by soldering to the corresponding terminals of the transformer. Select the body and fix the structure in it. The power supply is ready for use.
After the process is complete, turn on the power supply and test. The device must output 12 V.
Assembling a magnifying transformer
If you need to learn how to create a transformer yourself, use the instructions. To assemble the booster device, it is important to completely disassemble the core. When using separately placed plates, it is important to determine the batch thickness and calculate the sheets.
If noise is produced when the device is turned on, it is necessary to secure the existing fasteners as tightly as possible. Then you should check the device for functionality. For these purposes, it is connected to the network, after which a voltage of 12V should be displayed.
It is important to know that when turning on the device, it is important to leave it running for a couple of hours. In this case, the transformer must not overheat.
What is construction expertise?Selling a share in an apartment
- Certificate of conformity for equipment
Cutting
Cutting occurs after applying the coil drawing to the material. This is done using a regular construction pencil or even a marker.
The tools needed for cutting vary depending on the thickness of the PCB. For sheets up to 1.5 millimeters, whose cutting is carried out in a cold state, guillotine shears are used. And if the sheets are thicker, then a circular saw is used. Textolite with a thickness of 3 millimeters or more is sawed at a temperature of 80 degrees Celsius with a saw.
Tools
To make a transformer yourself, you should take tools, as well as certain materials:
- Lakotkan.
- A core for which a used TV is quite suitable.
- Thick cardboard paper.
- Boards and bars made of natural wood.
- Steel rod.
- Saw, special glue.
Making a transformer with your own hands, as in the photo, is not at all problematic. If you need to make a transformer designed for halogen light bulbs, then you can also use the tools listed above.
Do not forget that it is very important to adhere to the winding process. If you strictly follow the important rules, the device will serve you for more than a decade. These materials, as well as tools, will be enough for you to create a high-quality and practical transformer with your own hands.
Based on such a homemade product, you can create a transformer for recharging a machine battery, or create a step-up device for a laboratory power source, a wood burner, or another device that will satisfy the needs of a DIYer.
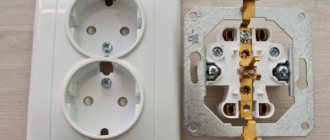
How to choose materials
When making a step-down transformer from 220 to 12 Volts, it is important to use high-quality materials - this will ensure high reliability of the device that you will subsequently assemble on it. It should be noted that the transformer allows for decoupling from the network, so it can be installed to power incandescent lamps and other devices that are located in rooms with high humidity (showers, basements, etc.). When making your own coil frame, you need to use durable cardboard or textolite.
It is recommended to use domestically produced wires; they are much stronger than their Chinese counterparts and have better insulation. You can use wire from old transformers, as long as there is no damage to the insulation. To isolate the layers from each other, you can use either plain paper (preferably thin) or FUM tape, which is used in plumbing. But to insulate the windings, it is recommended to use fabric impregnated with varnish. It is necessary to apply insulation on top of the windings - varnish cloth or cable paper.