Moreover, they are universal and allow you to install not only infrared, but also any other type of device, for example, oil or convection. The options presented below are arranged from simplest to most complex. Each subsequent one eliminates the shortcomings of the previous one and gives new opportunities to the consumer, but at the same time installation becomes more complicated and increases the amount of materials used.
Basic connection diagrams for infrared heaters
1. Direct
2. Through a thermostat plugged into an outlet
3. Through a stationary mechanical/electronic thermostat
4. Via thermostat and contactor
Connection options diagrams
Any type of thermostat requires proper connection.
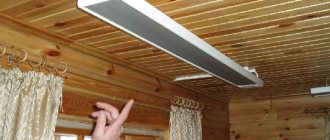
For this purpose, you can use several diagrams that reflect all the features of the process. You should first take into account that you cannot place the heater with a regulator close to heat sources or in rooms with high humidity, as this will lead to incorrect operation of the control system. Infrared panels will easily complement any interior
To operate you will need an automatic type relay. This element will act as a power source for the device. After selecting all the necessary parts, you can use one of the following connection diagrams:
in the first case, you can use 1 heater and 1 thermostat. The machine has 2 pairs of wires, one of them is directed to the thermostat. One wire is neutral, the other is phase. The connection is made accordingly. Using the second pair of elements, a connection is made to the infrared heater;
You can connect one heater to the regulator using wires
Connecting two heaters requires wiring from a thermostat
When connecting several devices, an individual circuit is developed
Features of thermostat models
Connecting the regulator to infrared electric heaters from different manufacturers requires taking into account the features of the device. One of the most popular electric heaters from Ballu is the Bih series, which are ceiling models. They can be connected to a remote controller, and it is also possible to combine several heaters into a whole system. Electronic models of thermostats are often used for connection.
The thermostat is convenient for both ceiling and other infrared heaters
Ballu thermostats combine well with infrared electrical devices of the same brand. The kit includes connection instructions, which makes work easier. The mechanical device has a built-in air temperature sensor, as well as an adjustment wheel, the range of which is often from 5 to 30°.
The regulator and heater of the same brand go well together
The Timberk brand produces both infrared heaters and temperature control devices. Modern models of regulators are produced complete with a remote control, as they are connected according to a circuit diagram to ceiling heating systems. The operation of the device is visualized using multi-colored sensors. Many models have the ability to program shutdown with a delay of 13 hours, and the step is 60 minutes.
The Timberk range includes diverse and modern regulator models
Universal control devices of the Eberle brand and the Instata 2 series are suitable for infrared, water and air heating systems. Digital and push-button control, the presence of a control unit allows you to control one sensor. The result of the work is visualized on the display, it is possible to program the mode for 7 days in advance.
Eberle's assortment includes regulators for heating boilers, as well as for infrared devices
Many brands that produce infrared heaters supplement their range with various types of thermostats. This allows you to create a high-quality chain of devices from one company, which facilitates connection and ensures reliable operation of the system.
Recommendations for proper installation
Universal and simple rules for connecting control devices to infrared panels should be followed for safe and uninterrupted operation of the equipment. Basic tips for installing and placing elements are expressed as follows:
- one thermostat can be installed in each room heated by an infrared heater;
- The sensor can be mounted on the surface of the infrared panel, but a heat-reflecting screen must be installed between them;
- ceiling heaters equipped with a control sensor do not have a power of more than 3 kW;
- It is recommended to install the regulators at a height of 1.5 m from the floor level.
The regulator on the infrared panel has a laconic design and does not spoil the interior of the room
Video: design and connection of a mechanical thermostat
Equipping infrared heaters with a thermostat allows you to remotely or manually regulate the operation of the heating system. Thanks to such control, it is easy to create an optimal atmosphere in the room, eliminating overheating or insufficient heating of the space.
Installation Tips
An incorrectly chosen location for the thermostat is one of the main reasons why there is no effect from using this device. Having studied the diagram of how to connect the thermostat to the heater, some experts take the advice literally and mount the thermostat on ready-made networks, somewhere in the area between the machine and the heating device.
As a result, the device reads information about the temperature in the corridor or adjacent room and, based on this data, regulates the operation of the infrared heater. To avoid such mistakes and create truly comfortable conditions in the room, you should carefully select the location for installing the thermostat:
- installed in the same room where the heater is located;
- The thermostat should not be located directly under or near heating devices;
- To measure temperature correctly, it is not allowed to cover the device with curtains, paintings, or interior details;
- You should avoid placing in drafts, near ventilation openings;
- placement on cold and damp walls gives a strong distortion of indicators;
- It is not recommended to install it opposite a window, in direct sunlight.
Attention!
The optimal height for placing the device is 1.5 meters. This will provide not only the most accurate data, but will also allow you to independently monitor and regulate the operation of the device without unnecessary effort. Given the relatively small height, it is very important to securely fasten the device so that it remains in place if it is accidentally touched. At the same time, care should be taken to minimize this likelihood - both electrical and mechanical thermostats can be easily damaged, which will lead to incorrect readings on the device itself and to malfunctions of the infrared heater.
Watch a video about installing an infrared heater
Principle of operation
If we talk about the principle of operation of such a thermostat, it should be noted that this is not an ordinary household appliance, but an entire climate system with an intellectual twist. To better understand the essence of its work, you need to understand that this is not just a thermostat, but also a kind of sensor. After all, it not only measures the temperature, but also activates and turns off heating equipment if the temperature in a closed space reaches certain maximum values. At first glance, it seems that the thermostat for an infrared heater is the same as for others, but it has a difference. Typically, these devices simply measure the temperature at the heating devices, rather than in the room. Then the thermal relay is supplied in its own housing and is fixed at the owner’s request where he wants it. For example, it can be floor- or wall-mounted. In addition, thermostats allow you to:
- program the shutdown of the entire system after several hours of use;
- set an auto-start program at a certain time;
- maintain the selected temperature;
- create cyclic programs for various time periods.
How to connect a thermostat to an infrared heater
Using a thermostat is very convenient; you just need to determine how to properly connect the thermostat to an infrared heater in order to get the maximum effect from using this device.
Necessary materials
Preparing to install the thermostat will not take much time, nor will the installation itself. Even if you have no experience connecting thermostats, you can easily do all the work yourself.
But if you do not have experience working with electrical equipment and even installing a socket is difficult, and you are not familiar with the operating principle of an indicator screwdriver, you should not try to figure out how to connect a mechanical or electronic thermostat. In such cases, it is safer to entrust this work to a professional.
For those who are well versed in electricity and know for sure that before work they should turn off the power to devices and equipment, it is necessary to prepare the following set of tools:
- Drill or screwdriver. They are only needed to drill a hole in the wall to mount the thermostat.
- Pliers for working with electrical cables.
- Indicator screwdriver or tester.
- Pencil, tape measure. They will help determine and mark the place where the temperature regulator will be located.
Also for work you will need an electrical cable that will connect the thermostat and the infrared heating device, a collapsible socket and hardware for attaching the regulator and fixing the cable. When the materials and tools are prepared, you can begin marking and installation.
Electronic thermostat that controls the operation of the IR heater
Connection diagram
The connection diagram of the thermostat to the infrared household heater is selected depending on the device used, the experience and knowledge of the electrical installation specialist.
Standard
In the standard scheme, the thermostat is installed in a ready-made network between the heater itself and the circuit breaker on the panel. The starting point of the network will be the machine. Two wires come from it - phase and zero, which are connected to the corresponding contacts of the thermostat. There are also two wires coming from the thermostat, which are connected to the heating device.
This scheme is also convenient if two or three heaters need to be connected to one thermostat. Located in different rooms, they ensure the same temperature throughout the apartment. For their effective operation, the connection is made as follows:
- Two wires lead from the machine to the thermostat: phase and zero.
- Two wires come from the machine for each heating device.
- Infrared heaters do not connect to each other.
Parallel connection will allow you to safely control several devices at once, without purchasing additional controllers for each of them.
Options for connecting infrared heaters via a thermostat. Important: Serial connection is allowed for several heaters. But it is considered less convenient, so it is used extremely rarely
Using a magnetic starter
This scheme is a little more complicated and will take a little longer. But thanks to the use of additional equipment in the form of a magnetic starter, it is possible to connect several heaters to one thermostat at once, including equipment with higher power and industrial systems.
Devices are connected in the following sequence:
- A thermostat is connected to the machine using a cable (phase and neutral).
- The thermostat is connected to the magnetic starter through the output terminals.
- The magnetic starter is connected to heating devices.
In this case, the circuit for connecting the magnetic starter is calculated individually. This will ensure the devices operate safely and efficiently.
Using a magnetic starter
Types and characteristics of thermostats
A thermostat is a device that periodically measures the air temperature in a room and, depending on the results obtained, adjusts the operation of the heating device. That is, if the air temperature reaches the set point, the power is limited and the heater stops working. As soon as the air cools down, the device again enters the active phase, thus constantly maintaining the desired level of heat in the room.
The design and operating principle of temperature control devices can differ significantly from each other. There are two main types of thermostats:
- Mechanical.
- Electronic.
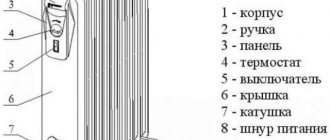
Mechanical type thermostat for infrared heater
The first version of thermostats is a small plastic box, the outer part of which is equipped with a switch. As a rule, it is round, which allows you to smoothly change its position. The division value may be different, for example, in some models it is 1°, while in others the transition occurs immediately from 2° to 5°, etc. In addition, on the body there is a power button and a light indicator indicating whether the device is active at this time moment.
There are also more modern mechanical models of thermostats that are equipped with a display. True, not so much data is displayed there, and the temperature is controlled using only two control buttons.
Helpful advice! It is convenient to use a mechanical thermostat only if one of the residents is present in the house for a significant time. This is an important point, since in the absence of people it is better to turn off the device. There is no remote control function.
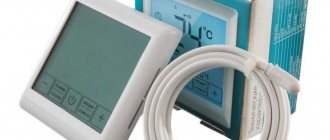
An electronic type of thermostat that controls the operation of an IR heater
Electronic thermostats have much greater control capabilities. The design and construction of these devices are constantly being modernized - even liquid crystal screens are used to manufacture modern models.
Depending on the selected model, setup and control can be carried out either using buttons or touch. Some devices use special hinged covers to protect the screen and create a more attractive appearance.
Such devices can be used without problems even in those houses where the owners are often absent or live seasonally. The device is easy to program and can be easily controlled remotely using mobile devices. The only difficulty in purchasing such a thermostat is the fairly high cost.
About the design of thermostats
Thermostats are divided into mechanical and electronic. The latter are more expensive, equipped with a liquid crystal display, and perform a number of additional functions.
Mechanical
A mechanical thermostat looks like a small plastic box with a circular knob for setting the temperature. Convenient risks marked with numbers will allow you to easily select a mode. The number 20 is replaced by a large convex circle. You don't need keen eyesight to find the icon. The trick helps people with poor vision and will also help the average person in the dark.
Inside the device there is a sensitive element that determines the accuracy of the device as a whole. Typical error is half a degree. Not bad at all. The limits for changing settings fall within the range of 5 – 30 degrees. Thermostats for infrared heaters are essentially reminiscent of a relay that is activated when the temperature in the room passes through a limit value. There are input and output contacts, the task of the device is to close and open the circuit between them.
The operating principle is mechanical, no external power is required. The response limit of the sensitive element is adjusted with a knob.
It is important to pay attention to the maximum operating power of the device. The thermostat for an infrared heater is capable of regulating the supply of electricity to a number of lines. It is permissible to install the only regulator per room or house
Example: thermostat power is 2 kW, the power of four heaters is 3.2 kW in total (1 + 1 + 0.6 + 0.6). Obviously, two regulators will be enough, each will control a pair of infrared emitters
It is permissible to install only one regulator per room or house. Example: thermostat power is 2 kW, the power of four heaters is 3.2 kW in total (1 + 1 + 0.6 + 0.6). Obviously, two regulators will be enough; each will control a pair of infrared emitters.
Electronic
A lot of temperature sensors have been released on the market.
For example, we will meet thermostats with an infrared sensitive element. As is known, heated bodies emit electromagnetic waves (devices on the topic of the article operate based on the phenomenon), they are perceived. The frequency of radiation is measured, which directly depends on temperature. This way the thermostat knows when it is time to stop supplying current to the infrared heaters.
The electronics are distinguished by a liquid crystal display and clarity; they will allow you to set a program, say, for a week in advance by day and hour. What you are prepared to do manually on mechanical models is done automatically here. This is convenient; heating can be started a quarter of an hour before arriving home. Which is basically impossible for mechanical thermostats.
The next step in evolution is “Smart Home” class devices. The thermostat communicates with the control center at a frequency of over 800 MHz and is capable of controlling a myriad of heating devices. There is no need to remind you that commands from a smartphone will help start heating the premises at the right time. This option is convenient if you are in a hurry and do not have time to turn off the heating. Wherever the owner is, the devices will obey.
Many devices are universal. Connecting the thermostat to the infrared heater can later be replaced with a Warm Floor system without hassle. The point is to correctly configure the sensors for measurement. Thermostats should not be exposed to direct sunlight or drafts. Devices should not be placed on the external wall of the room.
Most smart devices are equipped with self-monitoring functions. If the sensor fails, the heating devices are switched to 30% activity mode. This prevents the house from cooling completely and ensures that the premises do not overheat.
It is worth adding that electronic thermostats are many times more accurate than mechanical ones.
Connection recommendations
To increase the service life of the electronic temperature sensor, it is not recommended to install it in drafty areas or in places where there is active exposure to direct sunlight. Thanks to a simple thermostat connection diagram, almost any home DIYer can handle this job. However, first you need to decide on the connection method:
- Classical.
- Using a magnetic starter.
Both options are worth considering in detail.
Standard scheme
One of the important parameters of any thermostat is the power indicator. One device can be used to control several room heating devices. The number of heating devices that can be connected to it depends on the power of the thermostat. At home, it is quite enough to use devices with a power of no more than 3 kW.
Most often, thermostats have four contacts - two each for input and output. To connect the device, you need to stretch two conductors from the junction box and connect them to the input terminals. After this, the output contacts are connected to the heating system using two other wires.
If there is a need to connect two heating devices to the thermostat at once, then you need to decide on the type of connection:
In the first case, it is necessary to stretch two conductors from the output terminals of the thermostat to the first heater, and two more from it to the next one. When connected in parallel, four conductors should be drawn from the input contacts of the temperature sensor - two for each heating device.
Using a magnetic starter
This connection diagram for a mechanical thermostat is most often used to control several heaters. A magnetic starter is an electromagnetic type switching device. It is designed for use in networks with high loads. There are quite a few options for connecting a thermostat via a magnetic starter, but a home master only needs to know one.
At the first stage of the work, it is necessary to connect the regulator to the electrical network using two conductors, using the input terminals for this. Then the output contacts of the temperature sensor are connected to the starter, and it is already connected to the heater.
If everything was done correctly, then all that remains is to configure the regulator to the desired operating mode. Connecting the thermostat should not be difficult if you follow the instructions. However, you should not overestimate your strength, because the safety of family members depends on the quality of the connection.
How does a thermostat work?
Such a regulator consists of two main components:
- A temperature sensor installed near a heat source and/or in a heated room.
- A control unit that processes the signals from the temperature sensor.
These structural elements interact with each other according to the following scheme:
- The control unit receives the heater operating program, which indicates the temperature in the room or the degree of heating of the heating element.
- The temperature sensor reads the “degrees” in the room and/or at the heating element, transmitting this information to the control unit.
- The control unit turns on the heating element if the temperature transmitted by the sensor is less than the programmed value. And turns off the infrared panel if the temperature in the room or at the heating plate exceeds the programmed parameter.
As a result, ceiling and wall infrared heaters with a thermostat consume only the required “volume” of electricity, warming the room only to the desired temperature. In this case, calibration of heat transfer and temperature is carried out in steps of 0.1-1.0 °C
Typical types of thermostats
Modern manufacturers produce two types of thermostats:
Mechanical devices. Such regulators use a special plate or diaphragm made of a temperature-sensitive material as a temperature sensor. Therefore, thermomechanical regulators, in fact, do not have a control unit. The plate closes or opens the contacts of the electrical circuit that powers the infrared heater, “influenced” by the actual temperature in the house. And all regulation consists of fixing the set temperature using a mechanical lever, with the help of which the elements of the plate temperature sensor are positioned.
- The main advantage of such a regulator is the ability to operate without supplying electricity to the device.
- The main disadvantage is the low calibration accuracy - from 0.5 to 1 °C.
Connection diagram of an infrared heater to a thermostat
Electronic devices. The temperature sensor of such a device detects thermal radiation by reading electromagnetic waves of a certain frequency. At the same time, both the temperature “overboard” and the degrees in the house are controlled. The control unit of such a controller receives signals from the sensor and processes them according to a built-in algorithm (program). Electronic devices have only digital controls. The algorithm for processing signals from the sensor is set using factory programs or buttons on the case. Information about temperature and operating modes is displayed.
- The main advantage of such a device is high accuracy - calibration is carried out in increments of 0.1 °C. In addition, there is some control autonomy. For example, infrared heaters with a thermostat for a summer residence can be programmed to operate for a week based on the air temperature outside the house and not even leave the country to monitor and adjust the operation of the heating system. Mechanical regulators cannot do this - the user will have to “turn the adjustment wheel” almost every day.
- The main disadvantage is that it only works when there is voltage in the network.
How to connect a thermostat to an infrared heater?
When installing a thermostat, you need to follow the following generally accepted rules:
- A separate regulator is installed in each heated room.
- A heat-reflecting screen must be installed between the temperature sensor and the supporting surface.
- Infrared ceiling heaters with a thermostat cannot be more powerful than 3 kW.
- The recommended placement height is 1.5 meters from the floor level.
The installation of the device itself is carried out as follows:
- A separate line is “pulled” from the central panel to the regulator, which ends at the incoming “zero” and “phase” terminals.
- A power supply line is drawn from the regulator to the heater, starting from the outgoing “zero” and “phase” terminals.
- External temperature sensors are connected to the corresponding connectors of the thermostat, connected to the regulator using separate lines or wireless communication protocols.
Exact installation diagrams are given in the data sheets for specific models of control devices.
How to install an infrared heater yourself
Infrared panels are gaining more and more popularity every year. They are easy to use and provide quick heating of the room, and the built-in thermostat allows you to set the desired heating temperature in a few clicks. Moreover, installing infrared heaters yourself is quick and easy if you follow the instructions. Other advantages of this equipment include:
- long service life;
- noiselessness;
- safety;
- spot heating;
- Possibility of use in open space.
It is not surprising that many people are interested in installing infrared heaters themselves. This process does not require special skills and takes from 25 minutes to an hour and a half.
Preparation
Required Tools
In order for the installation of an infrared heater to go as expected, you must have the following tools:
If necessary, more complex equipment can be used. For example, if you are interested in installing several infrared heaters with your own hands, it is best to use a pyrometer for calculations. It will allow you to determine the warmest and coldest places in the room. Based on the information received, you will select the optimal location for each device.
Safety precautions
There is a set of measures that will prevent accidents both during installation and during operation:
- Do not install IR panels near flammable or explosive objects;
Electrical cables must be laid on a non-combustible base;
The fastener should not touch the heating element;
The height at which the panel should hang is 2.5-3.5 meters;
For a house or apartment, devices with a power of no more than 800 watts are purchased.
The device must not be turned on until installation is complete. The device must have an appropriate degree of protection if the panel is installed in a bathhouse or sauna. If all these rules are followed, the installation of an infrared heater will be quick and easy.
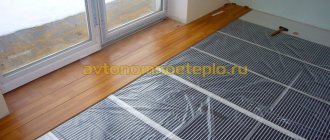
Installation recommendations
When installing infrared heaters with your own hands, the distance between the ceiling and the body must be at least 3 millimeters. In country houses, the panels are taken outside to heat the external space, for example, a summer kitchen. In such cases, to increase efficiency, it is necessary to place thermal insulation material or foil under the housing.
Installation process
To make the installation of an infrared heater as simple as possible, it is better to place the panel with the connector facing the wall. Most models have self-clamping contacts. The delivery package includes elements for attaching the device to the ceiling.
The installation process includes the following steps:
- remove the device from the packaging and place it on any flat surface with the heating plate down;
- mark the installation location and make several holes;
- screw in the screw rings;
- hang the chains, adjusting the height (if necessary).
Secure the device using mounting hooks or brackets.
As you can see, installing infrared heaters with your own hands is not a particularly difficult process. The panels can also be mounted on the wall, but the heating effect will be significantly less.
Installation of different models of IR heaters:
Network connection
The device is connected to a thermostat, which will maintain the desired temperature. This is done through three terminals: “ground”, “phase” and “zero”. Accordingly, the supply cable must be three-core. As an option, you can use PVA 3x1.5.
The ends of the cable are connected to the terminals. The polarity is indicated on the ends of the wires. After the device is installed and connected, it is advisable to wipe the panel with an alcohol solution before turning it on.
Connecting multiple devices
If you are interested in installing infrared heaters with your own hands in large rooms, then you need to take into account that you will need several devices. To ensure coordinated operation, all panels are connected to one thermostat. This will allow you to effectively regulate the temperature throughout the facility.
Features of different installation schemes
The IR heater is connected as standard, like all electrical devices. This can be a connection through a socket or a separate line drawn from a separate one on the electrical panel. That is, there are two wires: neutral and phase.
The thermostat is mounted in the network between the machine and the heating device. Simple circuit for one or two heaters
: The thermostat has four terminals: two input (phase and neutral) and two output (also “+” and “-”).
If there is only one heater
:
- two wires are laid, which are connected to the corresponding terminals of the thermostat;
- two wires are attached to the output terminals of the latter, taking into account the polarity - they are connected to the IR heater. This is a serial connection.
If there are two heaters
:
- You need to remove four wires from the thermostat (two phases and two neutrals) and route the wiring to the heaters. This is the so-called parallel connection.
- You need to remove two wires from the thermostat, connect them to one heater, and then to the second. This will be a series connection of two heaters.
In some cases, you will need to connect the phase directly (from the machine to the heater), and the neutral through a thermostat. The disadvantage of this method is that the thermostat does not work correctly. Complicated connection diagram for several heaters
:
- The thermostat is connected to the machine on the electrical panel;
- the output terminals are connected to the magnetic starter;
- the output contacts of the starter are connected to the heater.
This type of connection is suitable for industrial heaters or multiple IR heaters. assumes operation in automatic mode.
In conclusion, I would like to remind you that any powerful electrical appliances, especially heating or heating ones, require increased attention to safety measures.
First of all, this concerns grounding. The heater must be equipped with conductors of sufficient thickness and low resistance. In fact, the protection must remove excess current of any unimaginable magnitude. Human life depends on it!
Connecting a thermostat is not the easiest task. Even if you easily understand all the intricacies of the process, you may not have enough skills in handling tools. Having installed everything according to the diagrams yourself, you need to ask a specialist to check your work again.
Main process
Hanging the case
First you need to determine the installation location of the infrared heater in the house (or apartment). As we said above, the housing can be placed both on the ceiling and on the walls, depending on the individual preferences of the owners.
The first thing you need to do is mark out the mounting locations yourself. To do this, use a tape measure to measure the same distance from the ceiling to the selected area. It is also recommended to use a building level, with which you can level the brackets in a horizontal plane.
After marking, proceed to drilling. If the ceiling (or wall) is made of wood, drill holes with a drill. If you have to deal with concrete, you cannot do without a hammer drill. You need to drive dowels into the created holes and screw in the brackets, after which you can install the infrared heater in its place.
Please note that the design of the unit varies. Some products have guides that are fixed into brackets. A simpler option is chains attached to the ceiling (special holders attach to them)
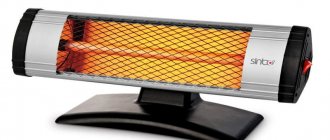
Also on the market you can see infrared heaters on a leg, which are simply placed on the floor
A simpler option is chains attached to the ceiling (special holders attach to them). Also on the market you can see infrared heaters on a leg, which are simply placed on the floor.
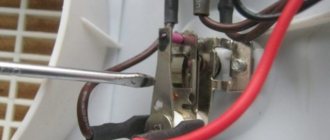
Electric installation work
First you need to connect the contacts of the collapsible electrical plug to the thermostat terminal blocks, which are installed in the product body. Each “socket” has its own designation: N – zero, L – phase. It should be noted that there are at least two of both zero and phase terminals (from the network to the regulator and from the regulator to the heater). Everything is quite simple - you strip the wires, insert them into the seats until they click (or tighten the screws). Be sure to follow the color coding of the wires so that the connection is correct.
For your attention here are the correct connection diagrams:
As you can see, connecting an infrared heater through a thermostat is quite simple, the main thing is not to mix up the wires and tightly tighten them in the terminal blocks.
A very important nuance is the correct choice of location of the regulator. You should not install the product next to a heater, because in this case, the incoming warm air will negatively affect the accuracy of the measurements. It is best to place the device in a more distant area, at a height of one and a half meters above the floor.
Also note that you need to install the controller in the coldest room, otherwise the heating problem will not be completely solved. As for the number of infrared devices served by one temperature controller, it all depends on the power of the heaters. Typically, one 3 kW controller is used for several products, with a total power of no more than 2.5 kW (so that there is a reserve of at least 15%)
Typically, one 3 kW controller is used for several products, with a total power of no more than 2.5 kW (so that there is a reserve of at least 15%).
You can read more about connecting a thermostat to an IR heater in our separate article, which provides several installation diagrams!
So that you can clearly see the entire connection process with your own hands, we provide these lessons for viewing:
How to connect a temperature controller
Zilon IR-0.8S
Model Zilon IR-0.8S can be installed both on the wall and on the ceiling. The device comes with a thermostat for checking the set and actual values. Protection is provided by automatic blocking and shutdown of the device.
The main parameters of this model are as follows:
- power is about 0.8 kW;
- overall dimensions 1.19x0.13x0.04 m;
- weight 3.2 kg;
- there are no side emissions of carbon dioxide into the room;
- low power consumption when the heater is operating.
This model has some disadvantages. In particular, when the temperature increases or decreases, the device produces noise in the form of crackling.
When installed on the ceiling, the floor in the room does not always warm up well. But from a price-quality point of view (price is about 2,400 rubles), it is quite worthy of close attention.