An oil heater is known as a reliable heating device. Its failure indicates a problem. If the equipment is under warranty, it is taken to the service center if the necessary documents are available. In other cases, consumers who understand electronics undertake repairs themselves. There may be several reasons why an oil heater breaks down. They are identified and ways to eliminate them are analyzed.
To identify malfunctions of an oil heater, you need to have a minimal understanding of electronics
Is it possible to repair an oil radiator?
Damage to the heater is caused by electronic or mechanical failure. In the event of electrical equipment failure, pay attention to the heating element, control unit, fuses, relays and switch. In rare cases, the cause of the malfunction is the electrical wiring.
Mechanical damage includes breakage of the housing, rupture of sections from which oily liquid may leak. This malfunction is determined by inspecting the location of the oil heater. If there is an oily stain under the device, the housing is damaged.
Sometimes during diagnostics, specialists identify complex breakdowns with the replacement of expensive parts. In such cases, it is cheaper to purchase a new oil heater than to repair the old one.
How to replace the heating element in a water heater?
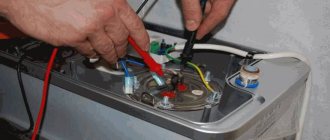
To carry out repair work, you will need a screwdriver, pliers, keys, a tester, as well as rags and napkins. The procedure for replacing a used heating element in a water heater consists of several sequential steps:
disconnecting the water heater from the network; draining all water from the tank (a description of the draining process is available in the product data sheet); dismantling the water heater (you can replace it without removing the device from the wall, if this is convenient); dismantling the cap (outer cover) covering the electrical part of the household appliance; unscrewing the bolts (nuts) of the flange holding the heating element during its operation; carefully remove the heating element from the container (it is recommended to do it over a bucket or basin to avoid water with sediment getting on the floor); checking the functionality of the heating element (inspection, ringing); cleaning the internal tank from scale and rinsing it with a stream of water; installation of a new heating element of the same power (it is recommended to purchase spare parts in specialized stores, paying attention to the quality of workmanship, since fakes quickly burn out); correct connection of all connecting wires (if replacing yourself, take photographs of all connections before disassembling); installation of a protective cap; connecting the water heater to the water supply and electrical networks; eliminating leaks, if any; switching the switch into working condition after the tank is completely filled with water.
The procedure for removing the heating element from the casing of a storage water heater is not for white-handed people. The tank and all internal parts are washed to remove scale and sediment.
The magnesium anode is mounted separately on the flange of the heating element in close proximity to it. When water is heated, magnesium, being a more active metal compared to iron, enters into electrochemical reactions with heavy metal compounds found in water. In addition, magnesium, by binding oxygen released during water heating, provides protective protection for equipment.
Read more: How to clean a refrigerator inside and outside, the best means and instructions
Repair work is carried out approximately according to the same algorithm as when replacing a heating element in a water heater. First, disconnect the device from the network, then turn off the water and drain the contents of the tank into the sewer. Using ordinary tools, remove the decorative panel and get to the flange on which the magnesium rod and heating element are attached.
View of a new magnesium anode and a storage water heater worn out after a short period of use. The harder the water, the faster the part deteriorates.
The flange is removed, the anode is inspected and, in case of extensive damage, replaced with a new part. In this case, the worn rod is unscrewed, and a spare part purchased from a specialized store is screwed into the vacant space. After rinsing the tank from scale, reassemble the equipment in the reverse order.
When choosing a magnesium anode, pay attention to the length and diameter of the part, as well as the dimensions of the threaded rod
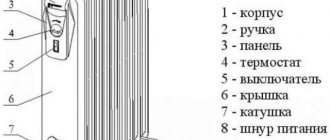
Oil heater device
The appearance of the device is a sectional heating radiator in the form of an accordion. The sealed container is filled with oil and contains 15% air, which prevents the metal from rusting.
The heater housing includes the following elements:
- double heating element;
- thermal fuse;
- thermal relay;
- switch;
- indicator;
- plumb line;
- electrical wire
The electrical device contains a heating element, a relay, a fuse and a switch.
The principle of operation of the device:
- When the device is turned on, the heating element heats up to the set temperature. You can enable 1 or 2 elements at the same time.
- The heating element heats the body and the filling of the sections, which maintains the temperature of the elements.
- The temperature sensor sends a signal to turn the heating element on and off.
- When the set temperature is reached, the heating element turns off, and when cooled, it turns on again.
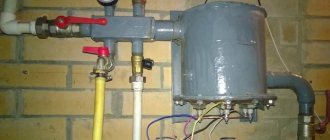
Operating principle and design of a gas-type convector
Let's consider a gas convector; its operating principle is very simple and is based on the ability of gas to change properties as the temperature level increases. When cold air passes through the heat exchanger of a convector device, it heats up, decreases in weight and begins to rise. Next comes new portions of air masses. This process is called convection.
The convector can operate on liquefied gas and natural gas.
To change the device's power source, you need to reconfigure the gas valve. Most often, a gas convector is placed under a window. This allows the unit to operate more efficiently. Since it is in this place of the room that heat loss is greatest.
Let's consider the device of a gas convector for heating a living space. As a rule, the device consists of the following components:
- Frame. Performs protective and decorative functions. Made from high strength metal. The surface is treated with heat-resistant paint with anti-corrosion properties.
- Heat exchanger. Designed to heat air.
- Gas-burner. Located inside the heat exchanger. Consists of the main and ignition parts.
- Combination valve. Allows you to control the gas pressure level.
- Combustion product removal system.
- Tangential fan. Responsible for the rate of supply of heated air, improves the process of heating the room.
Depending on the device, all devices are divided into two types: fireplace and parapet. The operating principle of a fireplace type is similar to that of a conventional stove. Parapet options are safer and more environmentally friendly. They are easier to install. Therefore, it is the most widely produced and used type.
Malfunctions of oil heaters
Analysis of device failure is carried out using special tools:
- pliers;
- screwdriver;
- soldering iron;
- ohmmeter;
- solder;
- alcohol;
- knife;
- rags.
To work, you will need a set of certain tools.
There are a number of typical heater malfunctions. Weak or excessive heating indicates a breakdown of the thermostat. Traces of oil on the housing portend depressurization of the radiator. A blown fuse indicates a malfunction of the electric drive. The reasons are determined by “dialing” the device’s microcircuit.
The heater does not turn on
In this case, a thorough external inspection of the power cord is carried out. The wire may fray at bend points. If the cord is in order, check the integrity of the plug contacts.
A visual inspection of the electrical wiring of the device modules will help identify problems.
If no visible defects are found, use an ohmmeter to test the cable.
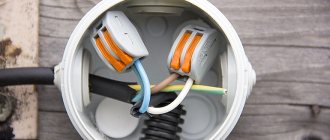
When repairing an oil heater with a fan, the connection points of the wires to the busbars are also inspected. If the terminals are burnt out, they are replaced with new ones.
The device measures the presence of current in the network throughout the entire circuit.
Darkening indicates a short circuit. Burnt out parts are removed or cleaned from carbon deposits on batteries. The contacts are cleaned with sandpaper and wiped with alcohol.
Attention! The heating appliance must be kept clean. Dust and debris, accumulating on the walls inside the case, can get onto the terminals and cause a short circuit; the debris is removed with a vacuum cleaner.
Damaged busbars are replaced; if there are no new elements, they are cut out of a sheet of brass to the size of the old terminals. If the bimetallic plates are damaged, they are replaced with new ones.
The radiator gets very hot or does not heat well
These polar faults indicate one problem - a breakdown of the thermostat. The module is removed and inspected. If the settings are lost, the armature stroke is set to 1.5-2.5 mm. If the damage cannot be eliminated, the part is completely replaced with a new one.
After installing the module, close the box and check the functionality of the device
Oil leak
If a leak is found on the body of the oil heater, depressurization of the metal body has occurred. To eliminate the problem, perform a visual inspection at the leak site. If necessary, drain the oil and solder with silver solder. Fill the system with water and check the device for leaks. If the housing does not allow liquid to pass through, drain the water and turn on the device to dry. Then fill with oil heated to 90 0C.
If the housing leaks at the joint, seal the joint with heat-resistant sealant
Attention! It is not recommended to mix oil, since it is not known what type of oil was filled in previously, synthetic or mineral.
If a significant amount of oil is lost due to a leak, it is completely replaced with transformer oil.
Extraneous noise
Crackling in the radiator occurs for several reasons:
- When assembling the device in a damp workshop, water could get on the internal walls; when heated, it turns into a gaseous state, producing noise.
- When carrying an oil heater, oil is mixed with air, and when heated, these bubbles begin to come out and burst, producing a crackling sound. When heated, the noise disappears.
- A constant crackling noise is evidence of an electrical fault. In this case, they find the cause and eliminate the breakdown. This heater must not be used.
Also, when heated, parts expand and change in size, which leads to cracking; when fully warmed up, the noise will disappear
Bimetallic plate
A constant crackling sound indicates a malfunction of the thermostat. A bimetallic plate changes its linear properties when heated and cooled, since it consists of two types of metal. If the contacts are fixed too rigidly and do not allow the plate to bend freely, they are loosened so that they do not short-circuit.
If the bimetallic thermostat is damaged, the damage is determined using an ohmmeter. The resistance in the normal state in different positions is 0. Otherwise, the contacts are ground with sandpaper, wiped with alcohol and connected.
If prevention does not help, replace the part.
Thermal relay
Typically an oil heater has 2 heating elements and 3 temperature settings. In this case there are 3 thermal fuses.
The parts are contained in fiberglass tubes. A breakdown is detected by measuring the resistance in the network. If the thermostat is faulty, it must be replaced.
After installing the element, check the functionality of all parts in the circuit
Failure of the heating element
The tubular electric heater consists of a shell, a nichrome spiral and quartz. The thermostat terminals are connected through non-polar insulators. The most common failure of heating elements is the breakage of the nichrome thread. The resistance is checked with an ohmmeter probe connected to the terminals of the heating element. The number 1 on the display indicates a thread break.
Heating elements of different power are located parallel or perpendicular to each other
Experts say that repairing heating elements is fraught with difficulties, as a result of which they come to the conclusion that it is cheaper to buy a new oil heater.
Drop or position sensor
The element in its normal position acts on the limit switch, which closes the network. If the device “fell”, the circuit does not close and the oil heater does not turn on.
The fall sensor consists of a weight and a spring lever
The element is connected to the circuit by two wires. If the resistance at the ends of the sensor is 0, the module is working, otherwise the part must be replaced.
Making a heater from improvised materials
How to make a homemade oil heater? Many video reviews on social networks are devoted to this topic. The principle of collection is identical everywhere, only the external indicators and the purpose of the heater differ.
The article presents an average option that is suitable for both a garage and a cottage or home. The appearance of the radiator and its functionality will depend on your capabilities, skill and availability of materials.
Preparation of material
A set of necessary materials will probably be found in the garage of every car enthusiast or skilled home craftsman. What you will need to create a heater:
- metal pipes or cast iron battery,
- heating element,
- new or used oil,
- wire with plug,
- welding machine if you plan to form the required dimensions of the structure.
Let us dwell in more detail on the principles of material selection.
The battery can be used, the main requirements are integrity, absence of external and internal contamination. For remodeling, time-tested cast iron samples are usually used.
Metal pipes can be used in different diameters, shapes and lengths; the thickness is also chosen at your discretion. The more area you need to heat, the larger your design should be. Radiators from cars and sealed metal containers are also actively used for the body.
Characteristics of the heating element for a homemade heater:
- 220V voltage is sufficient for connection,
- power 1.5–5 kW.
These parameters will be sufficient to heat a garage area and an average room.
You can use used car oil for the radiator or purchase new one. Before adding used oil, it is recommended to filter it and remove impurities and dirt.
Heater stand
Craftsmen offer two options for installing an oil heater: floor-mounted and wall-mounted. The most advantageous and convenient is wall-mounted; it takes up little space and is quickly hung in the chosen location on hooks deeply and firmly planted in the load-bearing wall.
Making a floor stand is not difficult. To do this you will need a metal corner or profile. Dimensions are selected based on the overall dimensions of the structure. We arm ourselves with a welding machine, a grinder and get to work.
- We draw a diagram of the structure of the legs and calculate the dimensions of the elements. It is recommended to provide for the possibility of disassembling and removing the stand in the future. It is possible that you will want to remove it during the warmer months.
- According to calculations, we cut all the parts of the future stand and sand the edges.
- We weld all the workpieces according to the diagram.
- We clean the welds and paint.
Working with pipes
Let's move on to more complex work - forming a body from metal pipes. First of all, we draw a drawing and determine the main parameters of the elements. Only after careful calculations can you start working with the grinder.
- We cut the pipes according to the diagram and carefully clean the ends.
- We weld the structural elements and install plugs; the tightness and operation of the entire radiator as a whole will depend on the quality of work.
- One of the lower ends must be left free. In the future, a heating element will be installed there. In the upper part it is required to provide a safety valve and a filler plug; it is made in the form of a welded squeegee with a coupling. The valve will allow you to control the pressure and secure the structure.
- We carry out piping using pipes of smaller diameter.
Installation of heating elements
The part of the homemade body responsible for working with electricity is easy to do and does not require special knowledge. You will need a heater radiator, a heating element, a gasket made of thermo-oil-resistant material and a wire with a plug.
The step-by-step steps for installing the heating element are as follows.
- We cut out the metal plate to which the heating element will be attached.
- A hole is drilled or cut out by electric welding in the plate to install the heater fasteners.
- We weld the plate to the end of the lower pipe. Previously, this place was specially left for installing a heating element.
- We process the seams after welding and install the heating element.
Now you can begin laying the gasket made of special heat-resistant rubber and attaching the electrical wire. At this point, you can complete the assembly and start filling in the coolant, namely oil.
Important: according to safety rules and technical standards, the amount of oil per total internal volume should be 80–85%.
Causes of malfunctions of oil heaters
The most common breakdowns are loose contacts. The cause of the malfunction may be dust that accumulates in the device body. To prevent malfunctions, preventive cleaning of the housing with a vacuum cleaner should be carried out 3-4 times a year.
Oxidized contacts can also cause breakdowns. This occurs due to high humidity. Moisture gets on the electrical wiring and the contacts oxidize. To eliminate such problems, the wires are stripped and wiped with alcohol, then reconnected into the circuit.
Intermittent mains voltage may cause the fuse to break.
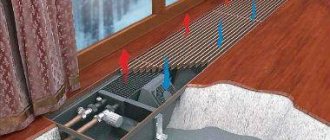
Types and design of convector
The convector device enhances natural convection, as a result of which air heated by heating elements or a coolant rises upward, and cold air falls down.
Convectors are divided according to their characteristics:
- Installation type: floor, wall (horizontal, vertical or ceiling), built-in.
- Heating principle: water, gas, electric, infrared.
- Circulation principle: natural, forced.
Floor convectors are mobile, but they need a constant connection to an outlet. Wall convectors are more common and have a small thickness. Wall-mounted convectors have a variety of attractive designs, attract little attention and do not spoil the overall interior.
The installation of such a convector must be thought out in advance - at the construction stage, because This type of convector requires niches, channels, and supply coolant. These convectors look like a grate in the floor through which warm air rises.
Water convectors made of copper and aluminum or other materials are a good alternative to radiators. The gas convector system is the most economical due to the affordable cost of fuel, but such a convector is more dangerous, so they are extremely rarely used in residential premises.
Convectors with forced circulation have a fan that increases the speed of rising warm air and cools the heating element. With the help of an electric convector you can quickly heat your house, because... they do not require pipes, a heating boiler, etc. to operate. To calculate the number of convectors sufficient to maintain a comfortable temperature in the room, it is enough to have the dimensions of the room, the number of windows and a calculator.
The most common brands of convectors that can be purchased in Moscow and other cities:
- Timberk;
- Ballu;
- Noirot;
- Thermia.
The use of electric heaters is permissible in any room where there is an outlet, subject to safety precautions.
The design of almost all convectors includes:
- Thermostat;
- Electronic rollover sensor;
- Thermal fuse;
- Screen.
The thermostat regulates the temperature of the heating mechanism and the air leaving the convector. On models in the lower price range, mechanical thermostats are installed, which regulate the temperature more roughly. Models in a higher price category have electronic thermostats. Electronic thermostats allow you to more accurately set the temperature value - down to 1/10 of a degree. In everyday life there is no need for such precision in adjusting the temperature value, so using a convector with a mechanical thermostat will not cause discomfort. To quickly heat the air, the thermostat value is set to the maximum value; after warming up, the value can be set lower.
It makes more sense to use a convector with an electronic thermostat in rooms where strict temperature conditions must be observed. Convectors also have a voltage supply switch to the heating element. It allows you to turn on all heating elements separately or at once. Convectors with a power of 1,500 - 2,500 W have several heating elements.
Because If there is a possibility of floor-type convectors tipping over, which can cause a fire, they are equipped with a safety device that turns off the power to the heating element. Disconnection occurs due to the opening of contacts in the event of a fall, when the value of the specified angle changes. The thermal fuse protects against overheating by turning off the fuel supply (gas, electricity) when the required temperature is reached. The screen or air damper serves to direct the air flow.
How to repair an oil heater with your own hands
Stages of repairing a heating device:
- Before diagnosing damage, the oil heater is disconnected from the power supply.
- Perform a visual inspection of the power cord and plug.
- The control panel is effortlessly disconnected from the body and the circuit elements are inspected.
- Diagnose the network using an ohmmeter.
- Check the terminals and strength of all contacts of the elements one by one. Diagnostics of the chain modules is carried out one by one, carefully inspecting the mounting points
- Defects are repaired by grinding, degreasing and soldering contacts.
- If a faulty element is detected, it is replaced.
- If mechanical damage is detected, the hole is sealed with heat-resistant sealant.
Advice! When repairing joints, experts advise using “cold welding”. The material is heated in your hands, rolled into a ball, after which it is pressed tightly to the leak site, the sealant hardens after 20 minutes.
If the hole is covered with rust, you must first thoroughly clean the surface with sandpaper. The gap is sealed using brass or silver solder.
Do-it-yourself oil radiator repair on video:
How to fix a temperature controller
The serviceability of the oil heater depends on the condition of the temperature controller. If the node fails, the device will not be able to turn off and start up again in time. Repairs are performed as follows:
- Open the control unit of the device and ring the section from the power cord plug to the thermostat.
- Set the lowest temperature and test the relay - the circuit should be open.
- After turning on the heating element, the dialing is performed again. At this moment the circuit should be closed.
- If a malfunction is detected, the regulator is removed from its seat and replaced with a new one.
There is no point in repairing the thermostat in an oil heater. It is difficult to do this yourself, and purchasing a replacement part does not require large expenses.
The temperature regulator in the oil cooler is located at the top of the control unit
Precautionary measures
An oil heater is a popular heating device that does not include complex technical solutions. When repairing the housing, it is necessary to carry out work in a well-ventilated utility room.
When repairing electrical wiring, disconnect the device from the power supply. Repairs must be carried out using insulating gloves.
Restoring failed radiator modules at home is dangerous; in this case, only installing new parts is allowed.
Preparing for heater repair
Before repairing the oil radiator, certain conditions must be created. This step will be the key to quality repairs. First of all, it is necessary to prepare the place where the equipment will be dismantled. The main condition for this is space and good lighting. Heater repairs can easily be carried out in a garage or a separate room.
Next, you need to prepare a set of tools for work and various devices. You will need the most ordinary tools, since the heater has a fairly simple structure. When performing repair work, you should have screwdrivers, pliers, wire cutters, a hammer and an awl on hand. In addition, you may need a soldering iron, a tester, lubricant and a clean rag. If the cause of the radiator failure is already known, then it is better to purchase a spare part in advance.
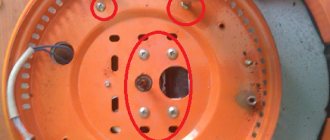
What to do if the heater does not turn off when tipped over
Most modern oil heaters automatically turn off when changing position. The role of the sensor is performed by a special plumb line with a weight, which is sensitive to deviations from the vertical.
The element is simple and quite reliable, but in an old heater it can turn sour in one position. Do-it-yourself repairs are carried out as follows:
- Remove the cover of the device to gain access to the internal parts.
- Manually test the heater again, tilting it to the sides, and monitor the position of the plumb line.
- If there is no reaction, clean the mechanical sensor from accumulated dust, and then develop it with careful movements.
If the weight moves too tightly even after repair, it is better to change it.
The plumb line with the load should be located at the top of the device next to the thermostat
How to check a bimetallic strip
Modern oil radiators are equipped with a bimetallic plate to protect against overheating. When the coolant pressure in the device reaches critical values, the part opens the circuit and forcibly stops the operation of the device.
The bimetallic strip may become deformed. Its serviceability is checked as follows:
- Open the radiator control panel and use a relay to set the temperature not too high to change the position of the plate.
- A powerful hairdryer is applied to the part until it reaches the specified degree of heating.
- They look at the reaction of the plate - a working element should bend and disconnect the contact. The deformed part will remain motionless after exceeding the set temperature.
The broken bimetallic plate is replaced with the same new one. After doing the repair yourself, you must first make sure that the part is working correctly and test it according to the above diagram, and then assemble the heater.
Advice! If the new plate also does not unbend at the required moments, it is adjusted by changing the pressure of the element to the contact corresponding to the minimum temperature.
If the bimetallic plate breaks, it is easier to replace the entire thermoregulation unit
Stages of assembling a homemade heater
After all materials, tools and accessories are prepared, you can begin assembling a homemade heater:
DIY garage heater
- Fiberglass sheets are cleaned from the inside with fine sandpaper.
- Markings are made - a line is drawn in the upper and lower parts, retreating 2 cm. On the right and left sides of the sheet, the indentation will be 3 cm. The heating coil will be attached to one sheet, for which it is necessary to make several holes on both edges of the sheet. Two more holes must be drilled to secure the electrical supply wires. They are located on the edge where a 3 cm indentation is left.
- Before you make a heater with your own hands, you need to turn the wire into a spiral by winding it around a nail or a long knitting needle.
- Matches, toothpicks or other fastening parts are inserted into the lower and upper holes, which can be easily removed after finishing the work.
- The spiral is laid in rows, starting each row by a match in the hole. A distance of 8-12 mm should be maintained between rows. Every 5-7 cm, the spiral is secured with paper centimeter strips, onto which Monolith glue has been previously applied. When the entire spiral is evenly placed on the panel, the matches can be removed, and these places can be further strengthened with paper strips with glue.
- Metal rivets are inserted into the side holes, onto which the stripped ends of the electrical wire are wound. On the outside of the fiberglass plate, a washer is placed on each rivet so that the contact is firmly fixed.
- The next step will be to check how the assembled electric heater works with your own hands, for which you connect the product to an ohmmeter and a power outlet.
- Now you need to glue the second sheet, for which epoxy-based glue is used. You need 150 grams of it. Epoxy resin is applied between the rows of the spiral and a second panel is placed on top. In order for gluing to occur efficiently, a sheet of plywood is placed on top of the second sheet and loaded. The weight of the load must be 40 kg or more, but not less.
- The time for complete curing of epoxy resin is a day. On the second day, you can already use the homemade device. But before that, you need to make a mount on the back wall if you plan to hang it on the wall or legs if it will be located on the floor.
Selection of materials
As is clear from the above, to obtain a homemade heater you will need to get the following components somewhere:
- frame;
- oil;
- heating element;
- mobile stand;
- control and automation devices.
As a housing, you can borrow an old radiator from a central heating system, sheet or sectional. A car, or any similar product, the design of which will allow fluid to circulate inside naturally or artificially (using an electric motor), is also quite suitable. You can also make a closed loop from steel pipes with your own hands.
As for the oil, firstly, its quantity should be based on the calculation of ~85% of the body volume. The rest of the cavity is filled with air. This 15% area is maintained so that during operation the oil does not crush the housing due to thermal expansion.
Secondly, the quality characteristics of the liquid must satisfy at least two criteria: purity and heat resistance. Dirt and impurities will shorten the life of the heating element by causing scale to settle on it. A decent temperature of the heating element indicates that you should select technical oil of the appropriate brand. A suitable option would be, for example, a transformer.
The number and characteristics of heating elements are selected depending on the required power of the heater (and taking into account the overall dimensions of the housing). Conventionally, we can assume that to create a comfortable atmosphere in a room with normal ceiling heights, ~1 kW per 10 sq. m. is required. m. For rooms with high ceilings, poorly insulated, located in cold areas, etc., several times more powerful products are needed.
Of course, the capabilities of the power supply network in the place where you plan to use the hand-made device must also be taken into account.
In terms of durability, it is also important to consider possible combinations of metals of the heating element and the body. For example, it is not recommended to use heaters with a magnesium anode, or to combine aluminum and ordinary steel (not stainless) with copper
How to disassemble a radiator
To repair the heater, you need to identify the cause of the breakdown. To do this, it is recommended to disassemble the device. First you need to prepare everything you need:
- an object for prying off the plastic panel - it is desirable that it has a wedge-shaped shape;
- screwdriver;
- alcohol or cologne;
- tester;
- sandpaper;
- soft napkin;
- brush;
- needle file
Before starting disassembly, the device must be disconnected from the power supply. Connecting a disassembled device is strictly prohibited. All heater models are different, so there is no standard algorithm for carrying out the procedure. However, there are several options for solving the problems.
First of all, you should carefully study the device control panel. If there are screws or mounting brackets, it is recommended to remove them.
But most often a spring latch is used to secure the plastic panel. In this case, you should touch the surface with a plastic object or a product made of another material. This must be done very carefully to avoid damage to the case. By touch you will be able to determine the area where the latch is located. If you press harder on this area, you will be able to bend it.
See also
The best ways to remove water-based paint from a ceiling
If you have little skill in disassembling equipment, it is worth photographing the entire shooting process. It is recommended to lay out the bolts and nuts as disassembly progresses. This will help to reassemble the device after the process is completed. Experts advise not to rush into disassembling the device. Some problems can be identified without looking inside the device.
Conclusions and useful video on the topic
Video material from a professional technician working in the service department of the Bosch dishwasher manufacturer.
The sequence of replacing the heating element, a detailed explanation of the nuances of operation. Tips on the practical use of heating elements applicable to specific modifications of dishwashers.
The heating system of the heating element is located in the dishwasher at a close distance to other control units. Because of this fact, replacing it or the entire pump + heater unit seems like a troublesome and difficult task. But if you follow the instructions, the repair will be successful and safe.
The main condition for replacement is strict adherence to the sequence of dismantling the inoperative machine unit and care when installing a new element.
How to check the power cord
A faulty power cord is a simple failure, the repair of which is not difficult. If the oil device is in order, its internal parts do not require replacement, but it still does not turn on, you must:
- Inspect the cable of the de-energized device along its entire length for breaks, twists and frayed windings.
- Check the connection between the power cord and the control board for breaks or oxides.
- Clean the darkened contacts with fine-grained sandpaper or re-solder.
- Ring the treated area with a tester and make sure there is a chain.
If the power cord is damaged, you must replace it with a new one and after repair, make sure that the cable does not twist or fray.
The heater must be installed so that the power cord is not pinched by furnishings.