Here you will learn:
- Repair of mechanically controlled convectors
- Repair of electronically controlled convectors
- Repair at the service center
Electric convector heaters have a fairly simple design. It is this fact that affects their availability and service life. But no equipment, including heating equipment, is insured against accidental breakdowns. Repairing heating convectors with your own hands, in case of equipment breakdown, will help save money in the family budget. After all, in order to repair broken equipment, you do not need any complex measuring instruments and tools.
Vacuum manifolds
Vacuum heating collectors
The design of the individual parts of the vacuum manifold is reminiscent of the operation of a thermos. Solar heat easily passes through the transparent surface of the bulb into the copper rod located inside. A vacuum is created between the layers of the tube. This structure helps retain up to 96% of accumulated heat.
Advantages of vacuum installations:
- high heating temperature;
- stable and reliable design;
- ease of installation;
- good performance in summer and winter;
- minor heat loss.
Minuses:
- high price;
- installation is carried out at a specific angle of inclination of the collector;
- After snow has fallen, the system must be cleaned.
In some countries, solar collectors are the main part of the communications of every home. This applies to southern countries and is characterized by a mild, sunny climate.
Convector accumulates dust
The convector design consists of a box (trough) in which the heating element is located. Accordingly, dirt, if it is a passage area, and dust that simply accumulates in the room tend to accumulate in the in-floor convector. This is logical, as for example, garbage and dust settle in the corners of rooms or under walls. So in a convector, dust settles. But the solution to this problem is simple, just as you do weekly house cleaning (sweeping, vacuuming, wet cleaning), such cleaning is carried out in an in-floor convector.
In order to remove the convector, you need to lift the grille or roll it up if it is rollable, and go through the convector box with a vacuum cleaner, you can also wipe it with a damp cloth. And this problem is solved. Of course, if you spilled jam or other liquids that tend not to dry, stick, etc., then yes, you will need to be more diligent in cleaning the in-floor convector. But in this case it will be needed everywhere, in the convector, on the parquet, on the carpet, and so on.
In a word, in order for the convector to be clean, it needs to be cleaned once a week, as planned, with a vacuum cleaner and a damp cloth. And everyone will be happy.
Read the article “How to clean a trench convector” (article + video)
Installation process
Dimensions of the in-floor convection heater and the niche for it.
If you want to install an in-floor convector yourself, we recommend that you think about the location for its installation during the construction stage of the building - this will make it easier to organize a niche of suitable depth. Moreover, the niche itself should be 1-1.5 cm larger (on each side) than the metal box of the device. At the same time, you need to make sure that the upper part, where the decorative grille will be located, is on the same level as the future floor covering.
We recommend that you first choose an in-floor convector, and only then work on the floors, so that you have the dimensions of the box in your hands
Please note that we will pour the final screed after installing the heating device. Once the niche is ready, you can begin installing the equipment
We fasten the in-floor convector box using the included fasteners. We check the correct installation using a building level - the heater should be located evenly in the niche, without distortions. Further installation involves connecting to a heating system or electrical network - for this, plastic pipes, flexible hoses or metal pipes of suitable diameter are used
Once the niche is ready, you can begin installing the equipment. We fasten the in-floor convector box using the included fasteners. We check the correct installation using a building level - the heater should be located evenly in the niche, without distortions. Further installation involves connecting to a heating system or electrical network - for this, plastic pipes, flexible hoses or metal pipes of suitable diameter are used.
If you are installing a water convector, provide thin, shallow niches for laying pipes/hoses. When installing an electrical appliance, we recommend laying the connecting wires in cable ducts or pipes so that they can be replaced without problems. We recommend wrapping supply pipes with coolant in thermal insulation.
The radiator pipes will also be covered with screed.
At the next stage, we fill in the concrete screed - our DIY installation of the in-floor convector is nearing completion. The result of this stage should be a subfloor, with a metal box protruding slightly from it. Next, we complete the final leveling of the floor and begin laying the floor covering. At the last stage, we place a decorative grille over the box - it is best to choose it in the same tone as the color of the floors.
Do-it-yourself installation of in-floor convectors is complicated by the fact that you need to choose the correct dimensions of the niche so that the metal body of the device is located at the correct depth. Recommendations on this issue can be found in technical data sheets. The worst thing is if you have to carry out the installation in a house that has already been built - it is not a fact that it will be possible to make a niche in the subfloor, as this may affect its strength. In this case, it will be necessary to increase the height of the subfloor in all rooms.
Types and design of convector
The convector device enhances natural convection, as a result of which air heated by heating elements or a coolant rises upward, and cold air falls down.
Convectors are divided according to their characteristics:
- Installation type: floor, wall (horizontal, vertical or ceiling), built-in.
- Heating principle: water, gas, electric, infrared.
- Circulation principle: natural, forced.
Floor convectors are mobile, but they need a constant connection to an outlet. Wall convectors are more common and have a small thickness. Wall-mounted convectors have a variety of attractive designs, attract little attention and do not spoil the overall interior.
The installation of such a convector must be thought out in advance - at the construction stage, because This type of convector requires niches, channels, and supply coolant. These convectors look like a grate in the floor through which warm air rises.
Water convectors made of copper and aluminum or other materials are a good alternative to radiators. The gas convector system is the most economical due to the affordable cost of fuel, but such a convector is more dangerous, so they are extremely rarely used in residential premises.
Convectors with forced circulation have a fan that increases the speed of rising warm air and cools the heating element. With the help of an electric convector you can quickly heat your house, because... they do not require pipes, a heating boiler, etc. to operate. To calculate the number of convectors sufficient to maintain a comfortable temperature in the room, it is enough to have the dimensions of the room, the number of windows and a calculator.
The most common brands of convectors that can be purchased in Moscow and other cities:
The use of electric heaters is permissible in any room where there is an outlet, subject to safety precautions.
The design of almost all convectors includes:
- Thermostat;
- Electronic rollover sensor;
- Thermal fuse;
- Screen.
The thermostat regulates the temperature of the heating mechanism and the air leaving the convector. On models in the lower price range, mechanical thermostats are installed, which regulate the temperature more roughly. Models in a higher price category have electronic thermostats. Electronic thermostats allow you to more accurately set the temperature value - down to 1/10 of a degree. In everyday life there is no need for such precision in adjusting the temperature value, so using a convector with a mechanical thermostat will not cause discomfort. To quickly heat the air, the thermostat value is set to the maximum value; after warming up, the value can be set lower.
It makes more sense to use a convector with an electronic thermostat in rooms where strict temperature conditions must be observed. Convectors also have a voltage supply switch to the heating element. It allows you to turn on all heating elements separately or at once. Convectors with a power of 1,500 - 2,500 W have several heating elements.
Because If there is a possibility of floor-type convectors tipping over, which can cause a fire, they are equipped with a safety device that turns off the power to the heating element. Disconnection occurs due to the opening of contacts in the event of a fall, when the value of the specified angle changes. The thermal fuse protects against overheating by turning off the fuel supply (gas, electricity) when the required temperature is reached. The screen or air damper serves to direct the air flow.
Installation and piping of batteries in the floor
The difficulty of installing an in-floor convector with your own hands is that its grille is flush with the floor covering
Therefore, it is extremely important to accurately align the heat exchanger trough with the water level. At the same time, it is necessary that it stands rigidly, because people will walk on the grate. Installation is carried out in a cut-out niche, a screed is poured around the perimeter
Filling nuances:
Installation is carried out in a cut-out niche; a screed is poured around the perimeter. Filling nuances:
- stick damper tape around the perimeter of the body;
- Do not remove the grate until the solution has completely hardened.
The convector grille must be level with the floor.
The damper tape compensates for thermal expansion of the screed and dampens possible vibrations from fan operation
It is extremely important that the grille is inserted into its seat. During hardening, the screed may deform the trough and the grate will no longer fit there at all. The case has holes for several connection options, which mainly depends on the position of the radiator relative to the circuit
In principle, the simplest piping option is to install conventional ball valves on the supply and return. Ideally, faucet handles should face down so that they are not visible through the grille. Also, in some convectors there is not enough trough height to install shut-off valves with the handles up
The case has holes for several connection options, which mainly depend on the position of the radiator relative to the circuit. In principle, the simplest piping option is to install conventional ball valves on the supply and return. Ideally, faucet handles should face down so that they are not visible through the grille. Also, some convectors do not have enough trough height to install shut-off valves with the handles up.
Here we compared pipes for heating a private house.
The piping method described above is not suitable if you have a long heating system with several branches of different lengths. In this case, for proper operation of the circuit, balancing will be required, and for this there must be a balancing valve on the radiator return. In addition, ball valves do not make it possible to regulate the degree of heating of the battery, which is very useful. Therefore, you need to install a thermostatic valve on the supply, preferably in tandem with a thermal head or servo drive.
Warm floor
Home owners use heated water floors with their own hands, in two versions.
Warm floors evenly warm the room, increase the level of comfort and do not require additional energy costs, since the batteries and the floor circuit are powered from one boiler.
Self-installation of floors is quite accessible to owners who have carefully studied the principle of operation and the procedure for calculating heated floors. Before installation, you need to decide and purchase the necessary materials and components for the heated floor. During the installation of the circuit, strictly follow the rules and recommendations of specialists.
In principle, a warm floor can be created in an apartment located in a multi-story building. But usually connection to the heating system is prohibited. If there is permission, then connection will require an examination of the influence of heated floors on the operation of the system. Typically, this design requires the installation of a separate pump and mixing unit. These additional elements will maintain system pressure at the outlet. In private houses, heated floors and a do-it-yourself heating system in a private house are inextricably linked.
To organize a heated floor, mainly three types of pipes are used. The best option is metal-plastic pipes, which are relatively cheap, easy to install and durable. Copper pipes are used, but they are very expensive, as well. They are inconvenient to work with because they are rigid, but they are not afraid of freezing and are easily repaired.
Equipment startup and performance check
- Open the gas valve and check the system joints for leaks.
- After checking, you can turn on the convector. For the first time, you need to hold the start button for 1 minute and wait until the gas penetrates the combustion chamber.
- Do you see the burner lit? Now you can adjust the operation of the convector.
Important: installation of a gas convector in a wooden house is absolutely safe, because fire hazardous parts are located in the inside of the heater. To summarize, we note: despite the fact that a gas heater is not a very popular heating device, it can be used to create a comfortable temperature in dachas and country houses. The unit quickly and efficiently heats the air in the room, and at the same time is much more economical than an electric radiator
Another obvious advantage is the ability to connect to a gas cylinder. One dubious circumstance can be considered that the gas convector heats only one room, and not the whole house, unlike a gas boiler connected to the heating system.
We hope that the article was useful and helped resolve the problem!
Characteristics of gas convectors
The main advantages are:
Uninterrupted operation. Even during a power outage, gas-type convectors continue to function. Possibility to convert equipment to run on liquefied gas
And this is very important. This is confirmed by the reviews of many users regarding gas convectors running on liquefied gas. Automatic maintenance of the selected heat supply mode
Reasonable price. During operation, the unit does not burn oxygen. There is no need to lay a pipeline in the room, as with water type heating. Installing the convector is very simple and you can do the procedure yourself. Maintainability. All spare parts for convectors can be purchased at any specialized store
Automatic maintenance of the selected heat supply mode. Reasonable price. During operation, the unit does not burn oxygen. There is no need to lay a pipeline in the room, as with water type heating. Installing the convector is very simple and you can do the procedure yourself. Maintainability. All spare parts for convectors can be purchased at any specialized store.
The disadvantages include the need to obtain permission for installation, the gas pipeline must be connected separately to each convector, the dimensions are slightly larger than those of a water radiator. The most important disadvantage is that quite large holes will have to be punched in the outer wall for installation.
How to repair a breakdown?
So, to make it clearer to you how to proceed, we will provide step-by-step instructions:
- Unplug the convector from the outlet.
- Give access to the temperature regulator and switch.
- In the event that the convector does not work at all, i.e. The indicators do not even light up when turned on, then check whether the voltage is reaching the terminals through the cord. To do this, use a multimeter. If there is no voltage, check it at the outlet, as well as the integrity of the cable itself. We talked about how to check the voltage in an outlet in the corresponding article. If the outlet has 220, but there is no cord on the cores, replace the cord or find the location of the damage and repair it.
- If the power supply is suitable, but the electric convector does not turn on, the next stage of repair will be checking the button. In 70% of cases, the malfunction lies precisely in this (contacts burn out). To check, first disconnect the heater from the network, then use a multimeter to ring the button. In the on position there should be a short circuit, in the off position there should be a high resistance, indicating an open circuit. If this is not the case in your case, change the button or try to clean the contacts. The video below will provide a technology for repairing a convector button.
- Next, you need to ring the thermostat with a tester. A working temperature controller should show little or no resistance on the multimeter display.
- If the thermostat is in good working order, then you need to go further along the circuit and make sure that all contacts are securely connected to the connectors.
- Having reached the heating element, you need to ring it too. Very often the reason that an electric convector does not work is the failure of the heating element. We talked about how to ring a heating element with a multimeter in the corresponding article. A failed heating element cannot be repaired and will have to be replaced.
- The next stage of repair will be checking the thermal fuses. Proceed by analogy with step 5.
- Well, the last reason why an electric convection heater may turn on, but not heat up or stop working altogether is a malfunction of the sensors, including rollover protection. By analogy, they need to be checked and, if not, replaced.
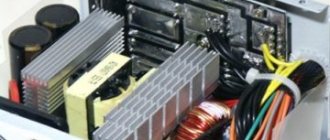
- If the circuit contains electronics (for example, an electronic thermostat, as in the photo below), it is unlikely that without the appropriate skills you will be able to repair the electric heater yourself. In this case, we recommend that you seek the help of a specialist.
Finally, we recommend watching useful videos on the topic:
That's all I wanted to tell you about how to repair a convector with your own hands at home. We hope the tips provided helped you solve the problem!
It will be interesting to read:
- How to make an electric heater
- Iron repair at home
- Comparison of fan heaters and convectors
Reasons for decommissioning an electric heater
Regardless of the quality, sooner or later, almost all electric heaters begin to heat poorly, do not turn on, or no longer heat at all. Repairing an electric heater yourself is not very difficult, since this class of devices is often not considered a complex device. In everyday life, people use a wide variety of electric electric heaters: electric infrared fireplaces, convectors, fan heaters and a variety of oil radiators. For all such devices, regardless of design features, the heating element is nichrome.
How to repair an electric convector?
Electric heater device
So, first, let’s look at the design of an electric convection heater so that you understand what will have to be checked and repaired. The heater consists of a cord with a plug plugged into an outlet, an on/off button, a thermostat and a heating element (heating element). In addition, the circuit may contain a thermal fuse that protects against overheating, as well as a tilt sensor that will turn off the power and save from fire if the mobile convector is tipped over. Also, some models may have a special sensor installed to protect against the penetration of foreign objects into the housing.
We've sorted out the design, now let's move on to the basics of repairing an electric heater with our own hands.
How to repair a breakdown?
So, to make it clearer to you how to proceed, we will provide step-by-step instructions:
- Unplug the convector from the outlet.
- Give access to the temperature regulator and switch.
- In the event that the convector does not work at all, i.e. The indicators do not even light up when turned on, then check whether the voltage is reaching the terminals through the cord. To do this, use a multimeter. If there is no voltage, check it at the outlet, as well as the integrity of the cable itself. We talked about how to check the voltage in an outlet in the corresponding article. If the outlet has 220, but there is no cord on the cores, replace the cord or find the location of the damage and repair it.
- If the power supply is suitable, but the electric convector does not turn on, the next stage of repair will be checking the button. In 70% of cases, the malfunction lies precisely in this (contacts burn out). To check, first disconnect the heater from the network, then use a multimeter to ring the button. In the on position there should be a short circuit, in the off position there should be a high resistance, indicating an open circuit. If this is not the case in your case, change the button or try to clean the contacts. The video below will provide a technology for repairing a convector button.
- Next, you need to ring the thermostat with a tester. A working temperature controller should show little or no resistance on the multimeter display.
- If the thermostat is in good working order, then you need to go further along the circuit and make sure that all contacts are securely connected to the connectors.
- Having reached the heating element, you need to ring it too. Very often the reason that an electric convector does not work is the failure of the heating element. We talked about how to ring a heating element with a multimeter in the corresponding article. A failed heating element cannot be repaired and will have to be replaced.
- The next stage of repair will be checking the thermal fuses. Proceed by analogy with step 5.
- Well, the last reason why an electric convection heater may turn on, but not heat up or stop working altogether is a malfunction of the sensors, including rollover protection. By analogy, they need to be checked and, if not, replaced.
- If the circuit contains electronics (for example, an electronic thermostat, as in the photo below), it is unlikely that without the appropriate skills you will be able to repair the electric heater yourself. In this case, we recommend that you seek the help of a specialist.
Finally, we recommend watching useful videos on the topic:
What to do if the button does not work
Major breakdowns of electric convectors
What to do if the button does not work
Major breakdowns of electric convectors
Self-repair of heating convectors
Here you will learn:
- Repair of mechanically controlled convectors
- Repair of electronically controlled convectors
- Repair at the service center
Electric convector heaters have a fairly simple design. It is this fact that affects their availability and service life. But no equipment, including heating equipment, is insured against accidental breakdowns. Repairing heating convectors with your own hands, in case of equipment breakdown, will help save money in the family budget. After all, in order to repair broken equipment, you do not need any complex measuring instruments and tools.
Repair of mechanically controlled convectors
You already know that heating convectors are divided into devices with electronic and mechanical control. Both modifications can be repaired with your own hands. Another thing is that “mechanics” are much easier to repair, since they are devoid of fine electronics . For tools you will need screwdrivers and wire cutters, and for measuring instruments - a multimeter or tester. You will also need basic knowledge in the field of electrical engineering, because you will need to imagine a convector circuit in your head.
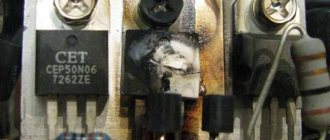
If after disassembly you see black carbon deposits somewhere, then first of all turn your attention to this element.
Repair of convector heaters begins with disassembling the housings. You need to carefully remove the casing, being careful not to damage anything inside. Next, we inspect the insides for their integrity. If something is shorted somewhere, you will definitely see it by the characteristic burnt spots - the faulty components will be located in this side. But some faults do not manifest themselves at all.
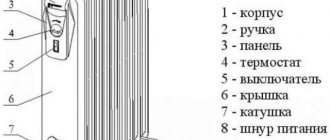
Before we tell you how to repair convector heaters with your own hands, it is useful to remember the design of a heating convector with a mechanical thermostat:
The device of a convector heater with mechanical control.
- Switch – provides a complete break in the electrical circuit, disconnecting the unit from the outlet;
- Fuses – protect the electrical network from overloads by tripping in the event of a short circuit;
- Mechanical thermostat – controls the air temperature by turning the heating element of the heating convector on and off;
- The heating element is most often a closed-type heating element sealed in a metal tube.
In total, we have before us almost the entire list of what can break here. Repairing such a convector with your own hands is not burdened with any difficulties; you just need to understand its structure.
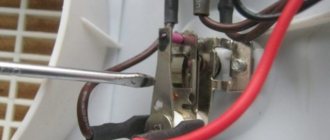
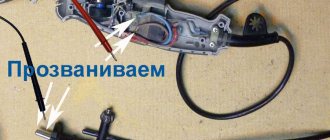
Carefully test all convector components with a multimeter.
Repairing a heating convector with your own hands begins with checking the supply voltage from the electrical network. That is, we need to check the integrity of the cable and plug. We take a multimeter in our hands and check the presence of electric current at the end of the power cable. If there is nothing here, you should replace the cable or plug itself. It wouldn’t hurt to check the outlet itself - it’s quite possible that it’s the one that’s broken.
When repairing heating convectors with your own hands, do not forget to check the switch. Convector heaters are quite powerful equipment, so the contact groups in the toggle switches can spark. Over time, this leads to a complete lack of contact . A failed toggle switch can be replaced or cleaned - disassemble it carefully, since the small parts with springs inside tend to scatter all over the table.
If everything is fine with the switch, we continue repairing the convector with our own hands - we check the thermostat. In a cold state, its contacts are closed, so they are easily “ringed” by a multimeter. If the thermostat is faulty, you should find the same unit and replace it - it will be easier. In some units, the thermostat is combined with a switch, so everything must be replaced at once.
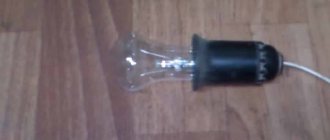
If all the preliminary circuits are intact, we are left with the last suspect - this is the heating element. This can be the main reason for the failure of the heating convector. Repairing this unit with your own hands is impossible, since the heating elements cannot be repaired - you need to find a similar heating element and replace it.
Its resistance will help determine the serviceability or malfunction of the heating element:
Check the resistance of the convector heating element.
- Infinite - there is a break here;
- Zero – a short circuit has occurred;
- 30-50 Ohm - the heating element is quite “healthy”.
By the way, if the convector does not work due to the fact that the “automatic machines” are activated in the panel, check the resistance between the contacts of the heating element and its body (as well as the body of the entire device).
Repair of electronically controlled convectors
Electronic control is implemented in many heating convectors. Repairing them yourself is difficult, since it is simply impossible to check the control unit without special knowledge in the field of electronics and circuit design. But the attempt is not torture - let’s try to at least roughly determine what is broken here.
We begin repairing a convector with our own hands by simply ringing the power cable coming from the outlet. We need to make sure that it is intact and that electric current flows through it to the heater. At the same time, we make sure that the socket is intact. We safely throw away the faulty cable and install a new one - do not forget to choose a wire with a suitable cross-section, taking into account the power of the heating convector being repaired.
The device is electronically controlled.
Next you need to check the fuses. They can fail as a result of a breakdown of any internal components, or as a result of a voltage surge in the power supply network. We replace the burnt fuses and turn on the equipment - if everything is normal and the heating starts, we assemble the heater and install it in its normal place .
If the fuses fail again, then further DIY repairs come down to checking the heating element - most likely, testing it will show the presence of a short circuit. It is also possible that the control unit may fail. The faulty heating element should be removed and discarded, replacing it with a working unit. If the last suspect is the control module, you will have to go to the service center.
Repair at the service center
If repairing the heating convector with your own hands turns out to be impossible, you should contact the nearest service center. You can find addresses on the Internet or in equipment passports. Authorized services can accept heaters of almost any brand for repair - Ballu, Nobo, Electrolux and many others. Also, in many cities there are unauthorized workshops - the prices here are a little lower, but there can be no talk of any warranty repairs here.
If the warranty has expired, then in any case we advise you to first try to repair the heating convector yourself. Thanks to their extremely lightweight internal structure, these devices are easy to repair. All you have to do is find spare parts and components - they are sold in some workshops and in specialized online stores.
Rational use
A similar issue should be addressed at the design stage of heating systems.
Attention should be paid to the correct calculation of the required floor thickness taking into account the installation of the convector. It should be taken into account that at the place where the convector is installed, it may be necessary to strengthen the strength of the ceiling. Do not forget that the performance of the convector directly depends on the depth
Do not forget that the performance of the convector directly depends on the depth.
When designing a heating system, you need to correctly place the supply pipe and return pipe, and also provide for draining water and pumping the system in case of air ingress
This is also important because in-floor convectors operate in a different plane, unlike traditional radiators
Such a convector also has a completely different resistance to coolant flow. Accordingly, before selecting a convector, it is necessary to perform a hydraulic calculation of the system and first select settings for thermostatic valves. Due to the imbalance of the system, heated water will not be able to enter the convector in sufficient volume, which is why the operation of the heating system will be ineffective.
Often, thermostatic valves with an integrated temperature sensor are installed on duct convectors, which provides the possibility of remote control.
Solar heating system design
A solar heating system can do more than just heat a home. Since some regions experience a large number of sunny days a year, this allows the use of this type of heating to obtain a high-quality hot water supply system in the house, which will be used for domestic needs.
If we take this into account, we can confidently say that such solar installations will be more economical, even despite the high price of the collector and auxiliary equipment. In addition to heating radiators and hot water supply, you can use auxiliary elements such as heated floors and heated towel rails
Installation of electric convectors
This type of convector, such as an electric one, is also excellent for heating rooms. Installation of heating convectors of this type can be done independently. To do this, you will need to perform the following steps in a certain sequence:
- First of all, you need to remove it from the packaging.
- It is necessary to remove the protective film from the convector panel.
- Next, you need to choose a place to install the convector.
Electric convector
When installing a heating convector with your own hands, you must consider the following recommendations:
Technical characteristics of water heating convectors
- The distance from the floor to the bottom of the convector must be no less than 20 cm.
- The distance from the walls should be no more than 25 cm, and from the ceiling no less than 55 cm.
- The distance from sockets must be at least 35 cm.
The electric convector must be installed as follows:
- The convector is turned over and support legs with wheels are fixed on it. In order to screw them on, you will need standard bolts.
- The convector turns on, and then the necessary modes and other parameters are set.
Checking the switches
If the convector, in addition to the power button, has other key mode switches and the like, then you need to check their serviceability. We set the “On” position, check the conductivity of each switch in turn with an ohmmeter, touching its contacts with probes.
Having discovered a malfunction, you should try to remove it by stripping the contacts, and if the switch breaks, you should replace it completely.
Checking the switch contacts
Elements for automating the operation of electric convectors
The use of electricity in the main operating circuit of the described convectors makes it convenient to include various electrical automation elements in their composition. The simplest option is to use a thermostatic device, which, when the set temperature is reached, breaks the power supply circuit of the convector, and when it cools down, turns it on again.
Since the on/off switch is controlled by a special contact plate, such a system does not maintain a precisely set temperature in the room.
However, there are practically unlimited possibilities for improving the control system of an electric convector, from connecting it with electronic room temperature sensors or electronic clocks to operate according to a given daily or weekly schedule, to integrating it with a home computer that has no restrictions on the complexity and accuracy of the program that controls the convector.
Thermal limiter
Its task is to automatically turn off the convector when the maximum temperature set by the manufacturer is reached inside the device. The contacts of the emergency thermal limiter are always closed, which can be easily checked using a probe.
If carbon deposits are detected, it is removed, and if shells form on the contacts, they must be filed with a file, then degreased with B-70 gasoline. All operations must be done carefully so as not to damage the bimetallic plate and not reset the factory settings.
If the thermal limiter cannot be repaired, then it is necessary to replace it with a new one in order to protect yourself from various troubles associated with overheating of the electric convector.
DIY convector installation
Today, electric convectors are one of the most popular types of heaters. This is due to a number of reasons. With its help, you can heat not only individual rooms of your house, but also the entire apartment. Installing a convector is a delicate process. This is why you should learn how to perform this process yourself.
In this article, we described in detail each stage of its installation. Thanks to this, you will learn how to install a convector yourself. We tried to make this process easier with video instructions.
Convector installation
Installing a convector on a wall consists of the following steps:
- First, unpack the device and turn it over on its back.
- Now you need to dismantle the fasteners.
- The bracket that you removed from the device should be leaned against the wall and the places of future fastenings should be marked with a marker.
- If your house has a wooden wall, then the installation of a wall convector is carried out using self-tapping screws. If the house has a concrete wall, you may need to drill holes using a hammer drill. Then you need to drive dowels into these holes and install the frame. Here is a photo where you can see how to install the convector frame. If you are interested, then you can read how to connect an electrode boiler.
- Now the convector should be placed on the installed bracket.
- Plug its power plug into a power outlet.
- Set the appropriate temperature. This can be done using a thermostat.
As you can see, the technology for installing an electric convector is quite simple. Even a beginner can complete this process. Below we will provide you with useful tips to make the installation process easier.
Diagnostics and repair
Element connection points
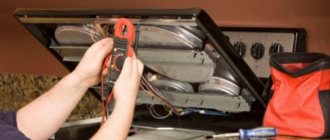
To carry out inspection, it is necessary to disassemble the device. We remind you once again that you must first disconnect it from the power source. The check is carried out as follows.
- Check the operation of the power button located on the device body.
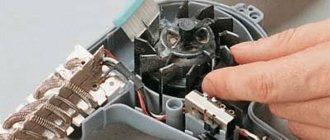
- If the button is in order, it is necessary to inspect the internal elements of the convector. Remove the front housing. You can read about how to do this in the instructions that came with your equipment. Models from different manufacturers differ from each other both in appearance and in the methods of fastening the elements. After studying the instructions, you will make your work much easier.
- After removing the front panel, visually inspect all wires, as well as the screws and terminals that secure them to other components.
- If you find a loose screw, inspect the thread - it may happen that it has been stripped. In this case, you will have to replace the part with a new one. If the thread is in order, then simply tighten the loose screw.
- If you find scale at the wire connection point, it must be carefully cleaned off. This must be done after first disassembling the connection. The washer and the section of wire freed from insulation must be carefully processed using sandpaper. Then reassemble the connection. Be sure to tighten the screw tighter.
- Next you will need a multimeter. Use it to “ring” the temperature regulator. It is likely that the problem lies in this detail. In this case, it must be replaced.
Temperature limiter
The convector design includes an element that monitors the temperature of the device. If it exceeds the permissible value, then, in order to avoid overheating of the equipment, the limiter automatically stops the operation of the convector.
Inspect the item carefully. “Ring” its contacts with the indicator - they should be closed. If you see carbon deposits, you need to clean it off with sandpaper. If shells are found on the contacts, they are filed off and then degreased using B-70 gasoline. All this must be done extremely carefully, since the bimetallic plate in the limiter may be damaged.
If for some reason the element cannot be repaired, it should be replaced with a new one. In principle, the convector can operate without a limiter. But it is not recommended to do this. The equipment will not be able to shut down automatically if it overheats, and this can lead to very harmful consequences, such as short circuits and even fire.
Switches
Therefore, it is necessary to check the functionality of each switch. This is done using an ohmmeter. Run the probe one by one over each contact and see if the conductivity is good everywhere.
If the problem lies precisely in the state of the contact, it must be cleaned using the same sandpaper. If the switch itself is broken, it must be replaced with a new one.
Heating elements
Heating elements in convectors are of two types:
- open;
- closed.
You can repair a broken heating element in a fairly simple way. If we are talking about an open type of heater, then it is usually a spiral wound on ceramic strips. It must be unwound, and then nichrome wire of the appropriate cross-section must be placed on the slats in the same way. Then put the heating element in place. Please note that winding nichrome wire must be done under tension to prevent it from further sagging during heating.
Troubleshooting
As you can see, there is nothing complicated in the design of a gas convector. Due to its simplicity, this equipment serves for a long time and with high quality. But sometimes it happens that incomprehensible interruptions arise in its work. If you notice that the flame burns unevenly or is difficult to ignite at all, the problem is often a clogged nozzle.
Simply put, the hole through which the gas escapes becomes clogged with soot or other contaminants. In this case, you can easily clean it yourself. All you need for this is a thin needle. Use it to carefully clean the hole.
Very important: before starting work, be sure to shut off the supply of blue fuel to the equipment. For this purpose, a special tap is provided on the supply pipe.
It is absolutely forbidden to work with the device when gas enters it!
If after cleaning the problem does not disappear, then the most reasonable option for further action would be to call a specialist from a specialized organization. Remember that gas equipment has a high fire hazard. All more or less serious work with it should be carried out only by craftsmen who have the appropriate license.
If you decide to repair the gas convector yourself, but do something wrong, this is fraught not only with subsequent fines from the gas service, but also with the possibility of a fire. You should not take such responsibility upon yourself; be sure to invite specialists to troubleshoot serious problems. Good luck and a warm home!
Heating elements
If all the switches are working properly, the cord is intact, but the convector still does not work, then the fault may be a malfunction of the heating element. In modern convectors they are used from one to three at a time.
To check the integrity of such an element, we use an ordinary multimeter: we apply one probe to the mounting point, and touch the other terminals on the elements with the second one in turn. Often a layer of scale or foreign contamination prevents good contact. We clean all contacts and wiring wires to a sparkling shine and repeat the measurements. When the cause of the malfunction is identified, we try to repair the heating element; if this is not possible, it must be replaced.
Heating elements are used in two types - closed and open.
Open heating elements
This type of heating elements includes:
- a spiral stretched between strips made of ceramic;
- nichrome wire twisted into a spiral with strung ceramic beads;
- a ceramic rod on which a nichrome thread is tightly wound.
Separate blocks are created from open heating elements together with heat shields.
Open heating element
Closed heating elements
Such heating elements consist of a spiral enclosed in a sealed tube made of transparent glass, which perfectly transfers heat, but also serves as a dielectric. These also include hermetic tubular-type electric heating elements (TEH) - in them the spiral is enclosed in a steel shell, and the dielectric is quartz sand, tightly packed inside.
In many imported convectors you can find heaters that are formed by applying a conductive coating to specially tempered glass or a very thin wire woven into heat-resistant fabric.
Closed heating element
Such elements are not repaired, but replaced with new ones from the repair kit, if the manufacturer has taken care of this. If there are no spare ones, you will have to select from domestic ones - here you will need knowledge of the basics of electrical engineering. It is better to entrust such nuances to specialists from the service center, otherwise you will have to buy a new convector to replace the one that burned out due to your incompetence.
Troubleshooting a micathermic heater
The first thing you need to do is carefully inspect all the wires, where they are connected to the terminals and connectors. If the external inspection does not produce results, then you need to proceed to checking the circuits using a tester or multimeter. The order in which the components are checked does not matter, but I always start checking the components with the lead wire.
The three-core power cord goes into the side cover, where it is secured by a pressure plate with two self-tapping screws. The two ends of the blue and red insulated wires end in a two-pin connector, and the yellow-green ground conductor ends in a tab screwed to the metal base of the heater. The yellow-green wire does not interest us when troubleshooting, since it does not directly participate in the operation of the heater, but serves only to protect a person from electric shock.
Checking the power cord
To check the power cord, you must first prepare the device by setting its switches to resistance measurement mode. Next, touch any pin of the plug with one end of the probe, and touch the ends of the green and red wires in turn with the other. When you touch one of the wires, the device should show zero resistance. Next, touch the second pin of the plug and check the second wire. In this case, it is advisable to hold the probes and pull the cord and bend it; the resistance should not change and sooner be zero.
If the resistance is significantly greater than zero as a result of a faulty plug or a frayed cord at its base, then the plug should be replaced. The article “Electrical plug” is devoted to checking and replacing the electrical plug.
Checking the operating mode switch
If the power cord is in order, then proceed to check the heater operating mode switch.
The switch terminal to which the brown wire goes is common and is supplied with supply voltage. To check the switch, you need to set it to position III, in which the common terminal must be connected to the other two terminals. Now it is enough to measure the resistance between the common terminal and the other two, it should be equal to zero. If the switch is set to position II, the middle contact will remain connected to only one of the other two. In position I, only with contact not yet tested. In the zero position, no contact should be connected to another. If the switch is in order, then you need to look for the cause of the heater failure in another place.
Checking the operation of the bimetallic thermostat
A bimetallic thermostat is installed next to the mode switch. Its operating principle is based on the properties of different metals, which increase or decrease in size with temperature changes in different ways. If you connect two plates of different metals into one, then when the temperature changes, the plate will begin to bend. And if an electrical contact is established on such a plate, then by bending the plate it will be possible to control the temperature of turning on or off electrical appliances depending on the ambient temperature. Each of us encounters the beneficial properties of bimetallic strips every day. For example, an electric kettle is turned off by a bimetallic plate heated by steam from boiling water.
To check the serviceability of the thermostat, just touch the probes of the multimeter to its terminals and turn the handle from lock to lock in any direction. In almost the entire rotation range, the resistance of the thermostat should be zero. If this is not the case, then it is usually enough to clean the contacts, which are clearly visible from the side, with fine sandpaper.
If you need to remove the thermostat, for example, for replacement or repair, you must first remove the adjustment knob. It stays on the axis due to a tight fit. To remove the handle, you need to carefully pry it off on both sides with the flat blades of screwdrivers. The handle will be removed from the axle with a little effort.
There are two screws under the handle. It is enough to unscrew them and the thermostat mechanism will be released.
Checking the serviceability of heating elements
Now it's time to check the heating elements connected to the switch and thermostat using a six-pin connector.
As it turned out, the micathermic heating element is composite and consists of two. One has a resistance of 60 ohms, the second 100 ohms. To check the heating element, it is enough to measure the resistance between the red, blue and brown wires. The check showed the serviceability of the micathermic heater.
The article on the site “How to check an electric heater” is devoted to checking the heating elements of electrical household appliances.
Checking the vertical position sensor
The position sensor is a weight mounted on a lever with a counterbalance spring attached to the opposite end of the lever. When the heater is in a vertical position, the weight stretches the spring and presses on the built-in microswitch. The supply voltage is supplied to the heating elements. If the heater is tilted on its side, the force of gravity will reduce the effect on the spring, it will move the lever away from the microswitch, the circuit will break, and the current will stop flowing to the heating elements.
There are two wires coming from the position sensor, white and brown. To check, it is enough to measure the resistance between them with a multimeter. When the heater is in a vertical position, the resistance of the position sensor should be zero. When tilted - infinity. The position sensor turned out to be OK.
Checking the health of the thermal fuse
It remains to check the thermal fuses connected in series, of which there were three and all of them were installed behind the micrometric heater plate. A pair of white wires went from the thermal fuses to a six-pin connector, the same as the wires from the micathermal heater. A test with a multimeter showed an open circuit in the thermal fuse circuit. It became clear that one of the thermal fuses was faulty.
Further disassembly of the heater was required. To do this, I had to remove the second side cover and the protective mesh, which is removed after removing the screws by moving it to the side. Access to check two self-resetting thermal fuses has opened.
To check the thermal fuses, with one end of the multimeter probe you need to touch the white wire that fits the six-pin connector, and with the second probe, piercing the insulation with a needle pressed to it, touch the wire connecting the thermal fuses. The check showed the serviceability of the fuses available for testing. All elements have been checked, except for the thermal fuse behind the micathermic heating element. That means it's faulty.
I had to remove the heating element, for which it was enough to unscrew the four screws in the corners and move it to the side. The following view opened.
The thermal fuse was located in a fiberglass tube and was attached to the heater body with a screw using a metal clamp.
As it turned out, the tube contained a self-recovering thermal fuse SF192E, designed for an operating temperature of 133˚C and a load current of up to 10 A at a voltage of up to 250 V. An additional check with a multimeter confirmed that the thermal fuse was faulty.
The thermal fuse was connected to the wires by crimping with a brass strip. Using an awl, the end of the strip on the thermal fuse side was bent, the thermal fuse was removed and a similar one, type G4A00, designed for an operating temperature of 128˚C and a load current of up to 10 A at a voltage of up to 250 V, was pressed into its place. The operating temperature of the installed thermal fuse was 5 degrees lower than a failed one. But taking into account the maximum heating of the heater body is only 65˚C, such a replacement will not affect the protective functions and performance of the heater.
Before assembling the heater, all connectors were connected to each other, the multimeter probes were connected to the pins of the power plug, and all operating modes of the heater were checked. The resistance in mode switch position 0 was infinite, in position I it was 156 Ohms, in position II – 100 Ohms and in position III – 56 Ohms, which indicated that the heater was in full service.
After assembly, the heater was connected to the network and confirmed its functionality. The repair of the heater is completed and only tool marks left on the plastic plugs remind of its malfunction.
How to replace the heating element in a water heater?
To carry out repair work, you will need a screwdriver, pliers, keys, a tester, as well as rags and napkins. The procedure for replacing a used heating element in a water heater consists of several sequential steps:
disconnecting the water heater from the network; draining all water from the tank (a description of the draining process is available in the product data sheet); dismantling the water heater (you can replace it without removing the device from the wall, if this is convenient); dismantling the cap (outer cover) covering the electrical part of the household appliance; unscrewing the bolts (nuts) of the flange holding the heating element during its operation; carefully remove the heating element from the container (it is recommended to do it over a bucket or basin to avoid water with sediment getting on the floor); checking the functionality of the heating element (inspection, ringing); cleaning the internal tank from scale and rinsing it with a stream of water; installation of a new heating element of the same power (it is recommended to purchase spare parts in specialized stores, paying attention to the quality of workmanship, since fakes quickly burn out); correct connection of all connecting wires (if replacing yourself, take photographs of all connections before disassembling); installation of a protective cap; connecting the water heater to the water supply and electrical networks; eliminating leaks, if any; switching the switch into working condition after the tank is completely filled with water.
The procedure for removing the heating element from the casing of a storage water heater is not for white-handed people. The tank and all internal parts are washed to remove scale and sediment.
The magnesium anode is mounted separately on the flange of the heating element in close proximity to it. When water is heated, magnesium, being a more active metal compared to iron, enters into electrochemical reactions with heavy metal compounds found in water. In addition, magnesium, by binding oxygen released during water heating, provides protective protection for equipment.
Read more: How to clean a refrigerator inside and outside, the best means and instructions
Repair work is carried out approximately according to the same algorithm as when replacing a heating element in a water heater. First, disconnect the device from the network, then turn off the water and drain the contents of the tank into the sewer. Using ordinary tools, remove the decorative panel and get to the flange on which the magnesium rod and heating element are attached.
View of a new magnesium anode and a storage water heater worn out after a short period of use. The harder the water, the faster the part deteriorates.
The flange is removed, the anode is inspected and, in case of extensive damage, replaced with a new part. In this case, the worn rod is unscrewed, and a spare part purchased from a specialized store is screwed into the vacant space. After rinsing the tank from scale, reassemble the equipment in the reverse order.
When choosing a magnesium anode, pay attention to the length and diameter of the part, as well as the dimensions of the threaded rod