How the hood works
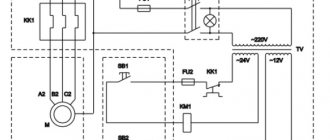
Before you start repairing the hood with your own hands, it is worth understanding its structure. This technique can be of an exhaust (discharge) or recirculation type (the air is cleaned and released back), but in both types the main working element is always an asynchronous motor (8).
In addition, such a technique will necessarily have a fan (2), which may be axial or tangential. The axial one consists of blades that “draw” air inside. The air flow will pass along the axis of rotation of the engine. Tangential type fans have blades evenly spaced in a circle. Such a fan is preferable - its operating principle provides increased efficiency.
There will definitely be filters in the hood. For example, a budget carbon filter (9) is placed on the round inlet window of the motor, and a more expensive filter structure with carbon granules will be one that has a rectangular shape and is installed immediately behind the fat filter. The grease filter, in turn, is located immediately behind the working surface (12). There are also fabric filters and impregnated paper products (disposable), but now mesh reusable metal grease traps are most common.
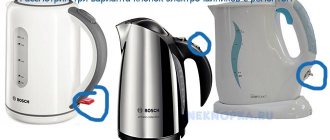
As for the control panel, it can be of a touch or mechanical type, but will always be a common unit, as shown in the photo below.
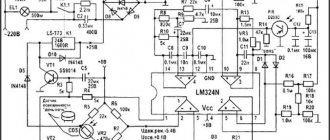
If the device provides for changing speeds, then there must be a circuit that generates the control voltage. The design is also complemented by lighting. These can be incandescent, halogen or LED lamps.
Repairing a hood with your own hands is not difficult if you follow a certain algorithm. It is clear that first you need to decide on the problem.
If the hood breaks down and does not turn on, you must check the functionality of the built-in lighting. In this way, the integrity of the power circuit and the correct connection to the outlet are monitored. If the lights work, then the problem is with the motor or control system, in which case you need to buy new parts that fit your hood model and are approved by the manufacturer.
Spare parts for kitchen hoods are sold in specialized stores of spare parts for household appliances and in online stores.
Expert advice
Experts advise adhering to the following rules:
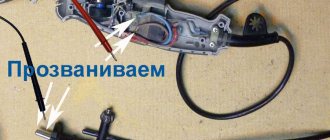
- To check the correct operation of the electric motor, it is not necessary to remove the motor from the hood. The necessary actions can be performed by checking the resistance of the windings of the entire system. To do this, you need to find the wires that lead to the electric motor from the motherboard. Then the engine is diagnosed for defects in the wiring.
- The main check is to remove the starting capacitor. In 90% of cases, the cause of motor failure is a short circuit that breaks through the motor blades and prevents operating voltage from passing deep into the system.
- When the electric motor has been completely dismantled and the problem has been eliminated, you need to check the operation of the entire system. Sometimes after repairs, when the power supply is turned on, the engine does not start working in ideal mode. Particular care must be taken during assembly. If parts are removed incorrectly, the system may malfunction and the fan may close.
Any person can repair the hood motor independently. To perform these works, you need to prepare tools and read the instructions for assembling the corresponding ventilation model.
Minor damage that occurs during operation can be repaired with your own hands. But for this you need to know and understand the design elements of kitchen equipment hoods. Read our experts' advice on how to repair a built-in hood yourself.
How to change the hood motor
- Turn off the power supply to the hood.
- Remove the filters by pulling the tab. Unscrew the bottom panel of the hood, holding it from below so that it does not fall.
- Disconnect the backlight wire connectors, this way you will disconnect both panels from each other.
- Remove the hood or remove it from the cabinet by unscrewing the screws and place it carefully on the floor. Attention, the hood is heavy, so it is advisable to remove it with a partner.
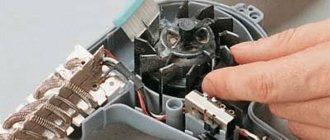
- Remove the fan from the engine by releasing the spring clip or other fastener.
- Now you need to remove the engine. To do this, disconnect the green ground wire from the screw on the hood body, and then cut the wires connected to the motor. Remove the 3 screws from the mounting plate as shown in the photo below, remove the plate and pull the fan motor out of the hood.
- Connect the new motor to the mounting plate, then place it in the hood body, ground wire back.
- Reinstall the fan blades using the spring clip. Install or build in the hood in its place, fasten all the body panels back and connect the power supply, check the operation of the new motor.
Preparation
Cleaning a kitchen hood is a complex process that requires care and some skill. Before cleaning the device, you should disassemble it and remove all necessary components.
The material from which the hood is made should be taken into account. For example, equipment made from expensive wood may not tolerate chemicals, so it is recommended to study the technical documentation of the hood, in which manufacturers indicate acceptable cleaning agents.
So, the step-by-step preparation plan for washing the hood is as follows:
- Detailed study of technical documentation on disassembling and cleaning the device;
- Preparing a place for small components so as not to lose them;
- Disconnecting the hood from the electrical network;
- Disassembling the hood, according to the recommendations and diagrams specified in the documentation.
Standard exhaust devices have a similar algorithm for dismantling the filter and grille, so it may look like this:
- Removing the housing cover;
- Removing the grille;
- Dismantling small elements that will only need to be soaked in soapy water;
- Removing the filter;
- Removing the ventilation pipe from the hood.
Preparation at this stage is completed, which allows you to begin a process such as cleaning the kitchen hood.
What to do if the control panel is broken
If the motor runs all the time but does not change speed, then in 92% of cases the problem lies in the control panel. It’s better and easier in this case to just buy a new one and replace it; repairing the board yourself is quite difficult.
Now let’s look at possible minor hood malfunctions.
What to do if the hood does not turn on
There are several possible problems here:
- The device may not be connected to the electrical network. You need to check both the fact of connection and the presence of voltage in the outlet.
- The functionality of the switch is checked by a tester. If this element does not “ring”, it must be replaced.
- It may turn out that there are problems with the power supply. They can occur due to a breakdown of the machine or failure of the fuses.
- The power plug may also fail. By the way, the plug may have a built-in fuse that may blow out - in this case it will need to be replaced.
- The internal wiring of the device can also cause malfunctions. It must be checked with a tester, and any bad contacts found are eliminated by tightening the screws or crimping the tips with pliers.
- But electric motor malfunctions require major repairs and professional intervention.
Disassembling the device: step-by-step instructions
Dismantling external ventilation parts
To remove the engine, it is necessary to disassemble the external parts of the kitchen ventilation. In this case, you can gain access to the engine system.
To do this you need to take the necessary tools and materials.
Attention
You need to prepare a screwdriver of suitable diameter. In this case, there should be several screwdrivers, since some parts can be voluminous and are caught by large screws, and some elements are microscopic in size and can only be dismantled with special tools designed for careful removal of parts.
When the motor is removed from the device, the resistance of its windings is checked. To do this, prepare in advance a bundle of wires that go from the board to the electric motor. In this case, you can simultaneously diagnose faults in the motor and try to repair it without removing it from the hood. The method is less convenient, since a complex of additional work will first be required. It is better to dismantle the engine itself and not touch other parts in the ventilation housing.
Cleaning and checking
- Whatever caused the ventilation motor to break down, remove the dirt and lubricate the bearing with oil.
- The dismantled motor is placed on a horizontal surface and the starting condensate is checked.
- If there is no short circuit, it is returned to its place.
- If the condenser is broken, it is replaced with a similar one in capacity and operating voltage.
After cleaning all the grooves, dry the small parts well. Cleaning can be done with a soft cloth that does not leave streaks or scratch the surface. After cleaning, the serviceability of the engine is checked. The problem of its failure to work could be due to clogging of parts. After cleaning, the structure can become serviceable.
When the motor is installed in place, its performance is checked. If the problem also persists, the ventilation works very poorly, which means the engine needs to be replaced or some of its components are broken. The device is again removed from the fan and its performance is checked in detail.
Testing and assembly
- If a broken electric motor cannot be replaced, then you can try to short-circuit its wires. This testing will help determine the performance of the motor with shorter wires. Repairs to faulty wiring are rarely carried out. Branded hoods are designed in such a way that the motors in them rarely burn out. This means that the operation of the motor cannot be disrupted due to electrical problems. But this only applies to modern technology.
- If we talk about a simple hood with a simple motor, then everything is much more complicated.
You will have to test and assemble such a part in the ventilation several times in a row. It is necessary to apply mains voltage to the working and starting windings. There are situations when the motor hums (this means the electrical network is working properly), but refuses to work. The engine may gain speed when turned on when cranking it manually. This situation indicates a fault in the starting winding. It needs to be removed from the electric motor and replaced. - The hood motor is checked by ringing the windings according to the diagram specified in the operating instructions. If at least one winding does not ring, then the engine must be repaired or sent to a service center. And in the most difficult cases, completely replace it with a working one, which not everyone can do on their own at home.
- Incandescent or halogen lamps are simply replaced. They are simply turned out of the hood and checked for functionality. In this case, the procedure can be performed in any suitable cartridge or base.
- Repairing LED systems will require additional steps.
You will need to remove the lamps and connect them to a low voltage DC source. An adapter-converter is connected to the system, which will help obtain the 3 V voltage required for the LED. The converter adapter is also checked with a tester to ensure it matches the voltage required for operation. When using a standard 220 V LED lamp in the system, repairs only involve cleaning the contacts in the lamp base.
The hood works, but does not eliminate odors
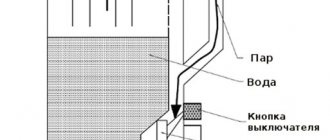
If there are still foreign odors in the kitchen when the hood is running, then most likely the problem is in the filter. The efficiency of the hood decreases if it is not replaced (not cleaned) in a timely manner. For example, the carbon filter located immediately behind the air intake grille must be replaced approximately once every 3 months. This type of filter can be dismountable, in which case only the carbon granules are changed (photo on the left).
Disposable grease filters (paper and fabric) must also be replaced. They are not restored and cannot be washed. But metal mesh structures need regular cleaning (they can even be washed in the dishwasher - approximately once a month).
If you are sure that the problem is not in the filter, then you can solve the problem as follows - increase the operating time of the device, turning it on a few minutes before turning on the burners and turning it off a quarter of an hour after the stove is free.
Main causes of malfunction
Among the main reasons:
- Incorrect operation of the exhaust system.
The engine may break due to improper handling of adjacent elements. For example, due to a clogged mesh filter that catches grease, the operation of the propulsion systems may be disrupted. The filter needs to be cleaned regularly, about once every three weeks. New models have an indicator light. When it lights up, then it is time to replace the filters. The signal is given during proper operation no earlier than after two years of engine operation. - Failure to comply with basic operating rules. The exhaust fan must be turned on when the stove is turned off. If you start the air extractor while cooking, the motor may not withstand temperature changes and break (how to repair a kitchen hood fan with your own hands?). The hood should be turned on 2 minutes before cooking. And after finishing, turn it off after 15 minutes.
- Lost contacts. The engine runs with slight vibration, so poor-quality contacts may break. This usually happens in Chinese technology.
- Incorrect engine installation. Incorrect installation disrupts the air flow and clogs the engine slots with debris. This can happen due to a poor-quality connection of the wires in the terminal box or due to a strong bend in the corrugation (air duct).
- Problems with electrical wiring. Due to frequent short circuits or power outages, interference in the operation of the motor is possible, which leads to breakdown and improper operation.
How to keep working
- In order for your hood to work as long as possible, you should change and clean the filters in it on time. Modern models are equipped with special sensors (buzzer or light bulb) that indicate the need for replacement;
- To prevent overheating (breakage) of the engine, it is necessary to prevent operation of the device with gas burners operating without utensils;
- In addition, the minimum installation height of the working surface of the hood must be maintained - 70-75 cm above the gas stove, and 65-70 above the hob.
Support the project - share the material with your friends on social networks: