Pump design in a thermopot
The pump is responsible for pumping water in the thermopot. It can be manual in the form of a pump and electric, where the impeller is driven by an electric motor. Each node differs in its structure:
- The electric pump consists of an electric motor. A plastic working chamber is mounted on its body. Inside it, water is pumped due to a rotating impeller mounted on the electric motor shaft. Some manufacturers of thermopots install a filter in front of the inlet pipe. Important! A clogged filter may be the reason why the pump of a household appliance has stopped working.
The electric pump consists of a motor and a plastic pumping chamber - The hand pump is a pump made in the form of a corrugated cylinder. All elements are made of plastic. The pump operates only with the lid tightly closed. She needs tightness. A person operates the pump. When he presses a button on the closed lid of the thermopot with his finger, the corrugated cylinder contracts. Air is forced into the upper part of the chamber. The resulting pressure pushes out a portion of water with each press of the button. The displaced liquid is directed through the pipe to the thermopot spout. When the button is released, the mechanism returns to its original position.
The hand pump is made of plastic and operates by generating air pressure inside the chamber.
Checking the thermopot after repair
Upon completion of the repair, all parts of the thermopot are collected and put in their place. Carefully inspect the connections of the pipes and the condition of the seals. The system must have a good seal. Water is filled into the reservoir. Allow the device to stand for 5-10 minutes. During this time, make sure there are no water leaks.
The hand pump can be checked without being plugged into the mains. When you press the button, a portion of water should flow out of the spout. If the manual thermopot pump does not pump, repeat the repair yourself. Perhaps the connection was made incorrectly somewhere, which led to depressurization of the camera.
The electric pump is checked after connecting to the mains. If the electric motor is running, it will immediately pump water through the system and deliver it through the spout. When the motor is silent, it is useless to repair it. The engine is non-separable. It's just being replaced.
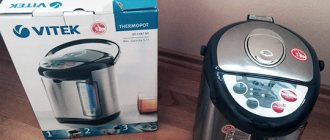
What is a thermopot
Thermopot is an electric kettle with a heat-saving body and a pump for supplying water and a function to maintain a set temperature. That is, it is a combined household appliance that not only boils water, but also maintains its temperature at a given level.
Thermopot is a “cross between” an electric kettle and a thermos with a pump
So, the functions of a thermopot are to heat/boil water and maintain its temperature. To reduce the cost of maintaining temperature, the housing is made with insulation. True, it is not vacuum, as in good modern thermoses, but air. So the losses are still greater than in a thermos. But this device is convenient where hot water is often needed.
This purpose is reflected in the names. Termopot is a transliteration from English termo-pot. Where termo is translated as heating, and pot is a pot or kettle. You can also find such names as heated thermos, electric thermos, thermos kettle, temperature-maintaining kettle, thermal kettle.
There are household thermopots with a capacity of 2–6 liters. There are also ones with a larger water tank, but they are usually used in cafes, restaurants, in offices, etc. To reduce the cost of maintaining the water temperature, the housing has two walls with an air gap. So even the two-liter version is quite large. Holding it and turning it over to pour water is completely inconvenient. Therefore, thermopots are equipped with pumps for supplying hot water.
The pump can be electrical or mechanical. The temperature regulator is stepped or smooth. There are also models with electronic control (buttons or touch panel). In this case, there may be a remote control.
Operating principle of the thermopot
After filling the tank with water and turning on the device, the heating elements begin to heat the liquid to a boil. When 100⁰C is reached, the relay is activated and the thermopot automatically switches to heating mode. The latter requires about 70-100 W, while boiling requires ten times more - from 1000 to 2500 W, which depends on the specific model.
Important! The water in the device cools at approximately the same speed as in a regular thermos, thanks to the heat-resistant flask that retains heat. That is, even when turned off, the liquid will remain hot much longer than in a classic electric kettle.
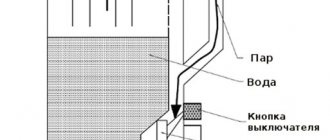
After the water temperature reaches minimum values, the thermal switch is triggered, activating the heating elements to maintain a certain degree. All devices of this type are equipped with a feed system. That is, there is no need to tilt the thermopot. It is enough to place the glass on a special platform and press the corresponding key. Water will be supplied under pressure, the strength of which depends on the selected model.
Budget thermopots, as a rule, have up to 4 modes, which are needed to indicate the minimum and maximum temperature thresholds. More expensive devices have much more adjustment options. In addition, they are equipped with some additional functionality: timer switching, “no steam” mode, self-cleaning, extended protection, an additional tank, etc.
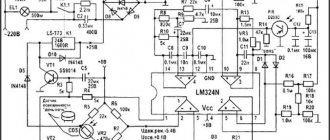
Schematic diagram
If the thermopot does not work, you need to familiarize yourself with the circuit diagram.
The circuit of this device is not too complicated - even a non-professional electrician can “read” it.
It can be used to investigate the causes of failure of devices from such popular manufacturers as:
- Polaris;
- Vitek;
- Elenberg;
- Scarlett et al.
Schematic diagram
Explanation of the main symbols used in the diagram
Explanation:
- S1 and S2 are temperature switches from the KSD 302 series, the first is located in the middle of the stainless steel tank and is connected in series to transmit a supply voltage of 220 Volts, the second is located in the bottom of the thermopot - current flows through it to the main heating element;
- F1 – thermal fuse;
- TN2 is an additional water heating coil, which should be checked to answer the question why the thermopot does not maintain the temperature;
- relay S1.1 connected in parallel with the reboiling spiral;
- TN1 – spiral of the main heating element;
- VT1, VT2 – transistors on which there is a relay for controlling the on and off time, which open under the influence of a charged capacitor C3;
- C3 is an electrolytic capacitor, charged by pulses from VD6 when the S4 button is briefly pressed;
- K1 – relay winding through which electric current flows and switches S1.1;
- C1, C2, VDS1 – voltage rectifiers that supply power to the time relay circuit.
Notes:
- C1 serves as a damper for excess voltage;
- C2 – smoothes out electric current ripples resulting from the operation of the bridge rectifier VDS1;
- Some units do not use C1, but a step-down transformer.
Disassembling the thermopot
Any deviation from the normal operation of the device can be called a breakdown requiring repair.
To remove the top housing, locate and remove the screws in the bottom of the unit. Next, make a visual inspection of all components for damage - mechanical and thermal, which can most often be repaired using a soldering iron.
The next step is to check the thermal switch in the bottom of the case using a regular household tester. A working switch does not have infinite resistance. Simply replace a non-working unit with a new one, and the easiest way to order it is via the Internet.
The pump can be disconnected only after disconnecting the supply tube and unscrewing the fastening bolts. Check it for clogging - often cleaning the impeller and magnet is enough to give the pump a second life.
Also, a standard thermopot, for example, Polaris or Boch, has not one, but several thermal switches, one of which is needed to control the water temperature, and the second protects the device from turning on if it is empty. The thermal switch is located so that the walls of the tank and the flange are in close contact. A special thermally conductive lubricant is used for contact.
The pump does not pump water
A common problem is that the potter stops supplying hot water. Pouring it with a ladle is an unpleasant prospect. And without water supply, the device turns into a regular electric kettle with improved thermal insulation. Repair of the thermopot in this case depends on the type of breakdown. If the pump does not turn on, there are two options - power problems or a burnt out motor. If it hums, but the water does not flow or flows with little pressure, the pump may be clogged or the impeller is faulty.
The thermopot does not pump water. It's not necessarily the pump. There can be many reasons
Eating problems
Oddly enough, the potter pump may not work due to a burnt-out heating coil. Look at the diagram. The pump is powered through this part of the heater. That is, if the potter does not pump water, the first thing we do is check to see if the temperature maintenance heater has burnt out.
Electrical circuit of a thermopot: one of the device options
If there are problems with the heating element, after replacing it the pump will start working. If replacing the heater is not an option, you can “build in” a separate power supply for the pump. You can find a charger with suitable parameters (most likely a constant voltage of 12 V is required), disassemble the case, and place the bridge and fuse somewhere in the case. You will have to resolder both the input and the voltage supply to the pump.
If the pump works but does not pump water
If the pump motor hums but no water flows, it may simply be clogged. In this case, it is necessary to disassemble the entire water supply path and rinse it from scale. It should help. Step by step steps:
- First of all, we take photos of all the parts from all sides so that we can assemble them later.
- Remove the hoses by loosening the clamps.
- Disconnect the pump, wash the hoses and remove the scale.
The thermopot pump may not pump due to scale - We measure the windings (with a multimeter in continuity or resistance measurement mode). There should be no short circuit or open circuit (very small or infinitely large resistance). If there is one or the other, it is useless to clean the pump - you need to buy a new one.
- If the motor is intact, perhaps the reason that the electric potter does not pump water is due to scale or debris that has gotten inside the pump and is preventing the impeller from spinning. In the pump, we remove the impeller (it is held on by magnets, just pull it), clean the blades and magnet from plaque, debris, etc.
- We assemble it in reverse order, turn it on and check the operation.
Cleaning or replacing a thermopot pump is not as expensive as replacing a heating element. So this type of repair work is quite justified.
How to check?
In order to independently check the reason for the incorrect operation of the thermopot, you need to know its internal structure. So, almost any thermopot consists of the following parts:
- reservoir;
- heating element;
- manual or mechanical pump.
It is the last component that most often causes the lack of water supply.
In order to check the correct operation of this mechanism, you just need to pour water into the thermopot and try to pump it out. It all also depends on the type of pump. To activate the automatic pump, simply press the appropriate button on the control panel. And to pump water using a cylindrical shape, you need to press it at least 2-3 times.
If there is no water supply or a thin stream is observed, then the mechanism is clogged or broken. You can try to disassemble the thermopot and fix the problem yourself.
Important point! Before you begin repairing the thermopot, you must disconnect it from the network and drain all the water inside.
Frequent breakdowns of thermopots
Let's look at the most common problems and how to fix them.
- The indicator panel does not light up and the device does not function at all. In such a situation, it is necessary to inspect all wires and connections, as well as the thermostat and fuse. If there is more than one breakdown, it will be more difficult to repair the device yourself.
- Only the secondary boil key functions, but the main primary boil is not performed. In such a situation, the thermal switch located in the bottom is checked.
- The main boiling works, but during the secondary boiling, the thermopot does not work. It is necessary to inspect the module on the main board.
- Boiling does not work, only heating is available. Most likely, the heating component burned out or the wire broke.
- The water supply is not working. There are problems with the pump. Often this will burn out the auxiliary heating coil element, resulting in no voltage being supplied to the motor.
See also -
How to repair an electric kettle yourself
What is a thermopot?
This is a modern electric analogue, which is already used by a large number of people. It has proven itself in work and safety. The thermopot includes an electric kettle and a thermos, they are combined in one device. This is convenient because the design does not take up functional space in the kitchen.
More and more people are inclined to want to purchase a thermopot. “What kind of device is this? How does it work? - these are questions that need to be carefully studied before purchasing a kettle. The thermopot will help you boil water in the shortest possible time, as well as maintain the optimal temperature for a long period.
First steps in repairing a thermopot: disassembling the body, checking the elements
In order to get to the contact group of the heater, you will need to remove the bottom cover, which serves not only as protection for the terminals, but also as a stand for the thermopot. It's easy to remove. It is fixed on plastic latches, which are opened with a regular slotted screwdriver or spatula.
PHOTO: YouTube.com You need to carefully unhook the plastic latches
Now you can check the heater. Here it is paired - one of the spirals is used for boiling (its resistance should be more than 4000 Ohms), and the second works to maintain the temperature (700 Ohms). In our case, the more powerful heating element shows no signs of life. Missing resistance indicates an open circuit.
PHOTO: YouTube.com It is clear that there is no resistance, the chain is broken
Location of terminals of the contact group
For clarity, you can pay attention to the example below.
On him:
- the first on the left is the common contact, which comes directly from the power socket;
- central - it goes to a powerful heater responsible for boiling;
- right contact - here you can see that it is powered through a low-power diode, which reduces the voltage by half. This means that this is the nutrition of the element responsible for maintaining the temperature of the water.
PHOTO: YouTube.com Location of contacts of heating elements
The diagnosis is clear, which means it’s time to start completely disassembling the thermopot and dismantling the heating element. Anyone can disassemble the case by unscrewing the fixing screws, and therefore we will not dwell on this. After the housing is completely removed, you can “in all its glory” examine the heating element, which here is made in the form of a clamp.
If there is no marking on the heater, then it is best to dismantle it and take it with you to the store to find the right one.
PHOTO: YouTube.com This is what a thermopot heating element looks like
How to disassemble a thermopot?
This electric kettle can be found in many households or workplaces. Thanks to its versatility, a large number of people want to purchase a thermopot for themselves. What kind of device is this, and can it be repaired? You can repair any electrical equipment yourself or take it to a workshop.
Each person will be able to remove the top part of the thermos from the thermopot. To do this, you will need to unscrew all the screws that are located on the bottom of the device. First of all, the board is inspected for damage. In some cases, cracks may be detected in the solder joints, which results in elements falling off. To repair a thermopot with your own hands, you need to use a soldering iron. It will help secure all the components in their original places.
A specialist must inspect the thermal switch. In most models it is located at the bottom of the device. Using an ohmmeter, its working condition is checked. It is worth noting that a device that is working must have zero resistance. Non-working parts are replaced with new ones, which are purchased in online stores. The thermopot diagram, which is in the instructions, will become an assistant when replacing all non-functioning parts.
Reasons for malfunctioning thermopots
Before you start looking for the reasons for the breakdown of the thermal kettle, you need to know what kind of item it is. A thermopot is an electric kettle that includes a thermos function and consists of two bodies. The outer one is usually made of plastic, and the inner one is made of metal. The inner housing contains a water flask. The kettle is closed using a lid on which the entire control panel is located.
To fix any breakdown of the thermopot, the first thing you need to do is check that the settings are correct. In its settings menu you need to set exactly the water heating temperature that is needed. If everything is in order with the heating settings, then the reasons for the breakdown may be:
- thermal switch located on the bottom of the kettle;
- thermal fuse located on the wall of the thermopot;
- insufficient contact of any component connectors;
- electronic board malfunction;
- The indicator panel stopped turning off. There are times when, on the contrary, the indicator panel turns on, but the thermopot does not start. If this is the cause of the breakdown, then it is worth checking all its components, wiring and thermal fuse.
- The kettle stopped turning on. To eliminate this malfunction, it is necessary to check the correct operation of the electrical circuit and temperature switches.
In order to more accurately identify the cause of the gadget’s breakdown, you will have to disassemble it.
What does a thermopot consist of?
All devices have a similar operating principle. The main difference is the presence of additional functions. To repair a thermopot, you will need to remove the working parts that are located inside the housing. All drives are equipped with special beads made of ceramic materials. These components are designed to protect internal parts to completely prevent the drive from coming into contact with a metal or glass container.
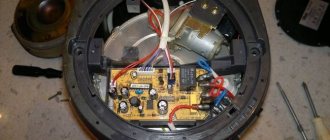
Repair of a thermopot can be carried out by anyone who has experience working with electric kettles. On the side of the structure there is a cylindrical object - this is the thermopot engine. The water pump was designed to supply water. The specialist will also see an electronic board with a circuit and a control unit.
Why do you need a pump in a thermopot?
A pump, or pomp, is needed to supply water through the spout. After the lid has been sealed and the water has been heated to the required temperature, you must press the unlock button. The Lock LED turns off and the Power key can be pressed. The pump begins to pump water that flows out of the spout. As soon as the user releases the key, the pump turns off and the water supply stops. After a few seconds, the interlock is activated, again locking the electric motor switching circuit. The control system of advanced models includes a water level sensor. If the water in the flask runs out, the pump turns off.
Many models are equipped with a backup hand pump in case of power failure. It is a corrugated tank located under the top cover of the device.
General thermopot device
Its capacity is usually 3-5 liters. For coffee breaks at large conferences, thermal pots with a capacity of 6, 8 and 10 liters are used. The thermopot is not much more complicated than a kettle. The main components of the device are located inside the plastic case:
- Flask. Made from stainless steel or special strengthened glass. There is a heating element at the bottom of the flask. It has the shape of a spiral or is built into the bottom of the vessel. The top of the flask is closed with a sealed lid;
- There is a hot water pouring unit at the front. It consists of a tube that goes down to the bottom of the flask, filters and a spout under which cups are placed;
- Electric pump. This is a mini compressor that pumps water out through a spout;
- Hand pump. Many models are equipped with a manual pump in addition to the electric one or as the main pump;
- Power unit. This unit provides power to the electric heater, and also converts AC mains voltage of 220 to low-voltage DC to power the pump and control system;
- Control and indication system. The electronic unit controls: allows you to set and maintain the required water temperature, unlock the pump, and controls its operation. The unit shows on the display the current operating mode of the device and the water temperature.
Quick thermopot repair: frequent breakdowns
If the thermopot constantly breaks down, then you need to take it in for repair or deal with the problem yourself. It is better to start repairing the kettle by disassembling the body, removing the lower plastic part, and unscrewing all the bolts. After this, access to all electronics opens. The electrical component of the product is open to fault detection. The fundamental importance is to repair the thermopot after complete disassembly. Having assessed all the components as described in the instructions, you can determine the reasons for the breakdown - perhaps the stainless steel tank has broken.
Reasons why the thermopot does not work:
- The indicator panel does not turn off. The opposite also happens, a complete lack of operation of the device and the indicator panel. In this case, you need to check all wires and contacts. Check the boiling regulator.
- The main switch doesn't work. Check all temperature switches and whether the electrical circuit of the switch located on the bottom is working correctly.
- The water is heated, but not boiled. When you turn on boiling, the thermopot turns off and does not perform its main boiling function. In this case, the contact is checked for rupture or the part is completely boiled.
If the thermopot does not heat due to the breakdown of 2 spirals, then there is no point in repairing it. This will take a long time and a large amount of money. If there are many defects, it’s easier to get a new one, because repairing the wiring and tank will be expensive in total.
Advantages of a thermopot
There are several advantages that such a unique and modern electrical device has.
Typical faults
The most common causes of breakdowns are the following device parts:
- network wire;
- control module;
- water pump;
- electric heaters;
- thermal switch.
Network wire
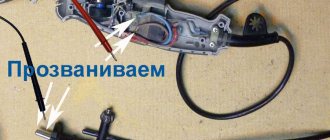
Before you repair a thermopot yourself, you should disconnect it from the network. After this, in order to “ring” the device’s wire with a tester, it must be disconnected. To do this, unscrew the screws on the bottom of the device and remove it. You will see the terminals where the power cord is attached. Disconnect the cord and start “ringing” it with the tester. If the cord is in order, you can proceed to further troubleshooting.
Microcircuits
If you find that a button or all keys on the device do not work, then the cause of the problem may be a faulty control unit. It is not recommended to repair it yourself, since you need to have certain knowledge in radio electronics. It would be better if a service center repairs the thermos kettle.
Electric heaters
If, after turning on the device, it does not boil water, while all heating modes are working, as well as the automation, then these symptoms indicate that the heater may have burned out, or the thermostat has failed . To find out, you will need to disassemble the unit.
- Empty the water from the container and turn the device over. At the bottom you will see screws that need to be removed.
- Using a flat object (you can use a screwdriver), remove the plastic ring from the latches. Underneath you will see a fastener that needs to be unscrewed.
- After removing the screws, remove the tray. To continue disassembly, it is recommended to mark all the wires of the same color with a marker and photograph the location of all other conductors. This should be done so that later there are no difficulties during assembly.
- Disconnect the clamps holding the hoses connected to the pump. They can simply be cut off with scissors or wire cutters.
- Disconnect the hoses from the electric pump connections.
- Remove the top cover of the thermopot without much effort, turn it upside down and lower the tank so that it rests on the table.
- Unscrew the PCB and set it aside.
- Under the gasket you can find 2 more screws.
- After unscrewing all the screws on the metal tray, it can be removed along with the bottom.
- Next, remove the 8 screws holding the cover in place.
- Now use a screwdriver to pry up the protective cover and remove it. You will see a heating element.
- After removing the heating element, it must be checked for a break using a tester. If the changes show that there is damage to the heater, then it will have to be replaced with a new one, since this damage does not cause the water to boil.
The type of heating elements may differ in different models of units. Their location may also differ. But the algorithm for disassembling the device is, in most cases, similar. To learn more about how to change heaters, you can watch the video.
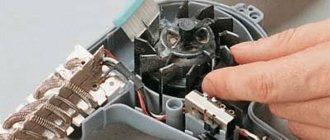
water pump
If the thermopot does not pump water when you try to pour hot liquid into a cup, then most likely the pump is not working due to its failure. To get to the pump, you will need to disassemble the device as described above. After removing all parts of the bottom, you will see the pump.
Next, do the following.
- To make it easier to remove the pump, disconnect one of the tubes connected to the pump. If the tubes are clogged with scale, it is recommended to remove them and clean them.
- Separate the pump from the housing and be careful not to lose the silicone gasket.
- After this, unscrew the fasteners connecting the motor to the impeller to the pump body.
- After disconnecting the pump housing and the electric motor, you can notice a build-up of scale that interferes with the rotation of the impeller.
- Also, if you remove the impeller (it is responsible for the water supply), you can find a clogged magnet that needs to be cleaned of dirt.
If, after removing all contaminants, the pump does not turn on and there is no water supply, then you will need to purchase a new pump, since these signs indicate a burnt out motor winding.
Thermal switches
Sometimes a situation arises when the thermopot does not turn off and constantly boils water. Or vice versa: you poured water, the device heats it, but turns off when the liquid is not yet boiling. Why is this happening? This malfunction can occur when the thermal switches are faulty. They can be found on the bottom and walls of the tank. For better contact with the surface, special thermal paste is used.
The thermal switch, located at the bottom of the tank, is attached to it with two screws. Sometimes a manufacturer, especially a Chinese one, applies little thermal paste, which is why the thermostat starts to work incorrectly: the device may not turn off for a long time when the water is boiling.
To check the thermal relay for functionality, you need to disconnect it from the tank body and remove the wires from the terminals. In the normal state (without heating), the relay is in the “on” position. If you check it with a tester, the device will show a resistance of 0 ohms.
Next, you should connect 2 wires to the switch and lower it into water brought to a boil. Now measure the resistance again. If the device shows infinity, this means that the switch has turned off and it is functioning normally. If the sensor does not work, you should purchase a new one and replace it. You can watch the following video about replacing the thermal switch.
Some breakdowns of the thermos kettle were discussed above, which can be completely eliminated without the involvement of a specialist. In other cases, the unit should be taken to a specialized service center for repair. But before you hand over your device for repair, ask how much it will cost you. Most often, from a financial point of view, repairs are not justified, since their cost will be within the price of a new thermopot.
How to repair a thermopot pump with your own hands?
If the other systems are checked and it is determined that the thermopot pump is not working, then a major disassembly of the device will be necessary - the pump is hidden deep in its depths. After all the bottom parts are dismantled, you can see the pump. When the thermopot does not pump, the pump can be repaired with your own hands
Figure 2 Pump after removing the bottom. Pipes and contacts are visible (right)
The sequence of actions for disassembling the unit is as follows:
- Disconnect the inlet and outlet pipes. If they are filled with scale, the pump does not pump water well. They should be cleaned, washed and blown out.
- Unscrew the screws securing the electric motor housing to the pump chamber.
Figure 3 Beginning to disassemble the pump
- Carefully separate the pump chamber with impeller and the motor housing. In this case, you need to treat the silicone gasket with care. If it is worn out or damaged, it must be replaced with a good one.
- There may be scale in the chamber that interferes with the rotation of the impeller. It must be carefully removed with a plastic or wooden spatula. The use of sharp metal objects is not recommended as they may damage the camera body.
Figure 4 Scale in the chamber
- After dismantling the impeller, the magnet recessed in the chamber body becomes visible, which is also susceptible to scale deposits. It must be cleaned with care. You can do this with a screwdriver, but it is safer to use a plastic or wooden spatula.
Figure 5 Scale prevents the impeller from rotating
Figure 6 Cleaning the magnet from dirt
- After cleaning the pump parts from scale, carefully reassemble it in the reverse order of disassembly. Particular attention should be paid to uniform tightening of the screws securing the electric motor to the pump housing and even laying of the gasket.
After assembly, you need to perform a test run. If the pump still does not work, it will have to be replaced. The engine is manufactured non-separable and cannot be repaired.
What to do if the hand pump does not work? It is much simpler. Actually, it consists of a single part - a corrugated cylinder. If it is worn out and leaky, it stops performing its functions and pumping air into the flask.
Figure 7 Dirty hand pump
In this case, it needs to be replaced. To replace it, you will have to remove the cover of the thermopot and disassemble it. On some models, the hand pump is pressed against a top cover secured with several screws. These screws will have to be unscrewed. On other models, the cover holding the hand pump cylinder is secured with latches. They must be pressed out with a thin screwdriver, being careful. If the latches break, you will have to change the entire cover, and it costs from one and a half to two and a half thousand rubles.
Figure 8 Spare part for hand pump
The hand pump may not pump water in another case - if the silicone gasket of the thermopot lid is leaking. In this case, the air pumped by the button comes out freely, and water is not supplied through the spout. In this case, the gasket will need to be replaced. To do this you will need to disassemble the case. In some models, the gasket can be carefully lifted with a spatula or a thin screwdriver. On others you have to remove the flask.
How to fix this problem?
There are two reasons that affect the water supply in a thermopot:
- mechanical, mainly due to water obstruction due to the formation of scale in the channels. To eliminate this cause, it is necessary to descale the entire thermopot system, strictly following the instructions. Use gentle products to avoid damaging the rubber elements of the system. In exceptional cases, clean mechanically.
- electrical, which consists of breakdown of electrical elements (buttons or pump), or lack of contact to the above electrical components. It can only be treated after disassembly. It is necessary first of all to ring the entire line and make sure that current is supplied to the pump and, last of all, check the pump itself. This can be done by directly supplying it with a voltage corresponding to the pump parameters.
There are three water supply buttons in the thermopot - one is a large pump button for manual injection located in the top cover, and two electric drive (pump) buttons, one on top on the control panel, the second behind the spout from which water flows, on the bottom. When you press any of them, water should flow from the spout.
If you have experience in repairing electrical appliances, then read on; if not, it’s better to take it to a service center.
It is necessary to determine which of the buttons does not work - a mechanical pump or an electric one. Arm yourself with a Phillips screwdriver and preferably have a multimeter.
All three buttons fail at once very rarely, this is if the seagull has not seen a lot of time and cleaning and maintenance.
The most common problem with electrical button failure is failure of the pump motor or clogging of the impeller and tubes with scale.
There is no way to do this without disassembling the thermopot. First of all, turn off the kettle from the 220 volt power supply. We turn it over and take out the belt on which the kettle is able to spin while standing, we see long screws (usually there are two or three of them). We unscrew the screws, remove the bottom cover and find ourselves in the bottom part of the kettle where the tube, the electronic control and power board, and the pump are located.
Usually in such a situation, the first thing I do is disassemble the pump. Separate the impeller and the engine
Sometimes there is a lot of scale in the impeller compartment, and not just small scale. Sometimes even the petals of exfoliated solid scale simply jam the impeller blades. Everything needs to be thoroughly cleaned.
We also clean the magnet from foreign objects and possible rust -
Reassemble in reverse order.
You should also ring both pump activation buttons with a tester to ensure they are making proper contact in the on position. The wires themselves rarely fail, but the soldering points may be poorly soldered - also check their contacts.
For deeper repairs, if the motor does not even hum, you should check for voltage at the motor terminals with the buttons turned on; the motor is usually designed for power in the range of 8 to 12 Volts DC. This is the voltage that should be supplied to it from the board.
Video instructions for repairing a thermopot
A thermopot is essentially an electric kettle combined with a thermos. Unlike an electric kettle, an additional heating element was added to the design of the thermopot, used to heat water, and a controller controls its operation and maintains the temperature within 75º - 95º C. In many thermopots, in addition, a pump is installed to supply water. The water heating tank is covered with a casing that protects against burns and serves as the outer shell of the thermos, reducing electricity consumption to maintain the temperature. If the enclosure is made of metal, it is grounded (see electrical diagram) to protect against electric shock. All main components of the thermopot are located at the base of the body.
Electrical circuit of thermopot
The electrical circuit diagram of thermopots of various models and manufacturers does not differ significantly from the one shown below:
Diagram of a thermopot with one temperature sensor (Fig. 1)
Schematic diagram of a thermopot with two temperature sensors (Fig. 2)
Parts and components used in the thermopot:
The water pump is an electric motor with an impeller in a sealed housing that, when turned on, supplies water to the thermopot spout. Power supply 12V DC. It is attached with a bracket with screws to the body through a silicone gasket, which protects the motor from overheating. The impeller itself rotates due to a magnet, a very interesting design, a magnet on the motor shaft rotates the impeller with a similar magnet.
Temperature sensor (thermal switch) - normally closed, when the required temperature is reached (95º - 125ºC) it opens the contacts. Designed for switching 10A 250V. It is attached to the surface of the tank with screws; for better thermal contact, thermal paste, type KPT-7, is used.
Thermal heating element - a heating element consisting of two heating elements (boiling, heating) is attached to the base of the tank. The resistance of the heating heating element is 650-700 Ω, the boiling heating element is 65-90 Ω.
Operating principle of an electric thermopot
The water heating heating element is constantly turned on; when the temperature in the tank drops to 75º (for example, if you add cold water), the boiling heating element is turned on. When the temperature reaches 95º, the thermopot turns off the boiling mode and switches to heating mode. Power consumption in heating mode is ≈70 watts, in boiling mode 1000 - 2500 watts, depending on the thermopot model.
If the water in the tank boils, the temperature rises sharply and when it reaches 125º, the thermal switch (F1 Fig. 1, FU1 Fig. 2) breaks the power supply circuit of the thermopot until the temperature drops.