Recommendations for choosing backlight
Some practical tips for apartment interior lighting design:
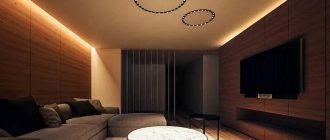
- When using niches, double or triple ceiling models in a room with low ceilings, you should carefully consider the lighting so that the structures do not look too heavy and bulky.
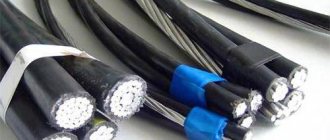
- For high-quality lighting, it is advisable to choose a white LED strip.
- An RGB LED strip is suitable as decorative lighting for a box or niche with a curtain rod.
- The lighting should not only enhance and decorate the ceiling space, but also indicate and correctly illuminate all functional areas in the room.
How to choose lighting for suspended ceilings
Stretch ceiling structure can be made of fabric or film. When choosing lighting, you should take into account the characteristics of the canvas. Cracks may appear on the film, the material may change color and lose elasticity if regularly exposed to temperatures above 60 degrees. The fabric is more resistant to elevated temperatures.
When choosing lighting fixtures for suspended ceilings, you should pay attention to the following characteristics:
- The maximum power of incandescent lamps should not exceed 60 W; for halogen lamps this figure should not exceed 30 W.
- The distance from the ceiling surface should be at least 40 cm.
- Energy-saving and LED lamps heat up slightly during operation; such devices are better suited for suspended ceilings.
Lighting devices for suspended ceilings Source dizainexpert.ru
For effective preparatory work and installation of lamps, the location of the devices must be thought out in advance. The lamps are attached to the main ceiling, and holes are made for them in the fabric of the suspended ceiling structure. Special thermal insulating rings protect the fabric or film from exposure to elevated temperatures, and also allow you to create a complete and beautiful appearance of the structure.
Types of lamps for suspended ceilings:
- A chandelier in the center of the ceiling is a classic option for placing a lamp. Devices can have different shapes and sizes; when using incandescent or halogen lamps, do not forget about the maximum power and safe distance. Plafonds with lamps can be directed downwards or onto the walls, not onto the canvas of the suspended ceiling structure. It is worth choosing lamps and lamps that do not heat up too much to match the main interior design.
Stretch ceiling with a chandelier Source dizainexpert.ru
To achieve a safe distance between the lamps and the ceiling, when installing a hanging crystal chandelier, you need to increase the length of the suspension.
You should consider how the lamp will look when installing a glossy ceiling. The reflective surface reveals those parts of the chandelier that are usually not visible from below.
- One of the most common options for complementing the ceiling are spotlights. They can be used to provide basic or additional lighting, highlighting the required area. Spot lighting is ideal for rooms with low ceilings. For good illumination of the room, you should install one lamp per approximately 2 square meters. m. area. The variety of models allows you to choose a model that suits the basic interior design.
Spotlights on the ceiling Source design-homes.ru
Types of ceilings
There are several types of ceiling structures.
Suspended ceiling
Hanging models are divided into the following types.
From plasterboard
A gypsum ceiling in combination with various lamps allows you to create unusual light accents in the room. See more plasterboard ceiling lighting ideas.
From wooden slats
Built-in lighting located between the slats gives this design a unique and interesting appearance.
The photo shows a slatted ceiling structure with lighting in the living room.
Glass
Glass models visually expand the room and give it lightness; in combination with various external or internal lighting, they look very beautiful and provide quite bright lighting.
Tensioner
see also
Photos of suspended ceilings with lighting
Various textured stretch fabrics allow you to fill the room with a soft glow. Such products look quite impressive and add a romantic mood to the atmosphere.
Stained glass
Original lighting located under the stained glass window adds depth and sophistication to the ceiling space, and allows you to highlight either the entire ceiling or certain sections of it.
The photo shows a stained glass ceiling structure with lighting.
Acrylic
Plexiglas creates original lighting effects and softly diffuses light. Illuminated acrylic or polycarbonate panels form a beautiful and luxurious interior.
Mirror
It gives the room additional volume and spaciousness, and in combination with lighting, mirrors look especially monumental and majestic.
Caisson
In this design, lighting fixtures can be placed both in each cell and in other areas of the coffered model.
LED strip as room lighting
Initially, an ordinary chandelier was planned for the main lighting of one of the rooms where a major renovation was underway. But recently I came across a super-bright Ultra 5000 LED strip with smd 5630 LEDs from the Arlight brand. The decision was made quickly, finally and irrevocably - I want such a strip as the main light in the room.
Theoretical brightness
The manufacturer stated that the Ultra 5000 smd 5630 tape provides a luminous flux of as much as 1200 lm per meter.
For comparison, the luminous flux of a 100-watt incandescent lamp is about 1600 lm. In my case, for a room of 14 m2, 15 meters of tape should have been used, laid along the entire perimeter. It seems that the resulting luminous flux cannot be calculated by simply multiplying lumens by meters. I decided to puzzle over how to correctly calculate the total luminous flux, but after Googling, I realized that this problem cannot be solved at once. I need to spend nth time studying the theory of lighting calculations using the luminous flux utilization coefficient method and somewhere find several data unknown to me:
- reflective ability of walls, ceilings, and other objects;
- honest luminous flux of one strip LED;
- characteristics of the profile diffuser in which the tape was planned to be placed;
- voltage drop along the strip and the dependence of the LED luminous flux on it.
In the end I decided that I would just do it and see what happens. But, just in case, I also purchased a dimmer for LED strips. Suddenly it will be too bright
Theoretical spectrum
Bright LEDs are, of course, cool.
But brightness is one thing, and the spectrum of light is another. If we compare it again with an incandescent lamp, it is good because it emits light in a wide range, its spectrum is relatively uniform and in some parts close to the spectrum of sunlight. Such light is familiar and pleasant to the eye, it does not irritate or tire.
The spectrum of white LEDs differs significantly from the spectrum of an incandescent lamp, and not for the better:
White LEDs in this case are of the phosphor type; two humps on the spectral characteristic are formed from the radiation of a blue LED (blue region of the spectrum) and a phosphor (yellow region of the spectrum).
My lower brain understood that I should be careful with the use of LED lighting and leave a regular chandelier as well. Who knows how the eyes will react to such a spectrum. It is also hardly possible to calculate this in advance.
Based on the color temperature, I chose the middle of the three options offered by the manufacturer - the so-called. Day White, 4000 K. Just seemed the nicest.
Accessories
Profile
I have a simple suspended fabric ceiling, without any multi-levels or cornices, and since the perimeter lighting strip was planned to be placed under the ceiling in plain sight, it was necessary to refine its appearance, but make it as invisible as possible. Thinking about which profile to use, straight or angular? It turned out that the intensity and uniformity of the lighting did not visually change in any way depending on the direction of the glow of the LEDs of the strip located near the ceiling. Down, along the wall, along the ceiling, at an angle to them - the same. This is understandable; the nominal glow angle of these LEDs is 120°, but in reality it turned out to be close to 180. Therefore, the angle of the tape was not important, and I chose a straight profile as the most compact:
Ribbon
Ultra 5000 tape is supplied from the factory on reels of 5 meters, the cutting ratio of the tape is 10 cm, the store cuts for sale in multiples of a meter.
In my case, I didn’t have to cut it, I took three whole packages: The width of the tape is 12 mm, it doesn’t quite fit into the selected profile, but it fits:
Power supplies
The rated power consumption of 15 meters of tape is 240 W.
Calculated based on real measurements - 180 W (measured on a 3-meter segment, current consumption was 3 A). But, in addition to power consumption, there is also the factor of voltage drop along the tape, which leads to a gradual decrease in the brightness of the glow towards its end. Power supplies for LED strips (I don’t know all of them or not, but the ones I took - yes) allow you to power one common load in parallel. To equalize the brightness along long powerful strips, instead of one power supply at one end, two less powerful power supplies are included at both ends of the strip, and in especially difficult cases, also in the middle of the strip. In my case, the perimeter is closed, I divided it in half, and simply took two 130 W power supplies and connected 7.5 meters of tape to each separately:
The choice of sealed power supplies was due to the fact that they have significantly smaller dimensions compared to open ones and do not have coolers, that is, they do not make noise, which is important. In addition, I planned to place them all in a sealed (for fire safety purposes) shield, located in a hidden place inside the wardrobe, where there are problems with heat dissipation.
Dimmer
The dimmer, which I liked the most in terms of functionality from those that were available, was originally designed for wall installation:
This dimmer has both mechanical brightness adjustment and remote control. Moreover, in addition to smooth adjustment, the remote control has four buttons for preset brightness levels (25%, 50% 75% and 100%), and four more buttons for programming custom levels.
But to connect it requires four wires, which I did not have installed in my walls. Therefore, I decided that I would install the dimmer in the panel along with the power supplies. By mechanically adjusting the brightness level, I will set only the starting level when turning on the tape, and I will adjust the desired brightness from the remote control.
But for this you will need to unsolder the IR receiver:
take it out of the shield on the wire and place it in a convenient, inconspicuous place. Will it work like that? Checked it, it works:
Looking ahead, I’ll note that the dimmer has one significant drawback. The role of memory of the brightness level set before turning off is performed by the potentiometer. When 12 volts are supplied to the dimmer, the tape turns on to the brightness level that was set by the potentiometer. After which the brightness can be changed both from the remote control and the potentiometer. But, regardless of how the potentiometer was installed, at the first moment when turned on, the dimmer does not immediately start PWM, and pure 12 volts flow out. At the moment of switching on, the tape necessarily flashes for a split second at maximum brightness, and then is set to the set value. It hits the eyes unpleasantly.
Amplifiers
The dimmer power was not enough for my tapes. I had to buy additional amplifiers for it - one for each power supply:
Shield installation
In addition to the main lighting, I decided to use another 3 meters of the same strip for local lighting above the cabinet, with a separate wall switch and limit switches in the sliding doors.
I also planned decorative lighting from a simple LED strip and a night light on duty on a short piece of dim strip switched on by a photo relay. All this is not directly related to this article, but since it was necessary to place three additional different power supplies in the shield, this should be mentioned. Initially, the photo relay has a rather large size and an unaesthetic appearance, so I also wanted to hide it in a shield so that it would not loom before my eyes: I did the same with it as with the dimmer - I unsoldered the sensor and moved it outside on a wire, having previously checked that it was will also work:
I found a sealed shield of suitable sizes:
Stocked up with corners and fasteners:
And started installation:
The shield is ready:
Installation of profile and tape
To increase light output, it would be advisable to mount the tape not close to the ceiling, but a little lower, at least 5 centimeters. In this case, the reflection of the light from the tape from the ceiling will be better.
But I didn’t have such an opportunity for some subjective reasons, so I mounted it close to the ceiling. On the left is a piece of profile for a local lighting strip above the cabinet, mounted on the lower end of the cornice, behind which the decorative lighting strip will be located:
It’s easy to cut the profile with a fine-tooth hacksaw exactly at an angle of 45° if you use a miter box, for example this one:
The profile was fastened with gypsum board self-tapping screws, length 32, directly into the drywall, without dowels (the drywall was glued to the walls using Perlfix), having previously drilled holes in it (in the profile) in increments of half a meter:
Then I laid the tape in the profile and soldered the power wires. I have not yet covered the perimeter profile with a diffuser (the store has not yet supplied part of the diffuser), I only covered the local lighting profile above the cabinet:
First start
So - let's turn it on!
Wow! This is awesome! Of course, I wasn't blinded by the brightness. Bright, yes, but not overwhelming. And very beautiful! Flash photo:
Without flash:
View from the street (4th floor):
I tried to photograph the difference in illumination between the tape and the 200 W incandescent lamp, which I currently have hanging instead of a chandelier. I fixed the camera settings with one light source, launched the camera for a series of shots, and in the meantime switched the light source. This is what happened.
First I tuned in to the light of an incandescent lamp and started a series, the first photo is a lamp, the second is a tape:
Now, on the contrary, the first is a tape, the second is a lamp:
An interesting effect - in the light of the tape there are almost no vertical shadows. This can be seen, for example, by the shadow from a horizontal pipe and the missing shadow from a vertically located regulator handle on it.
From these photos you can see that 15 meters of tape shines brighter than a 200 W incandescent lamp. But it seems like not much. In fact, it is certainly not entirely correct to compare this way. The light bulb is a point source, and the tape is a distributed source. With the light of a lamp, the corners of the room are much darker than in the center, and with the light of a strip located along the perimeter, it is equally light everywhere.
I measured the illumination with a lux meter:
Here are the results in numbers:
| Measuring point | Lamp 200 W, lx | LED strip 15m, lx | Lamp + tape, lx |
| In the center of the room at floor level | 121 | 240 | 358 |
| In the center of the room at eye level | 1200 | 300 | 1500 |
| In the corner of the room at floor level | 58 | 152 | 205 |
| In the corner of the room at eye level | 43 | 382 | 428 |
| At a distance of 1 meter from the source | 323 | 530 | — |
| Close to the source | 90000 | 150 | — |
As can be seen from the table, the illumination under the light of the tape differs slightly between different measurement points in the room, whether near the floor, at eye level, in the corners or in the center - the difference is no more than 2-3 times.
Of course, this is a consequence of the uniform distribution of a large number of point light sources along the perimeter of the room. What is not observed with a light bulb that hangs in the center of the ceiling - the difference at different points reaches almost 30 times. When both the lamp and the strip were turned on at the same time, their illumination levels were simply summed up. If someone could explain to me why the lumens do not add up directly (or do they add up?), but the luxes add up (maybe this is a consequence of the large difference in the spectral characteristics of the LED and the lamp in the long-wave region?), and how with the stated light intensity of 1200 lumens per meter when measured at a distance of 1 meter from a piece of tape 4 meters long, the illumination is only 530 lux, I will be very grateful.
For a short section, I put a diffuser on the profile and photographed the difference at a short shutter speed:
I measured the illuminance at a certain distance: without a diffuser 600 lx, with a diffuser 520 lx at the same distance. Absorbs more than 10%. It’s a pity that there is no diffuser for the entire perimeter yet, so we can’t evaluate the overall decrease in illumination.
Voltage drop
The voltage along the tape drops significantly.
At the beginning it was 11.5 V, and at the end of the segment of 7.5 meters it was already 8.5 V. Total - 0.4 Volts per meter. The drop in brightness is not noticeable, but if you specifically compare, you can see that in one corner the tape is much brighter than in the other. Measurements with a lux meter at a distance of approximately 30 cm in opposite corners of the perimeter gave results of 1600 and 600 lux, a difference of more than 2.5 times. Measurements at other distances gave the same difference of 2.5-3 times. Therefore, the value of 530 lux in the table for measurement at a distance of 1 meter from the tape is some kind of average value, measured at a distance of approximately 2 meters from the beginning of the tape.
Heating of the tape, temperature in the shield
The tape heats up, and heats up noticeably.
At the beginning of the tape, the temperature of the aluminum profile was 55...57°C, but at the end it was already quite cool, about 30°C. When the diffuser is installed on the profile, the temperature does not differ significantly. Inside the sealed shield at maximum load (which is unlikely to happen in reality), the temperature also did not rise above 57°C after a 4-hour run. This slightly exceeds the rated operating temperature of the power supplies, but it didn’t stink, everything worked. In normal operating mode, when only the perimeter tape is turned on, the temperature in the panel is set exactly at the level of the power supply's rating value of 45°C. Quite satisfactory.
Summary
I am quite pleased with the technical side of the LED lighting system.
Convenient and simple installation, high-quality components, light switching on without delay (which not all power supplies for LED strips provide), silent operation, moderate heating, low consumption with high light output. There are only two minuses, but both can be solved in principle - the voltage drop along the strip (although the total illumination in the room is already quite enough), and the incorrect operation of the dimmer at the moment of switching on (can be solved by introducing a delay circuit for turning on the strip after turning on the dimmer, but then instead of flashing there will be this is the same delay, I don’t know what’s better). It’s too early to talk about the operational side; time is needed. The first impression is that this light is completely different. And it is impossible to say whether he is better or worse. Just different. I spent several days assembling furniture under the lighting of the tape, and did not feel any discomfort. In general, I like everything so far.
I didn’t like the financial side - the whole system cost me about 20 thousand rubles. The cost of a meter of profile tape is approximately 1 thousand rubles. Plus power supplies and other equipment. True, it is unknown how long all this will work. LEDs have a stated service life of about 100 thousand hours, by which time they lose up to 30% of their brightness. If you use the tape for an average of 5 hours a day, then it should last for 50 years. We'll see.
Below the spoilers are several subposts that are not directly related to the topic of this article, but are directly related to it.
Control of separate switching on of chandelier and ribbon
Background
Not knowing in advance whether we would like living under the light of LEDs, as I already mentioned, the decision was made to use a regular chandelier along with an LED strip.
But always including both in parallel is stupid. Switching wires in a switch is also no problem. I wanted to be able to switch on separately the ribbon, the chandelier, and both together if desired. Unfortunately, the LED strip appeared after the electrical wiring was laid in the walls. And the overhead light now began to consist of two different sources, which I wanted to control separately.
I am extremely skeptical about any kind of wireless solutions in this area. Yes, there are a variety of ready-made systems with controllers and wireless remote switches. But I believe that this approach is a cannonball, or in the absence of other implementation options. And the need to change batteries in remote switches was not appealing. It was necessary to find a simple, oak solution.
Initially, three lighting control points were installed along the wiring - above the sofa and at the two doors of the room (passage room). From each point it was possible to independently turn on or turn off the overhead light. And above the sofa, it was additionally possible to turn on some other, secondary light sources (decorative lighting, sconces), creating a variety of lighting scenarios in the room.
Solution
Having racked my brain over the possibilities of using existing wiring, I came up with a diagram in which absolutely all light sources can be turned off from all three points with one click.
This seemed more convenient if you need to quickly turn off all the lights. At the main control point (which is above the sofa), in addition, each light source had its own separate key, including a separate one for the chandelier, and a separate one for the tape. But there was one pitfall that could cause some inconvenience in use. If at the main control point all the light sources are turned off using their personal keys, then then with the switches at the doors it will be impossible to turn on any light at all, and you will first have to make your way through the room to the sofa in the dark.
It was necessary to find an option in which it would be possible to turn on at least one light source from any point, regardless of whether it was previously turned off by its personal switch or not. Using the same, already installed wiring, and without resorting to redundant wireless technologies.
A solution was found in the form of a conventional electromagnetic switching relay used as a self-resetting memory cell. The light control logic now looks like this.
Work algorithm
We decide which light source will be the “main” one, that is, turn on by default under any conditions.
And we connect it to the power supply through the NC contacts of the relay. To turn off only this one “main” light source, instead of a simple key switch, we use an HP key button. The button controls the activation of the relay, which is set to self-power, while simultaneously opening the power circuit of the “main” light source. And it remains in this state until all the light is completely turned off, after which it resets itself to its original state, closing the NC contacts, and allowing the “main” light source to turn on next time. This solution has one drawback - in order to turn it on again after turning off the “main” light source with a button, you need to reset the main switch twice. It would be possible, of course, to build a T-flip-flop on several relays, but the simplest reliably working circuit would require as many as 5 relays, and the starting state of the trigger would not be defined and could be anything: It was obvious that in order to finalize the circuit to ensure a certain starting state, it would be necessary a few more relays, in the end all this would result in an unreasonably cumbersome design. Therefore, I decided to put up with this minus for now.
Final implementation
The schematic diagram of controlling two light sources from three points with the selection of the desired light source at one of the points looks like this:
I have chosen the tape as the “main” light source for now, if you don’t like it, then it’s easy to reconnect the wiring. When the light is turned on at any of the three points, the tape must turn on. The chandelier has its own simple rocker switch. The ribbon can be turned off using the button.
Making a button from a regular rocker switch is very simple. For such transformations, my favorite Unica series of electrical installation products from Schneider Electric is perfect. Switches of this (and maybe not only this) series have a modular design; one or two narrow modules of various functionality can be installed in each post (per frame). And the modules themselves are assembled from standardized parts. Using the parts of various modules, you can assemble the devil in a mortar. All elements are fastened with latches, everything can be easily disassembled down to the parts and put back together without any problems.
This series has a standard position - Switches for blinds, catalog number MGU5.207.18ZD. The only position where non-locking keys are used, and where there are springs of the required size. Well, then as your imagination tells you, there are many options. I won’t go into the details of the disassembly; whoever gets involved will understand everything himself, everything is simple. And since this is not the first time that I myself have been rearranging Unica switches and sockets, I have accumulated a certain supply of spare parts in the form of semi-disassembled modules. From what I had, I assembled a two-key switch, one of the keys of which worked as a switch, the other as an HP button:
First from the left:
The finished switch block at the main lighting control point looks like this:
On the left is a common switch key for all light sources at the same time. The second is the tape mute button. Next are three keys for turning on various backlights (not shown in the diagram). The last one is the chandelier switch.
At the doors there are single single-key switches, one simple, the other crossed:
The relay is located in a junction box hidden in the wall:
I use Taiwanese relays TRY-220VAC-S-4C. A group of such relays has already been working in my multi-level lighting system in another room for two years now, without any complaints. A good relay would need to be placed in a block, but I didn’t have it at hand, and they are hefty, so I soldered them to wires.
Tests of this system were successful, everything works as intended. It’s too early to talk about ease of use; I did everything recently.
Control of local lighting of the wardrobe
As I mentioned above, I used three meters of Ultra 5000 tape for local lighting of the wardrobe, from a separate power supply and with a separate switch. And this required some unusual management. This tape should turn on when the cabinet doors are opened. For this purpose, limit switches are used, located inside the cabinet above the doors. I found rollerblades, nothing unusual here.
But I thought that a situation might arise when the closet needs to be opened, but the light is not needed. And vice versa, too, turn on additional lighting without opening the cabinet. To do this, I decided to install a separate two-key switch, one key of which could force the lighting to be turned on, even if the cabinet is closed, and the other, forcibly turn off, even if the cabinet is open.
The result is the following schematic diagram:
The cabinet itself is still in the project, so there are no photos. But the lighting is already powered by the keys. The two-key wall switch is completely ordinary, without modifications, connected with a three-wire cable. The forced shutdown key has priority; if it is disabled, nothing will turn on. The forced-on key will turn on the light only if the first key is also on, but also regardless of the position of the cabinet doors. The mode of “automatic” turning on and off the light from the limit switches is possible only in the “on” position of the first key and “off” of the second.
LED mood lighting as main lighting
Decorative lighting on LED strips was planned in advance. One of these lighting objects was to be modular furniture (a set of cabinets). But the degree of illumination was difficult to predict in advance. For these purposes, I purchased the dullest tape I could find:
I planned to place it under the furniture, above the furniture, and inside it, of course, too. And already in the process of installing individual pieces of tape and test inclusions, it became obvious that, firstly, it was amazingly beautiful, and secondly, it was too bright
Having installed only the lower and partially internal lighting, I got a result that, to put it mildly, slightly exceeded my expectations. This is what it looks like when both the backlight and the powerful perimeter lighting strip are turned on:
And like this, if you turn off the overhead lighting and leave only the backlight:
These photos don't really show the actual lighting level. It's actually very light. But this is only a small part of what was planned. And this level of lighting can serve not just for decoration, but also as a completely comfortable soft light for life. This makes me think that when I finish all the lights, it is very likely that this light will be used most often and will become the “main” one.
UPD 01/27/2013
Finally received the long-awaited diffusers for the profile. Installing them turned out to be a very labor-intensive task - it is necessary to apply a lot of force to snap them into the profile. It is inconvenient to do this under the ceiling. It’s okay to put on a couple more meters, but at 15 meters I even rested a couple of times, since fingers usually heavier than the keyboard buttons do not press anything
The result is contradictory. Of course, it became darker, noticeably darker. I measured the illumination again before putting on the diffuser, and after that, this is what happened:
| Measuring point | Without diffuser, lx | With diffuser, lx |
| In the center of the room at floor level | 246 | 165 |
| In the center of the room at eye level | 312 | 215 |
That is, it became darker by 30%.
But on the other hand, the light itself has changed, and changed for the better. Firstly, it has become warmer in color temperature. While still installing the diffusers, I noticed a difference in color on the ceiling - where the diffuser was already installed, the shade of light was more yellow. This color has become even more pleasant for the eyes. Secondly, maybe this is a consequence of the first, color rendition has improved. Previously, everything seemed greenish to me in this light, but with diffusers this effect disappeared, now the colors of objects have become more natural. And thirdly, the tape began to look more aesthetically pleasing, not contrasting bright dots on a dark background, but more blurry dots on a lighter background.
In general, I'm pleased with the result. The brightness is now comparable to the lighting from a single two-hundred-watt incandescent lamp, but the quality of light is much better. The maximum level on the dimmer no longer seems excessive, but quite normal. Perhaps, when the tape loses some of its brightness over time, it will make sense to replace the matte diffuser with a transparent one. Well, or remove it completely.
With flash:
Without flash:
With a short shutter speed and small aperture (the eyes see the tape something like this):
UPD 03/09/2017
In the comments I added a review of four years of operating experience: geektimes.ru/post/257720/#comment_9935472
Backlight options
The choice of lighting fixtures for the ceiling is an important component of the design.
Along the perimeter
see also
Photos of soaring ceilings
These types of perimeter lighting are very often used for various design solutions:
- Soaring ceiling. Due to their unusual effect, flying structures expand the boundaries of space and are therefore perfect for low ceilings.
- Contour lighting. Located along the edges of the ceiling model, it allows you to outline certain shapes and figures and create an interesting play of light and color.
The photo shows a kitchen-living room with a single-level soaring white ceiling.
Internal
Continuous lighting adds volume to the room, enhances color and gives the feeling of a large space.
Lines and stripes
Linear luminaires provide a uniform luminous flux and add charming coziness to the atmosphere. Light bulbs with different power levels allow you to concentrate attention on certain areas of the ceiling plane.
The photo shows a kitchen-living room with lighting in the form of light lines on the ceiling.
Translucent
With the help of such a translucent ceiling, which glows from within, a unique and mysterious atmosphere is created.
Geometric shapes (circles, squares)
Contour lighting gives various geometric shapes additional visual volume and makes them a rather stylish design element.
Spot
Perfectly emphasizes and highlights the functional areas of the room. Spotlights can be used in both single-level and multi-level or combined structures.
Hidden
It is a modern and surprisingly stylish solution that visually lifts the ceiling and gives it a touch of mystery and fabulousness.
The photo shows a ceiling with hidden lighting in the interior of the dining room.
Types of lighting
To create a comfortable environment in a room, highlight its advantages, or, conversely, hide its shortcomings, four types of lighting are used. It is recommended to use all techniques to ensure maximum functionality of the interior space and give it style and originality.
Basics
Lighting is used to fill a room with light evenly. It is the diffused base light, which is reflected from the surfaces of the walls and ceiling, that is turned on when entering the building. To install it, chandeliers and various types of lamps are mounted on the ceilings.
Local
For certain events, light is needed that can be directed to the desired area. Such lighting not only provides maximum convenience when performing some operation, but also affects the health of those who use it.
Where you might need task lighting in an apartment:
- in the kitchen , providing illumination of work surfaces (sink, stove, food processing area);
- above the dining area;
- above the bed or armchair , where you can read literature or engage in hobbies;
- in an office or children's room to create conditions that allow you to comfortably do homework or complete work taken home;
- for cleaning up in the morning or evening in the bathroom or at the dressing table;
- in the hallway to fully prepare for leaving the house.
Local (or task) lighting is necessary to organize the zoning of space and ensure a comfortable stay for everyone living in the house, giving everyone the opportunity to do their own thing without distracting others.
Accent or decorative
Such lighting is primarily necessary to create a cozy atmosphere in the home. With its help, you can focus attention on individual areas or interior items. For example, highlight a showcase, a niche with installed figurines or photographs, paintings, etc.
Decorative ceiling lighting can be mounted in multi-level structures, above a fireplace or a beautiful vase. This technique allows you to highlight the necessary area against the background of other, darker ones, and make the decorative elements of the room even more attractive.
The intensity of artificial lighting can be conveniently adjusted using rheostats.
Light sources on the ceiling
They allow you to further reflect the individuality of the ceiling structure.
LED strip (LED)
It is particularly flexible and compact and can be mounted on almost any surface. Ice lighting visually changes the geometry of the room, raises the ceiling plane and makes the interior much more attractive and original.
LED lamps
They emit clear, non-blurry light, as close to natural as possible, and fill the room with high-quality lighting that is pleasing to the eye.
The photo shows a kitchen with a ceiling decorated with LED ceiling lights.
Light bulbs
They can have different positions on the ceiling, for example along a contour, along a wall, in a spiral or in several rows.
Spots
They provide the ability to regulate the light flux and direct it to the desired point. Spots perfectly highlight certain areas of the room and create bright lighting in them.
Duralight
The flexible ribbon light cord duralight allows you to create unusual lighting for any design and give it a memorable appearance.
The photo shows pink duralight lighting in the interior of a small living room.
Soffits
They distribute the luminous flux in the form of directed rays. Soffits are distinguished by their convenience, compactness and special aesthetic beauty.
Tools and consumables for installation
When installing an LED strip with your own hands, you need a certain set of tools and consumables:
- To cut and assemble the tape into a full-fledged lamp:
- Scissors or wire cutters for cable products.
Cable cutters
- Tape measure for measuring the required length of the cut.
Roulette
- Permanent marker for marking cutting.
Permanent marker
- Construction knife with a retractable blade for stripping contacts from silicone braiding.
Construction knife
- Electrical tape for reliable protection of the free end of the tape after cutting.
Insulating tape
- A section of cable with a plug, a step-down transformer and a removable contact for connecting the tape to the electrical network.
- To install the tape to the ceiling structure:
- When installing an element without the use of mechanical fasteners, use double-sided adhesive tape. To ensure that the product stays in place for a long time, you should choose only high-quality products from well-known brands, for example, 3M.
Double sided tape 3M
- With a mechanical fastening method, you will need special mounting loops made of plastic or metal with a landing groove dimension such that the entire tape fits into it.
- A set of self-tapping screws for secure fastening.
- Dowel nails for fixing fastening elements to the wall.
Dowel-nails
- A hammer drill for making holes in reinforced concrete structures or brickwork, depending on the location of installation of the product.
Hammer
- A screwdriver for tightening screws in LED strip holders.
Screwdriver
- A stepladder with dielectric inserts, or mounting scaffolding for easy work under the ceiling.
Ladder
- To connect electricity:
- Power cable of the required cross-section.
- Wire cutters and electrical tape mentioned above, or PVC heat shrink tubing to ensure a reliable seal on exposed cable sections.
Heat-shrink tubing
- Terminal boxes with crimp sockets for contact areas of cable cores.
Terminal box
- A circuit breaker in the panel, selected based on the total current in the connected circuit.
Automatic RCD
- Multimeter for determining the voltage and maximum short-circuit current, as well as the response time of the RCD.
Multimeter
All tools used must be in good working order and consumables must be of high quality to ensure long-term uninterrupted operation of the product.
Examples of ceiling structures
Main three varieties.
Single-level
A unique combination of the simplicity of a single-level design with the beauty of a variety of lighting fixtures creates a laconic and very harmonious design.
Two-level
LED strip or lamps especially effectively emphasize the multifunctional two-tier design.
Multi-level
A three-level ceiling allows you to implement the most extraordinary design solutions and create truly impressive and individual projects in the room.
Briefly about the main thing
Illuminating the ceiling with LED strip is an important step in creating a design solution when decorating a room. For correct installation, you must purchase the right products in accordance with the required protection class, luminous shade, and length. Installation must be carried out using special tools and consumables. LED strip can be installed in cornices, niches and on the back side of ceiling plinths. Fastening is done using double-sided adhesive tape or using mechanical clamps.
Backlight colors
A certain color or shade shapes the mood of the entire interior.
Neon
Flexible neon has a soft blue or blue glow. This cool shade looks great in both larger and smaller rooms.
Pink
Creates a magical atmosphere and incredibly beautifully envelops individual fragments of the room with magical light.
The photo shows a bedroom and a single-level gray ceiling with pink lighting.
Color (RGB)
Provides several multi-colored options that allow you to customize the ceiling model to suit any mood.
Yellow
It is a rather positive and bright interior solution.
Purple
A non-trivial option that is suitable for those who love non-standard and extravagant design.
White
The simplest, but at the same time very stylish and effective type of lighting, creating a uniform white light flux.
Decoding LED strip markings
LED strips are made of a dielectric with a thickness of about 0.2 mm, onto which conductive tracks are applied with contact pads for chips on which SMD components (LEDs and resistors) are mounted.
The standard tape consists of individual modules from 2.5 to 10 cm long, connected in parallel. Each module contains from 3 to 22 LEDs and several resistors that limit current consumption. Thus, an LED strip is a set of modules with a rated supply voltage of 12 or 24 volts. Finished products are usually supplied in reels 5 meters long and 8 to 40 mm wide.
The marking is applied to the packaging or reel of the product, adhering to international standards. An explanation of the tape markings using the example of LED 12V RGBW SMD 5050 120 IP65 is presented in the table below.
Position in title
Ceiling color
The lighting goes well with the ceiling plane of any color.
- Black.
- White.
- Beige.
- Red.
The photo shows a living room with a beige single-level ceiling with lighting.
Why is backlight so necessary?
Currently, strip lighting is most often used to implement design solutions in the field of lighting. If you have plans to radically transform your room, then this will be the ideal solution to get the best effect.
It is worth noting that experiments with diode ceiling lighting have been carried out since the distant 70s of the 20th century - at that time they became available for purchase. The only thing is that at that time they did not yet have the necessary quality to organize decent lighting that would not irritate the eyes.
At first, sconces were used as auxiliary lighting or illumination in the rooms, and then spotlights were used. However, it is LEDs that have shown themselves to be the best for installed hidden lighting - many are trying to achieve just this type of installation so that the light source is not in plain sight. Despite the fact that LEDs make it possible to create interesting lighting variations, both as additional and primary lighting.
The advantages of ceiling lighting with LED strip are as follows:
- The ability to install hidden lighting - the lighting source itself (LED strip) is installed unnoticed by the human eye, while generating a sufficient amount of light, thereby creating a kind of luminous aura in the room.
- You can easily install this type of lighting yourself.
- Ceiling lighting with LED strips can act as the main light source.
- Possibility of realizing any design fantasy.
- You can arrange lighting of almost any shade.
- LEDs can be supplemented with fiber optics (an excellent light source that significantly expands the lighting capabilities).
- Ceiling diode strip consumes a minimum of electricity and is therefore economical.
- If necessary, by installing lighting, it is possible to delimit areas of the room.
- And lastly, lighting is an ideal solution for organizing a simple decoration.
However, a ceiling with LED lighting also has its negative sides, but they are few.
These include the following:
- In some cases, installed lighting can irritate the eyes. To avoid such a problem, before planning installation, make sure that the finished lighting can be changed colors.
- Diodes, as a rule, cost a decent amount. This is compensated by simple maintenance and cost-effectiveness.
Among other things, LEDs are durable. According to many manufacturers, such a light source will last about 100,000 hours. However, you should not fully trust such statements. It turns out that over time, the LED strip will gradually begin to lose its nominal brightness. The service life is considered to be the period from the first switching on of the LED strip until its luminous flux drops by a third.
It is worth noting that if you use such lighting for 6 hours a day, then in the end the LED ceiling lighting can easily last up to 10,000 hours. It turns out that its brightness will begin to deteriorate only after 4 years of such use.
Ceiling design
The most interesting ceiling designs.
Window to the sky
A false window is an ideal solution for many interiors. The presence of lighting will enhance the effect of bottomlessness and depth of this design.
Night sky
The starry sky fascinates with its twinkling lights and its magical appeal, reminiscent of the galaxy and outer space. This decor will not leave anyone indifferent.
Transparent ceiling
Suitable for small spaces with limited natural light. It provides a sufficient amount of light and thereby becomes the highlight of the interior, which creates a cozy and pleasant atmosphere.
With beam
Spots, spotlights or diode strips can highlight the decorative beauty of the beam and create an emphasis on functional areas.
Unusual ideas
Various types of lighting in combination with unusual ceiling models are an original stylistic device.
On the one side
Side lighting provides the opportunity to illuminate the part of the room that is used most often.
Sky with clouds
It perfectly transforms the space, brings lightness, airiness and gives a feeling of freedom.
With stucco
Lighting highlights the curves and patterns of a molded ornament or design.
With a pattern and backlight
This combination creates various light illusions in space and undoubtedly becomes a bright and original touch.
Correction of space with light
A suspended ceiling structure takes a few centimeters from the height of the room. Since most apartments are small, such systems visually reduce the space. A light on a suspended ceiling will help solve this problem.
If you direct the light flux from a chandelier and additional lighting devices to the ceiling, it will appear higher than in reality. The best effect is obtained on glossy vinyl sheets.
LED strips help adjust the geometry of the room. Since they are flexible, they allow you to implement any design of lighting on a stretch ceiling. The tape is hidden in the ceiling cornice, which makes it possible to correct the geometry. It is also used to emphasize steps in a multi-tiered structure. If the transitions are not highlighted, they will not look three-dimensional, as required by the design, and the levels will merge together.
Ceiling shapes
The most common ceiling forms.
Round
Allows you to diversify the interior and make its design truly special. It can be illuminated using any original shade that matches the style of the room.
With a niche
Such models with a box provide clear boundaries of lighting and are a fairly popular interior solution.
Rectangular and square
Hidden lighting will make rectangular or square shapes more noticeable and will not allow them to blend into the general background.
Figured
The wave ceiling looks quite charming; in combination with various lighting effects, it opens up wide possibilities for various experiments.
Installation of ceiling lighting around the perimeter with step-by-step photos
The main ceiling in this version was puttied, so the first tier was not made. We attached only the box around the perimeter: the height is already small and 7-8 cm, required for organizing the hanging one, is critical.
Lighting box plan
Near the window there is space left for a cornice, the width of the box is 60 cm, it is lowered by 12 cm relative to the main ceiling, the height of the side is about 5 cm, the protruding part is 6 cm, roundings are made in the corners.
Sectional diagram of the lighting box
The first method was chosen - a step under the lighting without support. Since the lighting is planned from a regular LED strip, its load-bearing capacity is more than enough.
First make markings on the ceiling. All given dimensions are set aside and lines are drawn using a paint cord. Please note that the line on the ceiling is laid at a distance of 54 cm, and not 60 cm, as in the first diagram. It is obtained taking into account the fact that the step is moved forward by 6 cm.
Using a paint cord we make markings on the ceiling and walls
When drawing curves, their center is made not in the place where the profile is attached, but taking into account the protruding step: this way the element turns out to be more expressive.
How to draw a curve on the ceiling
The profile guides (CD or PNP as marked) are attached along the marked lines. They attached it to dowels at 50 cm intervals. They drilled straight through the metal. Having installed the plug, we tightened the dowel-nail.
The contours of the box are lined with profiles
Where it is necessary to form a rounding, the walls (sidewalls) of the profile are cut, the back remains intact. After this, the profile can be laid out in a circle.
From the front side, we attach a strip of plasterboard 12 cm wide to the guide profile on the ceiling. This will be the back side of our box. We fasten it around the entire perimeter with self-tapping screws at a distance of about 10 cm.
We attach a strip of gypsum board 12 cm wide. Near the window we attach a strip that will cover the string curtain rods
On the back side of the installed side we attach vertical posts from the CD (ceiling) profile. Their length is small - 9.8 cm (12 cm height of the box, minus 1 cm for installing profiles, and another minus 1.2 cm for the thickness of the gypsum board screwed from below).
In each segment the lower part is trimmed. The side walls are removed so that another guide profile can be screwed on. As a result, its bottom shelf should be flush with the profile screwed to the wall. The installation step of the vertical posts is about 40-50 cm.
We screw short vertical pieces around the perimeter. Another angle
Next step: screw on the PNP profile that goes along the bottom of the boot. It is also installed on self-tapping screws in increments of 10-12 cm.
Next, we proceed to install the horizontal jumpers, which will hold the gypsum board sheet covering the box from below.
Installation of horizontal jumpers
They connect two guide profiles: the one that is screwed to the wall, and the one that is attached to the main side. They are made from a supporting profile in increments of 40-50 cm.
Collected around the entire perimeter
Let's start creating the curves. To make the strip bend along the required path, we take a strip of drywall about 15 cm wide. We cut it in 5 cm increments and break the plaster. The result was pieces of plaster that were held on cardboard.
Cut the cardboard every 5 cm on one side and break the plaster
Now we attach such pieces to the profile. For each fragment - one self-tapping screw, approximately in the middle of the width, so that it does not burst.
We fasten the cut strips
Using a laser level, we transfer the height markings to the inside. If you don't have a laser level, use a water level and draw a line with a pencil.
Then we take a piece of the supporting profile 9.8 cm long, just cut it both at the top and bottom. Approximately in the middle of the arc, we place one edge behind the profile and fasten it with a self-tapping screw.
How to make a rounding
Then we take a piece of profile cut into fragments (as we did when forming a circle on the ceiling) and fasten it along the mark.
Finished rounding “from the inside”
Now the excess pieces of gypsum board can be removed. They are cut level with the bottom edge of the profile, carefully cutting the paper and breaking off small fragments.
Cut off the extra pieces This is how it looks from a different angle
The next step in making a backlit plasterboard ceiling is putty. The ceiling and main side are plastered. This is the most convenient moment for this. Later, the bottom hem and the protruding cornice will interfere.
We putty the side and ceiling
Next, we begin to hem the box from the bottom. The width of the strip is 60 cm. We cut it and screw it with self-tapping screws. The procedure for working with plasterboard is standard. Some explanation is required only for sewing corners.
We screw a sheet that fits well into the corner and is slightly larger in external dimensions than the required rounding
The most convenient way is to cut out a square, then trim it on one side. First we screw it in straight lines. Then, gradually, in an arc, drawing the required edge shape.
Draw the shape and cut it
First you can draw, then bite off small pieces along this line. Smooth out any uneven surfaces with a wallpaper knife.
Next, screw on the guide profile. An additional side will be attached to it, which will cover the backlight.
Screw the guide profile along the edge
No news: to make curves, we cut the sides, bend them to the required diameter and install them in place, fixing them with self-tapping screws.
This is what it looks like from below
If you are planning to use LED lighting for a plasterboard ceiling, now is the time to attach the tape. Then it will be very uncomfortable. It is glued in the right place, if necessary, installing some kind of inclined plane.
We install the tape before installing the outer side
Next, a strip of plasterboard 5 cm wide is attached to the profile. One of the features is that it is fastened in the middle, and not at the top and bottom: the height is too small. The bends are also done in a familiar way. We cut a strip every 4-5 cm, break the plaster and fasten it.
Installed bead Closer rounding
In this option, to facilitate the work and give the ceiling a finished look, fillets (ceiling plinth) are glued to the side. Similar ones are glued at the junction of the box and the wall.
Fillet glued
Now all that remains is to putty everything and achieve a smooth surface. Almost everything. The plasterboard ceiling with lighting is ready, all that remains is to install the lighting itself. And it can be different.
Final version
Another option can be seen in video format, but with working backlight.
The installation of a two-level flow is demonstrated in the following video. The steps are shown schematically, but the assembly of the first level is clear. So that might be useful.
Photo of ceiling lighting in the interior of rooms
Several photo examples of lighting solutions.
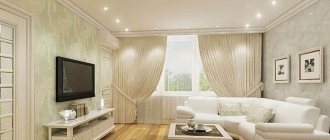
Living room
Spot, directional, hidden or any other lighting of the ceiling structure should first of all be in harmony with the overall design of the living room. A certain light focus allows you to mysteriously envelop the room in soft light.
Bedroom
Illumination or a variety of lamps on the ceiling will create an unobtrusive and relaxing glow, which is especially suitable for the relaxing atmosphere in the bedroom.
Kitchen
Spotlights or LED strip with a certain power or direction of light flux will allow you to highlight the working kitchen area and other elements on which you need to focus attention.
Children's
There should not be too bright or harsh light. Ceiling products with a variety of lighting will help create high-quality, soft, diffused lighting with smooth transitions in the nursery.
Corridor and hallway
Spotlights in the corridor provide a sufficient and measured amount of light. When correctly positioned on the ceiling plane, they will highlight the interior of the hallway, highlight its advantages and correctly hide its shortcomings.
Bathroom
Ceiling lighting will be in perfect harmony with tiles, mirrors, sanitary ware and other decorative elements of the bathroom.
Toilet
For such a small room, single-level models with a minimum number of lighting fixtures would be appropriate. They should create a directed light flow and not overload the space.
Attic
The lighting will be an excellent additional source of light in the attic; it will enlarge the attic space and add lightness to the sloping ceiling, as well as deprive it of the oppressive effect.
Balcony
LED light bulbs or spots in combination with simple ceiling shapes will allow you to organize high-quality lighting of the entire balcony space.
Errors when calculating ceiling lighting
On websites dedicated to LED lighting, even basic concepts are often confused. Some people calculate LED lighting in watts, which is fundamentally incorrect, since the light output of each type of matrix is different. Some try to compare the lux of a diode and an incandescent lamp, which is also incorrect.
The power of the lighting device does not matter to us; it is the efficiency of the light source and is used only for comparative recalculation.
Recommendations of 4-5 W/m2 for an LED lamp should be ignored. The luminous flux at this power can be from 180 to 330 lumens per 1 meter (depending on the LED matrix). With a room area of 20 square meters, the total illumination will be from 3600 to 6600 lumens. The difference is almost 2 times.
Examples of design in various styles
A correctly selected ceiling lighting design can harmoniously fit into any style direction.
- Classic. This style involves ceiling models with soft, but quite bright light. They help emphasize the impeccable, solemn and majestic atmosphere of a classic interior.
- Modern. Laconic products in light colors combined with modern, simple and stylish lamps are an integral part of modern style.
- Minimalism. Ceiling lighting design in cool shades will organically complement the minimalist style, emphasize its concept and will not attract unnecessary attention.
- High tech. Geometric ceiling shapes with simple lamp models will add thoughtfulness and completeness to the high-tech style.
- Loft. LED strip or spots with an industrial design on the ceiling plane will bring a kind of lightness and spatial depth to a discreet loft.
The photo shows a geometric ceiling with lighting in a high-tech style bedroom.
Ceiling "starry sky"
It’s hard to imagine who wouldn’t be impressed by the ceiling design with an imitation of the starry sky. Living in the city rarely gives us the opportunity to admire the night sky. Why not create your own personal starry sky within your own apartment?
A luminous ceiling with a “starry sky” effect in the bedroom creates a magical atmosphere
Options for creating a “starry sky” ceiling:
- Stretch ceiling with LEDs
- Fluorescent stickers
- Glowing photo wallpaper
- Luminescent paints
- Any of these methods has the right to life and, with the proper level of execution, will give joy and a bit of magic.
Aluminum ceilings with lighting
The slatted aluminum structures include strips 3 and 4 meters long. Their width is 5 - 25 cm. Thanks to spraying, the slats are given various decorative effects: silver, gold, chrome plating. The surface of the planks can be smooth or textured. Slatted ceilings are available for sale in three main varieties: Italian, German and designer. Due to its light weight, the system can be mounted without additional fastening. This type of ceiling finish is durable and resistant to external influences. However, it has a somewhat official appearance, which explains its use mainly in non-residential premises.
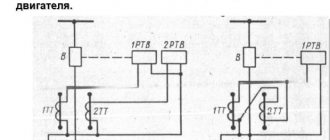
Types of LED backlight
A suspended ceiling can be illuminated in four ways:
- Contour diffused lighting - LEDs are located on the shelf (bottom row in the figure) and shine upward. The backlight forms a continuous light strip.
- Directional lighting - LEDs are mounted on a slope and shine along the ceiling. On the main (base) ceiling, diverging rays are visible.
- Spot lighting (“starry sky”). LEDs shine straight down from the ceiling. This kind of lighting is more difficult to make; You can’t get by with tape here, and you need some (however basic) technical knowledge.
- Shaped lighting . LEDs are placed in small ceiling lamps. To install such lighting, in addition to technical knowledge, you also need the skills of a home craftsman.
Kinds
There is a huge list of point models. There is a particular variety of ceiling lamps, suitable for plasterboard ceilings, ordinary ceilings, stretch ceilings, and even slatted ceilings, which are a curiosity for modern interiors.
To begin with, it is important to mention again that chiseled lighting is divided into two large groups: overhead and recessed. Directional light lamps are produced in both configurations. The rotating mechanism that complements such spots allows you to adjust the direction of the light flow. Directional and amplifying reflectors can diffuse light slightly, illuminating a larger area without additional energy costs
Please note that overhead soffits will also act as a decorative addition.
They also look good in furniture when you need to do something with lighting. For example, the most common option is to install lamps along the upper border of the cabinet so that its contents are better visible.
To create built-in lighting, LED or fluorescent energy-saving light bulbs are used. Both of these types do not overheat, consume little electricity and shine quite brightly. The differences lie in service life and price: LED lamps last up to 50,000 hours and are quite expensive, while the maximum operating time of energy-saving lamps is 20,000 hours, and their cost is half that of LED models.
Calculation of the number of lamps
To determine the number of lamps, you need to take into account the type of room and the level of illumination for it. All indicators are prescribed in SNiP, for convenience they are collected in the list:
- Living rooms and kitchens - from 150 Lm per meter.
- Children's - from 200 lumens.
- Bathrooms, toilets, showers and corridors - from 50 Lm.
- Wardrobes - from 75 lumens.
- Offices and libraries – from 300 Lm.
These are minimum standards; most often the illumination level is higher. To adjust the light intensity, use several modes on the switch or a dimmer to adjust the brightness.
Starry sky backlight
Components and element base
For the “starry sky” the tape is no longer suitable; separate LEDs are needed. First of all: do not try to connect many LEDs directly to a 220 V network. Uninformed people sometimes argue: yeah, in a flashlight 3 diodes glow from 6 V; This means that 100 diodes can be connected to 220 V after rectification.
It’s impossible, it will end in an accident and literally burnt money. In batteries, the internal resistance increases as the current increases, and the current through the diodes is limited. The power supply network has virtually zero internal resistance. The quenching resistor does not help: the LEDs do not hold the reverse voltage of 220 V (310 after rectification), they will immediately break through, and you will get a short circuit - a short circuit with all its consequences.
Therefore, for the “starry sky” you need the same power supply as for the strip, but at 5 V. The power of the power supply is calculated based on the number of LEDs: 10 W per 100 LEDs. Extra IP power won't hurt. Simply, since 20 diodes are enough for a “starry sky”, the simplest and cheapest IP is suitable. It is also advisable to purchase a controller-interrupter for 4-8 sections of diodes. Then the stars will blink like real ones.
When soldering individual LEDs, observe polarity: the positive lead of the diode is longer and is marked with a key, and be careful - the leads break quite easily. Also, do not forget to put an insulating tube - “cambric” - on each terminal, otherwise after installation you will not end up with short circuits.
Installation of the “starry sky”
The easiest way is to equip a suspended ceiling with “starry sky” lighting: LEDs are simply glued to the base ceiling with drops of construction silicone. All that remains is to correct them so that they do not shine too sideways, and enjoy the spectacle of the starry sky.
If the ceiling is plasterboard, you will have to cut an additional plate exactly for the ceiling niche, drill holes in it according to the number of diodes, cover it with a translucent plate on the front side, mount the electrical part and install the entire structure in the ceiling niche. It's not a matter of minutes and requires a certain skill. But, if the plate is finely corrugated, then the “stars” will produce prickly rays, like real ones. If, in addition, you paste an image of a real starry sky with nebulae, galaxies, etc. onto the covering plate, and drill holes for the diodes in accordance with the position of real stars, and use quenching resistors to select the brightness of the glow, the effect will be amazing.